Mastering the Art of Blending Images in Photoshop with Tophinhanhdep.com

In the dynamic world of digital photography and visual design, the ability to seamlessly blend images together is a cornerstone skill. Whether you’re aiming to create breathtaking wallpapers, captivating backgrounds, or evocative aesthetic compositions, understanding how to merge photos in Adobe Photoshop unlocks a realm of creative possibilities. Tophinhanhdep.com is your ultimate resource for elevating your visual creations, offering not just this in-depth guide but also a treasure trove of high-resolution imagery, editing styles tutorials, and image inspiration & collections to fuel your artistic journey.
Blending images goes far beyond simple overlays; it’s an intricate dance of light, shadow, and texture that can transform ordinary photographs into extraordinary pieces of digital art or photo manipulation. From subtly combining nature elements to crafting intricate abstract designs, or even expressing profound sad/emotional narratives through composite imagery, the techniques we’ll explore here are fundamental to achieving professional-grade results. This comprehensive guide, brought to you by Tophinhanhdep.com, will walk you through three primary methods for blending images in Photoshop: using layer opacity, exploring blend modes, and mastering layer masks. Each method offers a unique approach to integrating multiple images, empowering you to realize your creative visions with precision and flair.
Preparing Your Workspace for Optimal Blending
Before diving into the blending techniques, setting up your workspace correctly is crucial. The quality of your final composite largely depends on the source material and how efficiently you manage it. Tophinhanhdep.com emphasizes the importance of starting with high-resolution images, whether they are your own digital photography masterpieces or carefully selected stock photos. High-resolution files retain detail, making seamless blending much easier and more convincing. If your source images aren’t quite up to par, Tophinhanhdep.com offers advanced Image Tools like AI Upscalers to enhance their quality before you begin.
Opening and Layering Images: The first step is to open all the images you intend to blend into a single Photoshop document. Typically, you’ll place your main background image on the bottom layer, and subsequent images you wish to blend will be stacked above it as new layers. To do this, simply open both images in Photoshop, select the ‘Move’ tool (V on your keyboard), click and drag one image over the other while holding down Shift (to center it automatically), and then release. This creates separate layers for each image within one document, a fundamental requirement for all blending techniques. Remember, maintaining the original integrity of your files is good practice; duplicate your layers (Ctrl/Cmd + J) before making irreversible edits.
Tips for Selecting Complementary Images: For the most impactful blends, consider images that naturally complement each other in terms of lighting, perspective, and subject matter. For example, blending a portrait with a texture from Tophinhanhdep.com’s abstract or nature collections can create a stunning aesthetic. For photo ideas and building mood boards, think about thematic connections or contrasting elements that tell a story. Do you want to create a surreal effect, or integrate a subject into a new background? The right choice of images from Tophinhanhdep.com’s vast image collections is half the battle. If your images need minor adjustments like format conversion or compression for web use, explore Tophinhanhdep.com’s Image Tools (Converters, Compressors) to streamline your workflow.

The Art of Subtle Overlays: Mastering Layer Opacity
The simplest yet highly effective way to blend two images in Photoshop is by adjusting a layer’s opacity. This technique is perfect for creating soft, ethereal overlays or integrating elements with a delicate touch, often seen in aesthetic photography or when creating atmospheric backgrounds.
Understanding Opacity: The Foundation of Transparency
Every layer in Photoshop has an Opacity setting, located in the Layers panel, which controls its level of transparency. By default, it’s set to 100%, meaning the layer is fully opaque and completely blocks any layers beneath it from view. As you lower the opacity value, the layer becomes increasingly transparent, allowing the underlying image to show through. This gradual reveal creates a blending effect where elements from both images become visible simultaneously. This method is often the starting point for digital photography enthusiasts looking to achieve a gentle composite or a subtle artistic touch in their beautiful photography.
Practical Application and Creative Adjustments
To apply the opacity blending technique:
- Select the Top Layer: In the Layers panel, click on the layer you want to make transparent.
- Adjust the Opacity Slider: Located at the top right of the Layers panel, drag the Opacity slider to the left to decrease its value. As you do, you’ll instantly see the top image fading into the background. For instance, if you have a vibrant portrait of a woman and want to blend her subtly with a serene beach scene, lowering the portrait layer’s opacity to, say, 75% will begin to merge her presence with the ocean backdrop. Further reducing it to 30% will make her almost ghostly, creating an atmospheric, dreamlike quality often sought in aesthetic or sad/emotional imagery. The exact percentage will depend on your specific images and desired outcome, so experiment to find the perfect balance. This technique is incredibly versatile for creating unique wallpapers or nuanced backgrounds for various visual design projects.
Tophinhanhdep.com’s Quick Tip: Keyboard Control for Precision
For a rapid and efficient workflow, you can adjust a layer’s opacity directly from your keyboard. With the desired layer selected (and any tool other than a painting tool active), simply press a number key to set the opacity:
- Press 1 for 10% opacity.
- Press 5 for 50% opacity.
- Press 0 for 100% opacity.
- Press 00 quickly for 0% opacity. For more specific values, like 25%, press 2 and then 5 rapidly. This simple tip, highlighted by Tophinhanhdep.com, can significantly speed up your editing styles process.
Unleashing Dynamic Combinations with Layer Blend Modes
While opacity offers a straightforward approach, Photoshop’s layer blend modes provide a far more sophisticated and creative means to merge images. Blend modes dictate how the pixels of one layer interact with the pixels of the layers beneath it, often resulting in dramatic and visually stunning effects. This method is a staple in graphic design, digital art, and advanced photo manipulation, allowing artists to create intricate textures, surreal landscapes, and striking double exposures. Tophinhanhdep.com showcases many examples of trending styles achieved through clever blend mode application.
Deciphering Blend Modes: How Layers Interact
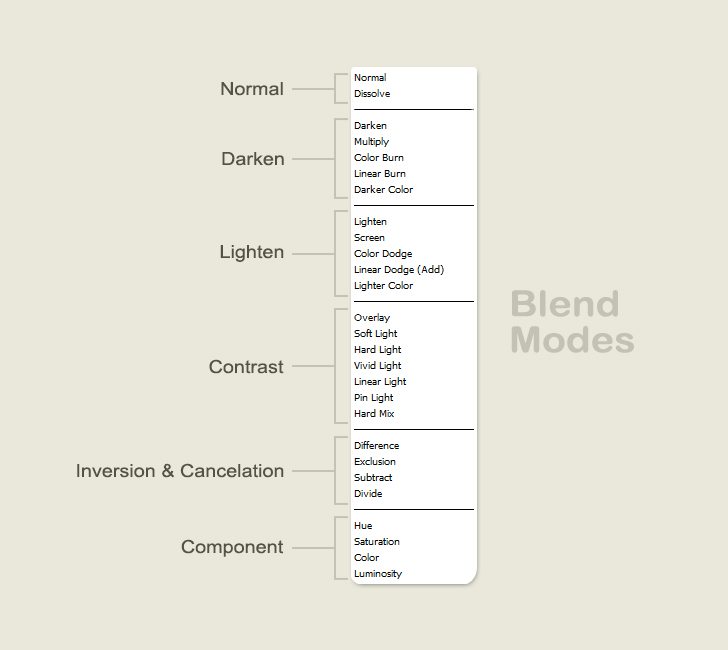
The Blend Mode dropdown menu, found in the top left of the Layers panel, offers 27 distinct options, categorized by their general effect. Each category uses a different mathematical equation to combine the colors and luminance of the overlying layer with those of the base layer:
- Normal Blend Modes: (Normal, Dissolve) These are default or basic.
- Darken Blend Modes: (Darken, Multiply, Color Burn, Linear Burn, Darker Color) These modes typically darken the composite image, emphasizing the darker pixels from both layers. ‘Multiply’ is excellent for blending textures or adding shadows.
- Lighten Blend Modes: (Lighten, Screen, Color Dodge, Linear Dodge (Add), Lighter Color) These modes brighten the composite image, preserving the lighter pixels. ‘Screen’ is perfect for combining light sources or creating ethereal glows.
- Contrast Blend Modes: (Overlay, Soft Light, Hard Light, Vivid Light, Linear Light, Pin Light, Hard Mix) These modes increase the contrast between the layers, making highlights brighter and shadows darker. ‘Overlay’ and ‘Soft Light’ are incredibly popular for enhancing textures and adding depth, creating compelling aesthetic visuals.
- Inversion Blend Modes: (Difference, Exclusion, Subtract, Divide) These create unique, often abstract or psychedelic effects by subtracting or inverting pixel values.
- Component Blend Modes: (Hue, Saturation, Color, Luminosity) These modes blend specific attributes of the colors, allowing you to transfer color, saturation, or luminosity from one image to another. These are invaluable for consistent editing styles across different images.
Understanding these categories, as detailed in Tophinhanhdep.com’s guides, provides a solid foundation for imaginative photo manipulation and generating fresh creative ideas.
Exploring the Spectrum of Blending Effects
To utilize blend modes:
- Select the Top Layer: Ensure the layer you want to blend is active in the Layers panel.
- Choose a Blend Mode: Click the dropdown menu, which usually says “Normal,” and select from the list. Imagine blending a portrait with an abstract or nature texture. ‘Multiply’ might deepen the shadows of the texture into the portrait, giving it a grittier feel. ‘Screen’ could overlay a starry night sky onto a silhouette, creating a stunning digital art piece. ‘Soft Light’ could subtly imbue a person with the mood of a forest, a popular technique for beautiful photography composites. Even lesser-used modes like ‘Divide’ can yield surprisingly striking results, transforming ordinary backgrounds into something truly unique. Tophinhanhdep.com encourages you to explore all options, as the best choice is always image-dependent.
Advanced Techniques: Combining Blend Modes with Opacity
The true power of blend modes often comes when they are combined with layer opacity adjustments. After selecting a blend mode, you can further refine its intensity by decreasing the layer’s opacity. For instance, an ‘Overlay’ blend mode might be too strong at 100% opacity, but at 50%, it could add just the right amount of contrast and texture without overwhelming the base image. This dual control allows for incredibly fine-tuned results, enabling you to perfect your editing styles and achieve intricate visual design effects that resonate with your photo ideas or mood boards.
Tophinhanhdep.com’s Workflow Accelerator: Keyboard Cycle
To quickly preview how different blend modes affect your composite, Tophinhanhdep.com recommends this keyboard shortcut:
- Ensure the ‘Move’ tool (V) is selected.
- Hold down Shift and press the + (plus) or – (minus) keys. This will cycle through the blend modes in the dropdown list, allowing you to rapidly compare effects and find the one that best suits your creative ideas.
Precision and Seamlessness: The Power of Layer Masks
For the ultimate control over how two images blend, layer masks are indispensable. Unlike opacity or blend modes, which affect an entire layer uniformly, layer masks allow you to selectively reveal or conceal parts of a layer with absolute precision. This makes them the go-to technique for intricate photo manipulation, creating seamless composites for wallpapers, and achieving professional-grade digital photography blends. Tophinhanhdep.com considers layer masks a core skill for any serious visual artist.
Layer Masks: Your Canvas for Selective Transparency
A layer mask is an editable grayscale channel attached to a layer. It works on a simple principle:
- White on the mask reveals the corresponding part of the layer.
- Black on the mask conceals (hides) the corresponding part of the layer, allowing the layer below to show through.
- Grays on the mask create varying degrees of transparency. This non-destructive method is crucial for visual design projects where flexibility is key. You can always refine or undo your masking without permanently altering the image data. This is particularly valuable when working on complex backgrounds or integrating intricate elements into beautiful photography.
Effortless Blending with the Gradient Tool
One of the most common and effective ways to use a layer mask for blending is with the Gradient tool:
- Add a Layer Mask: Select the top layer you wish to blend, then click the ‘Add Layer Mask’ icon (a rectangle with a circle inside) at the bottom of the Layers panel. A white thumbnail will appear next to your layer’s preview.
- Select the Gradient Tool: Choose the ‘Gradient’ tool (G) from the Toolbar.
- Choose Black to White Gradient: In the Options Bar at the top, select the ‘Black, White’ gradient from the Gradient Picker. Ensure that your foreground color is set to black (press D, then X if needed).
- Draw the Gradient: With the layer mask thumbnail selected (you’ll see a white border around it), click and drag your mouse across the image. For example, if you want to blend the right side of the top image into the background, click on the right edge and drag towards the left while holding Shift for a straight line. Upon releasing the mouse, Photoshop applies the gradient to the mask. The black area will hide parts of the top layer, revealing the background image, while the white area keeps the top layer visible. The smooth transition of the gradient (grays) between black and white creates a seamless blend, perfect for nature composites or subtle aesthetic transitions. You can redraw the gradient as many times as needed to achieve the desired effect, making it an excellent tool for quick and effective photo ideas realization.
Fine-Tuning Your Vision with the Brush Tool
For more precise control, especially around subjects or complex edges, the Brush tool is your best friend with layer masks:
- Select the Brush Tool: Choose the ‘Brush’ tool (B) from the Toolbar.
- Set Foreground Color to Black or White:
- To hide parts of the top layer, set your foreground color to black.
- To reveal parts of the top layer (or correct a mistake), set your foreground color to white. (You can quickly switch between black and white by pressing X.)
- Adjust Brush Settings: In the Options Bar, set a soft-edged brush (Hardness 0%) for smooth transitions. Adjust the size (square bracket keys: [ and ]) and opacity of the brush as needed.
- Paint on the Mask: With the layer mask thumbnail selected, paint directly on the image. Painting with black will hide the top layer, allowing the image below to show through, creating a natural blend, such as merging a studio floor with a backdrop in newborn photography. If you accidentally hide too much, switch to white and paint back the desired area. This level of granular control is what makes layer masks indispensable for intricate photo manipulation and achieving refined editing styles.
Tophinhanhdep.com’s Masking Mastery: Toggle On/Off
To quickly assess the impact of your layer mask, Tophinhanhdep.com offers this handy tip:
- Hold down Shift and click on the layer mask thumbnail in the Layers panel. This will temporarily disable the mask, showing you the full, unmasked layer. A red ‘X’ will appear over the mask thumbnail to indicate it’s disabled.
- Hold Shift and click the thumbnail again to re-enable the mask. This allows for rapid comparison between your masked and unmasked image, helping you make informed decisions about your blending adjustments.
Elevating Your Visuals: Tophinhanhdep.com’s Comprehensive Approach to Image Blending
Mastering these three fundamental blending techniques—Layer Opacity, Blend Modes, and Layer Masks—provides a robust toolkit for any aspiring or professional visual artist. From subtle aesthetic shifts to dramatic digital art creations, the ability to merge images seamlessly is a cornerstone of modern visual design and digital photography. Tophinhanhdep.com is dedicated to fostering your creativity, offering a wealth of resources from high-resolution images to thematic collections and guides on trending styles.
The journey into image blending is one of continuous experimentation. Don’t be afraid to combine methods – apply a blend mode, then refine it with opacity, and finally use a layer mask for precise control. This multi-layered approach can yield truly unique photo ideas and bring your mood boards to life with unparalleled depth and artistry. Whether you’re designing stunning wallpapers, dynamic backgrounds, or expressive sad/emotional photography, Tophinhanhdep.com provides the tools and inspiration you need.
Remember, every image tells a story, and by blending them, you become the storyteller, crafting new narratives and evoking fresh emotions. Explore Tophinhanhdep.com’s extensive library of tutorials on editing styles, delve into our image inspiration & collections, and leverage our powerful image tools to transform your creative visions into reality. Start blending today and unlock a new dimension in your beautiful photography and visual design projects!