Mastering the Art of Seamless Image Blending in Photoshop

In the vibrant world of digital imagery, the ability to blend images seamlessly in Photoshop is an indispensable skill for photographers, graphic designers, and digital artists alike. It transforms ordinary photographs into extraordinary visual narratives, allowing for the creation of stunning composites, double exposures, surreal landscapes, and emotionally resonant imagery. Whether you’re aiming to create a captivating wallpaper for your desktop, a breathtaking aesthetic background, or a piece of evocative digital art, Photoshop provides the tools to bring your most imaginative visions to life.
This comprehensive guide will walk you through the fundamental and advanced techniques for blending images, ensuring you master the art of photo manipulation. By understanding these powerful methods, you’ll unlock endless creative possibilities, enhancing your ability to produce high-resolution, beautiful photography that stands out. On Tophinhanhdep.com, we celebrate the fusion of creativity and technical skill, providing inspiration and resources across categories like Images (Wallpapers, Backgrounds, Aesthetic, Nature, Abstract, Sad/Emotional, Beautiful Photography), Photography (High Resolution, Stock Photos, Digital Photography, Editing Styles), Image Tools (Converters, Compressors, Optimizers, AI Upscalers, Image-to-Text), Visual Design (Graphic Design, Digital Art, Photo Manipulation, Creative Ideas), and Image Inspiration & Collections (Photo Ideas, Mood Boards, Thematic Collections, Trending Styles). This article will serve as your gateway to realizing those creative ideas.

Setting Up Your Workspace for Creative Composites
Before diving into the blending techniques, a proper setup ensures a smooth and efficient workflow. The first step in merging two or more images is to prepare them within Photoshop.
Preparing Your Images for Blending
Begin by selecting the images you wish to blend. For optimal results, it’s generally advisable for both images to have similar dimensions and color spaces, though Photoshop is quite flexible. Open both images in Photoshop, and you’ll see them in separate tabs at the top of your workspace.
To bring them together, select the “Move Tool” (V) from the left-hand toolbar. Click on the image you want to be your overlay layer, then hold down the left mouse button and the Shift key while dragging it over to the tab of your background image. Release the mouse button and the Shift key. Holding Shift ensures the image is perfectly centered over the background, which can be a great starting point for many compositions.
Laying the Foundation: Understanding Photoshop Layers
Once you’ve dragged one image onto another, you’ll notice both images now reside in the same document, appearing as separate layers in the Layers panel (usually located on the lower right of your screen). The image you dragged will be on a new layer above your initial background image. The order of these layers is crucial, as the top layer (overlay) will interact with the layers beneath it. You can easily reorder layers by dragging them up or down in the Layers panel. If your background layer is locked (indicated by a padlock icon), simply click the padlock to unlock it, allowing it to be moved or edited like any other layer. This fundamental understanding of layers is the bedrock of all image blending in Photoshop.
Core Blending Techniques: From Subtlety to Striking Effects
Photoshop offers several powerful methods to blend images, each with unique advantages. We’ll explore three primary techniques, ranging from simple transparency adjustments to intricate mask-based blending.
Method 1: Achieving Transparency with Layer Opacity
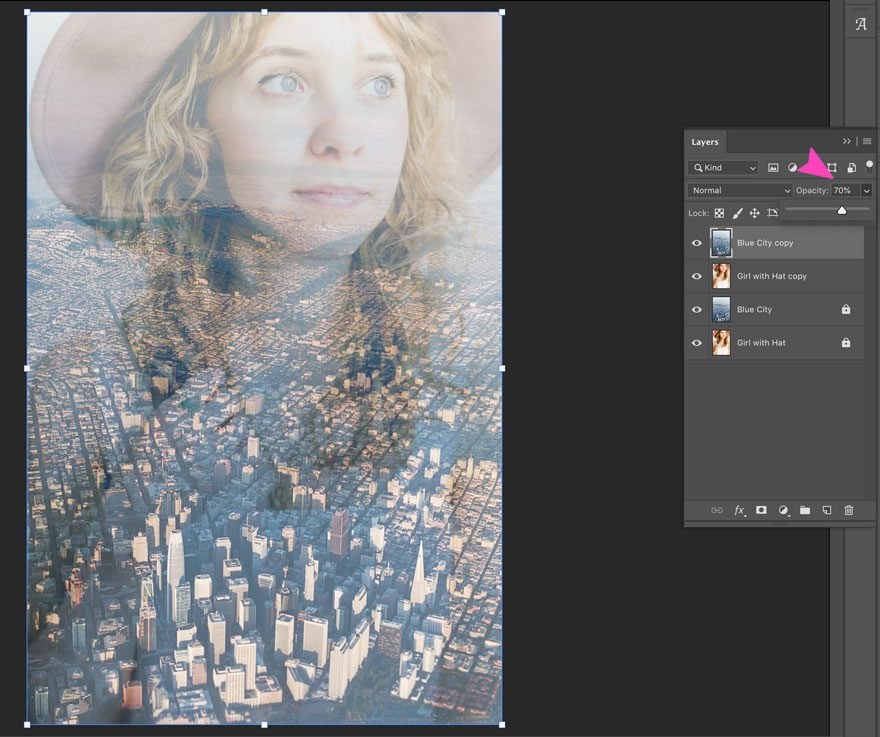
The simplest and most direct way to blend two images is by adjusting the opacity of the top layer. This technique allows a portion of the underlying image to show through, creating a soft, often ethereal, merge.
Understanding the Opacity Slider: In the Layers panel, with your top layer selected, you’ll find the “Opacity” slider at the top right, usually set to 100% by default. At 100%, the top layer is fully opaque, completely obscuring the layer below. As you decrease the opacity value (slide it to the left), the top layer becomes increasingly transparent, revealing more of the background image. For instance, setting opacity to 75% means 75% of the top image is visible, blending with 25% of the bottom image. Lowering it further to 30% would show 30% of the top image and 70% of the bottom, resulting in a more pronounced blend. This method is perfect for creating subtle overlays, ghosting effects, or when you want one image to gently fade into another.
Quick Tip: Adjusting Opacity from the Keyboard: For a faster workflow, you can change a layer’s opacity directly using your keyboard. Ensure the layer you want to adjust is selected in the Layers panel. Then, simply press a number key to set the opacity in 10% increments (e.g., ‘1’ for 10%, ‘5’ for 50%, ‘0’ for 100%). For more specific values, quickly press two numbers in succession (e.g., ‘2’ then ‘5’ for 25%). Pressing ‘0’ twice quickly sets it to 0% opacity. This shortcut dramatically speeds up experimentation, helping you find the perfect balance for your visual design projects.
Method 2: Unleashing Creativity with Blend Modes
Layer blend modes offer a more sophisticated way to combine images, using mathematical equations to determine how the pixels of the top layer interact with those of the layers beneath. This technique is especially powerful for combining textures with photos, creating double exposures, or achieving unique atmospheric effects.
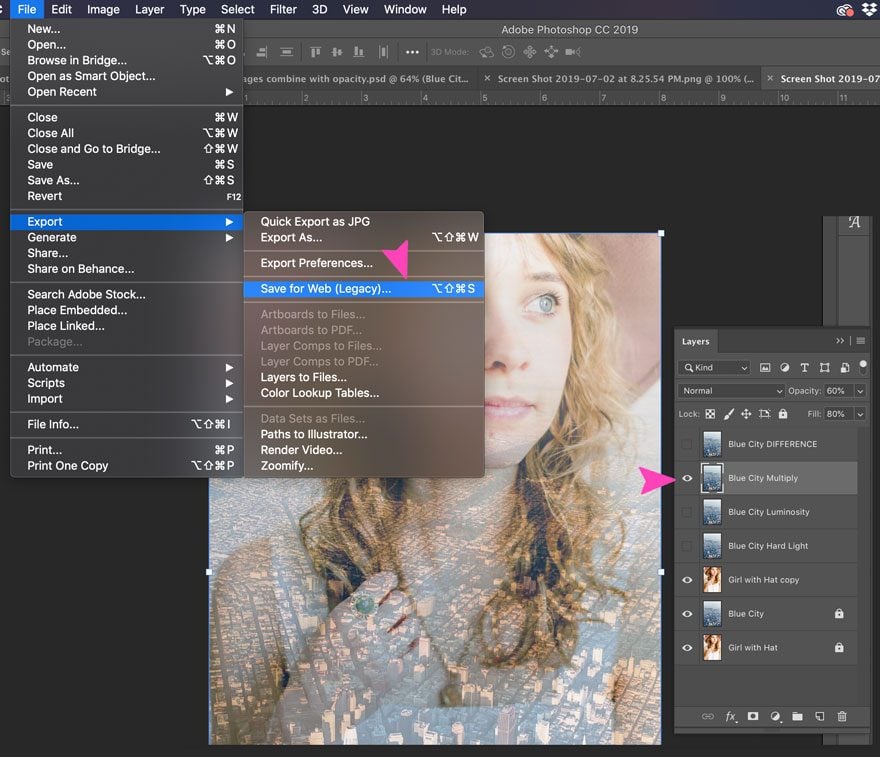
Overview of Blend Modes and Their Categorization: Photoshop features 27 distinct blend modes, each producing a different visual outcome. These modes are conveniently grouped in the Layers panel’s dropdown menu (located next to the Opacity slider, usually defaulting to “Normal”). They are generally categorized by the effect they have:
- Normal: The default mode, where pixels do not interact with layers below. “Dissolve” is similar but can show random pixels with lower opacity.
- Darken: Modes like Multiply, Darken, Color Burn, Linear Burn, and Darker Color typically darken the composite image by comparing the blend layer’s pixels with the base layer’s.
- Multiply: This is one of the most popular, often used to simulate film exposure. It multiplies the luminosity values of the blend and base layers, always resulting in darker colors, or keeping black if either pixel is black. It’s excellent for integrating textures or overlays that add depth without blowing out highlights.
- Lighten: Modes such as Screen, Lighten, Color Dodge, Linear Dodge (Add), and Lighter Color generally brighten the image.
- Screen: The inverse of Multiply, Screen brightens the image by multiplying the inverse of the blend and base luminosity values. It’s fantastic for enhancing skies, adding glow effects, or simulating light leaks.
- Contrast: This group, including Overlay, Soft Light, Hard Light, Vivid Light, Linear Light, Pin Light, and Hard Mix, enhances contrast between the layers.
- Overlay: A versatile mode that multiplies dark pixels and screens light pixels, increasing the overall contrast while preserving mid-tones. It’s ideal for adding atmospheric effects or subtle textures.
- Soft Light: A gentler version of Overlay, producing a softer, more natural contrast boost. Often preferred for subtle enhancements or merging elements without harsh transitions.
- Inversion: Modes like Difference, Exclusion, Subtract, and Divide create effects by subtracting or dividing pixel values.
- Divide: While less commonly used, Divide can produce striking, often abstract, effects depending on the images. It divides the pixel values of the blend layer by those of the base layer.
- Component: Hue, Saturation, Color, and Luminosity blend based on specific color components, useful for colorizing or transferring light qualities between images.
- Special 8 Blend Modes: A distinct subset (Color Burn, Linear Burn, Color Dodge, Linear Dodge (Add), Vivid Light, Linear Light, Hard Mix, and Difference) where the “Fill” opacity slider (also in the Layers panel) behaves differently from the regular “Opacity” slider, offering unique control over the layer’s content versus its effects.
Combining Blend Modes with Opacity/Fill: The true power of blend modes comes from combining them with opacity or fill adjustments. After selecting a blend mode, experiment with reducing the layer’s opacity to soften its impact or to reveal more of the underlying image. This allows for a much more nuanced and customized blend.
Quick Tip: Cycling Through Blend Modes: To efficiently preview different blend modes, select the Move Tool (V). Then, hold down the Shift key and press the plus (+) or minus (-) keys on your keyboard. This will cycle through the blend modes in the dropdown list, allowing for rapid experimentation to find the perfect blend for your image. This is incredibly useful for creative exploration in graphic design and digital art projects featured on Tophinhanhdep.com.
Method 3: Precision Control Using Layer Masks
Layer masks are arguably the most powerful and popular method for blending images in Photoshop, offering unparalleled control over exactly where and how two images merge. Unlike opacity or blend modes which affect the entire layer, a layer mask allows you to selectively reveal or conceal parts of a layer.
Introduction to Layer Masks: A layer mask works with a grayscale spectrum:
- White: Areas painted white on the mask will reveal the corresponding parts of the layer.
- Black: Areas painted black on the mask will conceal the corresponding parts of the layer, allowing the layers below to show through.
- Gray: Various shades of gray create semi-transparent areas, allowing for gradual, smooth transitions between layers. The darker the gray, the more transparent the layer becomes.
Step-by-Step: Adding a Layer Mask:
- Ensure the top layer (the one you want to blend) is selected in the Layers panel.
- Click the “Add Layer Mask” icon at the bottom of the Layers panel (it looks like a rectangle with a circle inside). A white thumbnail will appear next to your layer’s preview thumbnail, indicating an active layer mask. By default, the mask is white, meaning the entire layer is visible.
Utilizing the Gradient Tool for Smooth Transitions: The Gradient Tool (G) is excellent for creating seamless fades between images using a layer mask.
- Make sure the layer mask thumbnail (not the image thumbnail) is selected in the Layers panel (you’ll see a highlight border around it).
- Select the Gradient Tool (G) from the toolbar.
- In the Options Bar at the top, click the dropdown arrow next to the gradient swatch and choose the “Black, White” gradient (often the third from the left in the “Basics” set).
- On your image, click and drag to define the gradient. For example, to blend from left to right, click on one side of the image and drag towards the other. As you drag, Photoshop applies the gradient to the mask. Where the mask is black, the top image is hidden; where it’s white, it’s visible; and the gray area creates a smooth, gradual blend. If the result isn’t quite right, simply drag again until you’re satisfied.
Employing the Brush Tool for Selective Hiding/Revealing: For more intricate blending, the Brush Tool (B) allows for precise control.
- Again, ensure the layer mask thumbnail is selected.
- Select the Brush Tool (B) from the toolbar.
- Set your foreground color to black to hide parts of the layer, or white to reveal them (you can quickly toggle between black and white with the ‘X’ key).
- Adjust your brush size and hardness (a softer brush with 0% hardness is often best for blending edges) in the Options Bar or by right-clicking on the canvas.
- Now, simply paint over the areas of your image where you want to selectively hide or reveal the top layer. This is invaluable for delicate photo manipulation, allowing you to blend specific elements, such as a face onto a background, with incredible realism.
Tips for Viewing and Toggling Masks:
- To view the layer mask itself (rather than the image) on your canvas, hold Alt (Windows) or Option (Mac) and click the layer mask thumbnail. This helps you visualize the black, white, and gray areas. Click again to return to the image view.
- To temporarily disable (and re-enable) a layer mask, hold Shift and click the layer mask thumbnail. A red ‘X’ will appear over the thumbnail, indicating it’s disabled, and your entire top layer will be visible. This is useful for before-and-after comparisons.
Advanced Blending and Workflow Enhancements
Beyond the core techniques, Photoshop offers specialized features that can elevate your blending capabilities, particularly for complex scenarios.
Fine-Tuning with “Blend If”
The “Blend If” sliders provide an incredibly powerful way to control layer visibility based on the tonal range (luminosity) of the current layer or the underlying layers. This means you can make a layer appear only in the darks or lights of the image below it, or only where its own pixels fall within a certain luminosity range.
You can access “Blend If” by double-clicking on the layer thumbnail (not the mask) in the Layers panel, which opens the Layer Style dialog box. At the bottom, you’ll find two sets of sliders: “This Layer” and “Underlying Layer.”
- This Layer: Controls where the active layer is visible based on its own tonal values. Dragging the black slider to the right will hide dark tones; dragging the white slider to the left will hide light tones.
- Underlying Layer: Controls where the active layer is visible based on the tonal values of the layers beneath it. Dragging the black slider to the right will hide the active layer in the dark areas of the underlying content; dragging the white slider to the left will hide it in the light areas.
Splitting Sliders for Smoother Transitions: The real magic happens when you split these sliders. Hold down the Alt (Windows) or Option (Mac) key and drag one half of a slider. This splits it into two, allowing you to define a gradual transition range rather than an abrupt cutoff. This creates much smoother, more natural-looking blends and is crucial for advanced photo manipulation.
Streamlining Multi-Image Blending with Auto-Blend Layers
For specific blending tasks, particularly those involving multiple exposures of the same scene or panoramic stitches, Photoshop’s “Auto-Blend Layers” command offers an automated solution.
Purpose and Access: This feature (found under Edit > Auto-Blend Layers) is primarily designed for:
- Panoramas: Stitching several overlapping photos into a single seamless panoramic image.
- Focus Stacking: Combining multiple images taken at different focus points to create a single image with extended depth of field.
- Exposure Blending (HDR): Merging images taken at different exposures to create a High Dynamic Range (HDR) image, capturing detail in both highlights and shadows.
When using “Auto-Blend Layers,” Photoshop intelligently analyzes the content of selected layers, aligns them, and blends them together using layer masks and sophisticated algorithms to minimize seams and optimize color and tone. For photographers looking to create breathtaking natural photography or achieve digital photography excellence, this tool is invaluable. On Tophinhanhdep.com, you can find numerous high-resolution images and backgrounds suitable for such advanced techniques, providing the raw material for your creative endeavors.
Beyond the Blend: Expanding Your Visual Design Horizons with Tophinhanhdep.com
Mastering image blending in Photoshop is more than just a technical skill; it’s a gateway to boundless creativity. The techniques discussed empower you to transform visual concepts into compelling realities, directly aligning with the core offerings of Tophinhanhdep.com.
Blending for Visual Storytelling and Digital Art
The creative applications of blending are virtually limitless. You can use these techniques to:
- Craft Unique Wallpapers and Backgrounds: Combine elements from nature, abstract forms, or aesthetic compositions to create personalized and visually rich desktop backgrounds or mobile wallpapers.
- Develop Evocative Digital Art: Merge disparate elements to create surreal scenes, fantasy landscapes, or emotionally charged portraits, pushing the boundaries of traditional photography. Sad/Emotional imagery or beautiful photography can be deeply enhanced through thoughtful blending.
- Enhance Graphic Design Projects: Integrate textures, photographic elements, or illustrative components into your designs to add depth, dimension, and visual interest. Photo manipulation becomes a potent tool for creative ideas.
- Create Thematic Image Collections: Build a series of images that share a cohesive visual style or narrative by applying consistent blending techniques. This is perfect for curating mood boards or exploring trending styles.
Leveraging Tophinhanhdep.com for Inspiration and Resources
Tophinhanhdep.com serves as your ultimate resource hub for all things visual design and photography. As you hone your Photoshop blending skills, you’ll find our categories indispensable:
- Images (Wallpapers, Backgrounds, Aesthetic, Nature, Abstract, Sad/Emotional, Beautiful Photography): Discover a vast collection of high-quality images ready for your blending experiments. Find the perfect background or overlay to kickstart your next creative project. Our curated collections offer endless inspiration for your photo ideas and thematic compositions.
- Photography (High Resolution, Stock Photos, Digital Photography, Editing Styles): Access premium stock photos and learn about cutting-edge digital photography techniques. Explore diverse editing styles that can be achieved or complemented by advanced blending.
- Image Tools (Converters, Compressors, Optimizers, AI Upscalers, Image-to-Text): Beyond Photoshop, Tophinhanhdep.com offers a suite of image tools to prepare, optimize, and enhance your source material. Use AI upscalers to ensure your blended composites maintain high resolution, or convert formats seamlessly before importing into Photoshop.
- Visual Design (Graphic Design, Digital Art, Photo Manipulation, Creative Ideas): Our platform is a wellspring of creative ideas and tutorials, guiding you through advanced graphic design principles and photo manipulation concepts that can be executed with your blending expertise.
- Image Inspiration & Collections (Photo Ideas, Mood Boards, Thematic Collections, Trending Styles): Find curated mood boards and thematic collections that spark new ideas for image blending. Stay updated on trending styles and see how artists are incorporating blended images into their work, providing a constant source of inspiration for your next project.
For quick creative blending on the go, many mobile apps offer solutions, and Tophinhanhdep.com provides insights into these tools and showcases aesthetic blends for inspiration. For those exploring online solutions for image merging, tools exist, and Tophinhanhdep.com offers curated collections and guides to leverage various online image tools effectively.
In conclusion, mastering how to blend images in Photoshop is a foundational skill that opens up a universe of creative possibilities. From the subtle art of layer opacity to the precise control of layer masks and the intelligent automation of “Blend If” and “Auto-Blend Layers,” you now have a powerful arsenal of techniques at your disposal. Remember that the best results often come from combining several methods and through continuous experimentation.
We encourage you to grab a few images from Tophinhanhdep.com’s extensive collections – perhaps a captivating nature scene, an abstract texture, or a striking portrait – and start blending. Don’t be afraid to try different combinations and settings; ensure you’re working on duplicate layers to protect your originals. Your journey into creative photo manipulation has just begun, and Tophinhanhdep.com is here to support every step of your visual design exploration, providing the resources and inspiration to transform your ordinary pictures into extraordinary art.