How to Blend Multiple Images in Photoshop

In the vibrant world of digital art and photography, sometimes a single image, no matter how captivating, isn’t enough to convey a full story or achieve a desired aesthetic. The ability to seamlessly blend multiple images in Adobe Photoshop opens up a vast universe of creative possibilities, transforming ordinary photographs into extraordinary visual designs. From crafting stunning composites for professional portfolios to developing unique aesthetic backgrounds for your digital projects, mastering image blending is a fundamental skill for any visual creator. Tophinhanhdep.com, a leading resource for high-resolution photography, inspiring visual designs, and robust image tools, brings you this comprehensive guide to unlock Photoshop’s powerful blending capabilities.
This article will delve into three primary methods for merging and blending images – Layer Opacity, Layer Blend Modes, and Layer Masks – along with advanced techniques and practical tips. These methods are indispensable whether you’re working with serene nature photography, striking abstract compositions, or even infusing emotional depth into sad or poignant imagery. By the end, you’ll be equipped to create breathtaking photo manipulations and elevate your digital photography to new heights, leveraging the creative ideas and thematic collections available on Tophinhanhdep.com.

The Foundation: Preparing Your Workspace
Before diving into the intricate art of blending, setting up your Photoshop workspace efficiently is crucial. This ensures a smooth workflow and allows you to focus purely on your creative vision. Utilizing high-resolution stock photos or your own beautiful photography from Tophinhanhdep.com can significantly enhance the quality of your final composite.
Opening and Layering Images
The first step in any blending project is to bring your chosen images into a single Photoshop document. You can start a new project (File > New) with your desired dimensions, then place images into it (File > Place Embedded). Alternatively, you can open one image (File > Open) and then drag and drop subsequent images onto its canvas. Each image will automatically be placed on its own layer, which is essential for blending.
Understanding the concept of layers is fundamental. Photoshop operates on a stacking principle, where layers are stacked one on top of the other. The image on the topmost layer will obscure the layers below it by default. For blending, the image you intend to modify to interact with the one beneath it is referred to as the “blend layer” or “active layer.” Experimenting with the order of your layers will yield different results, as blending effects are always applied from the active layer downwards.
Importance of Duplicates and Non-Destructive Editing
A golden rule in Photoshop, especially when attempting complex photo manipulations, is to always work non-destructively. This means preserving your original images so you can revert to them if needed. Before making any significant changes, duplicate your image layers (Layer > Duplicate Layer or Ctrl/Cmd + J) and lock the original layers by clicking the padlock icon in the Layers panel. This safeguard is invaluable, preventing irreversible alterations and allowing for more fearless experimentation. Tophinhanhdep.com always recommends a non-destructive approach for all digital photography and visual design projects.
Method 1: Effortless Blending with Layer Opacity
The simplest and most straightforward way to blend images in Photoshop is by adjusting a layer’s opacity. This technique is incredibly versatile for creating subtle overlays, ghosting effects, or light, aesthetic backgrounds that merge seamlessly.
Understanding Opacity
Located in the upper right of the Layers panel, the Opacity slider controls the transparency level of the selected layer. By default, it’s set to 100%, meaning the layer is fully opaque and completely blocks out anything below it. As you reduce the opacity value, the layer becomes increasingly transparent, allowing the underlying image to show through. This creates a blend where both images contribute to the final visual, offering a simple yet effective way to combine them. It’s an excellent starting point for any creative ideas involving image overlays.
Step-by-Step Guide: How to Adjust Layer Opacity
- Open and Layer Your Images: Follow the steps in “The Foundation” to ensure your two images are in the same Photoshop document, each on its own layer. Make sure the image you want to be semi-transparent is the top layer.
- Select the Top Layer: In the Layers panel, click on the thumbnail or name of the layer you wish to make transparent. A highlight border will appear around it, indicating it’s selected.
- Adjust the Opacity Slider: Locate the “Opacity” option in the Layers panel. Click on the down-pointing arrow next to the percentage (usually 100%). A slider will appear. Drag the slider to the left to decrease the opacity. As you drag, you’ll instantly see the top image fade into the background.
- Experiment for Desired Effect: The ideal opacity percentage depends entirely on your specific images and desired outcome. Start by trying values like 70%, 50%, and 30% to observe how the blend changes. Lower percentages reveal more of the background, creating a softer, more integrated look.
This method is particularly effective when creating wallpapers or backgrounds where a subtle blend is desired, perhaps merging a foreground element with a calming nature scene or an abstract texture.
Quick Tip: Keyboard Shortcuts for Opacity
To significantly speed up your workflow, you can change a layer’s opacity directly from your keyboard. With the desired layer selected (and any tool other than a painting tool active), simply press a number key:
1for 10% opacity2for 20% opacity- …
9for 90% opacity0for 100% opacity (or press0twice quickly for 0% opacity).
For more specific values, quickly press two numbers, one after the other (e.g., 2 then 5 for 25% opacity). This allows for rapid experimentation and fine-tuning, especially when exploring various photo ideas.
Method 2: Dynamic Compositions with Layer Blend Modes
For more sophisticated and impactful blends, Photoshop’s Layer Blend Modes are your go-to tool. Blend modes define how the pixels of one layer interact mathematically with the pixels of the layers beneath it, producing a wide array of visual effects from darkening and lightening to increasing contrast or changing color components. This is where digital art truly merges with photography, offering endless possibilities for creative expression and unique editing styles.
Demystifying Blend Modes
At their core, blend modes are mathematical equations that process the color values of the “blend layer” (the active layer) and the “base layer” (the layer(s) below it) to produce a “result color.” While the underlying math can be complex, understanding their general categories makes them easier to use. They are invaluable for photo manipulation, graphic design, and developing thematic collections.
Exploring Blend Mode Categories
Photoshop offers 27 distinct blend modes, categorized by their general effect. Each group produces a similar overall outcome, but with unique creative variations.
- Normal Blend Modes:
- Normal: The default mode; no blending occurs. The top layer completely covers the layers below.
- Dissolve: Creates a speckled, dithered effect based on opacity. Useful for grunge or abstract textures.
- Darken Blend Modes: These modes analyze the pixel values and only keep the darker pixels, or darken the lighter pixels of the base layer.
- Darken: Keeps the darker of the two layers’ pixels.
- Multiply (M): Multiplies the base color by the blend color, always resulting in a darker color. Excellent for combining textures or creating shadows.
- Color Burn (B): Darkens the base color to reflect the blend color by increasing contrast.
- Linear Burn (A): Darkens the base color by decreasing its brightness.
- Darker Color: Compares the sum of all channel values and displays the darker color.
- Lighten Blend Modes: These modes analyze the pixel values and only keep the brighter pixels, or lighten the darker pixels of the base layer.
- Lighten (G): Keeps the lighter of the two layers’ pixels.
- Screen (S): Multiplies the inverse of the base and blend colors, always resulting in a lighter color. Great for brightening images, creating glow effects, or composite lighting.
- Color Dodge (D): Brightens the base color to reflect the blend color by decreasing contrast.
- Linear Dodge (Add) (W): Brightens the base color by increasing its brightness.
- Lighter Color: Compares the sum of all channel values and displays the lighter color.
- Contrast Blend Modes: These modes either darken or lighten pixels based on whether they are darker or lighter than 50% gray, increasing overall contrast.
- Overlay (O): Multiplies or Screens colors depending on the base color. It preserves the highlights and shadows of the base layer while infusing the blend layer’s color and tone. Ideal for texture blending.
- Soft Light (F): Similar to Overlay but produces a softer, more subtle effect. Often preferred for photographic blending.
- Hard Light (H): Produces a harsher, more intense effect than Overlay.
- Vivid Light (V), Linear Light (J), Pin Light (Z), Hard Mix (L): Offer varying degrees of contrast and intensity.
- Inversion Blend Modes: These modes create effects based on the difference between the base and blend colors.
- Difference (D): Subtracts the darker color from the lighter color. Often creates a negative-like or colorful abstract effect.
- Exclusion (X): Similar to Difference but produces a lower-contrast result.
- Subtract, Divide: More extreme effects, often used for specific abstract or experimental purposes.
- Component Blend Modes: These modes work with individual color components (Hue, Saturation, Color, Luminosity).
- Hue (U): Preserves the luminosity and saturation of the base layer while adopting the hue of the blend layer.
- Saturation (T): Preserves the luminosity and hue of the base layer while adopting the saturation of the blend layer.
- Color (C): Preserves the luminosity of the base layer while adopting the hue and saturation of the blend layer. Excellent for colorizing images.
- Luminosity (Y): Preserves the hue and saturation of the base layer while adopting the luminosity of the blend layer. Useful for enhancing light and vibrancy.
Additionally, eight “Special Blend Modes” (Color Burn, Linear Burn, Color Dodge, Linear Dodge (Add), Vivid Light, Linear Light, Hard Mix, and Difference) behave differently when the Fill value is adjusted compared to Opacity. While Opacity affects the entire layer and its effects, Fill only changes the opacity of the layer’s pixels, preserving the intensity of layer styles.
Applying Blend Modes for Impact
- Set Up Your Layers: As before, open and layer your images, ensuring the active layer is above the background you want to blend it with.
- Select the Top Layer: Click on the top layer in the Layers panel.
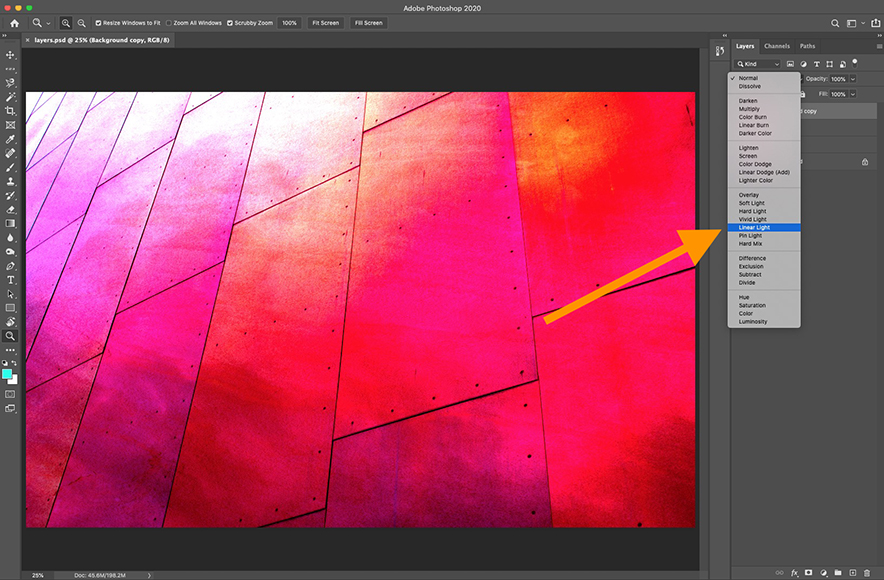
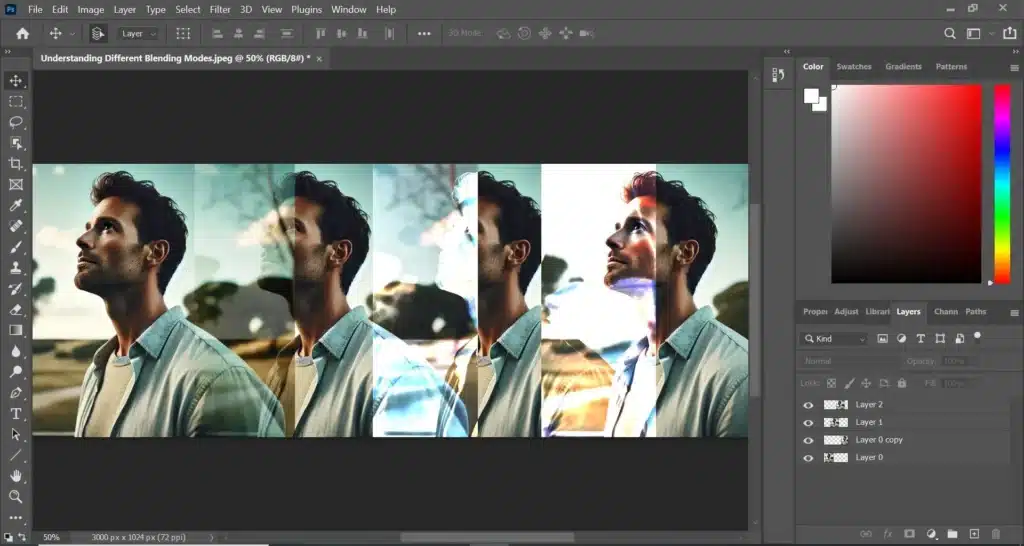
- Choose a Blend Mode: Click on the “Normal” dropdown menu in the Layers panel. Experiment by selecting different blend modes from the list. Pay close attention to how each mode alters the interaction between your images.
- For example, Multiply is excellent for adding textures or combining two images where you want the darker areas to dominate.
- Screen can create luminous effects, perfect for merging glowing elements or brightening a scene.
- Overlay or Soft Light are often ideal for blending textures with portraits, adding subtle contrast and color shifts without losing detail.
- Luminosity can give light and vibrancy to lighter parts of an image, creating a summery or energetic feel.
- Combine with Opacity: Once you’ve found a blend mode you like, fine-tune the effect by adjusting the Opacity slider (as described in Method 1). This combination offers nuanced control, allowing you to lessen the intensity of the blend mode’s effect.
- Layer More Images: Don’t limit yourself to just two! You can layer multiple images, applying different blend modes and opacity settings to each to create complex and visually rich compositions. This technique is fantastic for creating abstract art or detailed photo composites that tell a deeper story.
Quick Tip: Keyboard Cycling Through Blend Modes
For rapid experimentation, you can cycle through Photoshop’s blend modes directly from your keyboard. First, ensure the Move Tool (V) is active. Then, hold down the Shift key and press the + or - keys to move up or down through the list of blend modes. This lets you quickly preview how different modes affect your images without having to constantly open the dropdown menu. This is a game-changer for finding the perfect aesthetic quickly for your visual design.
Method 3: Precise Control with Layer Masks
Layer Masks represent a more advanced, yet incredibly powerful, technique for blending images. Unlike opacity or blend modes, which affect the entire layer uniformly, layer masks allow you to selectively reveal or conceal parts of a layer, providing unparalleled control over where and how two images blend. This precision is invaluable for intricate photo manipulation, digital photography editing styles, and achieving realistic composites.
The Power of Layer Masks
A layer mask is essentially a grayscale image attached to a layer, controlling its transparency. White areas on the mask reveal the corresponding part of the layer, black areas conceal it, and shades of gray create semi-transparency. This non-destructive approach means you’re never permanently erasing pixels; you’re simply hiding or showing them. This flexibility is what makes layer masks a cornerstone of professional visual design, enabling complex blending, selective focus, and seamless integration of disparate elements for compelling photo ideas.
Step-by-Step: Blending with a Gradient Mask
The gradient tool is an excellent way to create smooth, natural transitions between two images using a layer mask.
- Open Both Images in Your Canvas: Place your images in a Photoshop document, with the image you want to selectively blend on the top layer.
- Add a Layer Mask to The Top Layer: Select the top layer in the Layers panel. Then, click the “Add Layer Mask” icon (a white rectangle with a black circle) at the bottom of the Layers panel. A white thumbnail will appear next to your layer’s preview thumbnail, indicating an active layer mask. By default, the mask is entirely white, so the entire layer is visible.
- Select the Gradient Tool and Black-to-White Gradient: In the Toolbar, select the Gradient Tool (G). In the Options Bar at the top of the screen, click the down arrow next to the gradient swatch to open the Gradient Picker. Choose the “Black, White” gradient (typically the third thumbnail from the left in the “Basics” set). Ensure that your foreground color is set to black and your background color to white (press D to reset to default colors, then X to swap foreground/background if needed).
- Apply The Gradient to The Layer Mask: Make sure the layer mask thumbnail (not the layer’s image thumbnail) is selected in the Layers panel (it will have a highlight border). Click and drag your mouse across the image canvas.
- For example, if you want the left side of your top image to be visible and gradually fade into the background on the right, you would click on the right side of the image and drag towards the left. Holding
Shiftwhile dragging will create a perfectly straight line. - Upon releasing the mouse button, Photoshop applies the gradient to the layer mask, creating a smooth blend where the black part of the gradient hides the top layer and the white part reveals it. The grays in between create a gradual transition, essential for realistic blending in nature photography or complex scene composites.
- For example, if you want the left side of your top image to be visible and gradually fade into the background on the right, you would click on the right side of the image and drag towards the left. Holding
Refining Blends with the Brush Tool
While gradients are great for smooth transitions, the Brush Tool offers pixel-perfect control, allowing you to “paint” transparency onto your layer mask. This is crucial for detailed photo manipulation and achieving specific editing styles.
- Select the Brush Tool: With the layer mask still selected, choose the Brush Tool (B) from the Toolbar.
- Set Brush Properties: In the Options Bar, adjust the brush’s size and hardness. A soft-edged brush (lower hardness) is generally preferred for blending, as it creates smoother, less visible transitions.
- Paint on the Mask:
- To hide parts of the top layer (reveal the layer below), ensure your foreground color is black. Paint over the areas you want to disappear.
- To reveal parts of the top layer (undo hiding), ensure your foreground color is white. Paint over the areas you want to reappear.
- You can quickly switch between black and white foreground colors by pressing
Xon your keyboard. - Varying the brush opacity (in the Options Bar) allows for more subtle and gradual revealing/concealing, mimicking the effect of shades of gray on the mask.
- Zoom In for Detail: For intricate blending, zoom in close to your image (Ctrl/Cmd +
+) and meticulously brush along edges or specific elements to integrate them flawlessly. This technique is invaluable for digital art where precise control over every pixel is desired.
Quick Tip: Toggling Layer Masks On/Off
To quickly assess the impact of your layer mask, you can temporarily disable and enable it. Press and hold the Shift key and click on the layer mask thumbnail in the Layers panel. An “X” will appear over the mask, indicating it’s disabled, and your entire layer will become visible. Shift-click again to reactivate the mask. This instant toggle helps you compare your blended result with the original unmasked layer, refining your creative ideas.
Advanced Blending Techniques & Tophinhanhdep.com’s Toolkit
Beyond the core methods, Photoshop offers advanced features that enhance image blending, especially for specific photographic needs and visual design challenges. Tophinhanhdep.com also provides a suite of image tools that can complement your Photoshop workflow.
“Blend If” Feature
The “Blend If” sliders, found in the Layer Style dialog box (double-click on a layer thumbnail, or Layer > Layer Style > Blending Options), offer sophisticated control over layer visibility based on tonal values. You can specify that a layer should only be visible within certain tonal ranges of itself (This Layer) or the layers below it (Underlying Layer).
By holding Alt/Option and dragging one half of a slider, you can split it, creating a smoother transition between visible and hidden areas. This non-destructive method is incredibly powerful for selectively blending elements, for instance, merging a sky into a landscape only in the brighter cloud areas, or a texture into shadows. It’s a key technique for advanced photo manipulation and achieving complex digital art effects.
Automated Blending: Auto-Blend Layers for Panoramas/Stacks
For photographers working with multiple exposures or panorama shots, Photoshop’s Auto-Blend Layers command (Edit > Auto-Blend Layers) is a game-changer. This feature can automatically stitch images into a seamless panorama or combine multiple photos of the same scene into a “stack,” often used for focus stacking or noise reduction.
- Panorama: Ideal for creating high-resolution, wide-angle shots by merging several overlapping photos.
- Stack Images: Best for combining aligned layers, such as portraits with the same profile, to average out details or create unique effects.
This automated tool is particularly useful for achieving consistent quality across a series of images, especially when preparing content for Tophinhanhdep.com’s collections of wallpapers or background images where high resolution is paramount.
Beyond Photoshop: Tophinhanhdep.com’s Image Tools
While Photoshop is the gold standard for blending, optimizing your image assets before or after the process is equally important for stunning visual design. Tophinhanhdep.com offers a range of powerful image tools designed to enhance your workflow:
- Converters: Easily convert your blended images into various formats suitable for web, print, or specific platforms.
- Compressors & Optimizers: Reduce file sizes without compromising visual quality, ensuring your beautiful photography loads quickly on any device. This is crucial for web-based visual design and sharing your art.
- AI Upscalers: If you’re working with lower-resolution source images, Tophinhanhdep.com’s AI Upscalers can intelligently increase their size and detail, making them more suitable for high-resolution blends and large-format prints.
- Image-to-Text Tools: While not directly related to blending, these tools can assist in cataloging or extracting information from your image collections, a handy feature for managing extensive thematic collections or mood boards.
Leveraging Tophinhanhdep.com for Inspiration
The art of blending images thrives on creative inspiration. Tophinhanhdep.com is a treasure trove of visual assets and ideas that can ignite your next blending project. Explore its vast collections of:
- Wallpapers & Backgrounds: Find high-resolution images to serve as the base for your blended masterpieces.
- Aesthetic & Nature Photography: Discover captivating scenes and textures to layer into your compositions.
- Abstract Art: Use abstract images as blend layers to introduce unique patterns and colors into your photographs.
- Sad/Emotional & Beautiful Photography: Find imagery that evokes specific moods, enabling you to craft blends with deeper thematic resonance and emotional impact.
- Thematic Collections & Trending Styles: Stay updated with current visual trends and explore curated collections for fresh photo ideas and design inspirations.
By combining Tophinhanhdep.com’s rich content with the blending techniques learned here, you can consistently push the boundaries of your digital photography and visual design capabilities.
Conclusion
The journey of learning how to blend multiple images in Photoshop is one of continuous discovery and creative growth. From the simplicity of Layer Opacity to the dynamic interplay of Layer Blend Modes and the precision of Layer Masks, each technique offers a unique approach to transforming your visual assets. These fundamental skills are essential for anyone venturing into graphic design, digital art, or advanced photo manipulation, allowing you to create stunning composites, unique aesthetic backgrounds, and powerful visual narratives.
Remember that experimentation is key. Don’t be afraid to mix and match these methods, adjusting blend modes with varying opacities and precisely refining edges with layer masks. The colors, textures, and content of your chosen images will dictate the most effective blending strategies, opening up endless creative ideas.
As you continue to hone your Photoshop skills, Tophinhanhdep.com stands as your comprehensive partner, offering not only high-resolution imagery and inspiring thematic collections but also a suite of image tools to optimize every step of your creative process. Embrace the power of blending, and start creating breathtaking digital photography and visual designs that truly stand out. Happy blending!