Mastering the Art of Blur: A Comprehensive Guide to Enhancing Your Images with Tophinhanhdep.com

In the dynamic world of digital imagery, the ability to artfully blur an image is more than just a technical skill; it’s a powerful visual design technique that can transform ordinary photographs into stunning works of art. At Tophinhanhdep.com, we understand the nuances of creating impactful visuals, from high-resolution wallpapers and aesthetic backgrounds to captivating nature shots and abstract digital art. This comprehensive guide delves into the multifaceted world of image blurring, exploring its creative applications, the various types of blur effects, and the practical steps to achieve professional-grade results using Tophinhanhdep.com’s diverse suite of image tools and photography editing styles. Whether you’re a seasoned photographer looking to refine your digital photography or a novice aiming to add a touch of sophistication to your images, mastering blur will unlock new dimensions of creative expression.
The Transformative Power of Image Blur
Blurring a photo is a popular technique that can significantly enhance your images and create a more professional appearance. By selectively blurring elements within a picture, you can subtly guide the viewer’s eye, evoke specific moods, or even protect sensitive information. This technique is a cornerstone of effective visual design and photo manipulation, allowing creators to craft compelling narratives and aesthetics.
Why Blur an Image? Exploring Creative and Practical Applications
The applications for image blurring are as vast as the images themselves, ranging from purely artistic choices to essential practical considerations.
- Highlighting the Main Subject: One of the most common and effective uses of blur is to create a shallow depth of field effect, making your main subject pop. By softening the background or foreground, distractions are minimized, and the viewer’s attention is immediately drawn to the intended focal point. This technique is particularly effective in portrait photography, product photography, or aesthetic compositions where a clean, focused subject is paramount against a potentially busy backdrop. Think of a beautiful flower in a field of green – blurring the surrounding foliage emphasizes the delicate petals and vibrant colors of the flower itself. This aesthetic choice is frequently seen in beautiful photography and contributes to trending styles like the popular “portrait mode” effect on smartphones.
- Creating a Specific Mood or Emotion: Blur can be a potent tool for evoking emotions and setting the tone of an image. A soft, dreamy blur can convey a sense of calm, nostalgia, or romance, making it ideal for aesthetic wallpapers or emotional photography collections. Conversely, a motion blur can inject energy and dynamism into an action shot, suggesting speed and movement even if the original capture was still. This artistic choice can transform a static image into a narrative, contributing to digital art and creative ideas.
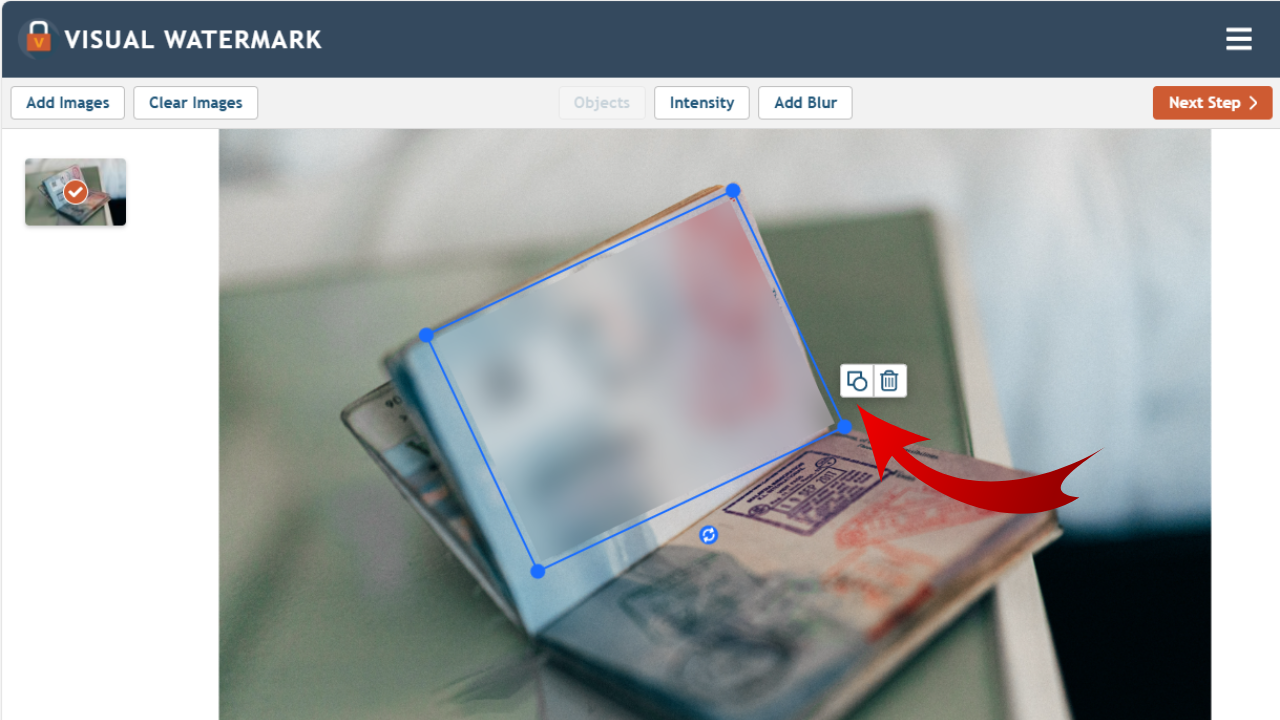
- Protecting Privacy and Obscuring Sensitive Information: In an age where digital sharing is ubiquitous, privacy is a growing concern. Blurring faces of strangers in a crowd, obscuring license plates in car photographs, or rendering addresses illegible in a home exterior shot are practical applications of blur that safeguard personal information. This utility extends to any high-resolution image containing sensitive data, making Tophinhanhdep.com’s blurring tools essential for secure image sharing.
- Improving Overall Composition by Eliminating Distractions: A busy background can detract from even the most compelling subject. By applying a judicious blur, unwanted elements seamlessly recede, allowing for cleaner, more balanced compositions. This is especially useful for stock photos or nature photography where environmental elements might compete with the primary focus. It’s a fundamental technique in graphic design and photo manipulation to refine visual hierarchy.
- Artistic Expression and Digital Art: Sometimes, the reason to blur is simply because it “looks cool.” Experimenting with different blur types and intensities can lead to unique digital art pieces or abstract images. The creative freedom offered by blurring tools allows artists to explore new photo ideas, contribute to thematic collections, and build distinctive mood boards. It’s a core component of developing unique editing styles in digital photography.
Understanding Different Blur Effects and Their Impact
The world of blur is not monolithic; various blur effects offer distinct visual characteristics, each suited for different artistic intentions. Tophinhanhdep.com’s tools typically include a range of these to give you maximum control over your visual design.
- Gaussian Blur: This is arguably the most common and versatile blur effect, known for its smooth, uniform diffusion of pixels. It creates a soft, hazy appearance that mimics out-of-focus areas produced by a camera lens. Our advanced editing software often utilizes this as a foundational blur tool for its natural-looking results, making it easy to add a smooth blur to images for a general softening effect or to de-emphasize backgrounds.
- Iris Blur: A specialized blur that simulates a shallow depth of field from a specific focal point. It applies a gradually increasing blur outwards from a user-defined area (often circular or elliptical), leaving the central subject sharp. This effect is excellent for mimicking the look of expensive lenses and is a favorite for portraits and product shots, allowing the specific matter to take center stage.
- Tilt-Shift Blur: This effect creates a simulated miniature scene by applying a gradient blur that increases towards the top and bottom of the image, while a central horizontal band remains sharp. It mimics the effect of tilt-shift lenses and is fantastic for landscape photography or cityscapes, transforming them into captivating miniature worlds. Tophinhanhdep.com’s editing tools allow precise control over the tilt and shift parameters to achieve this unique look.
- Bokeh: Derived from the Japanese word “boke” (meaning “blur”), Bokeh refers to the aesthetic quality of the blur produced in the out-of-focus parts of an image. It often manifests as pleasing, creamy circles of light. While traditionally a lens characteristic, Tophinhanhdep.com’s advanced photo editing software can replicate Bokeh effects, offering options for different shapes (round, X-shaped, heart, star) that work best for various photos, adding a glistening effect to low-light or night-time shots.
- Motion Blur: This effect simulates movement by blurring pixels in a specific direction, creating streaks or trails. It’s perfect for conveying speed and action in photographs of moving subjects like athletes, vehicles, or animals, giving the perception that the subject is moving quickly. Tophinhanhdep.com’s tools enable you to control the direction and intensity of motion blur for realistic results.
- Focal Zoom: Similar to motion blur, focal zoom implies movement, but specifically the movement of the camera or photographer zooming in or out rapidly during the shot. It creates a radial blur effect that emanates from the center, giving the impression of dynamic zooming.
- Soft Focus: This is a light, overall blur applied to an image, often used for a dreamy, ethereal, or romantic effect. It can be used subtly to soften harsh lines or to create a more nostalgic feel, making it perfect for aesthetic and emotional photography.
In-Camera vs. Post-Processing: Achieving Desired Depth of Field
While Tophinhanhdep.com offers powerful tools for post-processing blur, it’s important for digital photography enthusiasts to understand the distinction and interplay with in-camera techniques.
- In-Camera Blur: The ideal method for achieving natural depth of field is through lens characteristics (wide apertures like f/1.2 or f/1.4) and camera settings (focal length, distance to subject). This results in optical blur, which is inherently organic and often superior in quality. For photographers, choosing the right lens and understanding aperture is fundamental to achieving this look naturally.
- Post-Processing Blur with Tophinhanhdep.com: Despite the advantages of in-camera blur, circumstances don’t always allow for it. You might not have the right lens, or lighting conditions might prevent shooting wide open. This is where Tophinhanhdep.com’s editing software shines. Our tools can realistically replicate these effects, allowing you to salvage images or create effects that were impossible during the original shoot. While sometimes more time-consuming, our advanced features like field blur can approximate the Bokeh of an expensive lens with remarkable accuracy. This ensures that even if you’re working with existing stock photos or images without a naturally shallow depth of field, you can still achieve a refined, professional look.
Essential Tools for Blurring Images on Tophinhanhdep.com
Tophinhanhdep.com provides a versatile array of tools for image blurring, catering to both desktop and mobile users, as well as offering convenient online solutions. Our platform aims to be a comprehensive resource for all your image editing needs, from basic photo editing to complex photo manipulation.
Desktop Software Solutions for Precision Blurring
For users who prefer the power and control of desktop applications, Tophinhanhdep.com’s recommended solutions offer robust features for intricate blurring tasks, ideal for high-resolution images and detailed graphic design projects.
- Our Flagship Photo Editing Software (e.g., CorelDRAW/PhotoDirector equivalent): This all-in-one photo editor, image blurrer, and organizer provides an incredible selection of blur tools including soft focus, Bokeh, and motion blur. It includes AI-powered tools like deblur, a wide range of photo effects, advanced color controls, and intuitive layer editing. Whether you’re working on complex digital art or simply want to add gaussian smoothing, our software makes it a breeze. It also extends beyond blurring, offering features like font management, clip art, page layout, and vectorize tools, allowing you to create high-quality graphics with ease.
- How to add Gaussian blur using our desktop software:
- Open the Image: Launch our software and select “Open” to load the desired image from your computer.
- Select the Blur Tool: Navigate to the “Photo Effects” or “Filter” menu and choose the “Gaussian Blur” tool.
- Apply and Adjust: Use the sliders or a dial to adjust the blur intensity and radius to your preference. You can apply the effect to the entire image or specific parts.
- Save Your Work: Once satisfied, save your image before closing.
- How to add Gaussian blur using our desktop software:
- Advanced Image Manipulation Suite (e.g., Photoshop equivalent): For advanced users and professional visual designers, our suite offers sophisticated Blur Gallery effects like Iris Blur, Field Blur, and Tilt-Shift Blur. This powerful tool provides unparalleled control for creating realistic depth of field effects, managing complex selections with the Pen Tool, and refining edges with Layer Masks and the Spot Healing Brush. It’s the go-to for photo manipulation and intricate digital art.
- Detailed steps for advanced background blur in this software will be covered in the next section.
- Specialized Freeware (e.g., PhotoFiltre equivalent): Tophinhanhdep.com also points to effective freeware options that allow you to blur images by placing an ellipse and adjusting blur filter settings, providing a free entry point for basic blurring needs.
Mobile Applications for On-the-Go Blurring
For quick edits and mobile photographers, Tophinhanhdep.com offers recommendations for powerful apps that bring desktop-level blurring capabilities to your smartphone or tablet.
- Our Intuitive Mobile App (e.g., PhotoDirector App equivalent): Our mobile application is designed for effortless photo editing on both iOS and Android. It includes an easy-to-use “Blur Tool” with various blur masks (circular, linear, or brush) and visual blur types for added effects. This app is perfect for capturing trending styles or creating aesthetic images directly from your device.
- How to blur a photo on our mobile app:
- Open the App: Launch the Tophinhanhdep.com app and tap “Edit.”
- Import Your Photo: Select a photo from your device’s gallery or browse our built-in free stock media library for inspiration.
- Access Blur Tool: Go to the “Effects” menu and choose the “Blur Tool.”
- Choose Your Mask: Select your preferred blur mask (circular, linear, or brush) to define the blur area.
- Refine (Optional): Experiment with different visual blur types for creative expression.
- Save: Once you’re satisfied, save your blurred photo.
- How to blur a photo on our mobile app:
Online Tools and AI-Powered Solutions
For those who prefer not to download software or need quick edits, Tophinhanhdep.com also features online image tools, including AI-powered solutions that simplify complex blurring tasks.
- Our Online Photo Editor (e.g., Photopea/BeFunky equivalent): Our user-friendly online editor allows you to blur backgrounds directly in your web browser. It provides tools for quick selections and applying blur filters without installation. This is a great resource for quick photo ideas or when you need to optimize images for web use.
- Quick Background Blur with our online editor:
- Open Online Editor: Go to Tophinhanhdep.com’s online editor and open your photo.
- Select Subject: Use the “Select Subject” feature to automatically detect and select your main subject.
- Inverse Selection: Invert the selection to highlight the background.
- Apply Gaussian Blur: Apply a Gaussian Blur filter and adjust the intensity.
- Export: Export your blurred image as a JPG.
- Advanced Online Background Blur (using layers):
- Separate Subject: After selecting the subject, copy it to a new layer.
- Remove Subject from Background: On the original layer, use “Content-Aware Fill” (or similar tool) to intelligently remove the subject from the background, creating a more complete background.
- Blur Background Layer: Apply your desired blur (e.g., Gaussian Blur, or use a “Blur Gallery” for more artistic options) to this modified background layer.
- Place Subject Back: Make the subject layer visible again, placing the sharp subject over the blurred background.
- Export: Save your professionally blurred image.
- Quick Background Blur with our online editor:
Tophinhanhdep.com also leverages AI upscalers to ensure that even after significant photo manipulation, your images retain high resolution and quality.
Step-by-Step Guides: How to Blur an Image with Tophinhanhdep.com’s Recommended Tools
Achieving a perfectly blurred image involves a few key steps, regardless of the tool you choose. Here, we outline the procedures for both general blur effects and more advanced, nuanced techniques, all easily performed with Tophinhanhdep.com’s versatile editing platform.

Quick & Easy Gaussian Blur: The Universal Softening Technique
Gaussian blur is the go-to for a natural, even softening effect across an entire image or a selected area. Our software and online tools make this process straightforward for all users.
- Open Your Image: Launch any of Tophinhanhdep.com’s photo editing applications or our online editor. Go to
File > Open(or equivalent) and select the image you wish to blur. For example, if you want to add a smooth blur to a high-resolution wallpaper or a nature photo, this is your starting point. - Identify Your Target: Decide if you want to blur the entire image or only a specific part. For a full image blur, no selection is needed. If you aim to blur the background while keeping the foreground sharp, you’ll need to select your subject.
- For Background Selection (in our online editor or advanced desktop software): Use the
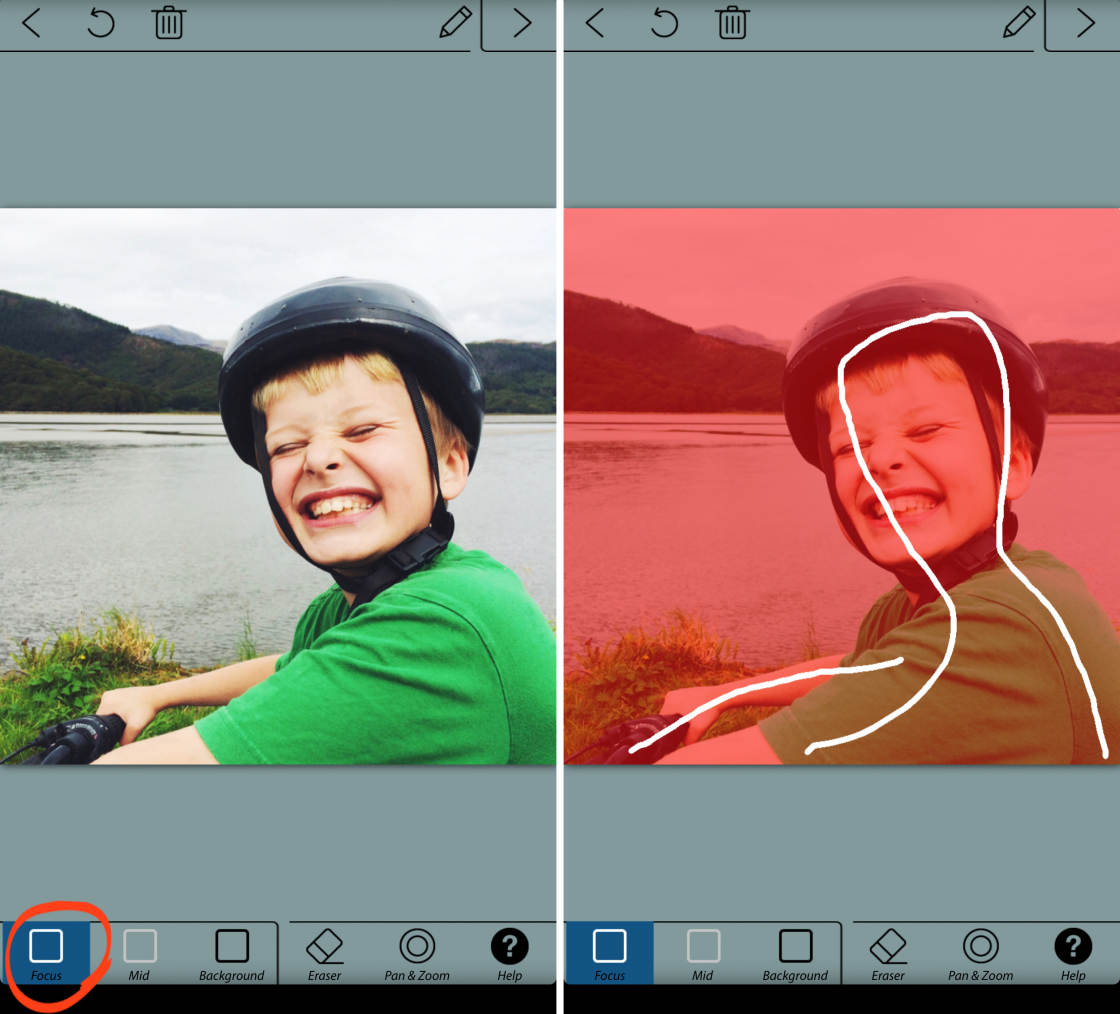
Select > Subjectfeature, which leverages AI to automatically detect and select the main elements of your photo. Once the subject is selected, go toSelect > Inverseto select everything but the subject (i.e., the background). In more manual tools, you might use the Lasso tool or Quick Selection tool.
- For Background Selection (in our online editor or advanced desktop software): Use the
- Apply Gaussian Blur: Navigate to
Filter > Blur > Gaussian Blur(orPhoto Effects > Blur Toolsin our app/software). A preview window will typically appear. - Adjust the Radius/Intensity: Use the “Radius” or “Intensity” slider to control the amount of blur. Dragging it to the right increases the blur, creating a softer, more dreamlike effect. Move it to the left to decrease the blur. Our tools provide real-time previews, so you can see the effect instantly.
- Confirm and Save: Once you are satisfied with the blur level, click “OK” or “Apply.” Then, save your edited image (
File > Export As > JPG/PNG). Consider using our image compressors or optimizers if you plan to use the image for web design or sharing, ensuring it maintains quality while being web-friendly.
Advanced Background Blur with Photoshop-style Tools (Iris & Tilt-Shift)
For those seeking more sophisticated and realistic depth-of-field effects, Tophinhanhdep.com’s advanced editing suite offers tools that emulate high-end lens effects, perfect for professional photography and digital art.
- Open Your Picture: In our advanced photo manipulation software, go to
File > Openand select your image. - Activate the Blur Gallery (for Iris Blur): For a targeted, professional-looking blur that mimics expensive lenses, navigate to
Filter > Blur Gallery > Iris Blur. - Establish a Focal Point: Upon activating Iris Blur, you’ll see a large blur sample circle with a central “pin” and several dots. The area inside the central pin is sharp, while blur increases as you move away from it.
- Move the Pin: Click and drag the central pin to position your main subject within the sharp zone.
- Adjust the Blur Area: The outer circle defines where the blur reaches 100%. Click and drag the small dots on the outer ring to expand or contract the blur area (e.g., an ellipse around your subject). You can also rotate the ellipse slightly.
- Fine-tune Blur Transition: Four larger white dots exist within the blur preview circle. These define the transition zone where blur gradually increases from 0% to 100%. Drag these white dots closer to the focal point for a slicker transition or further away for a more acute transition.
- Adjust Blur Degree: Use the blur dial around the central pin, or the “Blur” slider in the Blur Options panel, to increase or decrease the intensity of the blur. For example, apply an 8-point blur for subtle softening.
- Apply Tilt-Shift Blur (Optional, for perspective-based blur): If you desire a miniature effect or a linear depth of field, select
Filter > Blur Gallery > Tilt-Shift.- Position Blur Lines: You’ll see a central circle, a solid line, and a dotted line. The area between the circle and the solid line is typically unaffected by blur, while blur increases gradually from the solid line to the dotted line. Drag the central point and lines to align with your desired sharp zone (e.g., the horizon or your subject’s eye level).
- Adjust Blur Intensity and Transition: Use the “Blur” slider to control the blur strength. Adjust the distance between the solid and dotted lines to fine-tune the gradual blur effect.
- Add Grain for Realism: To make the digital blur appear more natural and consistent with the original image’s texture, navigate to the “Noise” tab within the Blur Gallery settings. Choose “Grain” and adjust the “Amount,” “Size,” and “Roughness.” A 20-30% grain amount is often recommended for a natural look.
- Finalize and Save: Once all adjustments are made, click “OK” in the Blur Gallery. Remember to save your image.
Crafting Realistic Depth of Field with Layer Masks and Spot Healing
For ultimate control over blur application and seamless integration of your subject, Tophinhanhdep.com’s advanced editing suite allows for multi-layered workflows incorporating masks and content-aware tools, crucial for detailed photo manipulation and digital art.
- Duplicate Background Layer: Open your image in our advanced software. Duplicate the
Backgroundlayer (Layer > Duplicate LayerorCMD/CTRL + J). Rename the originalOriginaland the duplicateBlur. - Remove Subject from
BlurLayer: Hide theSubjectslayer (if you already created one for selection, otherwise skip this and create one now). Select theBlurlayer. Use theSpot Healing Brush Tool(often found under a band-aid icon) to paint over your subjects in this layer. The tool intelligently fills in the area with surrounding background information, effectively removing the subjects while maintaining the background’s original appearance. This prepares a “clean” background to blur. For more precision, considerEdit > Fill > Content-Aware. - Convert
BlurLayer to Smart Object: Right-click on theBlurlayer and selectConvert to Smart Object. This allows you to apply non-destructive blur filters, meaning you can always go back and adjust the blur settings later. - Apply Advanced Blur to
BlurLayer: Now, apply your desired blur (e.g.,Filter > Blur Gallery > Tilt-ShiftorIris Blur) to thisBlurSmart Object layer, following the steps outlined in the previous section. Focus on getting the desired background blur without worrying about the subject yet. - Create a
SubjectsLayer: Go back to yourOriginallayer. Carefully select your subject(s) using a precise selection tool like thePen Tool(P),Quick Selection Tool, orSelect > Subject(if available and accurate). Once selected, duplicate this selection to a new layer (Layer > New > Layer Via CopyorCMD/CTRL + J). Rename this new layerSubjects. Position it above theBlurlayer.- Refining Pen Tool Selections: When using the Pen Tool, outline slightly inside the subject to avoid halo effects. For curves, add fewer, longer anchor points. Adjust paths by holding
ALT/OPTNand dragging the anchor points. After creating the path, right-click and selectMake Selection, with a smallFeather Radius(e.g., 0.5 pixels) for smooth edges.
- Refining Pen Tool Selections: When using the Pen Tool, outline slightly inside the subject to avoid halo effects. For curves, add fewer, longer anchor points. Adjust paths by holding
- Recover Fine Details (e.g., Hair): Duplicate the
Originallayer again and rename itHair Detail. Move this layer to the very top. Change itsBlending ModetoLighten. This makes darker areas transparent, revealing only the lighter fine details (like wispy hair) against the blurred background.- Add a Layer Mask to the
Hair Detaillayer and fill it with black (CMD/CTRL + Deleteif black is background color). This hides the entire layer. - Select the
Brush Tool(B), set foreground color to white (X), and paint over the areas where you want to reveal the fine hair details. Use a soft brush with moderate opacity and flow.
- Add a Layer Mask to the
- Smooth Edges with
Blur Toolon Subject Mask: Select theSubjectslayer mask. Unlink the mask from the layer (click the chain icon between the thumbnail and mask thumbnail). Select theBlur Tool(raindrop icon in the toolbar). SetStrengthto 100%,ModetoNormal, and uncheckSample All Layers. Carefully brush along the edges of your subject on the layer mask (you might holdALT/OPTNand click the mask to view it in grayscale for precision). This subtly blends the sharp subject edge with the blurred background, making the transition more realistic.
By employing these multi-layered techniques, you can achieve highly realistic and customized blur effects, essential for top-tier photo manipulation and aesthetic images, ensuring your subjects seamlessly integrate into their newly blurred surroundings.
Maximizing Your Blur Effects: Tips, Techniques, and Tophinhanhdep.com Resources
Beyond the technical steps, successful image blurring is an art form that significantly contributes to overall visual design and effective storytelling. Tophinhanhdep.com offers resources and insights to help you get the most out of your blurring efforts.
Strategic Blurring for Enhanced Visual Design
Blurring is not just about softening; it’s about making conscious choices that elevate your creative ideas and digital art.
- Compositional Guidance: Use blur to strengthen compositional lines or to frame your subject subtly. For instance, a linear blur can draw the eye directly through an image, while a circular blur naturally centers attention. This is key for compelling aesthetic and beautiful photography.
- Layered Depth: In digital art, combining multiple types of blur on different layers can create incredible depth. A slight Gaussian blur on distant elements, a more pronounced Iris blur on the mid-ground, and subtle edge softening around the foreground subject can produce a highly immersive image. This sophisticated photo manipulation adds rich dimensions to your images.
- Color and Contrast: Be mindful of how blur affects colors and contrast. A strong blur can desaturate colors or reduce contrast. Use Tophinhanhdep.com’s advanced color controls to fine-tune these aspects after applying blur, ensuring your overall image retains its desired vibrancy and visual impact.
- Experimentation is Key: Don’t be afraid to experiment with different blur types and intensities. What works for a serene nature background might not suit a dynamic abstract image. Our platform encourages creative exploration through various photo ideas and editing styles.
Beyond Blurring: Optimizing Your Images for Impact
A beautifully blurred image is only one step in the journey of creating stunning visuals. Tophinhanhdep.com provides a suite of image tools to ensure your artwork is presentation-ready.
- Image Optimization and Compression: After applying blur effects, especially to high-resolution images or large thematic collections, optimizing and compressing them is essential for web performance and sharing. Our image compressors and optimizers ensure your files are efficient without sacrificing quality, which is vital for quick loading times for online portfolios or social media.
- AI Upscalers: If you started with a lower-resolution image and want to ensure it looks crisp after manipulation, Tophinhanhdep.com’s AI upscalers can intelligently increase resolution, making your blurred image suitable for larger displays or prints.
- Image Converters: Easily convert your blurred images into various formats (JPEG, PNG, WebP) using our image converters, ensuring compatibility across different platforms and uses.
- Metadata and Organization: For photographers managing large collections of digital photography, properly tagging and organizing images after editing, possibly using our image-to-text tools for descriptions, can save valuable time and enhance discoverability.
Finding Inspiration: Blur in Trending Styles and Thematic Collections
The versatility of blur makes it a staple in various trending styles and thematic collections found on Tophinhanhdep.com.
- Aesthetic & Abstract Wallpapers: Blurry backgrounds provide a clean slate for text overlay or minimalist designs, making them popular for aesthetic desktop backgrounds and phone wallpapers. Abstract images often rely heavily on blur to create intriguing textures and fluid forms.
- Nature & Emotional Photography: Soft focus and Bokeh effects are frequently employed in nature photography to highlight delicate flora or fauna. In emotional photography, a subtle blur can add a layer of intimacy or melancholy. Explore our curated collections for mood board inspiration.
- High-Resolution Stock Photos: Professional stock photo libraries, including ours, utilize blur strategically to ensure subjects are prominent and backgrounds are non-distracting, making them versatile for various graphic design projects.
In conclusion, the ability to effectively blur an image is a fundamental skill in digital photography and visual design. Tophinhanhdep.com equips you with a comprehensive arsenal of tools, from intuitive mobile apps to powerful desktop software and convenient online editors, to master this transformative technique. By understanding the diverse types of blur and applying them strategically, you can create visually compelling images that stand out, tell a story, and resonate with your audience. Dive into Tophinhanhdep.com’s resources today and unlock your full creative potential in image manipulation.