How to Blur a Picture in Photoshop - Blur Faces, Backgrounds, and More

Blurring an image is one of the most fundamental yet powerful techniques in digital photography and visual design. Whether you’re a professional photographer looking to add depth to your portraits, a graphic designer crafting compelling advertisements, or simply someone who wants to enhance their personal photos, understanding how to effectively blur an image in Photoshop is an invaluable skill. At Tophinhanhdep.com, we recognize the diverse applications of this technique across various categories, from creating stunning aesthetic images and dynamic wallpapers to refining high-resolution stock photos and inspiring creative ideas for visual design.
Blurring can serve multiple purposes: it can draw the viewer’s eye to a specific subject, simulate the shallow depth of field often achieved with expensive camera lenses, hide distracting elements in a background, or even create unique artistic effects that transform an ordinary image into a captivating piece of digital art. Photoshop, with its comprehensive suite of blur tools and filters, provides unparalleled control over these effects. This guide will delve into the various methods Tophinhanhdep.com recommends for blurring images in Photoshop, ensuring you can achieve professional and creative results, whether you’re a complete novice or an experienced editor.
The Transformative Power of Blur in Digital Photography and Visual Design
The ability to manipulate focus and sharpness is a cornerstone of impactful imagery. Blur, far from being a simple softening effect, is a sophisticated tool that can profoundly alter the mood, message, and visual hierarchy of your photographs and designs. For creators at Tophinhanhdep.com, understanding these capabilities means unlocking new dimensions of visual storytelling.
Creating Focus and Depth
One of the primary uses of blur is to establish a clear focal point, guiding the viewer’s eye precisely where you want it to go. By blurring the areas surrounding your main subject, you create a natural visual hierarchy, making the sharp elements stand out dramatically. This technique is particularly effective in portrait photography, product shots, and high-resolution stock photos, where the subject must command attention. A softly blurred background, often referred to as “bokeh,” not only isolates the subject but also adds a sense of depth and three-dimensionality, mimicking the sophisticated aesthetic produced by professional cameras with wide aperture lenses. This depth can transform flat images into vibrant, immersive scenes, elevating everything from nature photography to abstract compositions.
Artistic Expression and Concealment
Beyond guiding focus, blur is a versatile tool for artistic expression. It can evoke a sense of movement, as with motion blur, transforming static images into dynamic narratives. Radial blur can create mesmerizing spin or zoom effects, adding an energetic vibe to your visual design projects. Moreover, blur can infuse an image with a dreamlike, ethereal quality, making it ideal for aesthetic images, mood boards, or creative ideas where a soft, gentle atmosphere is desired.
Crucially, blur also serves a practical purpose in concealment. Distracting backgrounds, unwanted objects, sensitive information like faces or license plates, or even blemishes in a photograph can be effectively softened or obscured. This allows photographers to salvage imperfect shots and designers to maintain a clean, professional aesthetic for wallpapers, backgrounds, or any visual content where certain elements need to be deemphasized. For image-to-text applications, blurring a background can significantly improve the readability and prominence of overlaying text, ensuring your message stands out clearly.
Essential Blur Techniques: Mastering Photoshop’s Core Tools
Photoshop offers a comprehensive array of blur tools, each designed for specific effects and levels of control. Mastering these techniques is fundamental for any serious photographer or graphic designer utilizing Tophinhanhdep.com’s resources for high-quality image manipulation.
Gaussian Blur: Your Foundation for General and Selective Softening
Gaussian Blur is perhaps the most frequently used and fundamental blur filter in Photoshop. It applies a smooth, even blur across a selection or an entire image, making it incredibly versatile for a wide range of tasks.
Blurring an Entire Image
If your goal is to soften the entire image uniformly, perhaps to create an abstract backdrop, a dreamy landscape, or a gentle texture for a wallpaper, Gaussian Blur is the simplest approach.
- Open your image in Photoshop.
- Go to Filter > Blur > Gaussian Blur…
- In the Gaussian Blur dialog box, adjust the Radius slider. Increasing the radius will apply more blur, while decreasing it will lessen the effect. As you slide, you’ll see a live preview of the blur.
- Once you’re satisfied with the intensity, click “OK”. This method is straightforward but applies the blur globally.
Blurring Specific Areas (Easy Method)
For targeted blurring – such as obscuring a face, text, a logo, or a distracting element in the background – you can selectively apply Gaussian Blur.
- With your image open, use any of Photoshop’s selection tools (e.g., Elliptical Marquee Tool, Lasso Tool, Quick Selection Tool, Object Selection Tool) to precisely select the area you wish to blur. For instance, to blur a face, use the Elliptical Marquee Tool to draw a circle around it.
- Once the area is selected, go to Filter > Blur > Gaussian Blur…
- Adjust the Radius to achieve the desired blur amount and click “OK”.
- Finally, go to Select > Deselect (or press Ctrl/Cmd + D) to remove the selection marquee. While effective, this “easy method” creates a hard, abrupt line between the blurred and unblurred sections, which might not always be aesthetically pleasing, especially for elements like faces or backgrounds that require a natural transition.
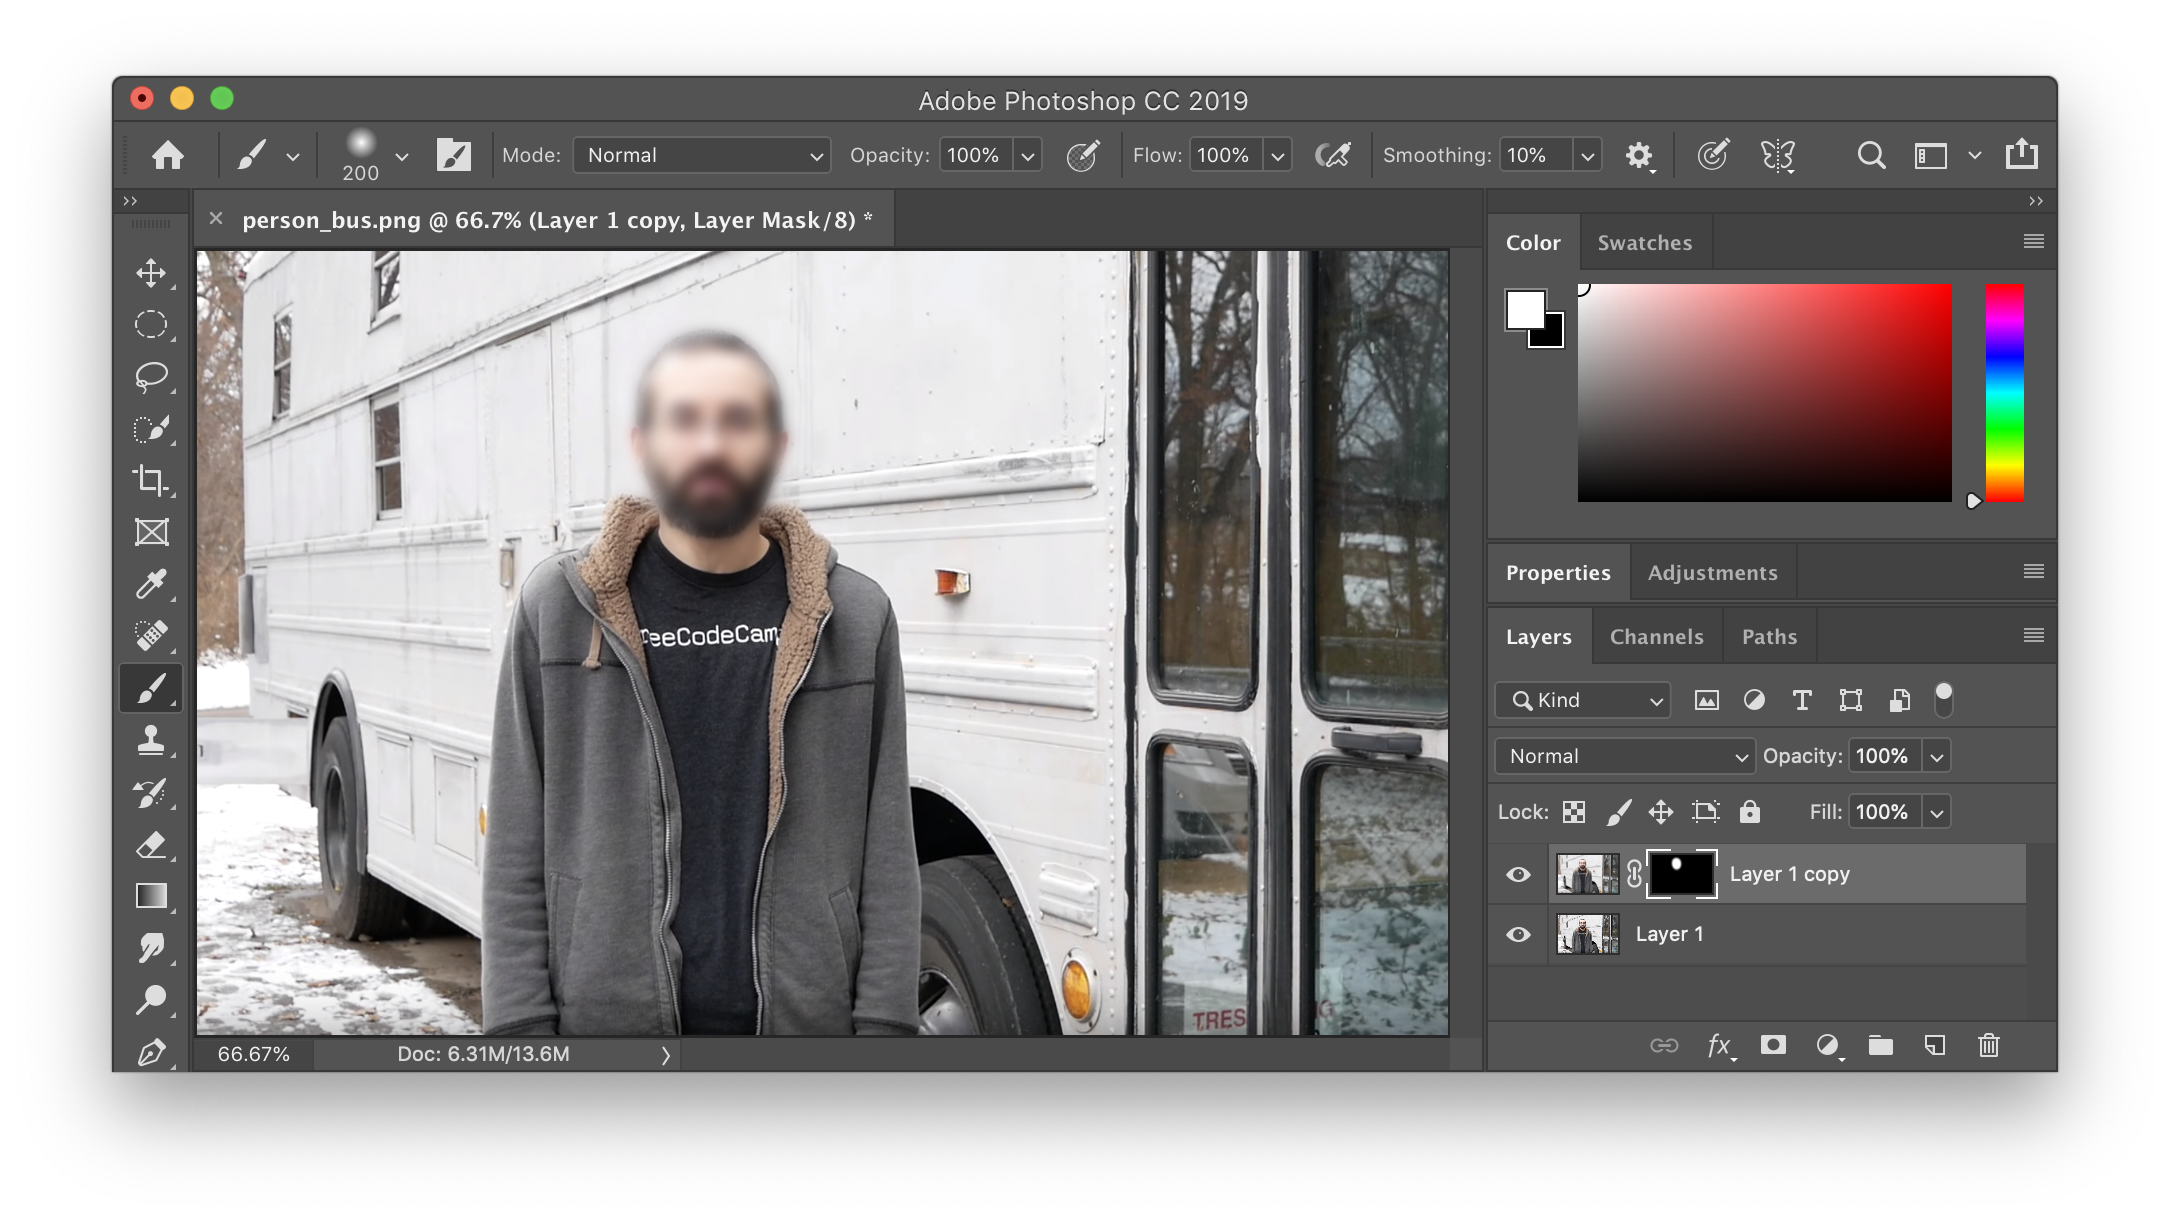
Achieving Soft Transitions with Layer Masks (Advanced Method)
To create a seamless, soft transition between blurred and unblurred areas, or to maintain maximum editing flexibility, the advanced method using layer masks is indispensable. This technique is a staple in professional photo manipulation and digital photography editing styles.
- Duplicate your image layer by right-clicking on the layer in the Layers panel and selecting “Duplicate Layer…” (or press Ctrl/Cmd + J). This keeps your original image intact, ensuring a non-destructive workflow.
- Apply a Gaussian Blur to the duplicated layer. Go to Filter > Blur > Gaussian Blur…, set your desired radius, and click “OK”. At this point, your entire duplicated layer will be blurred.
- Add a layer mask to the blurred duplicated layer. Hold down Alt (Windows) or Option (Mac) and click the “Add vector mask” button (the rectangle with a circle inside) at the bottom of the Layers panel. This will add a black layer mask, completely concealing the blurred layer and revealing the unblurred original layer underneath.
- Select the Brush Tool (B). Set your foreground color to white and ensure the brush has a soft edge (set Hardness to 0% for a very soft transition, or a low percentage for a slightly firmer edge). Adjust the brush size as needed.
- Now, paint with white on the black layer mask over the areas where you want the blur to be visible (e.g., the background, a face). As you paint, the blurred content from the duplicated layer will be revealed, blending smoothly with the unblurred areas due to your soft-edged brush.
- You can easily refine the effect by switching your foreground color to black and painting over areas where you want to hide the blur, revealing the original sharp image. This non-destructive approach allows for precise control and easy adjustments, making it perfect for creating beautiful photography with nuanced depth.
Exploring the Blur Gallery for Specialized Effects
Photoshop’s Blur Gallery (found under Filter > Blur Gallery) provides a suite of advanced blur filters designed to simulate various photographic lens effects and add sophisticated depth. These tools are crucial for photographers seeking to emulate “in-camera” effects and designers looking for creative ideas to enhance visual storytelling.
Iris Blur: Highlighting Your Focal Point
Iris Blur is excellent for creating a shallow depth of field effect, drawing attention to a specific circular or elliptical area while blurring everything else. This is particularly useful for product photography, where the item needs to stand out, or for portraits.
- Go to Filter > Blur Gallery > Iris Blur.
- A large blur preview circle with a central “pin” will appear on your image. The area inside the pin is sharp, and the blur increases as you move away from it.
- Move the central pin (click and drag) to position your focal point over your subject.
- Adjust the blur area:
- Drag the outer circle to change the overall size and shape of the blurred region.
- Drag the four small dots within the outer circle to extend or contract the blur transition zone.
- Adjust the blur transition: Drag the four larger white dots that define the blur transition region. Moving them closer to the focal point makes the transition sharper; moving them further out makes it smoother.
- Control the degree of blur using the blur dial around the central pin (click and drag circularly) or the “Blur” slider in the Blur Options panel on the right.
- Click “OK” at the top of the Blur Gallery window when you’re done. Iris Blur helps create stunning focus points, making your beautiful photography truly pop.
Field Blur: Crafting Complex Depth Effects
Field Blur allows for highly customizable gradient blurring, simulating depth of field by defining multiple blur points with varying amounts of blur across your image. This tool is a step up from Iris Blur when you need more intricate control over depth.
- Go to Filter > Blur Gallery > Field Blur.
- A pin will appear on your image with a blur dial. This pin defines a specific point of blur.
- Click to add multiple pins across your image. Each pin can have its own blur amount, controlled by its individual dial.
- Drag the blur dial around each pin to increase or decrease the blur at that specific point. Photoshop intelligently interpolates the blur between these pins, creating a gradual, realistic depth effect.
- You can move pins, delete pins (by selecting them and pressing Delete), and adjust their blur strength independently.
- Click “OK” to apply the effect. Field Blur is excellent for mimicking complex focal planes in digital photography.
Tilt-Shift: Creating Miniature Landscapes and Selective Bands
The Tilt-Shift blur simulates the effect achieved with a specialized tilt-shift lens, creating a narrow band of sharpness that gradually blurs linearly above and below, often resulting in a “miniature” effect when applied to landscape photography.
- Go to Filter > Blur Gallery > Tilt-Shift.
- You’ll see a central sharp zone with lines extending outwards.
- Move the central pin to position the sharp area.
- Adjust the lines:
- The solid lines define the boundaries of the sharp zone.
- The dashed lines define where the blur effect reaches its full intensity.
- Drag the lines to adjust the size of the sharp and transition zones.
- Rotate the entire effect by dragging the curved arrow handle.
- Adjust the blur amount using the dial around the central pin or the “Blur” slider in the Blur Options panel.
- Click “OK”. This filter is fantastic for creative ideas, transforming ordinary scenes into captivating miniature worlds.
Motion Blur and Radial Blur: Injecting Dynamic Movement
These two blur filters from the main “Blur” menu, rather than the “Blur Gallery,” are excellent for conveying speed, movement, and dynamism, adding an energetic element to your visual design and photo manipulation projects.
- Motion Blur (Filter > Blur > Motion Blur…): Simulates the effect of an object or camera moving during exposure. You can adjust the
Angleto define the direction of movement (from -360 to +360 degrees) and theDistance(from 1 to 999 pixels) to control the intensity of the blur. It’s perfect for conveying speed in sports photography or creating abstract streaks. - Radial Blur (Filter > Blur > Radial Blur…): This filter creates a blur that radiates outward from or spins around a central point.
- Spin: Simulates rotation, creating concentric circular blur lines. You can adjust the
Amountof blur and choose theBlur Method(Spin). - Zoom: Simulates zooming in or out, creating blur lines that converge towards the center. You can adjust the
Amountand selectBlur Method(Zoom). - Both methods allow you to reposition the
Blur Centerby clicking and dragging within the preview box. This is useful for creating dynamic visual effects or emphasizing a central subject with surrounding motion.
- Spin: Simulates rotation, creating concentric circular blur lines. You can adjust the
Advanced Blur Applications and Non-Destructive Workflow
Beyond applying individual blur filters, true mastery of blurring in Photoshop involves understanding advanced techniques that ensure flexibility, realism, and a non-destructive workflow. These concepts are key for users of Tophinhanhdep.com seeking to push their photography and visual design to professional levels.
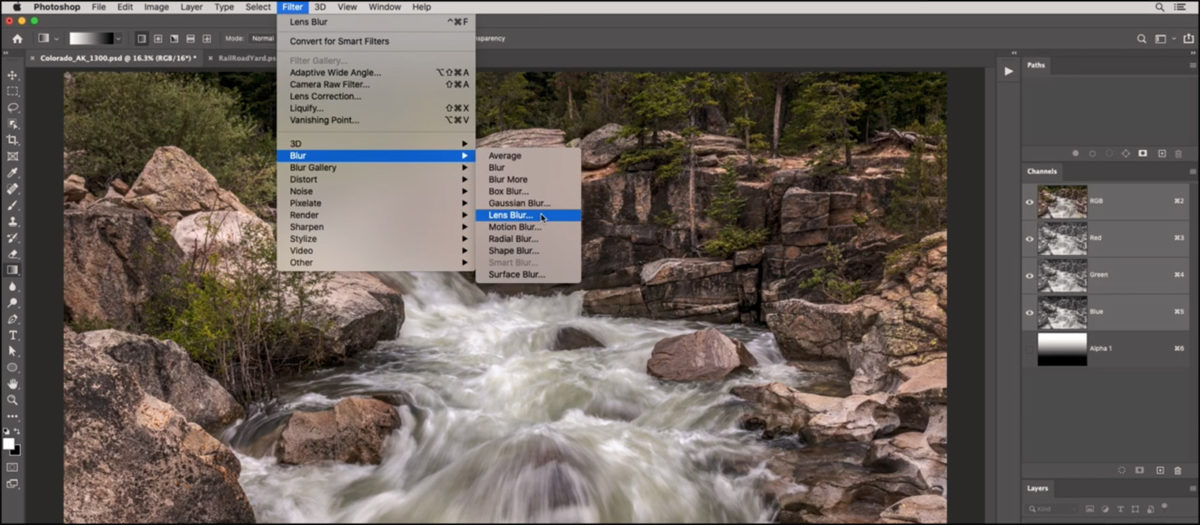
Leveraging the Lens Blur Filter for Realistic Depth
The Lens Blur filter (Filter > Blur > Lens Blur…) is a powerful tool designed to realistically simulate the depth-of-field effect of a camera lens, often more accurately than Gaussian Blur for complex scenes. What makes Lens Blur particularly potent is its ability to interpret depth information from an image, allowing for sophisticated selective blurring that mimics how light passes through a physical lens.
- To achieve the most realistic results, it often works best in conjunction with alpha channels. An alpha channel can act as a depth map, where lighter areas indicate elements closer to the camera and darker areas represent elements further away.
- You can create an alpha channel by making a selection of your subject and filling it with white, then inverting the selection and filling the background with black (or a gradient of grays for more nuanced depth).
- Once your alpha channel is ready (saved in the Channels panel), go to Filter > Blur > Lens Blur…
- In the dialog box, under “Depth Map,” select your newly created alpha channel from the “Source” dropdown.
- Adjust parameters such as
Blur Focal Distance(which controls where the sharpest point is based on your depth map),Radius(blur strength),Blade Curvature(simulates aperture shape for bokeh effects), andSpecular Highlights(to make bright out-of-focus areas glow). This method, though more involved, provides unparalleled control for adding selective blurring that truly simulates an “in-camera” lens blur after the fact, a technique highly valued in digital photography and photo manipulation. Tophinhanhdep.com encourages experimentation with alpha channels for truly bespoke depth effects.
Smart Filters and Restoring Natural Noise for Professional Results
Maintaining editing flexibility and realism are paramount in professional image editing. Photoshop’s Smart Filters and noise management tools provide solutions.
Working with Smart Objects
To ensure any blur effect remains editable and non-destructive, always apply it as a Smart Filter.
- Before applying any blur filter, right-click on your image layer in the Layers panel and choose “Convert to Smart Object”.
- Now, apply your chosen blur filter (e.g., from Filter > Blur or Filter > Blur Gallery). The blur will appear as a “Smart Filter” underneath your Smart Object layer in the Layers panel.
- To adjust the blur settings later, simply double-click on the Smart Filter name (e.g., “Gaussian Blur”) in the Layers panel. The filter’s dialog box will reopen, allowing you to tweak settings without reapplying the blur from scratch. This workflow is incredibly efficient for creative ideas and iterative visual design.
Reintroducing Natural Noise
When an image is blurred, especially a background or a large area, it can sometimes lose its natural texture and appear too smooth or “plastic,” contrasting unnaturally with the unblurred elements. This is because the blur removes the inherent photographic noise or grain. To restore realism, especially for high-resolution photography:
- After applying a blur using the Blur Gallery filters (Iris, Field, Tilt-Shift, Spin), navigate to the “Noise” tab within the Blur Gallery panel on the right.
- Check the “Noise” checkbox.
- You can then choose a
Noise Type(Uniform, Gaussian, or Grain, with “Grain” often providing the most natural look). - Adjust the
Amountto match the noise in your unblurred areas, ensuring a consistent texture. You can also fine-tuneSize,Roughness(for Grain),Color(for monochrome vs. colored noise), andHighlight(to reduce noise in bright areas). - If you’re using other blur filters (like Gaussian Blur) not from the Blur Gallery, you can add noise manually afterward by going to Filter > Noise > Add Noise… and adjusting the
Amount,Distribution, andMonochromaticsettings. This step is critical for maintaining the authenticity of your images, ensuring that your blurred sections blend seamlessly with the rest of your beautiful photography and don’t detract from the overall quality.
Strategic Use of Layer Masks and Alpha Channels
As demonstrated with the advanced Gaussian Blur method and the Lens Blur filter, layer masks and alpha channels are indispensable for precision. Layer masks offer pixel-level control over where a blur effect is applied, allowing for gradual transitions and intricate selections that would be impossible with simple selection tools. Alpha channels, functioning as grayscale depth maps, provide an even more sophisticated way to dictate blur intensity based on perceived distance, empowering advanced photo manipulation techniques. Mastering these tools means achieving a level of nuance and realism that sets your visual design apart.
Integrating Blur with Other Tophinhanhdep.com Features
The power of blurring extends far beyond isolated effects; it integrates seamlessly with many of the other creative tools and resources available on Tophinhanhdep.com.
- For Image Tools: Once you’ve achieved your perfect blur, you might use our compressors or optimizers to prepare the image for web use or ensure it meets specific file size requirements. For larger prints, AI upscalers can ensure your blurred backgrounds retain their quality, even when magnified.
- For Visual Design: Blurring is fundamental in graphic design. A blurred background behind crisp text improves readability, a technique often seen in banner ads or social media graphics, aligning perfectly with ‘Image-to-Text’ tools.
- For Image Inspiration & Collections: Blurring can enhance ‘Mood Boards’ by drawing attention to key elements or setting a particular aesthetic tone. Exploring ‘Trending Styles’ often reveals new and creative ways blur is being used in contemporary photography and design, influencing new ‘Photo Ideas’.
Conclusion
The ability to blur an image in Photoshop is a cornerstone skill for anyone engaged in digital photography and visual design. From the quick and versatile Gaussian Blur for general softening and selective focus to the advanced, depth-simulating powers of the Blur Gallery and Lens Blur, Photoshop provides an extensive toolkit to achieve virtually any blur effect imaginable.
By understanding how to effectively create focus, add depth, evoke artistic moods, or strategically conceal distractions, you unlock immense creative potential. Embracing non-destructive workflows through Smart Objects and paying attention to subtle details like noise restoration will elevate your images from good to truly professional.
Whether you’re crafting stunning aesthetic images, perfecting high-resolution stock photos, or generating creative ideas for your next visual design project, mastering blur is a journey of continuous discovery. Experiment with the different tools, combine techniques, and let your creativity soar. Visit Tophinhanhdep.com for more tips, image inspiration, and cutting-edge resources to continue refining your skills and producing captivating visuals that stand out.