Mastering Image Blurring in Photoshop: A Comprehensive Guide for Stunning Visuals

In the dynamic world of digital imagery, the ability to manipulate and enhance photographs is a cornerstone of creative expression and professional presentation. Among the myriad techniques available, blurring stands out as a fundamental yet incredibly versatile tool. It’s not merely about obscuring; it’s about guiding the viewer’s eye, creating depth, evoking mood, and even ensuring privacy. Whether you’re a budding enthusiast exploring Aesthetic visuals or a seasoned professional refining Beautiful Photography, understanding how to effectively blur an image in Photoshop is an invaluable skill.
On Tophinhanhdep.com, we celebrate the power of Images, from captivating Wallpapers and intricate Backgrounds to thought-provoking Digital Art and High Resolution Stock Photos. Our mission is to provide Image Inspiration & Collections, Photo Ideas, and Visual Design insights that empower your creative journey. Blurring, a key aspect of Photo Manipulation and Editing Styles, plays a significant role in achieving many of the Trending Styles you see today. This comprehensive guide will delve into the various methods of blurring in Photoshop, from simple adjustments to advanced techniques, equipping you with the knowledge to transform your Photography and bring your Creative Ideas to life.
The Art and Purpose of Blurring Images
Blurring an image in Photoshop is far more than a simple filter application; it’s a deliberate artistic choice with multiple practical and aesthetic applications. Understanding why and when to blur is just as important as knowing how.
Why Blur? Elevating Your Visuals with Purpose
The motivations behind applying a blur effect are diverse, ranging from enhancing visual appeal to addressing ethical concerns:
- Aesthetic Enhancement and Depth of Field: Perhaps the most common reason to blur is to create a sense of depth. By keeping your subject sharp and intentionally blurring the
Backgrounds, you mimic the shallow depth of field achieved with expensive lenses. This technique draws the viewer’s attention directly to the focal point, creating visually striking andAestheticcompositions. It’s a hallmark ofBeautiful Photography, especially in portraits and product shots. - Privacy and Confidentiality: In an increasingly visual and interconnected world, privacy is paramount. Blurring faces, license plates, sensitive documents, or proprietary logos is crucial for protecting identities and information. This is particularly relevant for
Photographyshared online, whereTophinhanhdep.comemphasizes ethical considerations and safe sharing practices. - Drawing Focus and Eliminating Distractions: A busy or cluttered background can detract from your main subject. Blurring allows you to “mute” these distracting elements, ensuring your subject takes center stage. This is a vital technique in
Visual DesignandGraphic Designto maintain clarity and impact. - Noise Reduction and Smoothing: Images captured in low light or with higher ISO settings often suffer from digital noise, appearing grainy. Applying a subtle blur can effectively smooth out these pixel values, reducing noise and improving the overall quality of
High Resolutionimages. - Creative Text Integration: When placing text over an image, a sharp, detailed background can make the text difficult to read. Applying a blur to the image, or a specific area beneath the text, creates a clean canvas that enhances text readability, making your
Creative IdeasinGraphic Designstand out. - Artistic Effects and Mood: Blurring can be used to create dreamlike, ethereal, or abstract effects, lending a unique mood to your images. It can also convey a sense of motion or speed, adding dynamism to
Digital Artpieces.
Understanding Different Blur Types in Photoshop
Photoshop offers a comprehensive suite of blurring filters, each designed for specific effects and scenarios. While the Gaussian Blur is a foundational and frequently used option, Tophinhanhdep.com encourages exploring the full Blur Gallery to unlock diverse Editing Styles:
- Gaussian Blur: Named after mathematician Carl Friedrich Gauss, this filter applies a smooth, even blur across a selection or entire image, simulating the effect of viewing an image through a translucent screen. It’s ideal for general softening, noise reduction, and creating basic depth.
- Iris Blur: Part of the Blur Gallery, Iris Blur allows you to define a specific area of focus (an iris shape) that remains sharp, while progressively blurring the surrounding areas. It’s perfect for creating a realistic shallow depth of field effect.
- Field Blur: Also in the Blur Gallery, Field Blur lets you place multiple “pins” on an image, each with its own blur amount. This enables highly customizable, gradient blur effects that simulate real-world lens distortion and varying depths.
- Lens Blur: This advanced filter aims to simulate the blur produced by a camera lens, allowing for more realistic
Bokeheffects, especially when combined with depth maps (alpha channels). - Motion Blur: Creates the illusion of movement in a specific direction.
- Radial Blur: Simulates zoom or spin motion effects.
- Tilt-Shift Blur: Mimics the effect of tilt-shift lenses, creating miniature-world or selective focus effects by defining a sharp band and blurring above and below it.
Each of these filters offers unique possibilities for Photo Manipulation and achieving specific Creative Ideas.
Foundational Blurring Techniques with Gaussian Blur
The Gaussian Blur is often the first stop for anyone looking to blur an image in Photoshop. Its simplicity and effectiveness make it an indispensable tool for various tasks, from subtly softening an entire image to selectively blurring specific elements.
Applying Gaussian Blur to an Entire Image
Blurring an entire image is the most straightforward application of the Gaussian Blur filter. This technique can be used to create soft, dreamlike effects, or to prepare an image as a subtle background for text or other graphic elements, aligning with principles of Visual Design.
Step-by-Step Guide:
- Open Your Image: Launch Photoshop CC and open the image you wish to modify by going to
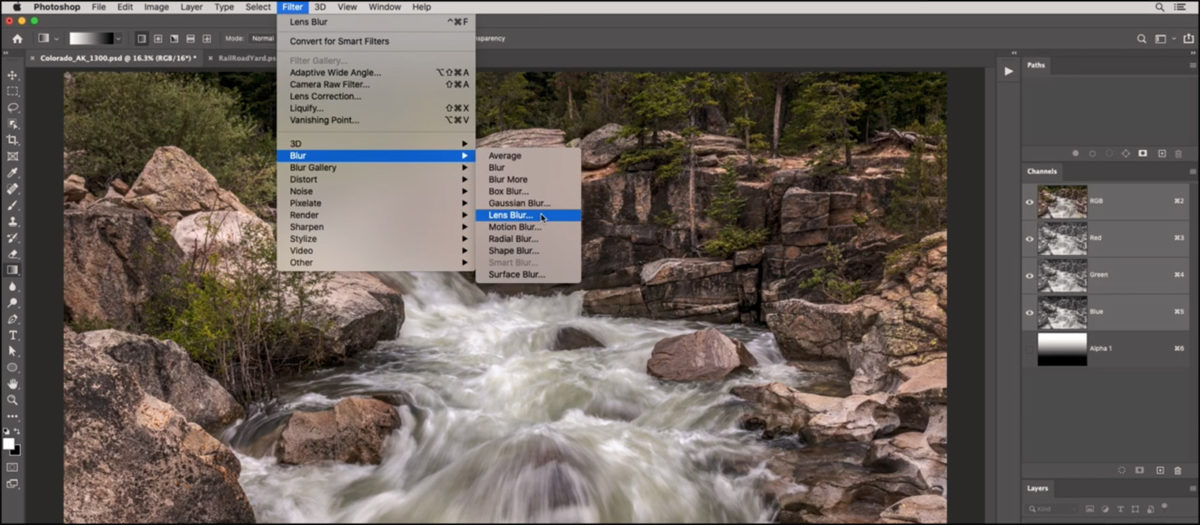
File > Open...and selecting your file. - Access Gaussian Blur: Navigate to
Filterin the top menu bar, thenBlur, and finally selectGaussian Blur.... - Adjust the Radius: A dialog box will appear with a slider for “Radius.” This slider controls the intensity of the blur. Dragging it to the right increases the blur, while dragging it to the left decreases it. You’ll see a live preview of the effect on your image.
- Confirm the Blur: Once you’re satisfied with the level of blur, click “OK.”
And just like that, your entire image is transformed with a smooth, even blur. This can be a great starting point for Abstract art or for creating subdued Backgrounds for overlays.
Selective Blurring for Faces, Backgrounds, and Objects (Easy Method)

While blurring an entire image has its uses, more often you’ll want to blur only specific areas, such as faces, distracting backgrounds, or sensitive text. This easy method utilizes Photoshop’s selection tools combined with Gaussian Blur to achieve focused blurring quickly.
Step-by-Step Guide:
- Open and Prepare Your Image: As before, open your image in Photoshop. For non-destructive editing, it’s always a good practice to duplicate your layer (right-click the layer in the Layers panel and choose
Duplicate Layer, or pressCtrl+J/Cmd+J). This ensures your original image remains untouched. - Select the Area to Blur: Choose an appropriate selection tool from the Toolbar.
- For faces or circular objects, the
Elliptical Marquee Tool(Mkey, then right-click for options) is ideal. - For irregular shapes, the
Lasso Tool(Lkey) orQuick Selection Tool(Wkey) can be effective. - Draw a selection around the specific area you want to blur (e.g., a face, a logo, or a section of the background).
- For faces or circular objects, the
- Apply Gaussian Blur to the Selection: With the area selected, go to
Filter > Blur > Gaussian Blur.... - Adjust Blur Radius: In the Gaussian Blur dialog box, adjust the “Radius” slider until you achieve the desired blur intensity for your selected area.
- Deselect the Area: Once you click “OK” to apply the blur, the selection outline will still be visible. To remove it, go to
Select > Deselect(or pressCtrl+D/Cmd+D).
This method is quick and effective for simple selective blurring. However, a common drawback is the creation of a hard, abrupt line between the blurred and unblurred sections, which can sometimes appear unprofessional or distracting. For a more refined look, advanced techniques are necessary.
Advanced Selective Blurring for Professional Results
For those seeking a more sophisticated and natural-looking blur, Photoshop offers advanced techniques that allow for seamless transitions and non-destructive editing. These methods are preferred in Digital Photography, Photo Manipulation, and Graphic Design where precision and flexibility are key.
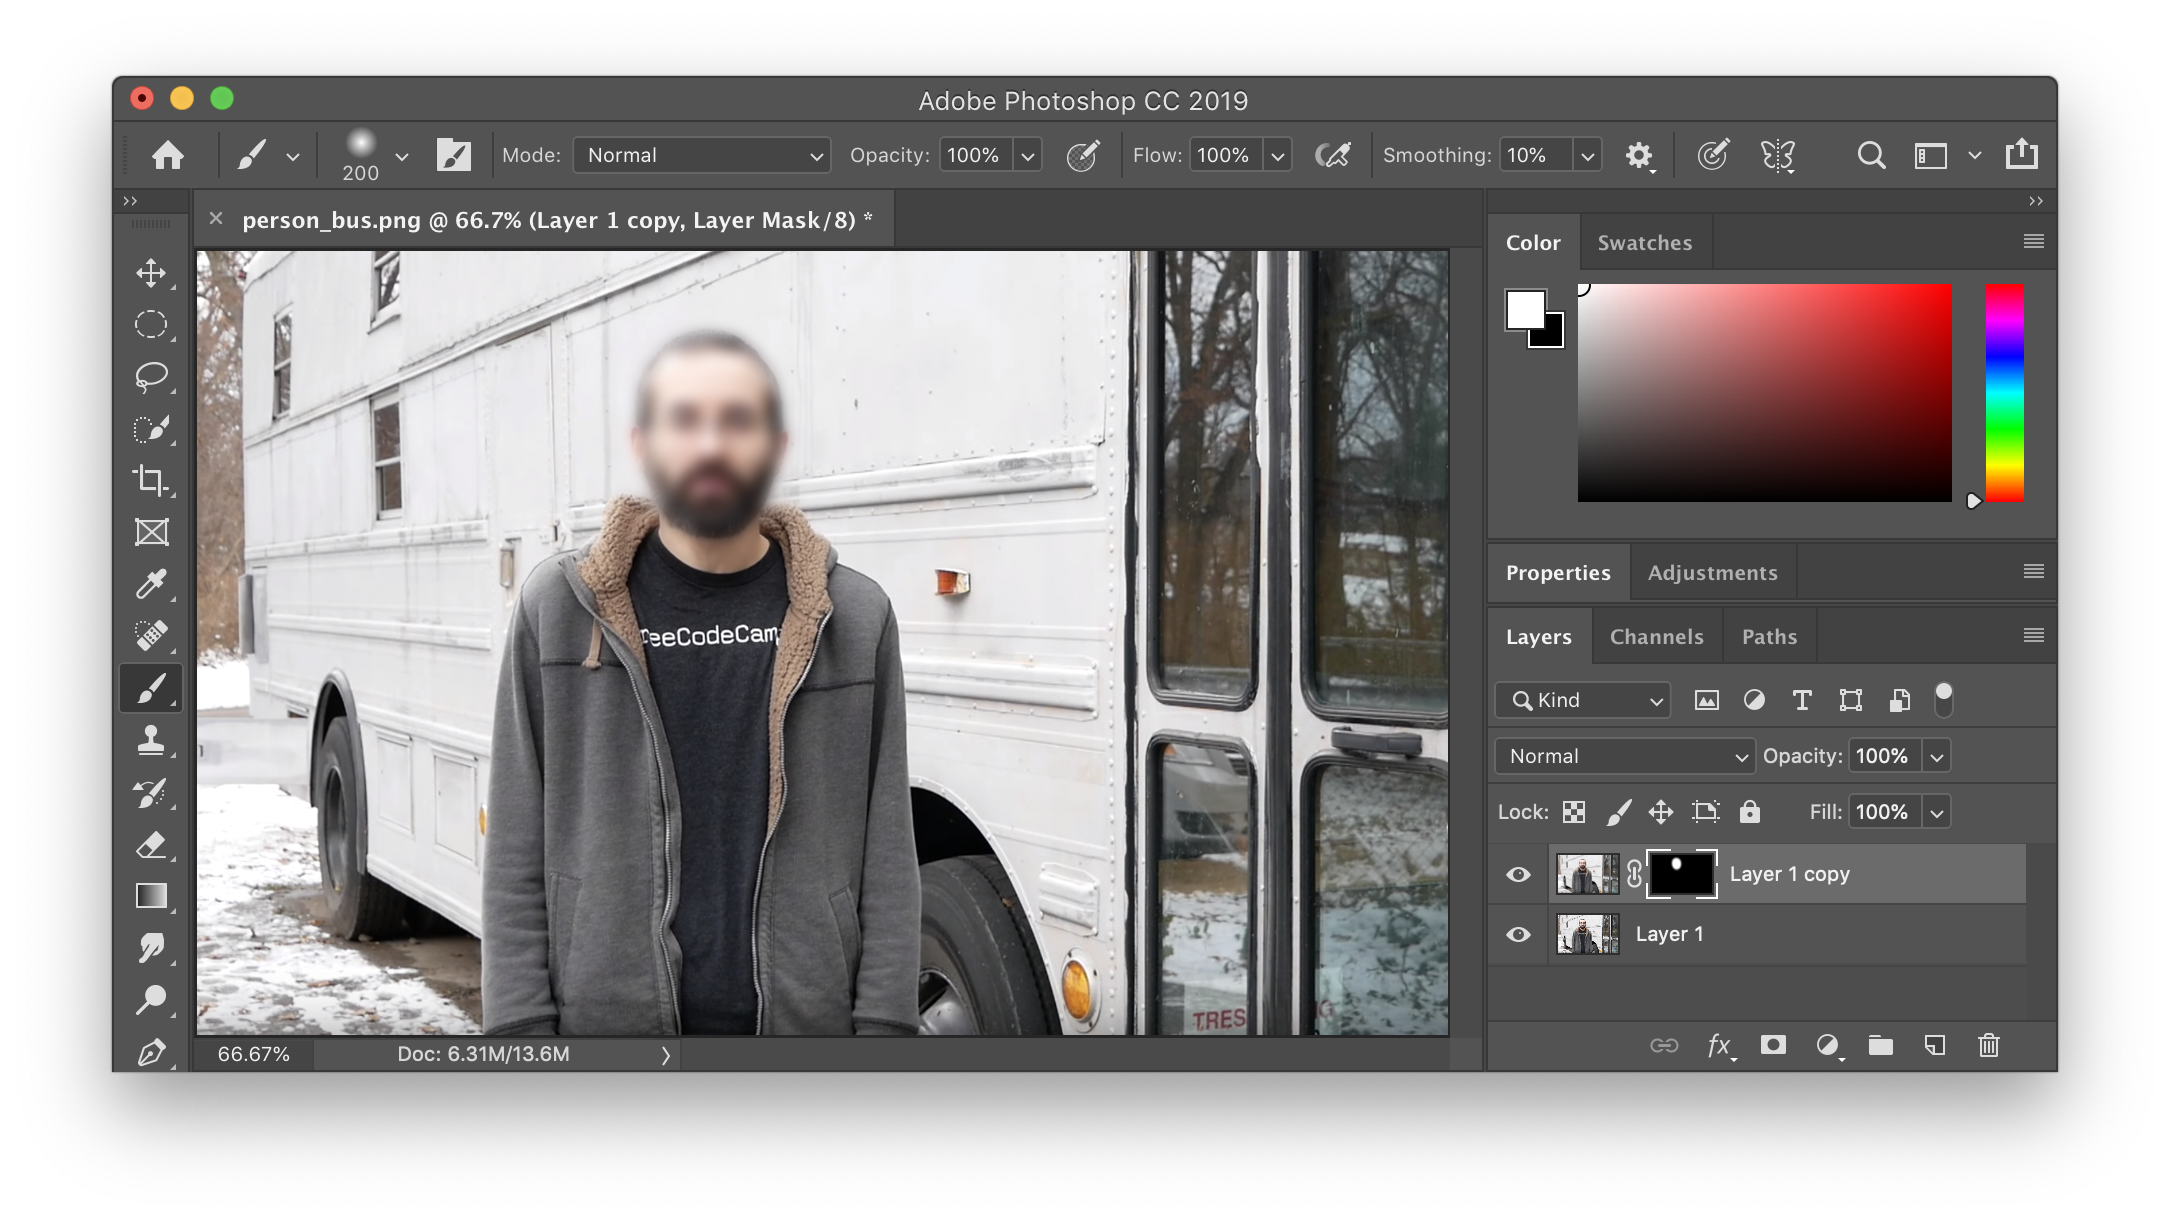
Achieving Seamless Blurs with Layer Masks and the Brush Tool
This advanced method is a cornerstone of professional image editing, allowing you to create smooth transitions between sharp and blurred areas. It’s particularly effective for softening backgrounds or subtly blurring elements like faces without harsh edges. The key is working non-destructively, meaning you can always adjust or revert your changes.
Step-by-Step Guide:
- Duplicate Your Layer: Open your image in Photoshop. Select the
Backgroundlayer in the Layers panel. Duplicate it by pressingCtrl+J(Windows) orCmd+J(Mac). This ensures your original image remains intact. For even more flexibility, convert this new layer to a Smart Object (Layer > Smart Objects > Convert to Smart Object) before blurring. - Apply Gaussian Blur to the Duplicated Layer: Ensure the duplicated layer (or Smart Object) is selected. Go to
Filter > Blur > Gaussian Blur.... Adjust the radius to your desired maximum blur intensity for the areas you want blurred, then click “OK.” At this point, your entire duplicated layer will be blurred. - Add a Concealing Layer Mask: While holding down
Alt(Windows) orOption(Mac), click the “Add Layer Mask” icon (a rectangle with a circle inside) at the bottom of the Layers panel. This will add a black layer mask to your blurred layer, effectively hiding the entire blurred layer and revealing the sharp original layer beneath it. You’ll see a black rectangle appear next to your blurred layer thumbnail. - Reveal the Blur with the Brush Tool:
- Select the
Brush Tool(Bkey) from the Toolbar. - Set your foreground color to white. (If it’s not white, press
Dto reset colors to default black and white, thenXto swap them). Painting with white on a black mask reveals the layer content. - Crucially, set the Hardness of your brush to
0%in the Options bar at the top. This creates a soft-edged brush, essential for smooth transitions. Adjust the brush size using the[and]keys. - Ensure the black layer mask thumbnail is selected in the Layers panel (click on it if it’s not highlighted).
- Now, “paint” over the areas of your image where you want the blur to appear (e.g., the background, specific faces). As you paint with white, the blurred content of your top layer will be revealed, blending seamlessly with the sharp areas.
- Select the
- Refine and Adjust:
- If you over-blur an area, simply switch your foreground color to black (
Xkey) and paint over it to conceal the blur again. - You can also adjust the
Opacityof your brush in the Options bar for a more gradual application of the blur effect. - If you used a Smart Object, you can double-click the
Gaussian Blurfilter below the layer to re-open the settings and adjust the blur amount non-destructively.
- If you over-blur an area, simply switch your foreground color to black (
This technique is incredibly powerful, offering precise control over where and how the blur is applied, resulting in polished Photo Manipulation and refined Editing Styles. It aligns perfectly with creating Aesthetic Backgrounds for Beautiful Photography.
Mastering Background Blur with the Blur Gallery (Iris & Field Blur)
While Gaussian Blur is versatile, Photoshop’s Blur Gallery offers specialized tools like Iris Blur and Field Blur that provide more nuanced control, particularly for simulating the natural Bokeh effects of a camera lens. These tools are fantastic for Digital Photography when you want to create sophisticated depth of field effects after the fact.
Iris Blur: Creating a Specific Focal Point
Iris Blur is ideal when you want to highlight a circular or elliptical focal point while progressively blurring everything around it. This is highly effective for product photography or portraits where a single subject needs to stand out.
Step-by-Step Guide:
- Open a Picture: Go to
File > Open...and select your image. - Activate the Blur Gallery: Navigate to
Filter > Blur Gallery, then chooseIris Blur. - Establish a Focal Point (Pin): You’ll see an overlay on your image: a large blur sample circle with a “pin” in the center. The area within the pin is sharp. Click and drag the central pin to position your focal point over your main subject.
- Adjust the Blur Area: The outer circle of the blur preview defines where the blur effect reaches 100%. The blur effect is applied to everything beyond this circle.
- Click and drag the line of the ellipse or the small dots on the outer ring to resize and reshape the blur area (e.g., to match an object’s contours).
- You can also rotate the ellipse by hovering near the edge until a curved double-ended arrow appears.
- Make Adjustments to the Blur Transition: Inside the outer blur circle are four larger white spots. These define the “transition region” where the blur gradually increases from 0% to 100%.
- Drag these white spots closer to the focal point for a slicker, more acute blur transition.
- Drag them further away for a softer, more gradual transition.
- Increase or Decrease the Degree of Blur:
- Around the central pin, you’ll find a
Blur Dial. Click and drag this dial clockwise to increase the blur intensity, or counter-clockwise to decrease it. - Alternatively, use the
Blurslider in theBlur Optionspanel on the right side of your workspace.
- Around the central pin, you’ll find a
- Apply the Blur: Once you’re satisfied with the effect, click “OK” at the top of the Blur Gallery screen (or press
Enter).
Field Blur: Customizing Depth with Multiple Pins
Field Blur takes the concept of localized blurring a step further, allowing you to place multiple pins across your image, each with its own blur intensity. This enables highly customizable depth maps and gradient blurs, creating a very realistic “in-camera” effect with less effort than manual depth map creation.
- To use Field Blur, go to
Filter > Blur Gallery > Field Blur. - Click anywhere on your image to drop a blur pin. Each pin has a blur dial.
- Add multiple pins, adjusting the blur dial for each, to define precise areas of sharpness and blur. This can simulate complex depth variations.
Lens Blur: Simulating Realistic Bokeh
For the most authentic simulation of lens-produced blur and Bokeh, the Lens Blur filter (Filter > Blur > Lens Blur) is powerful. It allows for advanced customization of the blur’s shape (based on aperture blades) and, critically, can use an alpha channel or a separate depth map to define depth, resulting in highly realistic Digital Photography effects. While more complex, Tophinhanhdep.com recognizes its value for achieving truly professional, in-camera quality blur.
Optimizing Your Blurring Workflow and Beyond
Effective blurring isn’t just about knowing the steps; it’s about integrating these techniques into a broader workflow for consistent, high-quality results. This includes adopting best practices and leveraging complementary tools.
Practical Tips for Effective Blurring
To ensure your blurring efforts enhance your Images and Visual Design without appearing artificial, consider these practical tips:
- Always Work Non-Destructively: As emphasized, duplicating layers or converting to Smart Objects before applying blur filters is crucial. This preserves your original image data and allows for unlimited adjustments.
- Precision in Selection: The quality of your selective blur heavily relies on accurate selections. Invest time in mastering tools like the
Pen Toolfor crisp edges,Quick Selection Toolfor speed, orSelect and Maskfor intricate subjects. - Experiment with Blur Types: Don’t limit yourself to Gaussian Blur. Explore
Iris,Field,Lens,Motion, andTilt-Shiftblurs in theBlur Galleryto discover the perfect effect for yourCreative Ideasand desiredEditing Styles. - Consider Image Resolution: When working with
High Resolutionimages, the radius settings for blur filters might need to be higher to achieve a noticeable effect compared to lower-resolution images. - Layer Opacity and Blending Modes: After applying a blur, experiment with the layer’s
OpacityandBlending Modesin the Layers panel. This can create subtle, integrated effects or unique artistic expressions. - Combine Techniques: Often, the best results come from combining multiple blurring methods. For instance, a base Gaussian Blur on a duplicated layer, followed by a layer mask and brush tool for refinement, can yield exceptional control.
- Reference Real-World Bokeh: When aiming for realistic background blur, observe how
Bokehappears inBeautiful Photographycaptured with expensive lenses. Note how blur increases with distance from the focal plane and how light sources render as soft circles.
Beyond Photoshop: Quick Blurring Solutions with Tophinhanhdep.com’s Image Tools
While Photoshop is an incredibly powerful and versatile tool for Photo Manipulation and Digital Art, its complexity and learning curve can be daunting for quick tasks or for users who don’t require its full suite of features. For users seeking rapid solutions for blurring, Tophinhanhdep.com offers a suite of online Image Tools designed for efficiency and ease of use.
Our platform understands that sometimes you need to blur a face for privacy reasons before sharing on social media, or quickly soften a background for an Aesthetic post without diving deep into complex software. Tophinhanhdep.com leverages advanced algorithms, including AI Upscalers and Optimizers, to provide simplified blurring functionalities. Instead of manual selections and layer masks, our intuitive tools can often detect common elements like faces or backgrounds automatically, allowing you to apply a clean, professional-looking blur with just a few clicks.
This quick-blurring capability is perfect for:
- Batch Processing: Efficiently blurring multiple faces or backgrounds across several
Imagesfor consistent privacy and aesthetic. - Social Media Ready Content: Quickly preparing
Beautiful Photographyfor sharing, ensuring focus points are clear and any sensitive information is obscured. - Beginners and Casual Users: Providing an accessible entry point to image editing without the steep learning curve of professional software.
By offering both in-depth tutorials for Photoshop and streamlined Image Tools on our platform, Tophinhanhdep.com aims to cater to every level of user, ensuring that whether you’re creating Digital Art or just optimizing a Stock Photo, you have the right resources at your fingertips.
Blurring is an indispensable technique in digital image editing, offering a vast spectrum of creative and practical applications. From enhancing the Aesthetic appeal of Beautiful Photography by creating depth and focus, to safeguarding privacy and streamlining Visual Design projects, mastering the various blurring methods in Photoshop is a valuable skill.
Tophinhanhdep.com is committed to being your go-to resource for Image Inspiration & Collections, Photography insights, and Image Tools that empower your Creative Ideas. We encourage you to experiment with Gaussian, Iris, Field, and Lens blurs, and explore how these filters can transform your Images. Remember, the best results often come from practice, experimentation, and a clear understanding of your artistic vision. Dive in, explore the possibilities, and elevate your visual content with the power of blur!