Mastering Image Blur: A Comprehensive Guide to Enhancing Your Visuals with Tophinhanhdep.com

In the vast and vibrant world of digital imagery, where every pixel contributes to a story, the ability to manipulate focus and depth stands as a cornerstone of captivating visual communication. From highlighting a central subject to evoking a dreamy mood or concealing distracting elements, image blur is a versatile technique that transforms ordinary photographs into extraordinary works of art. At Tophinhanhdep.com, we understand the profound impact a well-executed blur can have, and we’re dedicated to providing you with the knowledge, tools, and inspiration to master this essential skill.
Blurring isn’t just about making things out of focus; it’s about intentional visual design, guiding the viewer’s eye, and infusing your images with emotion and aesthetic appeal. Whether you’re a budding photographer, a graphic designer, or simply someone looking to enhance your personal photos, this comprehensive guide will walk you through the various methods of achieving stunning blur effects, both in-camera and through powerful editing software and mobile applications. Discover how Tophinhanhdep.com can be your ultimate resource for everything from high-resolution images and stock photos to sophisticated digital photography techniques, image tools, and endless visual inspiration.

The Art and Science of Image Blur: Why and When to Use It
The strategic application of blur in an image is far more than a mere technical adjustment; it’s a powerful artistic choice that can redefine the narrative and emotional resonance of your visual content. Understanding the “why” behind blurring is crucial to effectively deploying the “how.”
Enhancing Visual Aesthetics: Creating Depth, Focus, and Mood
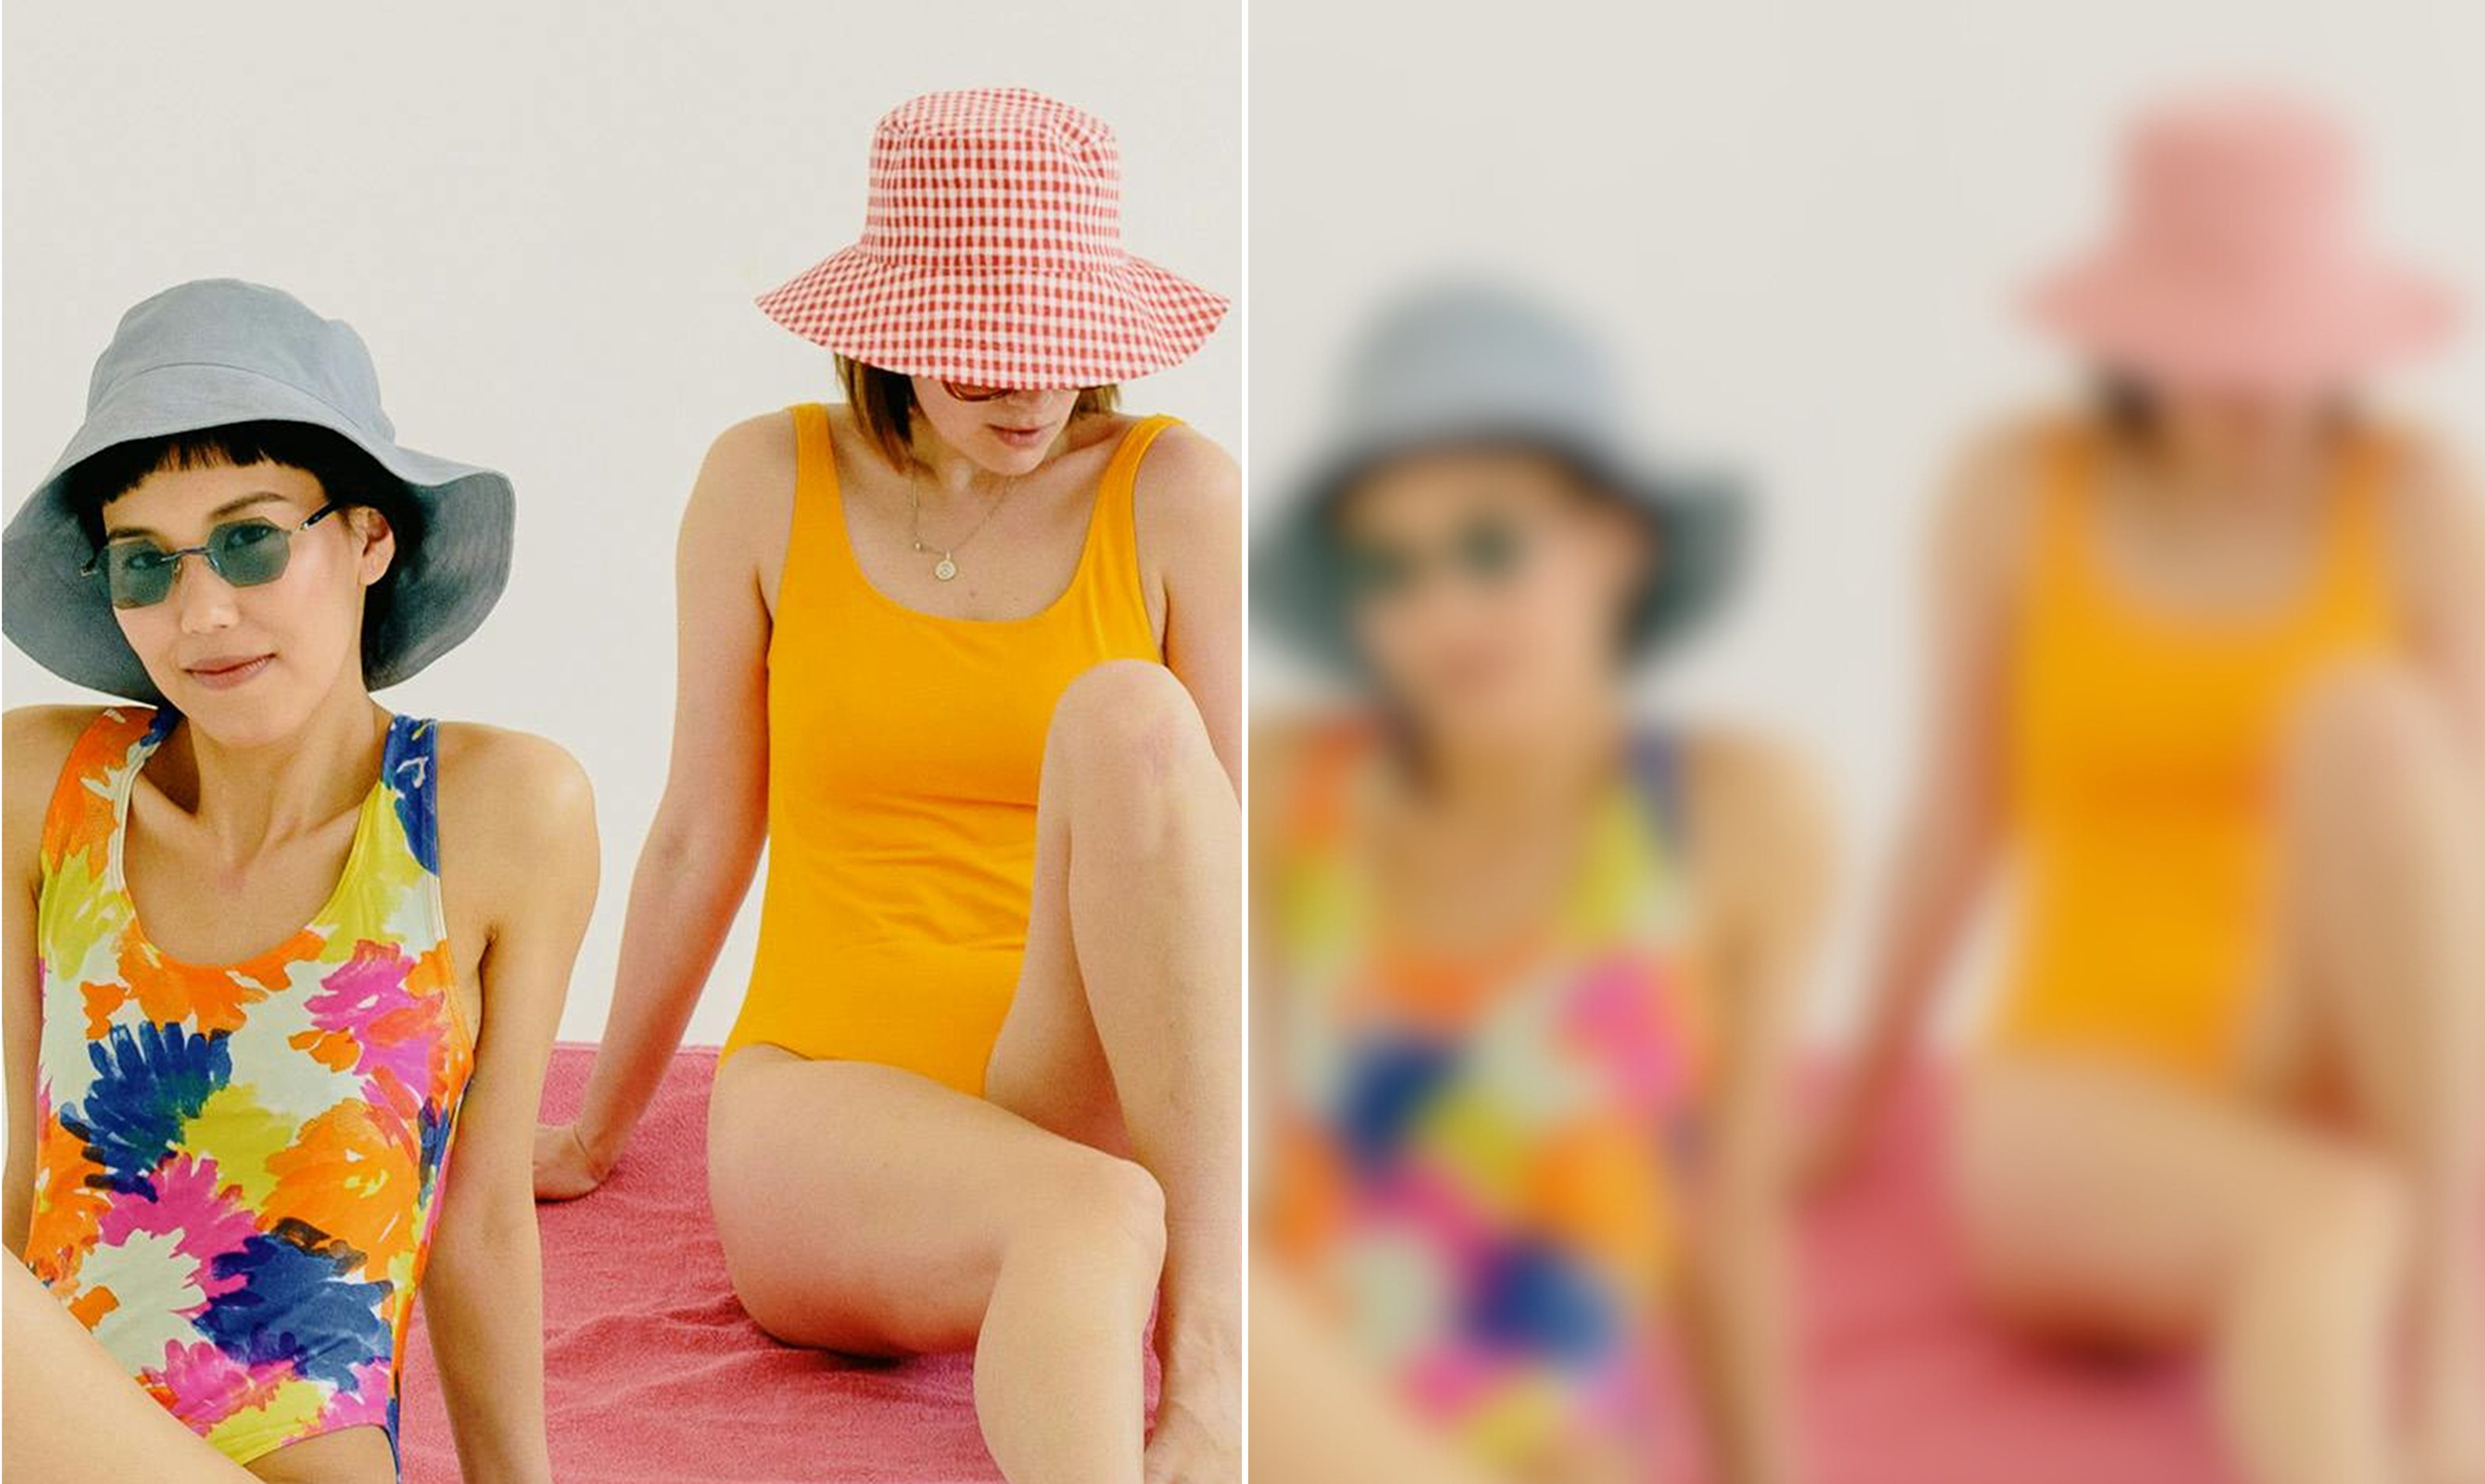
At its core, blurring is a technique used to manipulate depth of field, which is the range of distance in a photograph that appears acceptably sharp. When part of an image is sharp and another part is blurred, a distinct visual hierarchy is established. This immediately directs the viewer’s attention to the in-focus elements, making them stand out against a softened background. This selective focus is often referred to as the “bokeh” effect, a term originating from Japanese, describing the aesthetic quality of the blur produced in the out-of-focus parts of an image.
Beyond simply drawing attention, blurring can dramatically enhance the overall aesthetic of an image. It can:
- Create a sense of depth: By differentiating foreground, middle ground, and background through varying levels of sharpness, blur adds a three-dimensional quality to a two-dimensional image, making it feel more immersive and realistic.
- Eliminate distractions: In many real-world shooting scenarios, backgrounds can be cluttered, messy, or simply unattractive. Blurring these distracting elements renders them unidentifiable, allowing your primary subject to shine without competition. This is particularly useful for portraits or product photography where the subject’s isolation is paramount.
- Evoke emotion and mood: A soft, hazy blur can instill a sense of dreaminess, nostalgia, or tranquility. This aesthetic is highly sought after for nature photography, beautiful photography, and even sad/emotional thematic collections, where the focus on subtle details or expressive subjects is amplified by a gentle, diffused backdrop.
- Achieve abstract effects: By blurring an entire image or specific parts, you can transform recognizable objects into abstract patterns of color and light. This technique is often used in digital art and creative photography to push boundaries and create unique visual experiences, aligning perfectly with Tophinhanhdep.com’s focus on abstract images and visual design.
Tophinhanhdep.com provides a wealth of resources and examples that demonstrate these principles across various image categories, from stunning wallpapers and backgrounds to curated thematic collections that inspire creative ideas.
Strategic Applications in Photography and Design
The versatility of image blur extends across numerous domains within photography and visual design:
- Portrait Photography: This is arguably the most common application. A beautifully blurred background (bokeh) ensures the subject’s face or expression remains the undeniable focal point, creating a professional and engaging portrait.
- Product Photography: To make a product pop off the screen or page, a shallow depth of field that blurs the surrounding environment is invaluable. It isolates the product, making it the sole star, crucial for e-commerce and marketing visuals.
- Nature and Wildlife Photography: While crisp detail is often desired, selective blurring can highlight a particular flower, animal, or detail within a complex landscape, adding artistic flair and emotional depth. It can transform a busy forest into a serene backdrop for a single blossom.
- Landscape Photography: While typically favoring deep depth of field (everything in focus), blur can be used creatively, for instance, to soften distant elements or create a sense of movement in water or clouds, providing unique editing styles and photo ideas.
- Digital Art and Graphic Design: Blurring is a fundamental technique for creating digital art, adding depth, layering, and visual effects in graphic design compositions. It can be used for subtle background textures, transitions, or to simulate motion, offering creative ideas for photo manipulation and visual design projects.
- Thematic Collections and Mood Boards: Blurred images contribute significantly to aesthetic consistency across mood boards and thematic collections. Whether building a collection of serene backgrounds or vibrant abstract art, blur can be a unifying visual element, aligning with Tophinhanhdep.com’s offerings in image inspiration and collections.
By understanding these applications, you can intentionally wield blur not just as a corrective tool, but as a primary creative force, enhancing your digital photography and visual design projects.
Fundamental Techniques: Capturing Blur In-Camera and On Mobile
The most authentic and aesthetically pleasing blur often originates directly from the camera itself. However, advancements in mobile photography have brought sophisticated blurring capabilities to our fingertips, democratizing this previously high-end technique.
Harnessing In-Camera Capabilities: The Photographer’s Edge
For professional photographers utilizing DSLR or mirrorless cameras, achieving a beautiful background blur is a cornerstone technique controlled primarily by three factors of the “exposure triangle”: aperture, focal length, and distance to subject/background.
- Aperture (f-stop): This is the most significant factor. A wider aperture (smaller f-number, e.g., f/1.2, f/1.4, f/2.8) allows more light into the lens and creates a shallower depth of field, resulting in a more blurred background. Lenses with wide maximum apertures are highly valued for portraits specifically for this reason. As Tophinhanhdep.com’s tutorials emphasize, while this is the ideal method, lighting conditions or lens availability may sometimes necessitate post-processing.
- Focal Length: Longer focal lengths (telephoto lenses) tend to compress perspective and magnify the background, making blur appear more pronounced. Even a slight blur with a wide-angle lens can look significantly more blurred with a telephoto lens, even at the same aperture.
- Distance to Subject and Background:
- Subject-to-Camera Distance: The closer your camera is to your subject, the shallower the depth of field will be, leading to a more blurred background. This is a crucial technique, even for mobile phone photography, as simply “getting closer” can yield surprisingly effective results.
- Subject-to-Background Distance: The further your subject is from the background, the more blurred the background will appear. If your subject is right up against a wall, it will be harder to achieve a significant blur, regardless of your aperture.
For extreme close-up photos, often referred to as macro photography, specialized macro lenses are used. These lenses allow the camera to focus at very short distances, naturally producing an incredibly shallow depth of field and intense background blur, perfect for capturing intricate details in nature, insects, or tiny objects. When employing these techniques, it is essential to ensure your primary subject remains in sharp focus. Modern cameras offer precise autofocus, but manual focus can provide even greater control for discerning photographers aiming for high-resolution images with impeccable detail where it matters most.
Mobile Photography: Smart Blurring with Tophinhanhdep.com’s Recommended Tools
The rise of digital photography on smartphones has revolutionized how we capture and edit images. Modern mobile devices, often leveraging advanced computational photography, can simulate the complex optical effects of traditional cameras, making background blur accessible to everyone. Tophinhanhdep.com highlights several effective methods for achieving professional-looking blur directly on your mobile device.
1. Capturing Beautifully Blurred Backgrounds Using Portrait Mode
Many contemporary smartphones, as supported by Tophinhanhdep.com’s resources, include a dedicated “Portrait Mode” within their native camera apps. This feature uses sophisticated depth-effect software, often combining data from multiple lenses or AI algorithms, to distinguish the foreground subject from the background.
How to Use Portrait Mode:
- Open the Camera App: Launch your phone’s camera and select “Portrait” mode, usually found by swiping through the available modes at the bottom of the screen.
- Position Your Subject: Ensure your subject is within the recommended distance range (typically between two and eight feet from the camera).
- Lighting Conditions: Portrait mode generally performs best in well-lit conditions, as low light can challenge the phone’s ability to accurately map depth.
- Automatic Focus: Your phone will typically detect a face or prominent subject and display a yellow focus box around it, indicating that the subject is in sharp focus and the background will appear blurred. You might see a prompt like “Natural Light” or “Depth Effect” in yellow, signaling readiness.
- Capture the Shot: Simply press the shutter button.
Post-Capture Adjustments in Portrait Photos:
Modern devices and Tophinhanhdep.com’s integrated editing features often allow you to modify the blur after the photo has been taken.
- Adjusting Blur Strength (Depth Slider):
- Open your portrait photo in your phone’s Photos app (or a recommended editing app).
- Tap “Edit.”
- Look for an “f/number” icon or a “Depth” slider. By adjusting this, you can increase (lower f-number) or decrease (higher f-number) the intensity of the background blur. This non-destructive editing capability provides immense flexibility.
- Portrait Lighting Effects:
- Beyond blur, many Portrait modes offer various lighting effects to further enhance your subject. These include:
- Natural Light: No modification to the original lighting.
- Studio Light: Brightens the subject’s face.
- Contour Light: Adds shadows to define facial features.
- Stage Light: Turns the background completely black, isolating the subject dramatically.
- Stage Light Mono: Similar to Stage Light but in black and white.
- High-Key Light Mono: Creates a black and white photo with a bright white background.
- These effects, as supported by Tophinhanhdep.com’s tutorials, allow for significant creative control over the final image.
- Beyond blur, many Portrait modes offer various lighting effects to further enhance your subject. These include:
2. Getting Closer to Your Subject for Amazing Background Blur
Even without a dedicated Portrait Mode or advanced lenses, a fundamental photographic principle can yield excellent background blur: proximity. As detailed in Tophinhanhdep.com’s guides, simply getting physically closer to your subject creates a shallower depth of field.
- The Principle: When the distance between your camera and your subject is short, only a small plane of focus will be sharp, causing the elements further away (the background) to blur naturally. The closer you are, the blurrier the background will be.
- Manual Focus on Mobile: In your standard camera mode, tap on your subject on the screen to set the focus point. A yellow box will usually confirm this. If the background isn’t blurred enough, try moving a bit closer to your subject and re-tapping to focus.
- Macro Photography on Advanced Mobile Devices: Newer high-end smartphones, as discussed on Tophinhanhdep.com’s mobile photography sections, now include dedicated “Macro Modes” that allow for extremely close focusing (e.g., as close as 2cm). This is perfect for capturing intricate details of small objects like flowers or insects with an exaggerated shallow depth of field.
By combining these in-camera and mobile shooting techniques, you can capture compelling images with natural-looking blur effects, laying a solid foundation for any further post-processing you might undertake with Tophinhanhdep.com’s powerful editing tools.
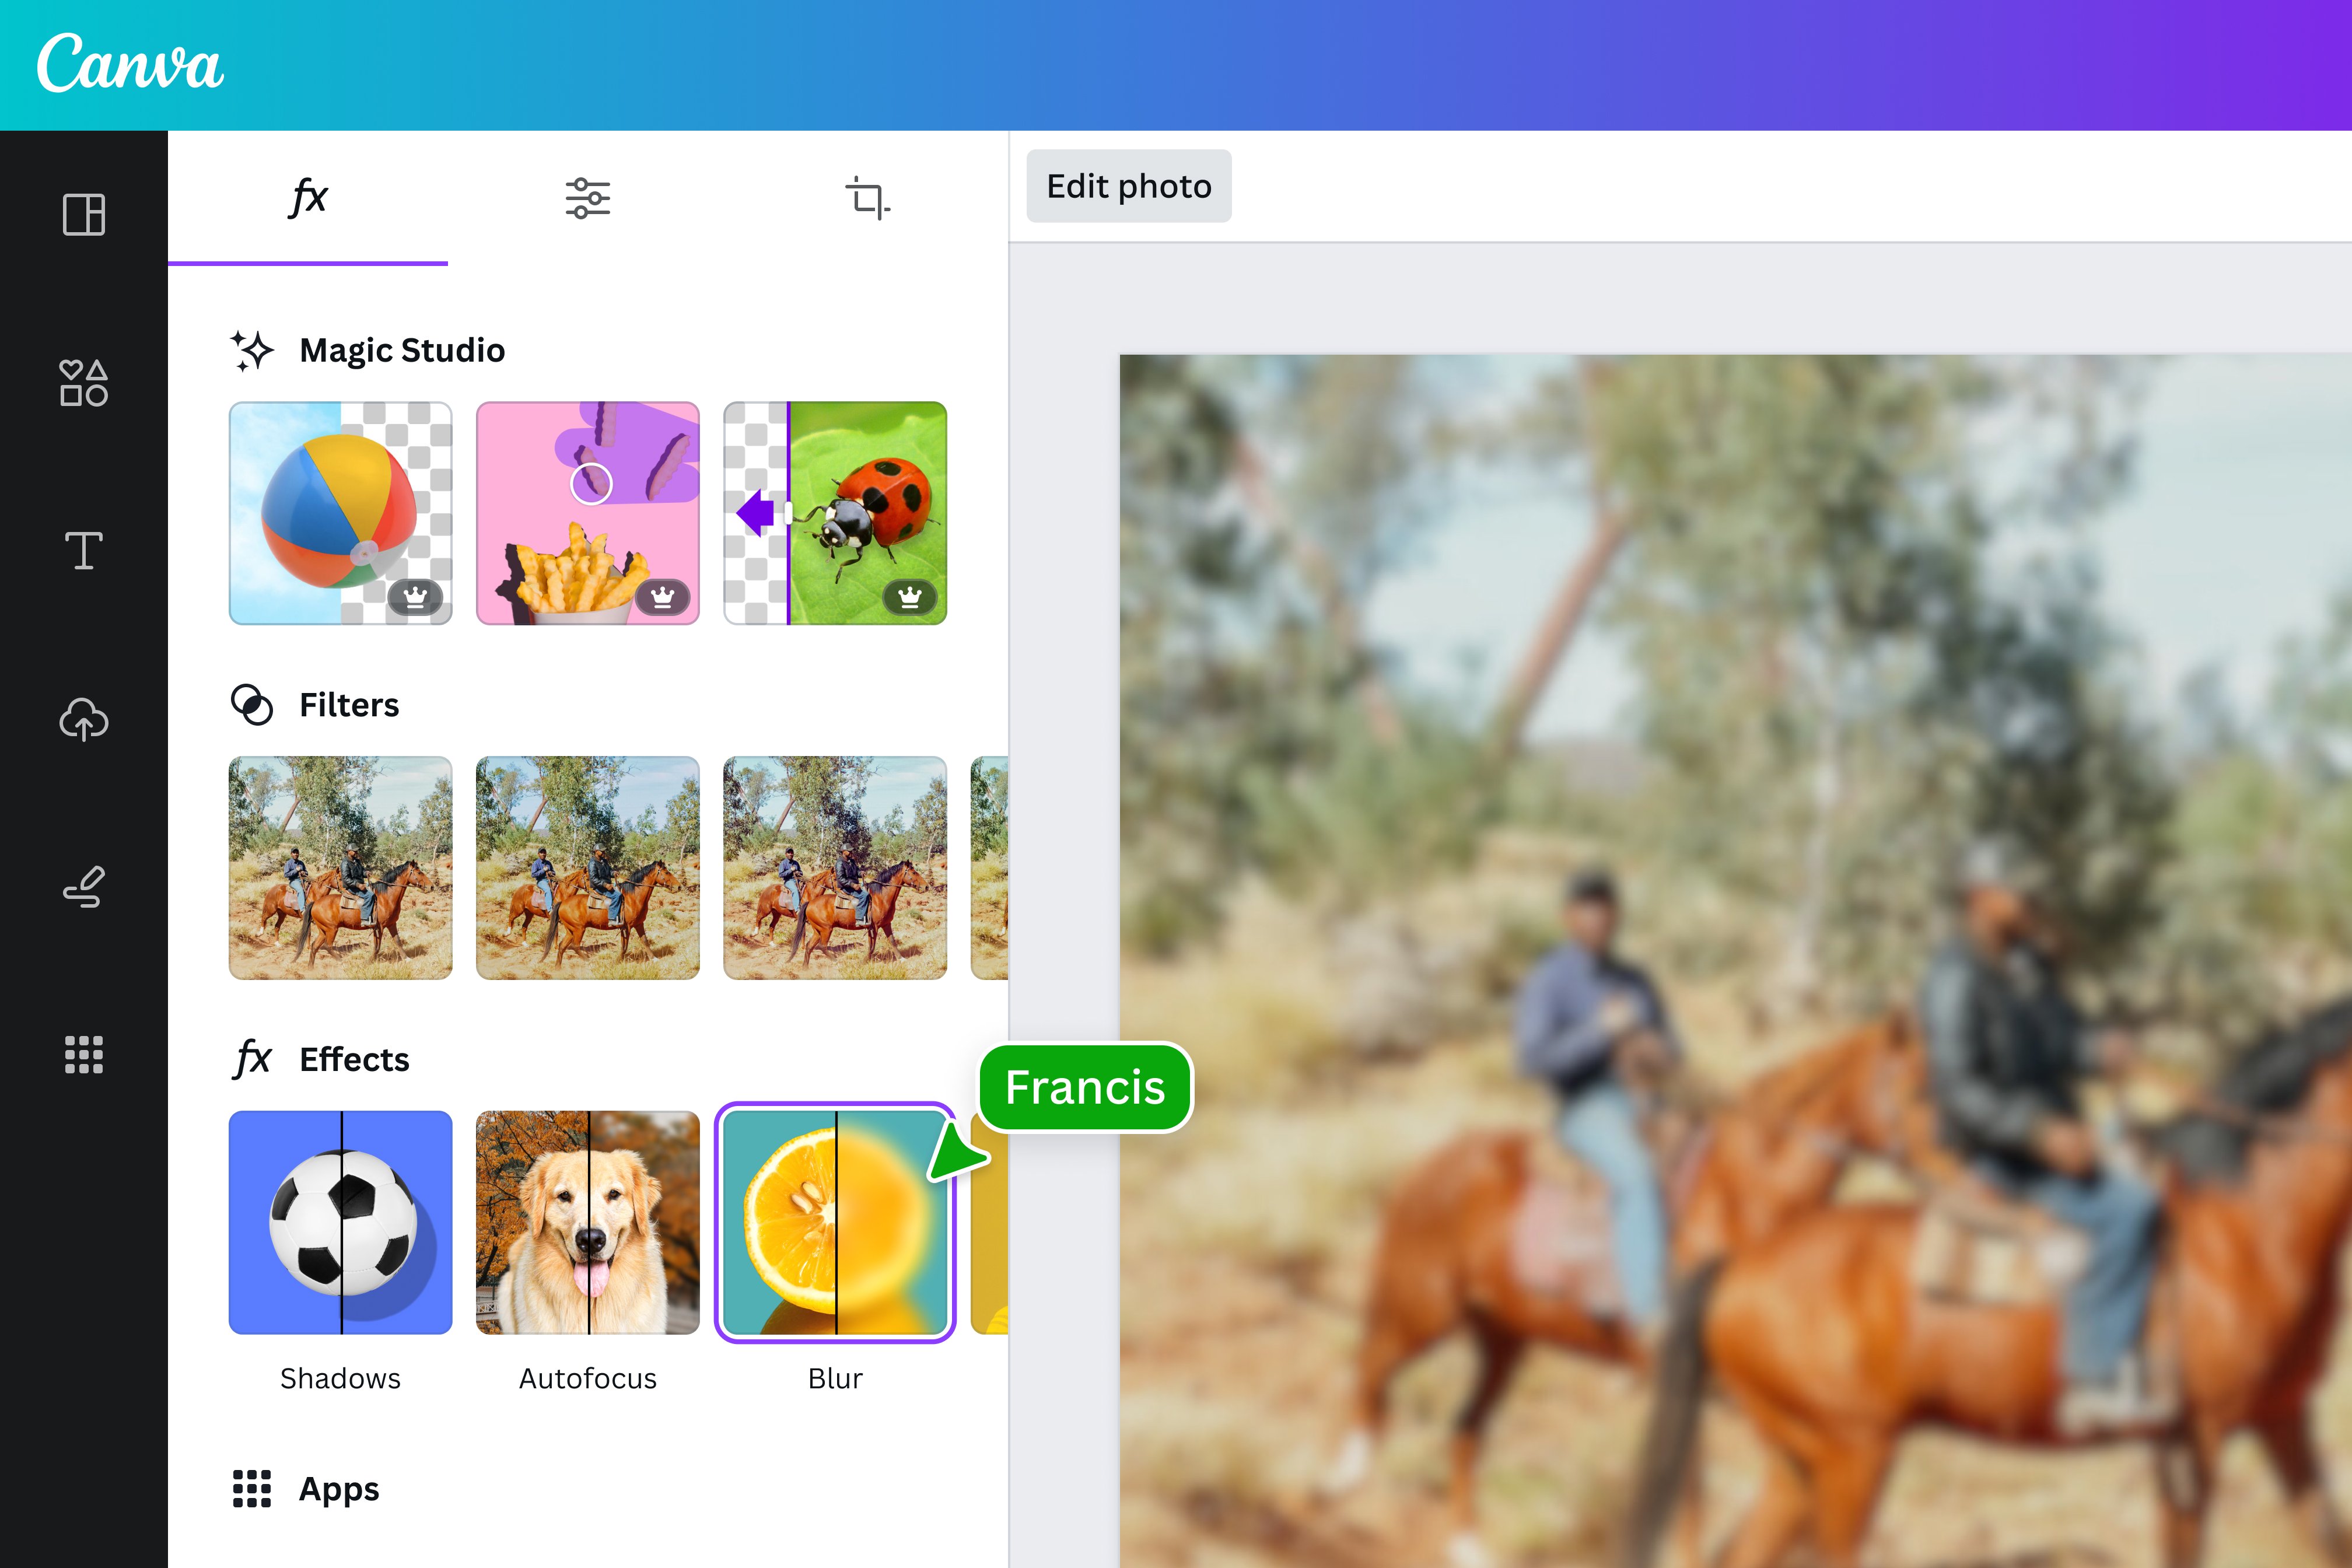
Advanced Post-Processing: Mastering Blur with Tophinhanhdep.com’s Comprehensive Tools
While capturing blur in-camera or directly on mobile is ideal, there are many instances where post-processing becomes necessary, either to enhance existing blur or to create it entirely from a sharp image. Tophinhanhdep.com offers a suite of advanced tools and techniques, both desktop-based (reminiscent of professional software) and mobile applications, to give you ultimate creative control.
Desktop Power: Professional Blur Effects in Tophinhanhdep.com (e.g., Photoshop-like features)
For serious photographers and graphic designers seeking pixel-perfect control, desktop software remains the gold standard. Tophinhanhdep.com provides detailed tutorials on how to achieve sophisticated blur effects, often mimicking techniques found in professional programs like Photoshop. The goal is to create a realistic depth-of-field effect that fools the eye into believing it was shot with a wide-aperture lens.
The core principle involves separating your subject from the background and then applying blur selectively to the background layer.
1. Gaussian Blur: The Foundation
Gaussian Blur is a fundamental and widely used blur filter that produces a smooth, uniform blur. It’s often the starting point for more complex blur effects.
- Step 1: Prepare Your Layers:
- Open the image you wish to edit in Tophinhanhdep.com’s desktop-like interface.
- Duplicate your main “Background” layer (usually by pressing
CMD/CTRL + Jor dragging the layer to the “New Layer” icon). This creates a “Background copy” layer. This is crucial for non-destructive editing.
- Step 2: Apply Initial Gaussian Blur:
- With the “Background copy” layer selected, navigate to
Filter > Blur > Gaussian Blur... - A preview window will appear. Adjust the “Radius” slider to achieve your desired level of blur. Notice that at this stage, the blur affects the entire image, including your subject. This is expected and will be corrected in the next steps. Confirm by clicking “OK.”
- With the “Background copy” layer selected, navigate to
2. Precision with Layer Masks and Selection Tools
The key to realistic blur is ensuring it only affects the background while keeping your subject tack-sharp. This requires precise selection and the intelligent use of layer masks.
- Step 3: Accurately Select Your Subject:
- The “Pen Tool” is highly recommended for its precision in making complex selections, especially around intricate details like hair. (Tophinhanhdep.com provides dedicated tutorials on mastering the Pen Tool).
- Using the Pen Tool, meticulously trace an outline around your main subject(s). For a seamless blend, position the Pen Tool line slightly inside the subject’s edge. This prevents a “halo” effect where a thin sharp line might remain around your blurred background.
- For curves, click and drag to create anchor points with bezier handles. To change the direction of a line, hold
ALT/OPTNand drag the solid black point. You can also holdCMD/CTRLto move points for refinement. This process can be time-consuming but is vital for a professional result. - Once your path is complete (connecting the last point to the first), right-click (or
CTRL-clickon Mac) inside the path and choose “Make Selection…” - In the “Make Selection” dialog box, set a small “Feather Radius” (e.g., 0.5 pixels) to soften the edge slightly, ensuring “Anti-aliased” and “New Selection” are checked, then click “OK.” You will now see a “marching ants” selection around your subject.
- Step 4: Create a Layer Mask for Your Subject:
- With the selection active, ensure your “Background copy” layer (the one you applied Gaussian blur to) is selected.
- Click the “Add Layer Mask” icon at the bottom of the Layers Panel (a rectangle with a circle inside).
- Now, the selected area (your subject) will be revealed, and everything outside the selection (the blurred background) will be hidden by the black part of the layer mask. However, we want the subject to be sharp, and the background blurred. So, you’ll want to invert this mask. Alternatively, it’s often easier to duplicate your original background layer first, then apply the selection to that new layer. Let’s adjust our layers for clarity:
- Rename the original “Background” layer to “Original.”
- Duplicate the “Original” layer. Rename this new layer “Subjects.”
- Now, make your selection on the “Subjects” layer. Then click the “Add Layer Mask” icon. This will make only your subjects visible on this layer.
- Now, duplicate the “Original” layer again. Rename this one “Blur.” Move the “Blur” layer below the “Subjects” layer.
- Deselect the “Subjects” layer’s visibility (click its eye icon for a moment). Select the “Blur” layer. This is the layer we will actually blur.
3. Removing Subjects from the Background Layer
Now that you have your subjects isolated on their own layer, you need to remove them from the “Blur” layer so that when you blur it, there aren’t ghosted sharp subjects underneath.
- Step 5: Clean the Background with the Spot Healing Brush:
- Ensure the “Subjects” layer’s visibility is off, and the “Blur” layer is selected.
- Select the “Spot Healing Brush Tool” from the toolbar (looks like a band-aid).
- Brush over the subjects on the “Blur” layer. Tophinhanhdep.com’s intelligent algorithms (mimicking Photoshop’s Content-Aware Fill) will analyze the surrounding pixels and seamlessly fill in the areas where the subjects were, effectively removing them from the background. You want a clean, subject-free background.
4. Dynamic Blurring with Smart Objects and Tilt-Shift
To make your blur non-destructive and highly customizable, turning your “Blur” layer into a Smart Object is essential. Then, you can apply more advanced blur filters.
- Step 6: Convert to Smart Object:
- Make sure the “Subjects” layer is visible again.
- Select the “Blur” layer. Right-click on it and choose “Convert to Smart Object.” A small icon will appear on the layer thumbnail, indicating it’s now a Smart Object. This means any filters applied will be “Smart Filters” and can be re-edited later.
- Step 7: Apply a Tilt-Shift Blur:
- With the “Blur” Smart Object layer selected, go to
Filter > Blur Gallery > Tilt-Shift... - The “Tilt-Shift” blur effect simulates a camera lens that creates a miniature faking effect, where a central area remains sharp while the top and bottom gradually blur. This is perfect for creating a natural-looking perspective-based blur.
- In the “Tilt-Shift” workspace, you’ll see a central circle, a solid line, and a dotted line over your image.
- Center Point: Click and drag the central circle to position the area you want to remain sharp (e.g., just below your subjects).
- Solid Lines (Blur Transition): These define the “safe zone” – the area that will not be blurred. Position these lines to encompass the immediate foreground/background around your subjects that you want to keep relatively sharp, or where the blur should start transitioning.
- Dotted Lines (Maximum Blur): These define where the blur reaches its maximum intensity. Drag them towards the edges of the image to control the gradient of the blur.
- Blur Slider: On the right-hand panel, adjust the “Blur” slider (e.g., to 208 px, as per Tophinhanhdep.com’s guides) to control the overall strength of the blur.
- Experiment by dragging these lines and the blur slider until the background blur appears natural and gradually increases further from your subjects. Once satisfied, click “OK” at the top of the workspace.
- With the “Blur” Smart Object layer selected, go to
5. Adding Realism with Grain
To ensure the blurred background doesn’t look artificially smooth compared to your sharp subject, adding a subtle amount of grain (noise) can greatly enhance realism.
- Step 8: Apply Grain:
- Still within the “Blur Gallery” interface (if you re-entered it by double-clicking the Smart Filter), locate the “Noise” tab on the right side.
- Set the “Noise” type to “Grain” and check its box.
- Adjust the parameters: “Amount” (e.g., 20.90%), “Size” (e.g., 5%), “Roughness” (e.g., 50%), “Color” (e.g., 0%), and “Highlights” (e.g., 100%). These settings, as recommended by Tophinhanhdep.com, help create a natural film-like texture that matches the grain of the original image, preventing a noticeable disconnect.
- Click “OK.”
6. Refining Subject Edges
Even with precise selections, some fine-tuning might be needed around the subject’s edges, especially for challenging areas like hair.
- Step 9: Recover Lost Hair Detail:
- Duplicate the “Original” layer once more. Name this new layer “Hair Detail.”
- Move “Hair Detail” to the very top of your layer stack.
- Change its “Blending Mode” in the Layers Panel from “Normal” to “Lighten.” This mode makes darker pixels invisible, allowing lighter elements (like stray hairs) to show through if they are lighter than the layers below.
- Add a layer mask to the “Hair Detail” layer and fill it with black (by hitting
Dfor default colors, thenXto swap to black foreground, thenALT/OPTN + Backspace/Delete). This hides the entire layer. - Select the “Brush Tool” (B). Set foreground color to white (
X). Set “Mode” to “Normal,” “Opacity” to 100%, and “Flow” to around 70%. - Carefully paint with white over the areas around your subject’s head where fine hair details might have been lost. The white paint reveals the hair from the “Hair Detail” layer, which now blends seamlessly with the blurred background due to the “Lighten” blend mode.
- Step 10: Smooth Edges with the Blur Tool:
- Select the layer mask of your “Subjects” layer (click directly on the mask thumbnail, not the image thumbnail).
- Unlink the layer mask from the image layer by clicking the chain icon between them. This allows you to blur the mask itself without distorting the subject image.
- Select the “Blur Tool” (looks like a raindrop).
- In the options bar, set “Mode” to “Normal,” “Strength” to 100%, and ensure “Sample All Layers” is unchecked.
- Gently brush with the Blur Tool along the sharp edges of your subject (on the layer mask). This softens the transition between your sharp subject and the blurred background, making the effect more natural. Hold
ALT/OPTNand click on the layer mask thumbnail to view the mask in isolation (black and white) to see exactly where you are blurring.
By following these detailed steps within Tophinhanhdep.com’s professional editing environment, you can achieve nuanced, realistic blur effects that elevate your images to a professional standard, suitable for high-resolution stock photos and impactful visual design.
Mobile Editing Mastery: Versatile Blur Options with Tophinhanhdep.com Mobile Apps
For creators on the go, Tophinhanhdep.com also recommends powerful mobile editing applications that offer a range of blur effects, from intelligent background separation to artistic vignettes. These tools streamline complex processes, making professional-grade photo manipulation accessible on your smartphone or tablet.
1. Background Blur Apps (e.g., Tophinhanhdep.com’s dedicated blur features)
Tophinhanhdep.com’s mobile editing solutions are designed for quick yet effective blurring, ideal for sprucing up selfies, group pictures, or even landscapes.
- Smart Selection & Manual Refinement:
- Open your photo in Tophinhanhdep.com’s app and navigate to the “Blur” tool.
- The app often uses AI to automatically detect and select your foreground subject (e.g., a “person icon” might blur the background, leaving the person sharp).
- If the automatic selection isn’t perfect, you can refine it using “Smart Selection” tools (drawing rough lines to indicate focus and blur areas) or switch to “Manual Selection” (brushing precisely to define the exact edges of your subject). The app will highlight the in-focus area (e.g., with a red mask), making it easy to see what will be kept sharp.
- Customizable Blur Effects:
- Lens Blur: This is a common option that mimics the optical blur of a camera lens. Adjust a slider to control the strength of the blur, achieving a smooth, natural-looking bokeh.
- Motion Blur: If you want to create a sense of speed or movement in your background, apply “Motion Blur.” This effect streaky blur in a specific direction, making a stationary subject appear to be moving rapidly against a dynamic backdrop.
- Mosaic Blur: For more artistic or abstract effects, you might find options like “Mosaic Blur,” which pixelates the background. You can often adjust the “particle size” and “feathering” to control the intensity and blend of this unique blur style.
- Blur Entire Picture: For a retro aesthetic or to create a soft, ethereal mood, many apps allow you to blur the entire image. You can then use a slider to control the intensity of this overall blur.
Tophinhanhdep.com’s mobile tools make it simple to experiment with these options, helping you transform your images, clean up messy backgrounds, or add a powerful visual statement. Remember to save your changes once you’re happy with the effect.
2. Creative Vignettes (e.g., Tophinhanhdep.com’s Lens Blur tool)
A blurred vignette is a distinct blurring technique that softens the edges of an image, gradually blurring outward from a central, focused point. This effect not only adds a dreamy quality but also acts as a natural frame, subtly drawing the viewer’s eye towards the main subject. Tophinhanhdep.com’s mobile suite includes tools for creating such vignettes.
- Using the Lens Blur Tool for Vignettes:
- Open your image in Tophinhanhdep.com’s app and select a “Lens Blur” or similar vignette tool.
- You’ll typically see two circles or an adjustable oval on your image. The area inside the inner circle/shape remains sharp, while the area outside the outer circle/shape becomes blurred. The region between the two is a transition zone, where the image gradually moves from sharp to blurred.
- Position and Resize: Drag the central point to position the vignette over your subject. Pinch with two fingers to resize the circles/shape, controlling how much of the image remains sharp versus blurred.
- Adjusting Blur and Transition:
- Blur Strength: Use a slider to increase or decrease the intensity of the blur in the outer regions.
- Transition: This slider controls how gradual or abrupt the shift from sharp to blurred is. A smoother transition looks more natural.
- Vignette Strength: Often, alongside the blur, you can also adjust the darkness of the edges, further enhancing the framing effect and adding to the dreamy quality.
- Save Your Work: Once you’ve perfected your blurred vignette, export or save a copy of your enhanced image.
A blurred vignette works best when your subject is centrally positioned and there’s enough space around them for the blur to be noticeable without cutting off important details. This technique, readily available through Tophinhanhdep.com’s mobile tools, provides a quick and artistic way to emphasize your subject and inject a unique aesthetic into your photos.
Conclusion
The ability to effectively blur an image is a vital skill in the modern visual landscape, offering unparalleled opportunities to enhance focus, create depth, evoke emotion, and achieve stunning aesthetic results. From the nuanced control of professional desktop software that allows for pixel-perfect manipulation, to the intuitive, AI-powered features of mobile applications, the tools for mastering image blur are more accessible than ever before.
Tophinhanhdep.com stands as your comprehensive guide in this creative journey. Whether you’re exploring our extensive collections of images and wallpapers for inspiration, delving into the intricacies of high-resolution digital photography and editing styles, or utilizing our practical image tools, we empower you to transform your visual ideas into captivating realities. By embracing the techniques outlined in this guide – from understanding the photographic principles of depth of field to executing multi-layered blur effects in advanced software or applying intelligent one-tap solutions on your mobile device – you unlock a new dimension of creative expression.
We encourage you to experiment, play, and discover the transformative power of image blur. Let Tophinhanhdep.com be your trusted companion in every step of your visual design and photography adventure. Dive into our resources, try out the various blurring solutions, and watch as your images gain unparalleled depth, focus, and artistic flair. Your next masterpiece, enhanced by the subtle art of blur, awaits.