Mastering Image Blurring in Photoshop: A Comprehensive Guide for Tophinhanhdep.com Users

Adobe Photoshop stands as an indispensable tool for anyone delving into the world of digital imagery, from professional photographers and graphic designers to casual enthusiasts looking to enhance their personal photos. For the vibrant community at Tophinhanhdep.com, a platform dedicated to high-quality images, photography resources, and visual design inspiration, understanding Photoshop’s blurring capabilities is paramount. Blurring isn’t just about obscuring; it’s a powerful artistic and technical technique used to guide the viewer’s eye, create depth, convey motion, and add a professional, polished finish to any image.
This comprehensive guide will explore various methods of blurring images in Photoshop, ranging from simple global blurs to sophisticated selective techniques that mimic expensive camera lenses. We’ll delve into how these effects can transform your wallpapers, backgrounds, aesthetic collections, nature shots, abstract art, and beautiful photography. Whether you’re looking to protect privacy, emphasize a subject, or inject dynamic energy into your visual creations, mastering these blur techniques will unlock a new realm of possibilities for your Tophinhanhdep.com contributions.
The Fundamental Blur: Gaussian Blur for Versatile Effects
Gaussian blur is often the first stop for many Photoshop users due to its simplicity and effectiveness. It’s a fundamental blur filter that averages pixels within a defined radius, creating a smooth, hazy effect. This makes it incredibly versatile for a wide range of applications, from softening harsh edges to creating entirely new backgrounds.
Blurring Entire Images with Gaussian Blur
The most straightforward application of Gaussian blur is to apply it to an entire image. This can be useful for creating abstract backgrounds, softening wallpapers that might otherwise distract from overlaying text, or achieving a dreamy, artistic effect across a whole scene.
To apply Gaussian blur to an entire image in Photoshop CC:
- Open your image in Photoshop.
- Navigate to Filter > Blur > Gaussian Blur…
- A dialog box will appear. Adjust the Radius slider to increase or decrease the intensity of the blur. A higher radius will result in a more pronounced blur.
- Click “OK” once you are satisfied with the effect.
This method offers an immediate transformation, allowing you to quickly convert a detailed photograph into a soft, atmospheric backdrop, perfect for Tophinhanhdep.com users curating “Abstract” or “Aesthetic” image collections where mood takes precedence over sharp detail.
Selective Blurring: Faces, Backgrounds, and Objects (Easy Method)
More often, you’ll want to blur only specific parts of an image while keeping other areas sharp. This is crucial for directing focus, protecting privacy (like blurring faces or sensitive text), or isolating a product against a softened background. The easy method for selective blurring provides a quick way to achieve this.
To selectively blur an area using the easy method:
- Open your image in Photoshop.
- Use one of Photoshop’s selection tools to select the area you wish to blur. Popular tools include:
- Elliptical Marquee Tool: Ideal for circular or oval selections, often used for faces.
- Lasso Tool: For freehand selections of irregular shapes.
- Quick Selection Tool / Object Selection Tool: Excellent for quickly selecting distinct objects or subjects with AI assistance.
- For example, if blurring a face, activate the Elliptical Marquee Tool and draw a circle around the face.
- With your selection active, go to Filter > Blur > Gaussian Blur…
- Adjust the Radius slider to achieve your desired blur intensity.
- Click “OK”.
- Finally, choose Select > Deselect (or press Ctrl+D / Cmd+D) to remove the selection outline.
This method is quick and effective for scenarios where a clear, defined boundary between the blurred and unblurred areas is acceptable. It’s particularly useful for “Sad/Emotional” images on Tophinhanhdep.com where a part of the scene might need to be subtly obscured to evoke a feeling, or for anonymizing individuals in “Beautiful Photography” shared publicly.
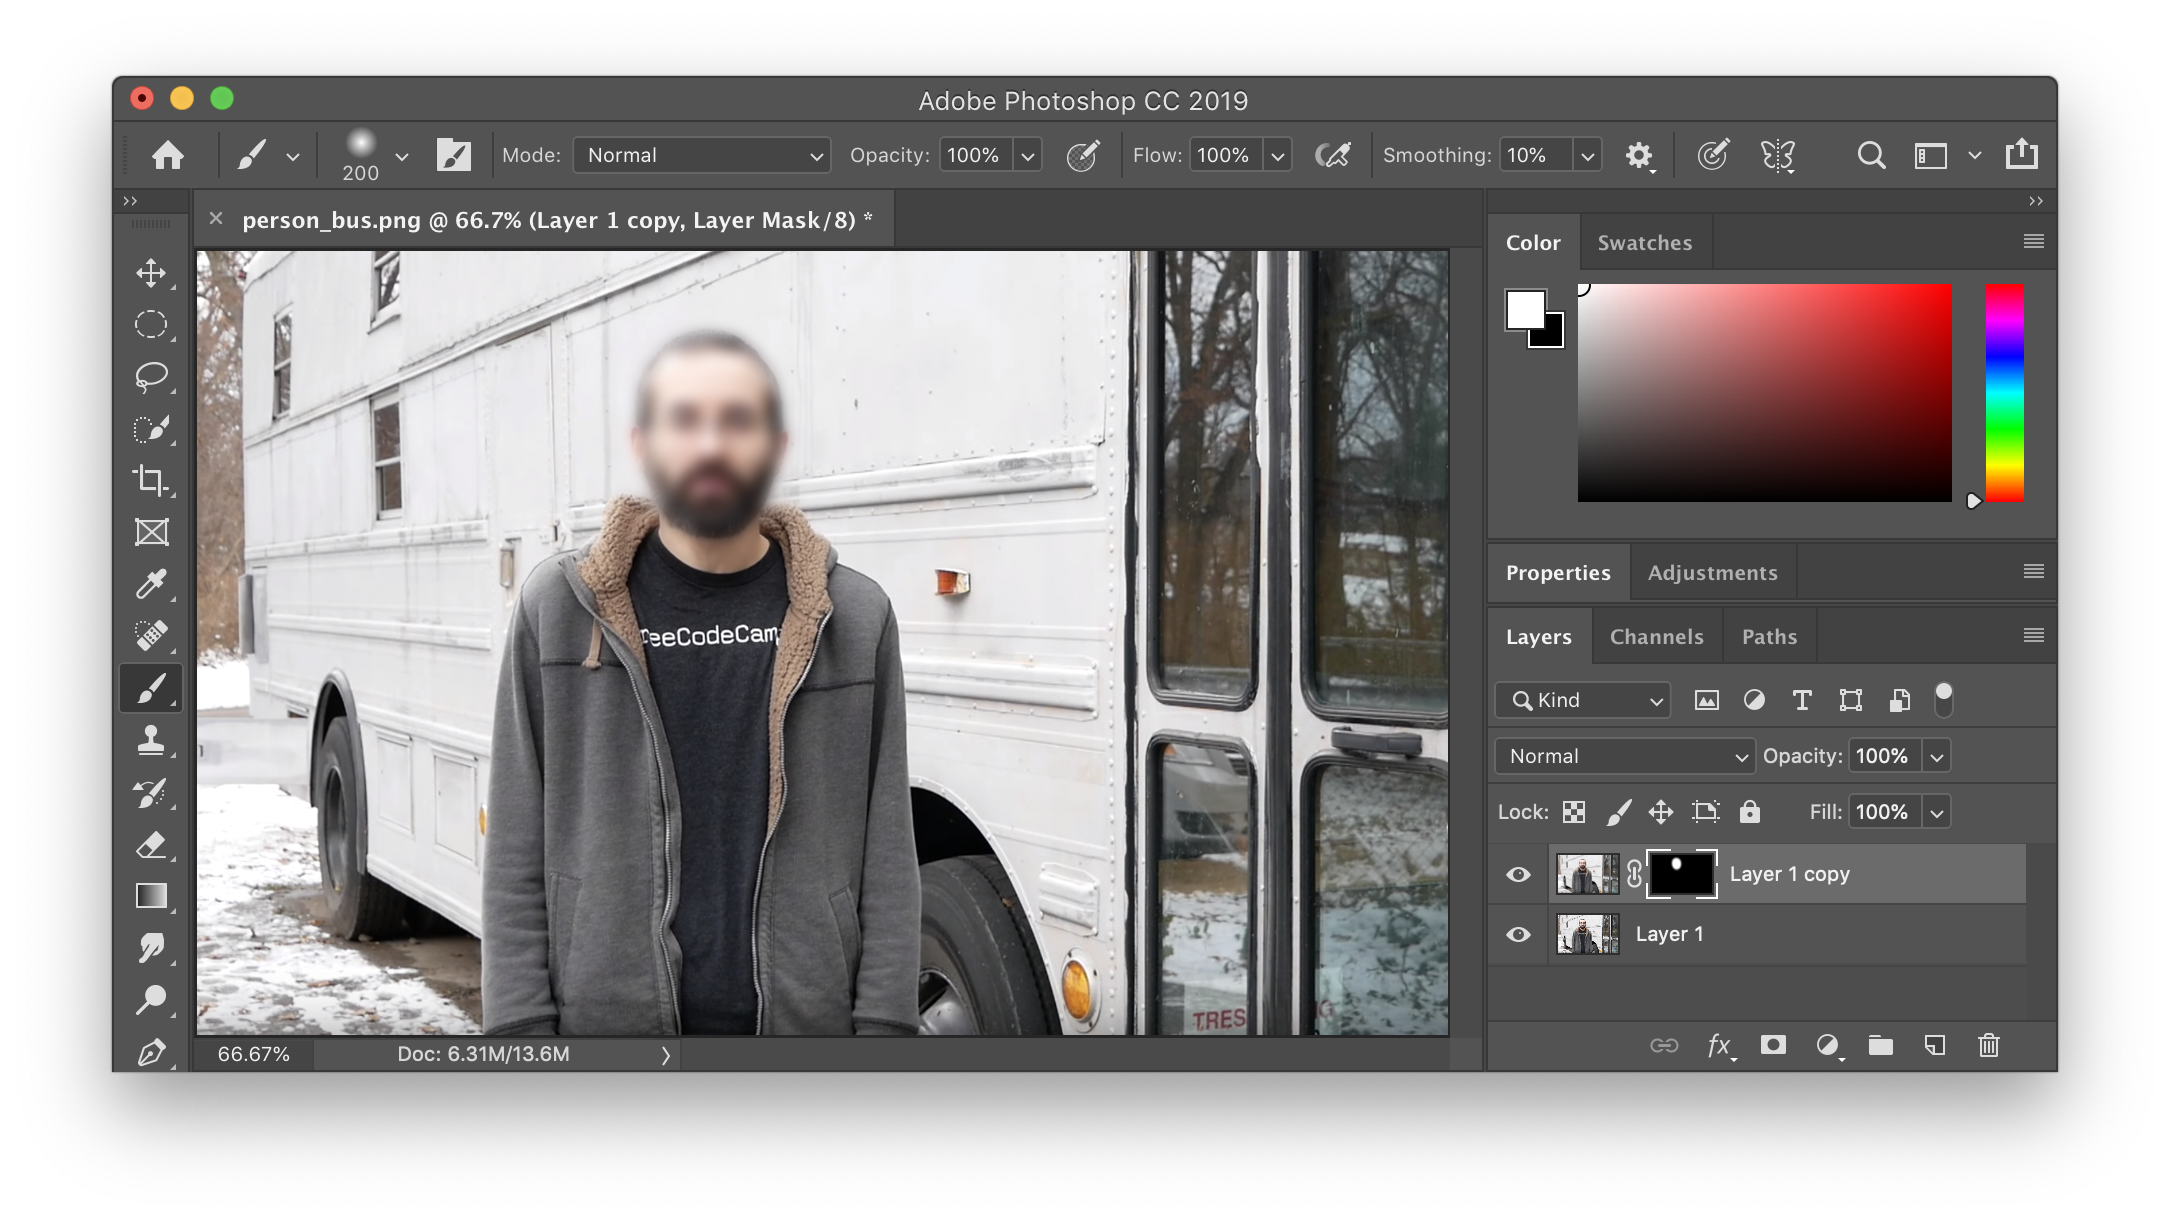
Achieving Seamless Transitions with Advanced Gaussian Blur
While the easy method is convenient, it can result in a hard line between the blurred and unblurred sections, which might not always be aesthetically pleasing. For a more professional, soft transition, the advanced method using layer masks is indispensable. This non-destructive approach also keeps the original unblurred image intact on a separate layer, offering flexibility for adjustments or reversions.
To create a soft transition blur:
- Open your image in Photoshop.
- Duplicate the background layer. Right-click on the layer in the Layers panel and select “Duplicate Layer…” (or press Ctrl+J / Cmd+J).
- With the duplicated layer selected, go to Filter > Blur > Gaussian Blur… and apply your desired radius. Click “OK”. At this point, your entire duplicated layer will be blurred.
- Add a layer mask to this blurred layer. Hold down Option (Mac) or Alt (Windows) and click the “Add vector mask” button (the rectangle with a circle inside) at the bottom of the Layers panel. This will create a black mask, completely concealing the blurred layer and revealing the original, sharp layer underneath.
- Select the Brush Tool (B). Ensure your foreground color is white and set the brush’s Hardness to 0% (for a soft edge).
- Paint with white over the areas you want to blur. As you paint, the blurred layer will be gradually revealed through the mask, creating a smooth transition from sharp to blurred.
- If you accidentally blur too much, switch your foreground color to black and paint over the area to conceal the blur again.
This advanced technique is a cornerstone of “Photo Manipulation” and “Digital Photography” editing styles, allowing Tophinhanhdep.com users to craft sophisticated effects for portraits, product shots, or any “Visual Design” project requiring nuanced depth of field. It ensures that your subjects stand out with natural-looking separation from their backgrounds.
Advanced Blur Techniques for Professional Results and Creative Vision
Beyond Gaussian blur, Photoshop offers a suite of specialized blur filters that allow for more targeted and realistic effects. These tools are crucial for achieving professional-grade edits that simulate real-world optical phenomena or introduce dynamic storytelling elements.
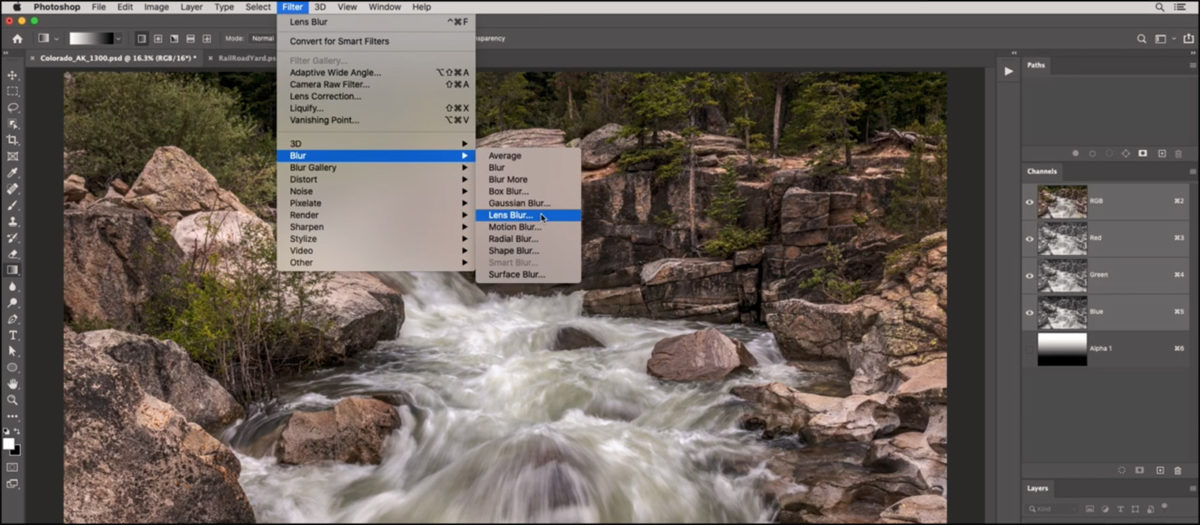
Simulating In-Camera Effects: The Lens Blur Filter
The Lens Blur filter is a powerful tool designed to simulate the shallow depth of field achieved with expensive camera lenses. It goes beyond a simple pixel average, considering the shape of the lens diaphragm (aperture) and depth information to create a more realistic “bokeh” effect – the aesthetic quality of the blur in out-of-focus areas. This is especially valuable for “High Resolution” images and “Beautiful Photography” on Tophinhanhdep.com.
To use the Lens Blur filter effectively, especially for selective blurring that simulates optical depth, it often involves creating alpha channels. Alpha channels act as grayscale masks that Photoshop can use to interpret depth, where lighter areas are closer to the camera and darker areas are further away. By defining these channels, you can instruct Photoshop exactly where and how much to blur based on perceived distance.
While the detailed process of alpha channel creation for Lens Blur is advanced, the core idea is to:
- Create a selection of the area you want to keep in focus.
- Save this selection as an alpha channel (Select > Save Selection).
- Go to Filter > Blur > Lens Blur…
- In the Lens Blur dialog, choose your saved alpha channel as the “Depth Map Source.”
- Adjust parameters like Blur Focal Distance (to define the plane of focus), Radius (for blur intensity), and Iris Shape (to control the bokeh highlights).
This technique enables Tophinhanhdep.com users to replicate stunning “in-camera” effects, making subjects pop against beautifully diffused backgrounds, enhancing product shots, and adding a cinematic quality to their “Digital Photography.”
Crafting Focus with Iris Blur and Field Blur
Within Photoshop’s “Blur Gallery,” you’ll find a collection of sophisticated blur effects, including Iris Blur and Field Blur. These tools offer highly customizable ways to control depth of field and create focus points, surpassing the capabilities of simpler blur filters. For Tophinhanhdep.com content creators, especially those dealing with product photography, portraits, or “Nature” scenes, these filters can significantly elevate visual appeal.
Understanding Bokeh and Depth of Field in Photoshop
Bokeh is the aesthetic quality of the blur in the out-of-focus areas of an image. Achieving true, photographic bokeh in Photoshop is challenging because it’s influenced by complex factors like a lens’s focal length, aperture shape, and the distance between the subject, camera, and background. The most critical aspect to simulate is the distance effect: objects further from the focal point should show more distortion than those closer. While building a comprehensive depth map for ultimate realism can be time-consuming, the Blur Gallery tools, especially Field Blur, offer an excellent approximation with less effort. As Tophinhanhdep.com strives for “High Resolution” and professional “Editing Styles,” understanding this nuance is key.
Step-by-Step with Iris Blur: Highlighting a Focal Point
Iris Blur is particularly effective for drawing attention to a specific focal point while gracefully blurring the rest of the image. It’s an intuitive way to add sophisticated depth to your photographs.
Here’s how to use the Iris Blur effect:
- Open a picture in Photoshop. Go to “File > Open” and select your image.
- Activate the Blur Gallery. Navigate to Filter > Blur Gallery > Iris Blur.
- Establish a focal point. When Iris Blur launches, you’ll see a large blur preview circle and several control points. A central “pin” marks the crisp, vivid center of your focus. Click and drag this pin to reposition the focal point over your main subject.
- Make changes to the blur area. The outer ellipse of the blur preview defines where the blur effect reaches 100%. Click and drag the small dots on this ellipse to resize and reshape your blur area (e.g., to match the contour of a subject or create a wider blur). You can also rotate the ellipse slightly.
- Adjust the blur transition. Inside the outer ellipse, you’ll see four larger white dots. These control the transition region where the blur gradually increases from 0% to 100%. Drag these spots closer to the focal point to make the transition sharper (more acute blur), or further away for a smoother, sleeker fade.
- Increase or decrease the degree of blur. Around the central pin, there’s a blur dial. Click and drag this dial in a circle (clockwise to enhance, counter-clockwise to decrease) to set the overall blur intensity. Alternatively, use the “Blur” slider in the Blur Options panel on the right side of your workspace.
- Once satisfied, hit Enter or click “OK” at the top of the Blur Gallery screen.
This technique is incredibly useful for Tophinhanhdep.com users seeking to make a product “stand out” in an image, or to give a portrait a more sophisticated, shallow depth of field look. It’s a key tool for enhancing “Aesthetic” and “Nature” images by clearly defining the intended focus.
Dynamic Storytelling with Motion Blur
Sometimes, an image needs to convey a sense of speed, movement, or frantic energy. This is where Motion Blur comes into play. Instead of a static haze, motion blur simulates the streaking effect of objects moving rapidly across the frame, a technique often seen in “Trending Styles” and “Creative Ideas” within “Digital Art.”
Imagine those iconic train shots where the train is a blur of speed while the person on the platform remains sharp. While such effects can be captured in-camera with slow shutter speeds and tripods, Photoshop allows you to recreate them digitally, offering greater control and convenience, especially for “Stock Photos” or complex “Photo Manipulation” projects for Tophinhanhdep.com.
Here’s a step-by-step process for adding realistic motion blur:
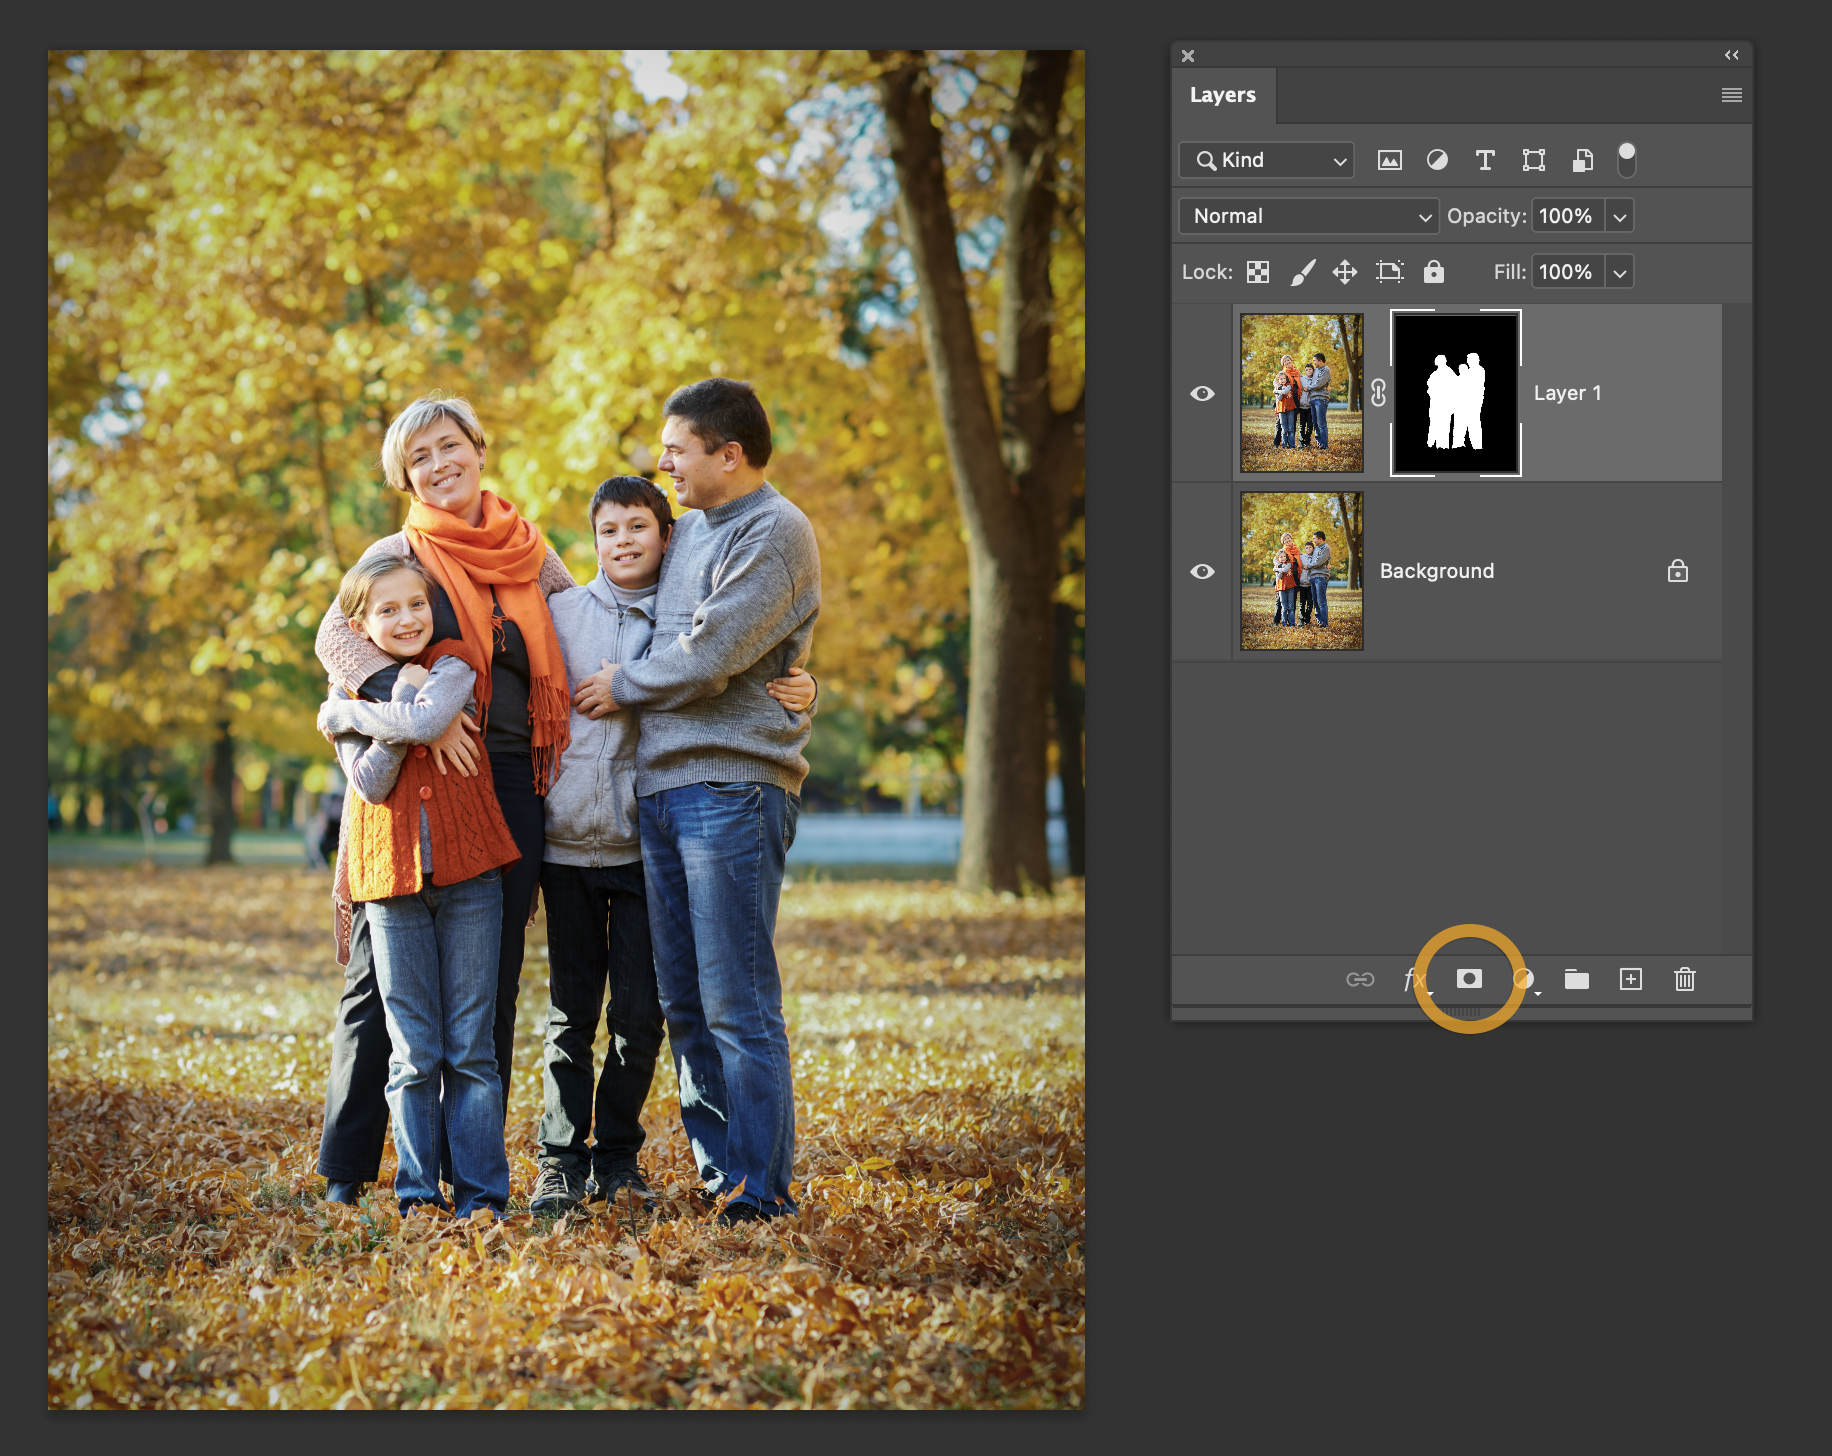
- Separate the Subject from the Background:
- Duplicate your image layer (Ctrl+J / Cmd+J).
- Use Photoshop’s AI-powered selection tools (e.g., “Select Subject” with the Quick Selection Tool) to precisely select your main subject.
- Click the “Add layer mask” icon at the bottom of the Layers panel to create a layer mask, effectively separating your subject.
- Duplicate and Modify the Background Layer:
- Duplicate your original background layer.
- With this new background layer selected, hold Ctrl (Windows) or Cmd (Mac) and click on the subject’s layer mask. This creates a selection of your subject on the background layer.
- Delete the subject from this background layer (e.g., press Delete, or use Generative Fill if available in your Photoshop version to intelligently fill the empty space).
- If using Generative Fill, expand the selection slightly (Select > Modify > Expand) before generating, to give Photoshop more context for a seamless fill. Choose the best variation.
- Merge the Layers (for the blur target):
- Hide the subject layer (click its eye icon).
- Select the top visible layer and use Ctrl+Alt+Shift+E (Windows) or Cmd+Option+Shift+E (Mac) to create a new layer containing all visible elements. This will be your combined background layer without the subject.
- Add Motion Blur:
- Duplicate this new combined background layer.
- Use the Lasso Tool (L) to select the area where you want to apply motion blur (e.g., the train tracks, the street where cars are moving).
- Add a layer mask to this selected area.
- Convert this layer to a Smart Object (Right-click layer > Convert to Smart Object). This makes the blur effect non-destructive, allowing you to edit it later.
- Go to Filter > Blur > Motion Blur… Adjust the Angle (0 degrees for horizontal motion like a train) and Distance (higher values for more blur). Experiment with values to achieve a natural look (e.g., starting with 2000 and refining to around 500).
- Final Touches:
- Un-hide your original subject layer.
- Refine any edges or transitions using the layer masks and a soft brush. For transparent elements like glasses on a person, you might use a lower opacity brush to clean up edges without completely obscuring the original.
- Apply any additional adjustments needed.
This comprehensive process allows Tophinhanhdep.com users to infuse their images with dynamic energy, transforming static scenes into engaging visual stories, perfect for “Creative Ideas” and capturing the essence of “Thematic Collections.”
Strategic Applications of Blur for Tophinhanhdep.com’s Content Categories
The diverse blur techniques in Photoshop are not merely technical feats; they are creative tools that directly enhance the specific content types found on Tophinhanhdep.com.
- Enhancing Wallpapers and Backgrounds: A soft Gaussian blur can transform a busy photograph into a serene background, allowing text overlays or foreground elements to truly pop. Abstract wallpapers benefit from blurs that create intriguing color gradients and ethereal textures.
- Elevating Aesthetic and Nature Photography: Iris and Field Blurs are invaluable here. They guide the viewer’s eye to the delicate details of a flower, the majestic peak of a mountain, or a captivating portrait. By strategically blurring the surroundings, you create a sense of depth and focus that makes the main subject more impactful. This is key for Tophinhanhdep.com’s “Beautiful Photography” section.
- Boosting Product and Stock Photography: For showcasing products, a clean, blurred background created with Iris or Field Blur ensures the item is the undisputed star. This professional aesthetic is crucial for “Stock Photos” and commercial “Digital Photography,” signaling quality and attention to detail.
- Artistic Expression and Photo Manipulation: Motion blur can turn a pedestrian street scene into a vibrant, bustling cityscape, or give a portrait an edgy, dynamic feel. For “Sad/Emotional” or “Abstract” images, selective blurring can evoke mood, hide details, or create a dreamlike quality, pushing the boundaries of traditional photography into “Digital Art.”
- Practical Uses: Beyond aesthetics, blurring serves practical purposes. Anonymizing faces or blurring sensitive information like license plates or documents in “High Resolution” images or “Digital Photography” is essential for privacy and ethical sharing on Tophinhanhdep.com.
Maximizing Your Workflow: Tips and Best Practices
To effectively integrate blurring into your image editing workflow on Tophinhanhdep.com, consider these best practices:
- Embrace Non-Destructive Editing: Always work on duplicate layers and use layer masks and Smart Objects. This preserves your original image data, allowing for endless experimentation and adjustments without permanent changes. This aligns perfectly with professional “Editing Styles.”
- Experimentation is Key: Don’t shy away from trying different blur types and varying their settings. Each filter offers unique qualities, and the “right” blur is often discovered through playful exploration. The “Blur Gallery” is a playground for “Creative Ideas.”
- Refine with Precision: Layer masks, combined with soft brushes and varying opacities, offer unparalleled control over the transition between blurred and sharp areas. Take your time to meticulously paint your masks for the most natural and professional outcome.
- Mind Your Performance: Blurring can be processor-intensive, especially on large, “High Resolution” images. If Photoshop becomes sluggish, try working on a smaller proxy file or closing other applications.
- Integrate with Tophinhanhdep.com Tools: Consider how blurring complements other “Image Tools.” For example, you might apply a subtle blur before using an “AI Upscaler” to soften pixelation, then use “Image Optimizers” to ensure the final, blurred image is web-ready for Tophinhanhdep.com. Conversely, you might blur sensitive text before using an “Image-to-Text” converter, or use blur to enhance “Mood Boards” for “Visual Design.”
Conclusion
The ability to blur images in Photoshop is more than just a trick; it’s a fundamental skill that empowers Tophinhanhdep.com users to craft compelling visual narratives, enhance aesthetic appeal, and direct attention with precision. From the straightforward Gaussian blur to the sophisticated Iris and Motion blurs, each technique offers a unique way to transform your photographs and designs.
By understanding when and how to apply these effects – whether to create elegant backgrounds, highlight a subject with captivating bokeh, or imbue a scene with dynamic energy – you unlock the full creative potential of your images. So, open Photoshop, experiment with these powerful tools, and watch as your “Wallpapers,” “Backgrounds,” “Aesthetic” creations, and “Beautiful Photography” reach new heights of visual artistry on Tophinhanhdep.com. Happy editing!