How to Blur Images in Photoshop: A Comprehensive Guide for Stunning Visuals

At Tophinhanhdep.com, we understand that mastering image manipulation is key to unlocking breathtaking visual narratives. Blurring an image in Photoshop is far more than just obscuring details; it’s a powerful artistic technique that can transform ordinary photographs into compelling visual statements. Whether you’re aiming to create a sense of depth, draw attention to a specific subject, achieve a dreamy aesthetic, or simply enhance the overall mood of your digital art, Photoshop offers a diverse range of tools to achieve these effects.
This extensive guide, curated by the experts at Tophinhanhdep.com, delves deep into the various methods of blurring images in Photoshop. We’ll cover everything from the foundational Gaussian blur to the more sophisticated Lens and Iris blur effects, demonstrating how these techniques can elevate your Wallpapers, Backgrounds, Aesthetic, Nature, Abstract, Sad/Emotional, and Beautiful Photography. We’ll also explore how blurring contributes to High Resolution stock photos, Digital Photography, and various Editing Styles, becoming an integral part of Visual Design, Graphic Design, Digital Art, Photo Manipulation, and Creative Ideas. By the end, you’ll have a comprehensive understanding of how to wield these tools to bring your Image Inspiration & Collections, Photo Ideas, Mood Boards, and Trending Styles to life.
The Art and Science of Image Blurring in Photoshop
Blurring an image is a fundamental skill in the realm of photo editing, offering both aesthetic and practical advantages. At Tophinhanhdep.com, we believe that understanding the ‘why’ behind the ‘how’ is crucial for truly mastering any technique.
Why Blur? Elevating Your Photography and Visual Design
The reasons for introducing blur into your images are as diverse as the images themselves. From a creative standpoint, blurring can evoke emotion, add drama, or create an ethereal quality, aligning perfectly with our themes of Aesthetic and Beautiful Photography.

- Emphasizing Your Subject: One of the most common applications of blurring is to create a shallow depth of field, making your main subject pop against a soft, out-of-focus background. This technique is invaluable for product photography, portraits, and showcasing specific elements in nature photography, ensuring the viewer’s eye is immediately drawn to your focal point.
- Creating Depth and Dimension: A well-executed blur can trick the eye into perceiving greater depth in a two-dimensional image. By blurring elements in the foreground or background, you can simulate the natural optical effects of a camera lens, adding a professional and sophisticated touch to your digital photography.
- Achieving Aesthetic Effects: Blurring can lend a dreamy, artistic, or ethereal quality to an image, transforming it into a piece of digital art. Soft, blurred edges can create a gentle transition, contributing to an overall sense of calm or mystery, especially effective in abstract or sad/emotional imagery.
- Removing Distractions and Clutter: Sometimes, a busy background can detract from your subject. Blurring allows you to effectively mute these distractions, whether it’s unwanted objects, text, or logos, ensuring your primary subject retains its prominence. This is particularly useful for stock photos where a clean background is essential.
- Conveying Motion and Speed: A subtle motion blur can imbue a static image with a sense of movement, dynamism, and speed. This is a powerful storytelling tool for creative ideas and photo manipulation.
- Noise Reduction and Smoothing: In some cases, blurring can be used as a low-pass filter to smooth out pixel values, effectively reducing noise and grain in photographs, especially those taken in challenging lighting conditions.
- Privacy and Censorship: For practical reasons, blurring faces, license plates, or confidential information is a quick and effective way to ensure privacy within an image.
While replicating “true Bokeh” – the aesthetic quality of the blur produced in out-of-focus areas by a particular lens – can be challenging in post-production compared to achieving it in-camera, Photoshop’s advanced blur filters offer powerful and convincing alternatives, allowing photographers and designers to achieve similar stunning effects.
Understanding Photoshop’s Blur Toolkit: Beyond the Basics
Photoshop’s arsenal of blur filters is extensive, each designed for specific purposes and offering unique creative possibilities. At Tophinhanhdep.com, we encourage you to explore these tools as essential components of your image tools and editing styles.
- Gaussian Blur: The workhorse of blur filters, Gaussian Blur is a foundational tool that applies a smooth, even blur, often used for softening details, reducing noise, or creating a general background blur.
- Lens Blur: This sophisticated filter simulates the optical blur of a camera lens, offering more realistic depth-of-field effects, often leveraging depth maps or alpha channels for precise control.
- Iris Blur: Part of the Blur Gallery, Iris Blur allows you to define a specific area of focus (like the iris of an eye) and gradually blur outwards, creating a natural-looking shallow depth of field.
- Field Blur: Also within the Blur Gallery, Field Blur lets you apply multiple blur pins to an image, each with a different blur amount, enabling precise control over blur transitions across complex scenes.
- Tilt-Shift Blur: Mimics the effect of a tilt-shift lens, creating a selective blur that makes objects appear miniature, often used in landscape photography for dramatic effects.
- Motion Blur: Simulates the effect of movement, applying blur in a specific direction and at a certain intensity.
- Radial Blur: Creates blur in concentric circles or zooms from a central point, great for simulating spinning or explosive motion.
By understanding the distinct capabilities of each, you can select the perfect blur effect to match your creative vision and enhance your visual design.
Mastering Core Blurring Techniques: Gaussian Blur for Versatility
The Gaussian Blur is often the first blur filter photographers and designers encounter in Photoshop, and for good reason. Its simplicity and effectiveness make it incredibly versatile for a wide range of tasks, from basic softening to sophisticated selective focus. This is a cornerstone technique for any photo manipulation or editing style.
Quick and Easy: Blurring Entire Images and Simple Selections
For immediate impact or specific privacy needs, Gaussian Blur provides straightforward solutions.
How to Blur an Entire Image
If your goal is to transform an entire photograph into a soft, abstract background or create a dreamy, atmospheric effect, blurring the whole image is your fastest route. This method is excellent for generating abstract wallpapers or establishing a mood for sad/emotional imagery.
- Open Your Image: Begin by launching Photoshop CC and opening the image you wish to modify. Go to “File” > “Open,” or simply drag and drop your image into the Photoshop workspace.
- Access Gaussian Blur: Navigate to the top menu bar and select “Filter” > “Blur” > “Gaussian Blur…”.
- Adjust the Radius: A dialog box will appear with a “Radius” slider. This slider controls the intensity of the blur. Dragging it to the right increases the blur, while moving it to the left decreases it. As you adjust, you’ll see a live preview of the effect on your image. Experiment to find the perfect level of blur.
- Confirm: Once you’re satisfied with the blur amount, click “OK.”
Voila! Your entire image is now blurred, ready to be used as a soft background or an artistic element within a larger visual design project.
Selective Blur for Faces, Text, and Objects (Easy Method)
Often, you only want to blur a specific part of an image – perhaps a face for privacy, a logo, or distracting text. This easy method for selective blurring is perfect for quick adjustments to your digital photography.
- Select the Area: Use any of Photoshop’s powerful selection tools to define the area you wish to blur.
- Elliptical Marquee Tool: Ideal for circular or oval shapes, such as faces. You can find this by clicking and holding on the Rectangular Marquee Tool in the toolbar until a fly-out menu appears.
- Lasso Tool (L): For free-form selections.
- Quick Selection Tool (W): Great for selecting objects with defined edges quickly.
- Pen Tool (P): Offers the most precise control for complex shapes, allowing you to draw a path around your object and then convert it to a selection (as discussed in detail on Tophinhanhdep.com’s other tutorials).
- For example, to blur a face, select the Elliptical Marquee Tool and drag a circle or oval around the face.
- Apply Gaussian Blur: With your selection active (you’ll see the “marching ants” around it), go to “Filter” > “Blur” > “Gaussian Blur…” again.
- Adjust Radius: Just like before, adjust the “Radius” slider to achieve your desired blur intensity. Since only the selected area will be affected, you can be very precise. Click “OK.”
- Deselect: Finally, go to “Select” > “Deselect” (or press Ctrl+D on Windows / Cmd+D on Mac) to remove the marching ants.
You’ve successfully blurred a specific part of your image! This simple technique is incredibly useful for common photo manipulation tasks.
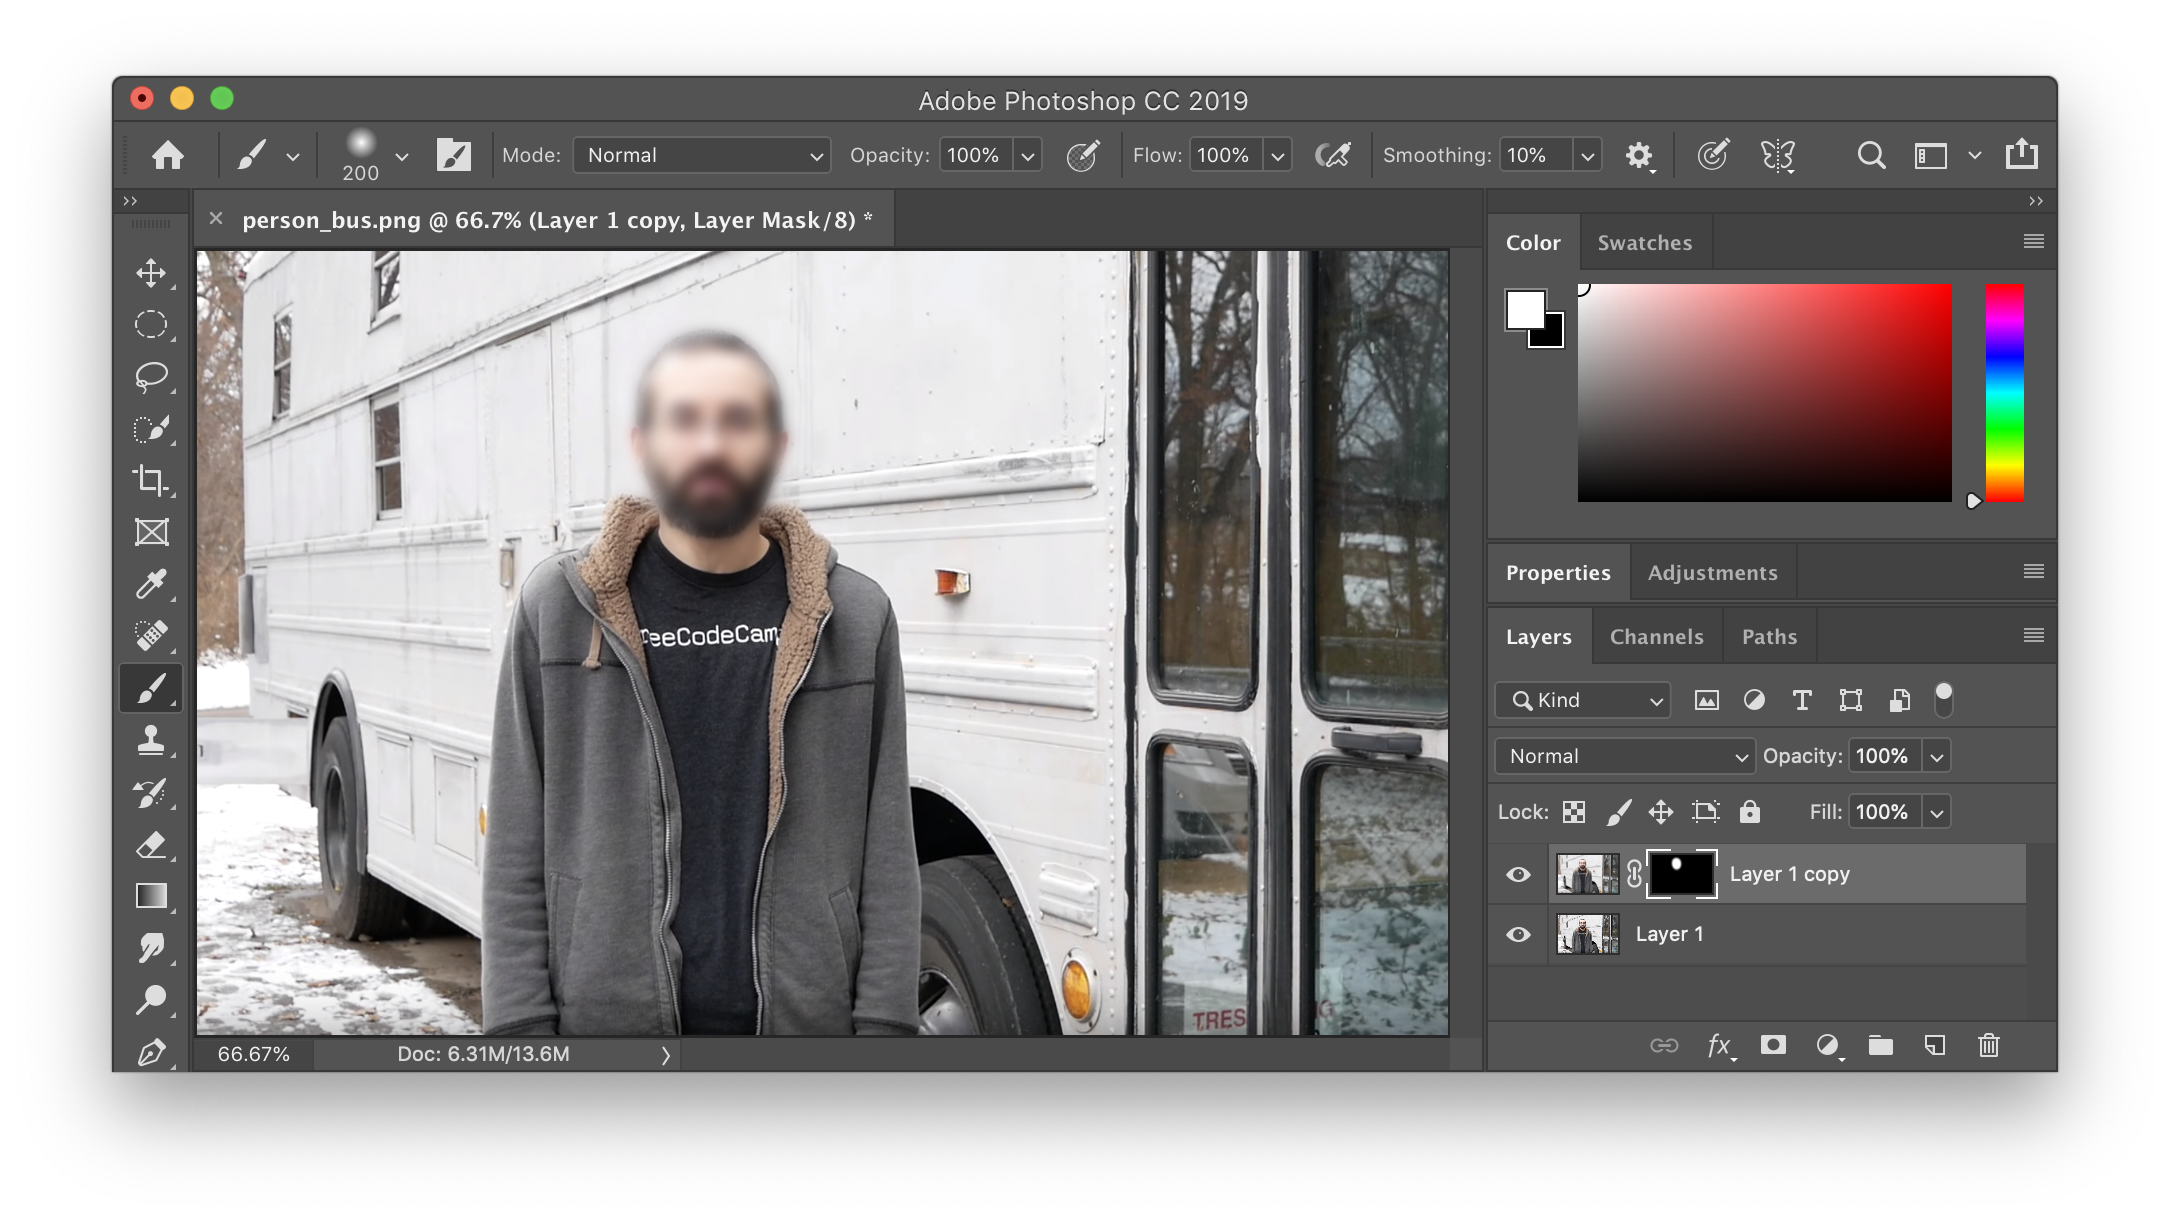
Advanced Control: Seamless Blending with Layer Masks
While the easy method works well for distinct blurs, it often creates a sharp, noticeable line between the blurred and unblurred sections. For a more natural, soft transition – mimicking the smooth fall-off of a lens – the advanced method using layer masks is indispensable. This non-destructive technique is a hallmark of professional graphic design and digital art.
- Duplicate Your Layer: To preserve your original image and work non-destructively, duplicate your background layer. Right-click on the background layer in the Layers panel and select “Duplicate Layer…” or use the shortcut Ctrl+J (Windows) / Cmd+J (Mac). This ensures you can always revert to the original if needed, making it a critical step for creative ideas and experimentation. You can also convert your layer to a Smart Object (Layer > Smart Objects > Convert to Smart Object) which keeps the blur filter editable.
- Apply Gaussian Blur: Select the duplicated layer, then go to “Filter” > “Blur” > “Gaussian Blur…”. Apply a blur radius that is slightly more intense than what you think you’ll need, as you’ll be revealing it gradually. Click “OK.” At this point, your entire duplicated layer will be blurred.
- Add a Concealing Layer Mask: Now, to selectively reveal parts of this blur, you’ll add a layer mask.
- Hold down the “Alt” key (Windows) or “Option” key (Mac) on your keyboard.
- While holding the key, click the “Add Layer Mask” icon (a rectangle with a circle inside) at the bottom of the Layers panel.
- This will add a black layer mask to your blurred duplicated layer, effectively hiding the entire blurred layer and revealing the unblurred layer beneath.
- Paint to Reveal the Blur:
- Ensure your foreground color is set to white (press D to reset colors to default, then X to swap to white foreground if necessary).
- Select the Brush Tool (B).
- In the options bar at the top, adjust your brush settings:
- Hardness: Set this to 0% for a very soft edge, allowing for smooth transitions.
- Opacity/Flow: Experiment with these settings. A lower opacity (e.g., 30-50%) allows you to build up the blur gradually, offering more control.
- Make sure your layer mask (the black thumbnail next to your blurred layer) is selected in the Layers panel.
- Begin painting over the areas where you want the blur to appear (e.g., the background, specific faces). As you paint with white on the black mask, you are revealing the blurred layer beneath, creating a soft, natural-looking blur.
- If you accidentally blur too much or in the wrong spot, simply switch your foreground color to black (press X) and paint over the area on the mask to conceal the blur.
This technique provides unparalleled control over your blur effects, making it perfect for refining your editing styles and achieving high-quality photo manipulation results.
Crafting Depth and Focus with Specialized Blur Filters
While Gaussian Blur is excellent for general blurring, Photoshop’s Blur Gallery offers specialized tools designed to mimic specific photographic effects, crucial for advanced digital photography and visual design.
The Sophistication of Iris Blur for Backgrounds and Focal Points
The Iris Blur, found within Photoshop’s Blur Gallery, is a powerful tool for creating a convincing shallow depth-of-field effect, effectively isolating your subject and emphasizing a focal point. It’s particularly useful for product photography, portraits, and drawing attention in beautiful photography.
- Open Your Picture: Start by opening the image you intend to modify in Photoshop. You can go to “File” > “Open” and select your image.
- Activate the Blur Gallery: Go to “Filter” > “Blur Gallery” > “Iris Blur.”
- Establish a Focal Point (the Pin): When Iris Blur activates, you’ll see a large blur preview circle and several adjustable dots. At the center of this circle is a “pin.” This pin marks the area that will remain sharp and in focus. Click and drag the pin to reposition it over your main subject (e.g., a person’s face, a product).
- Make Changes to the Blur Area:
- The outer circle of the blur preview dictates where the blur effect reaches 100%. Everything beyond this circle will be fully blurred.
- Inside the outer circle, you’ll see four small dots. Hovering over these dots reveals a curved, double-ended arrowhead, allowing you to click and drag to reshape and resize the ellipse or circle that defines your blur area. This lets you precisely control the shape of your focused region.
- You can also click and drag the line connecting these dots to enlarge the blur zone while maintaining its shape.
- Adjust the Blur Transition:
- Within the blur preview circle, there are four larger white spots. These define the blur transition region. The blur effect gradually increases from 0% (at the focal point) to 100% (at the outer circle) within the area between these white spots and the outer circle.
- Click and drag these white spots to modify the size of this transition region. Dragging them closer to the focal point creates a sharper, more acute transition, while dragging them further away results in a smoother, more gradual blur.
- Increase or Decrease the Degree of Blur:
- Around the central pin, you’ll find a blur dial. Click and drag this dial clockwise to increase the blur intensity, or counter-clockwise to decrease it.
- Alternatively, you can use the “Blur” slider in the “Blur Options” panel on the right side of your workspace for fine-tuning. For instance, Tophinhanhdep.com recommends an 8-point blur as a good starting point for many images.
- Finalize: Once you are satisfied with the effect, click “OK” at the top of the Blur Gallery screen or press Enter.
Using Iris Blur allows you to make the content of your shot truly stand out, giving your pictures a distinctive and professional style, perfect for creating compelling backgrounds and showcasing your beautiful photography.
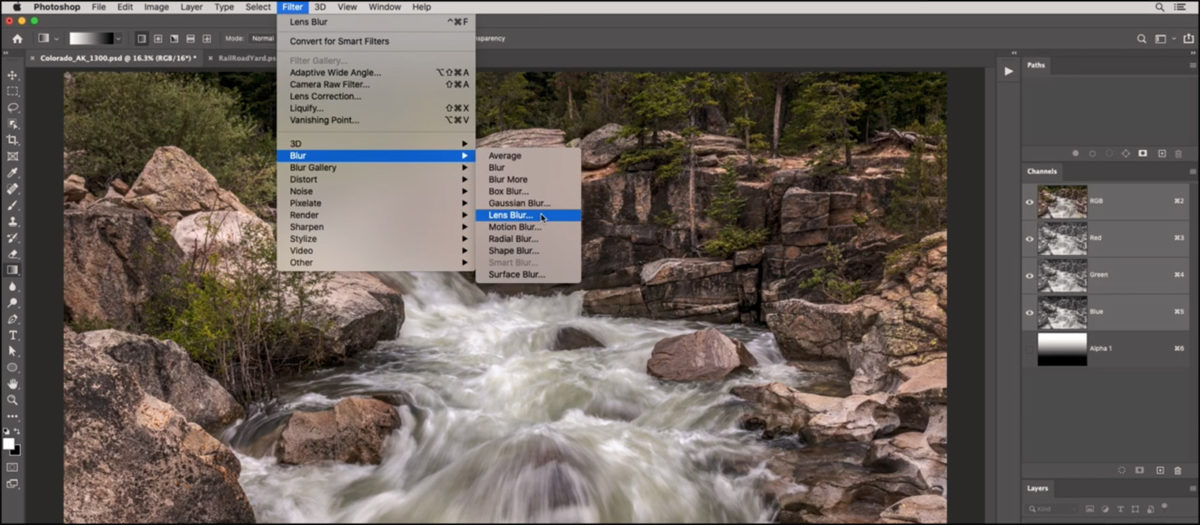
Simulating In-Camera Effects: Lens Blur and Alpha Channels
For photographers seeking to mimic the realistic optical characteristics of lens blur achieved in-camera, Photoshop’s Lens Blur filter is an advanced tool. This filter is paramount for adding selective blurring that accurately simulates true depth of field, making it a powerful component of high-quality digital photography and photo manipulation.
The Lens Blur filter is unique because it can interpret depth information within an image to create a more realistic blur, unlike the uniform spread of Gaussian Blur. While complex, one of its most powerful applications involves using alpha channels. An alpha channel can act as a depth map, telling Photoshop which parts of your image are closer to the camera and which are further away. This allows the blur to increase realistically with distance, simulating expensive lenses and professional techniques.
To use Lens Blur effectively:
- Create a Depth Map (Alpha Channel): This is the most crucial and often most time-consuming step. You essentially need to tell Photoshop the “depth” of each pixel. Lighter areas in your alpha channel represent foreground elements, and darker areas represent background elements. This can be done by carefully painting a grayscale mask or by converting a selection to an alpha channel. Tophinhanhdep.com provides detailed tutorials on creating effective depth maps for various scenarios.
- Access Lens Blur: Go to “Filter” > “Blur” > “Lens Blur…”.
- Specify Depth Map Source: In the Lens Blur dialog box, under the “Depth Map” section, select your created alpha channel from the “Source” dropdown menu.
- Adjust Blur Parameters: Experiment with the “Radius” (blur amount), “Blade Curvature” (shape of the bokeh highlights), and other settings to fine-tune the appearance of the blur. The preview window will help you visualize the effect.
- Confirm: Click “OK” when you are pleased with the result.
By leveraging alpha channels, the Lens Blur filter offers a level of control and realism that can truly elevate your editing styles and produce stunning high-resolution visuals.
Refining Edges with Feathering for Dreamy Aesthetics
Beyond simply blurring entire areas, sometimes the goal is to soften the edges of a subject or create a vignette-like effect that gently fades into the background. Feathering in Photoshop achieves this, producing a dreamy, ethereal aesthetic that is popular in aesthetic photography and digital art.
- Make a Selection: Begin by importing your image into Photoshop. Use a selection tool to define the area you want to keep sharp. For softening edges into a background, the Elliptical Marquee Tool or Rectangular Marquee Tool are excellent choices. Select the central portion of your image (usually your subject) that you want to remain in focus. You’ll see “marching ants” around your selection.
- Blur the Edges (Feather Selection): With your selection active, go to “Select” > “Modify” > “Feather…”.
- A “Feather Selection” dialog box will appear. Enter a “Feather Radius” value (e.g., 20-40 pixels is a good starting point, but experiment for different results). This value determines how gradually the selection’s edge will soften.
- To visualize the feathered area, you can temporarily activate “Quick Mask Mode” (the icon resembling a circle within a rectangle in the toolbar). A red overlay will show the unselected, feathered area.
- Inverse the Selection: Now, you need to apply the effect to the outer part of your image, not the selected subject. Go to “Select” > “Inverse” (or use the shortcut Shift + Ctrl + I on Windows / Shift + Cmd + I on Mac). The marching ants will now border the outside of your image, indicating that the feathered area is selected.
- Select the Color of the Edges: The final step is to fill the feathered edges with a solid color, creating a seamless blend.
- In the Layers panel, click on the “Adjustments menu” icon (half-filled circle) at the bottom.
- Select “Solid Color…” from the dropdown menu.
- A “Color Picker” window will appear. Choose your desired color for the blurred edges. White, black, or a color sampled from your image are common choices for backgrounds or mood boards. Click “OK.”
You’ll see your image now has beautifully feathered and soft edges, drawing attention to your subject and contributing to a harmonious visual design. This technique is invaluable for photo ideas and crafting specific thematic collections.
Beyond Blurring: Integrating Tophinhanhdep.com’s Image Tools & Inspiration
Mastering blurring in Photoshop is just one piece of the puzzle at Tophinhanhdep.com. We envision blurring as a foundational skill that seamlessly integrates with our broader offerings, enhancing every aspect of your visual journey.
- Elevating Image Collections: Create stunning wallpapers and backgrounds by blurring distracting elements. Use selective blur to transform ordinary scenes into aesthetic, nature, or abstract masterpieces. Curate sad/emotional collections with soft focus, or accentuate the beauty in beautiful photography with carefully applied depth effects. Blurred images can also form captivating elements for mood boards and illustrate trending styles.
- Refining Photography Expertise: Blurring techniques are essential for enhancing high-resolution images, making them suitable for stock photos by isolating subjects and removing clutter. These methods contribute directly to advanced digital photography and define your unique editing styles.
- Leveraging Image Tools for Post-Blur Perfection: After meticulously blurring your images, Tophinhanhdep.com’s suite of image tools can further optimize your creations.
- Use our converters to ensure your final image is in the ideal format for its intended use.
- Employ compressors and optimizers to reduce file size without compromising quality, crucial for web performance and sharing your stunning photo ideas.
- If you started with a lower-resolution image, our AI upscalers can intelligently enhance its detail, ensuring your blurred masterpieces look crisp where they need to be.
- Even image-to-text tools can benefit, for instance, if you blurred text for privacy, you could then use our tools to add new, clear text overlay for graphic design projects.
- Fueling Visual Design and Creative Ideas: Blurring is a cornerstone of effective graphic design and digital art. It’s a fundamental aspect of photo manipulation, allowing you to merge elements seamlessly, create illusions of movement, or design compelling compositions. Tophinhanhdep.com provides endless creative ideas and image inspiration on how blurring can serve as a potent artistic device.
By combining Photoshop’s powerful blurring capabilities with the comprehensive resources available at Tophinhanhdep.com, you unlock a world of creative possibilities. We aim to empower you, whether you’re a budding enthusiast or a seasoned professional, to produce visuals that not only look incredible but also tell a compelling story.
In conclusion, blurring images in Photoshop is a versatile and indispensable skill for anyone working with digital visuals. From the simplicity of Gaussian Blur to the nuanced control of Iris Blur and Feathering, these techniques offer endless possibilities for enhancing your photographs, creating compelling designs, and expressing your unique artistic vision. Tophinhanhdep.com is your go-to resource for mastering these skills and discovering new inspiration, ensuring your visual content always stands out. Experiment, create, and let your imagination run wild – the power of blur is at your fingertips!