How to Blur Images for Stunning Visual Effects

In the expansive realm of digital imagery, where every pixel contributes to a story or an aesthetic, the ability to manipulate focus and depth stands as a paramount skill. Blurring an image, whether partially or entirely, is far more than a simple aesthetic trick; it’s a powerful tool for visual designers, photographers, and casual users alike. On Tophinhanhdep.com, we understand the profound impact that a well-executed blur can have—from accentuating a subject in a beautiful photograph to creating an abstract backdrop for a digital art piece, or even conveying a specific mood in an emotional image.
The art of blurring allows creators to guide the viewer’s eye, eliminate distracting elements, simulate motion, or infuse a dreamlike quality into their visuals. It’s a fundamental technique in photo manipulation and graphic design, offering endless creative ideas and helping to transform ordinary shots into extraordinary visual statements. This comprehensive guide, brought to you by Tophinhanhdep.com, will explore various methods to achieve captivating blur effects, leveraging both in-camera techniques and the advanced image tools available on our platform. Whether you’re seeking to create professional-grade portraits with high resolution, develop striking aesthetic backgrounds, or simply enhance your stock photos, mastering the blur will unlock a new dimension in your visual journey.

Achieving Natural Blur During Capture
The most organic and often sought-after blur effects are those achieved directly at the moment of capture. Professional photographers frequently rely on camera settings and lens choices to create a shallow depth of field, naturally blurring the background while keeping the subject in sharp focus. Modern technology, particularly in smartphones, has made these once-exclusive techniques accessible to everyone, allowing even amateur photographers to produce stunning results.
Leveraging Advanced Camera Modes
Many contemporary smartphones, akin to the advanced features found in dedicated cameras, come equipped with specialized modes designed to create a beautiful background blur. The most prominent of these is “Portrait Mode.” This intelligent feature utilizes sophisticated depth-effect software to analyze the scene, identify the primary subject, and artfully blur the elements behind it as you take the photo. The result is a striking image where your subject pops with crisp clarity against a soft, diffused backdrop—perfect for capturing emotionally resonant portraits or highlighting key elements in nature photography.
Using this mode is typically straightforward: open your camera app, select the Portrait option, and compose your shot. The camera will usually indicate when your subject is correctly positioned and ready for the depth effect. A key advantage of these advanced modes is the flexibility they offer post-capture. Many devices allow you to adjust the strength of the background blur after the photo has been taken. This means you can fine-tune the intensity of the blur, ranging from a subtle haze to a dramatic separation, ensuring your image perfectly aligns with your creative vision. Additionally, some modes include “Portrait Lighting” effects, which further enhance your subject with various studio-quality lighting styles, adding another layer of professional polish to your blurred images. These features collectively empower users to elevate their digital photography, creating beautiful images that resonate deeply.
The Art of Shallow Depth of Field: Getting Closer
For those without the latest smartphone models or who prefer a more traditional photographic approach, a simple yet highly effective technique for achieving natural background blur is to physically get closer to your subject. This method hinges on the principle of “shallow depth of field,” where only a small portion of the image is in sharp focus, and everything else gradually blurs out.
The closer your camera is to the subject, the shallower the depth of field becomes, leading to a more pronounced background blur. This technique is invaluable for isolating subjects, whether it’s a delicate flower in nature photography, an abstract texture, or a specific detail you want to emphasize. When experimenting with this, remember to always ensure your primary subject remains critically sharp. If you get too close, your camera might struggle to focus at all, resulting in a blurry subject instead of a blurred background. A good practice is to tap on your subject on the screen to explicitly set the focus point.
For extreme close-up shots, often referred to as macro photography, an add-on macro lens can further enhance this effect, allowing your camera to focus at incredibly short distances. This opens up a world of possibilities for capturing intricate details with wonderfully blurred backgrounds, turning everyday objects into aesthetic wonders. This direct interaction with your subject and camera settings embodies the essence of high-resolution photography, demonstrating that powerful visual effects can often be achieved with fundamental photographic principles.
Enhancing Photos with Editing Software on Tophinhanhdep.com
While in-camera techniques offer immediate gratification, the true power of blur often lies in post-processing. Image editing software provides unparalleled control, allowing you to selectively blur, apply different blur types, and even salvage photos where natural blur wasn’t achieved. Tophinhanhdep.com’s suite of image tools offers comprehensive solutions for applying and refining blur effects, catering to every creative need.
General Principles of Blur Application
The ability to blur parts of a picture in editing software is a game-changer for digital photography and visual design. It offers a solution for images where the background is distracting, messy, or simply not contributing to the desired aesthetic. By applying blur in post-production, you can effortlessly transform a busy scene into a clean, focused composition. The fundamental principle involves isolating the area you want to keep sharp (your foreground subject) and applying the blur effect to the remaining parts (the background or other unwanted elements).
On Tophinhanhdep.com, our user-friendly interface simplifies this process. You can upload any image – be it a high-resolution stock photo, a casual snapshot, or a piece of digital art – and immediately begin manipulating its depth. Whether your goal is to draw attention to a central figure, create a soft, abstract background, or subtly enhance an existing blur, our tools provide the precision and flexibility required. This method is particularly useful for photo manipulation, allowing you to retrospectively add artistic depth or correct photographic imperfections. It’s about giving you the creative control to make every image tell its intended story with clarity and impact.
Exploring Diverse Blur Effects
Beyond a simple background blur, Tophinhanhdep.com offers a variety of specialized blur effects, each designed to evoke a distinct visual sensation or achieve a specific artistic goal. Understanding these different types of blur is crucial for elevating your visual design and image inspiration.
- Motion Blur: This effect simulates movement within an image, creating streaks and smears that convey speed or dynamic action. It’s perfect for subjects in motion, like a skateboarder, a car, or even a flowing river, exaggerating the feeling of movement and adding an exciting, energetic quality to your photographs. By directing the blur in the perceived direction of motion, Tophinhanhdep.com’s tools can create an ultra-realistic and dramatic effect.
- Radial Blur: With radial blur, the effect emanates from a central point, drawing the viewer’s eye directly to the focal point of the image. It’s an excellent way to create a shallow depth of field and emphasize your main subject, giving the impression that everything else is spinning or receding away from the center. You can adjust the intensity to create a subtle glow or a more dramatic vortex effect, enhancing the aesthetic appeal of your images.
- Tilt-Shift Blur: This unique effect makes objects in your photo appear like miniature models, creating a charming “toy town” look. Historically achieved with specialized camera lenses, Tophinhanhdep.com’s editing tools allow you to apply tilt-shift blur by blurring the top and bottom sections of your image, simulating the shallow depth of field typical of close-up photography. This creative idea can transform cityscapes, landscapes, or even people into whimsical, scaled-down versions.
- Bokeh Blur: Derived from the Japanese word for “haze,” bokeh refers to the aesthetic quality of the blur in the out-of-focus areas of an image. It’s characterized by soft, pleasing, often circular light patterns in the background. Tophinhanhdep.com’s tools allow you to apply and customize bokeh effects, letting you experiment with different shapes (circular, heart-shaped, etc.), opacity, and hues. This dreamy blur is highly sought after in beautiful photography, adding an ethereal and emotional quality to portraits, nature shots, and aesthetic backgrounds.
Each of these blur types offers a unique way to enhance your images, contributing to distinct editing styles and allowing for profound creative expression in your digital art.
Practical Application: Blurring with Tophinhanhdep.com’s Tools
On Tophinhanhdep.com, implementing these powerful blur effects is made simple and intuitive, whether you’re a seasoned graphic designer or just starting with photo manipulation. Our platform is designed to provide seamless access to advanced tools, transforming complex techniques into straightforward steps.
Blurring the Entire Image for Atmospheric Effects
Sometimes, the goal isn’t to isolate a subject but to transform the entire image, imbuing it with a particular mood or aesthetic. Blurring an entire picture can create a retro, dreamy, or even abstract effect, serving as an excellent background for text, a mood board element, or a thematic collection piece. This technique is particularly useful when you want to soften harsh lines, blend vibrant colors into a more cohesive backdrop, or evoke a sense of nostalgia or mystery.
Here’s a general approach using Tophinhanhdep.com:
- Upload Your Photo: Begin by uploading the image you wish to blur to the Tophinhanhdep.com editor. Our platform supports various image formats and ensures high-resolution processing.
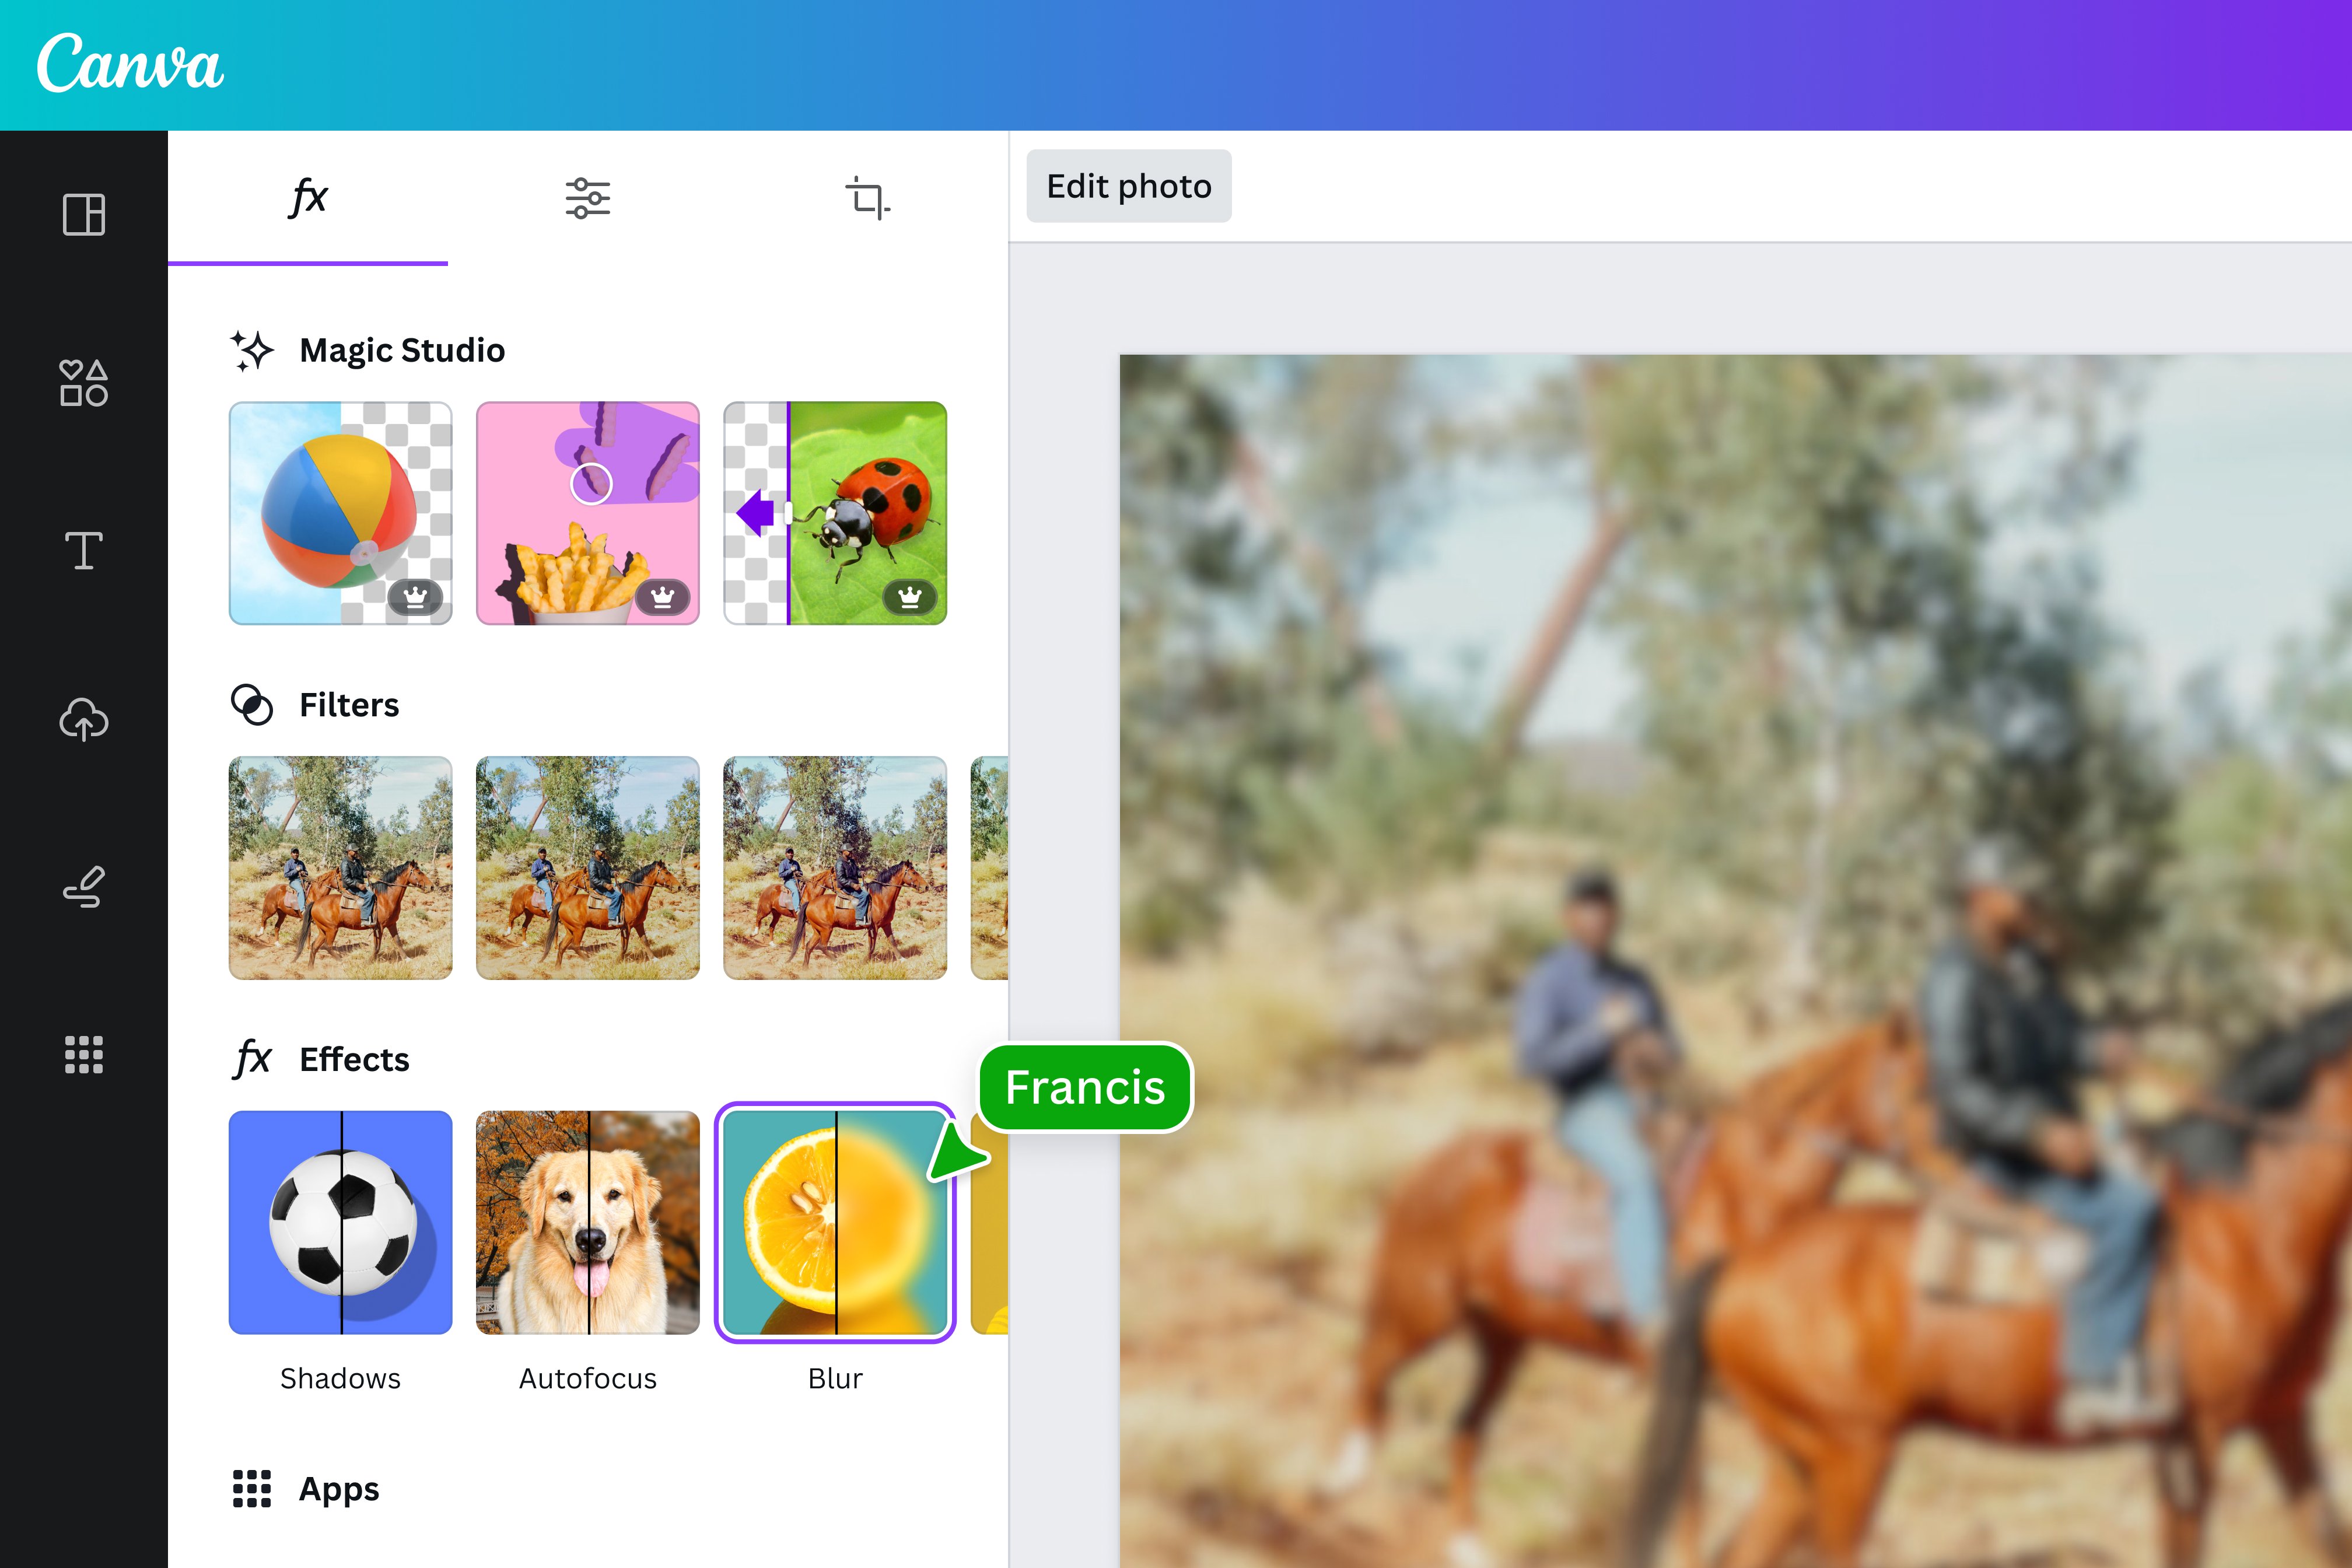
- Access Blur Tools: Navigate to the “Effects” or “Tools” section within the editor and locate the “Blur” feature.
- Apply Full Image Blur: Select an option that applies blur across the entire canvas, such as a “Global Blur” or by using a “Brush” tool that automatically blurs the whole image upon activation.
- Adjust Intensity: Use the provided slider to control the strength of the blur. You can experiment to find the perfect level, from a subtle softening to a deeply abstract haze.
- Save Your Creation: Once satisfied, save your newly blurred image. It’s now ready to be used as a captivating background, an element in digital art, or as part of a creative collection.
This method is ideal for creating soft, aesthetic backgrounds, digital art textures, or even conceptual images where the subject is the overall atmosphere rather than a sharply defined object.
Selective Blur: Highlighting Subjects and Concealing Details
More frequently, the power of blur lies in its ability to selectively enhance or conceal parts of an image. This is crucial for guiding the viewer’s attention, ensuring that the main subject stands out, or discreetly blurring sensitive information like faces in a crowd. This precise photo manipulation technique is fundamental in high-resolution photography and professional visual design.
Tophinhanhdep.com’s tools offer sophisticated ways to achieve selective blur:
- Load Your Image: Open your desired image in the Tophinhanhdep.com editor.
- Activate Selection Tools: Go to the “Tools” section and choose “Selection.” This will provide you with various options for defining the area you want to modify.
- Define Your Focus/Blur Area:
- AI Select: For quick and accurate subject isolation, utilize our AI Select feature. It can automatically detect and highlight specific elements, like a person’s face or a foreground object.
- Shapes: If the area to blur is regular, choose an “Oval” or “Rectangle” tool to easily outline it.
- Lasso/Brush: For irregular shapes or fine-tuned control, the “Lasso” or “Brush” tools allow you to manually trace or paint over the exact areas you want to blur or keep in focus. This is particularly useful for complex outlines in graphic design.
- Apply Blur Effect: Once your selection is made (often highlighted in red), navigate to the “Effects” menu and select your preferred “Blur” filter (e.g., Lens Blur, Smart Blur, Gaussian Blur). The blur will apply only to the unselected area if you’re focusing on the subject, or to the selected area if you’re directly blurring an object or face.
- Refine and Adjust: Our tools allow you to manually adjust blur strength, feathering (softness of the blur edge), and other parameters. If you made a mistake, an “Eraser” tool lets you remove blur from unwanted areas, ensuring a seamless and realistic effect.
- Save Your Edit: Confirm your changes and export your refined image, ready for sharing or further use within your thematic collections or mood boards.
This granular control over blur empowers you to create visually compelling compositions, directing focus with precision and professionalism.
Crafting a Blurred Vignette for Focused Composition
A blurred vignette offers a subtle yet effective way to frame your subject and direct the viewer’s gaze towards the center of the image. Unlike a full background blur, a vignette applies blur around the edges of the photo, gradually fading inwards, creating a dreamy and aesthetically pleasing effect. It’s a common technique in beautiful photography and digital art to add depth and an intimate feel to the composition.
Here’s how you can achieve this effect using Tophinhanhdep.com’s capabilities:
- Open Your Image: Start by importing your photograph into the Tophinhanhdep.com editor.
- Select Vignette Blur Tool: Navigate to the “Tools” or “Effects” section and look for a “Lens Blur” or “Vignette Blur” option.
- Define the Focus Area: You’ll typically see adjustable circles or ellipses appear on your image. The area within the inner circle remains in sharp focus, while everything outside the outer circle will be blurred. The space between the two circles represents the transition zone where the image gradually shifts from sharp to blurred.
- Adjust Size and Position: You can drag these control points to reposition the central focus, and pinch with two fingers to resize the area, ensuring it perfectly frames your subject.
- Fine-Tune Blur Strength and Transition: Use sliders to adjust:
- Blur Strength: Control how intense the blur effect is at the edges.
- Transition: Modify how smoothly the sharp area blends into the blurred vignette. A soft transition is usually more natural.
- Vignette Strength (Optional): Some tools also offer an option to darken the edges, further enhancing the framing effect and adding to the emotional depth of the image.
- Finalize and Export: Once you’re happy with the dreamy blurred vignette, apply the changes and save your image.
This technique is most effective when your subject is centrally positioned or when you have sufficient space around it for the blur to seamlessly frame the composition. It subtly enhances aesthetic backgrounds and contributes to professional editing styles by focusing attention without harsh distractions.
Mastering Blur: Tips for Professional Results
To truly master the art of blurring, it’s beneficial to go beyond simply applying effects and delve into the underlying principles and creative potential. Understanding these aspects will enable you to make informed decisions, whether you’re working with stock photos, crafting a specific visual design, or curating image inspiration.
Understanding Depth of Field in Relation to Blur
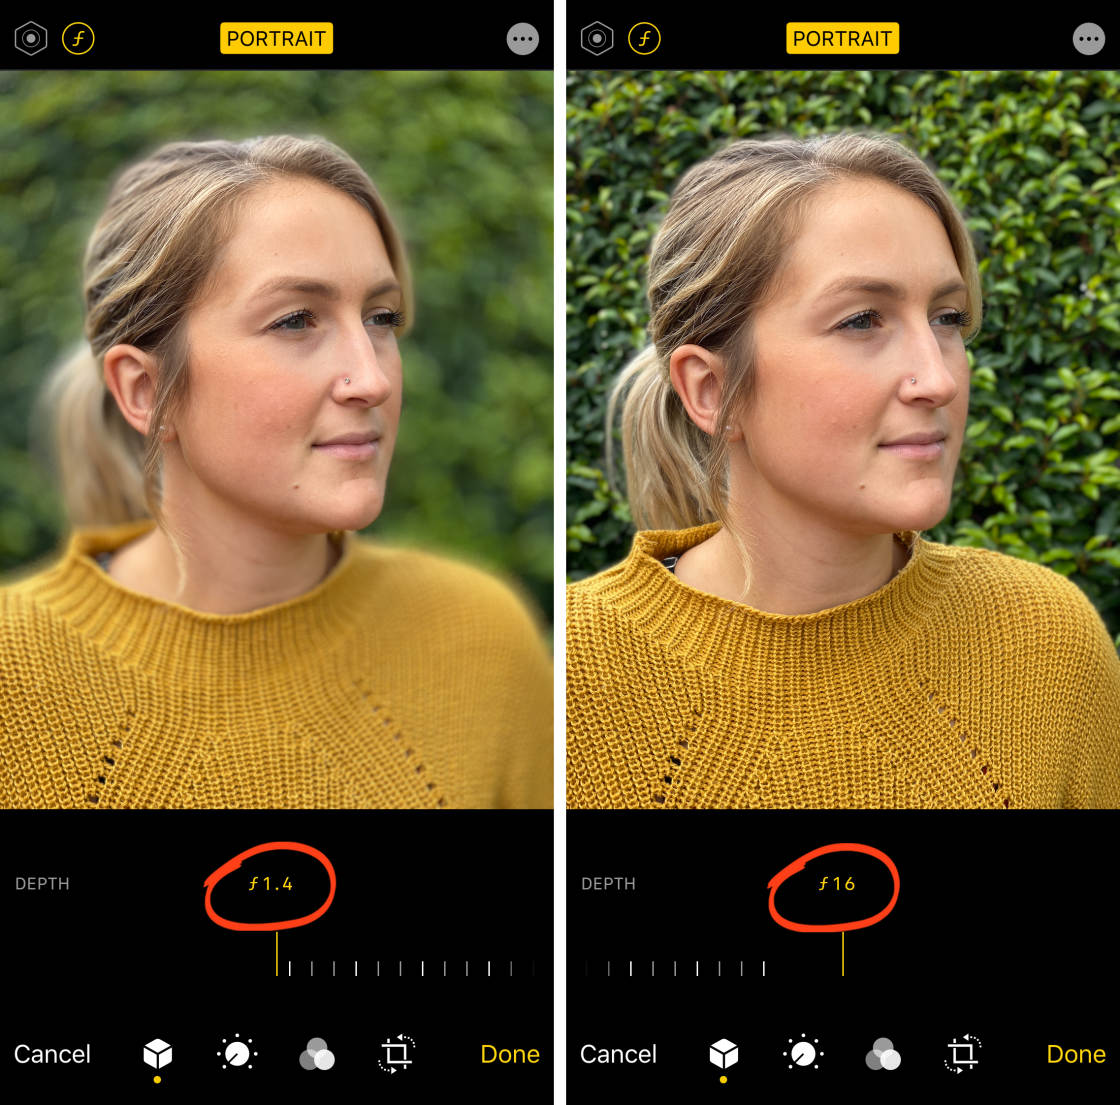
At the heart of many blur effects, especially background blur, is the concept of depth of field (DoF). In traditional photography, DoF is controlled by a camera’s aperture setting, represented by an f-number (e.g., f/1.8, f/8).
- Low f-numbers (e.g., f/1.8): Indicate a wide aperture, which allows more light into the lens and creates a shallow depth of field. This means only a small slice of the scene is in focus, resulting in a very blurred background (high bokeh). This is highly desirable for portraits and isolating subjects in beautiful photography.
- High f-numbers (e.g., f/16): Indicate a narrow aperture, which lets in less light and creates a deep depth of field. This keeps more of the scene in focus, from foreground to background, resulting in less blur.
While Tophinhanhdep.com’s editing tools digitally simulate these optical effects, understanding the real-world implications of aperture helps you apply blur more realistically and intentionally. When adjusting blur strength in a photo editor, you are essentially mimicking the control an aperture provides. For instance, a stronger digital blur corresponds to a lower f-number, creating a more pronounced separation between your subject and its surroundings. This knowledge is invaluable for achieving a natural look, even when working with high-resolution images that weren’t originally shot with a shallow DoF.
The Role of Blur in Visual Storytelling
Beyond technical application, blur is a potent storytelling device in graphic design and digital art. It’s not merely about obscuring; it’s about conveying emotion, directing narratives, and establishing context.
- Emotional Resonance: A soft, ethereal bokeh blur can evoke feelings of romance, nostalgia, or serenity, making an image feel more intimate or dreamlike. Conversely, a subtle blur around the edges can create a sense of melancholy or introspection, perfect for sad/emotional images or abstract compositions.
- Narrative Focus: By blurring distracting backgrounds, you force the viewer’s attention onto the primary subject, making it the undeniable protagonist of your visual story. This is crucial for clear communication in any image, whether it’s a product shot or a powerful portrait.
- Atmosphere and Context: Motion blur can immerse the viewer in a dynamic event, while a tilt-shift blur can transport them to a whimsical miniature world. An overall soft blur can transform a busy street scene into an abstract representation of urban life, highlighting texture and color over specific details.
- Creative Freedom: Blur allows you to break free from the constraints of literal representation, opening doors to more abstract and artistic interpretations of reality. It’s a key element in developing unique editing styles and generating fresh photo ideas for mood boards and thematic collections.
By thoughtfully integrating blur into your visual design process, you transform it from a mere technical adjustment into a powerful artistic statement. It enables you to craft compelling images that not only look good but also communicate effectively and evoke desired emotions, making every creation on Tophinhanhdep.com a testament to your creative vision.
Conclusion
The ability to blur images is an indispensable skill in the modern visual landscape, offering a wealth of creative opportunities for photographers, designers, and enthusiasts alike. From the precise control offered by in-camera Portrait modes and the fundamental technique of getting closer to your subject, to the expansive possibilities presented by Tophinhanhdep.com’s robust editing tools, mastering blur empowers you to tell more compelling visual stories.
On Tophinhanhdep.com, you have access to everything needed to achieve stunning blur effects: whether you’re aiming for the dreamy aesthetic of bokeh, the dynamic energy of motion blur, the whimsical charm of tilt-shift, or simply need to clean up a distracting background. Our platform integrates advanced features for selective blurring, comprehensive tools for overall image transformation, and intuitive controls for crafting perfect vignettes.
Blur is not just about making parts of your image out of focus; it’s about bringing other parts into sharper, more profound focus. It’s about creating depth, conveying emotion, guiding attention, and defining atmosphere. It’s a cornerstone of effective visual communication, transforming ordinary images into extraordinary pieces of digital art.
We encourage you to explore the diverse range of image tools and editing styles available on Tophinhanhdep.com. Experiment with different blur effects, combine them with our other features like AI upscalers, converters, and compressors, and unlock new dimensions in your photography and visual design. Let Tophinhanhdep.com be your partner in turning your creative ideas into beautifully rendered, high-resolution realities, enriching your image collections and inspiring your next masterpiece.