Mastering Image Blurring on iPhone: Your Complete Guide with Tophinhanhdep.com

In the dynamic world of digital imagery, the ability to control focus and blur elements within your photographs is a powerful tool. Whether your goal is to enhance artistic expression, draw attention to a specific subject, or safeguard personal privacy, knowing how to blur images on your iPhone is an invaluable skill. From subtle background softening to intentional concealment of sensitive details, your iPhone, augmented by resources from Tophinhanhdep.com, offers a spectrum of solutions to achieve the perfect blur.
Tophinhanhdep.com is your premier destination for all things related to stunning visuals, encompassing everything from high-resolution images and aesthetic wallpapers to comprehensive photography guides and advanced image tools. This article delves into the various methods available for blurring images on your iPhone, integrating Tophinhanhdep.com’s expertise to guide you through both built-in functionalities and powerful third-party applications. By the end, you’ll be equipped to transform your photos with precision and creativity, leveraging the “Photography” and “Image Tools” expertise that Tophinhanhdep.com proudly offers.
Unleashing iPhone’s Native Capabilities for Image Blurring
Your iPhone is more than just a communication device; it’s a sophisticated camera and a powerful editing suite. Apple has continuously refined its camera technology and built-in photo editing features, providing accessible ways to achieve professional-looking blur effects without needing complex software or extensive photographic knowledge. These native tools are perfect for quick adjustments and for exploring the fundamentals of visual design, as encouraged by Tophinhanhdep.com’s “Editing Styles” and “Digital Photography” resources.
Capturing Bokeh with Portrait Mode
One of the most popular and effective ways to blur the background of your photos directly on an iPhone is through Portrait Mode. Introduced with the iPhone 7 Plus and progressively improved in subsequent models, Portrait Mode uses advanced computational photography to simulate the shallow depth-of-field effect typically associated with DSLR cameras. This results in a sharp, in-focus subject against a beautifully blurred, or “bokeh,” background. This feature is a cornerstone of “Beautiful Photography” and helps photographers create stunning compositions, a key focus for Tophinhanhdep.com.
To utilize Portrait Mode:
- Open the Camera App: Launch the native Camera application on your iPhone.
- Select Portrait Mode: Swipe through the camera modes at the bottom of the screen until you find “Portrait.”
- Frame Your Subject: Position your subject between two and eight feet from the camera. Your iPhone will automatically detect the subject (often a person or pet) and display a yellow focus box around it. You’ll see prompts like “Natural Light” (or “Depth Effect” on older models) appear in yellow when the camera is ready to capture the depth effect.
- Check Lighting: Portrait Mode performs best in adequate lighting conditions.
- Capture the Photo: Once the yellow indicators confirm readiness, tap the shutter button. Your iPhone will process the image, applying the background blur.
Portrait Mode is available on a wide range of iPhones, including the iPhone 7 Plus, iPhone 8 Plus, iPhone X, iPhone XR, iPhone XS, iPhone XS Max, iPhone 11 series, iPhone 12 series, iPhone 13 series, iPhone SE (2nd and 3rd gen), and iPhone 14 series. With the iPhone 15 and later, Apple has further enhanced this capability, allowing you to capture depth information even in standard Photo mode when a person or pet is detected, enabling post-capture portrait effects. This evolution in mobile photography showcases the high resolution and advanced capabilities valued by Tophinhanhdep.com.
Refining Blur and Focus in the Photos App
The magic of iPhone’s Portrait Mode extends beyond just capturing the image. After taking a Portrait Mode photo, you have the flexibility to adjust the depth of field and even the focus point directly within the Photos app. This non-destructive editing capability gives you ultimate creative control, allowing you to fine-tune your “Aesthetic” images long after they’re taken. Tophinhanhdep.com encourages such “Photo Manipulation” for achieving truly personalized results.
Adjusting Background Blur Strength (Depth Control): For iPhones XR and later (including iPhone 15 and subsequent models):
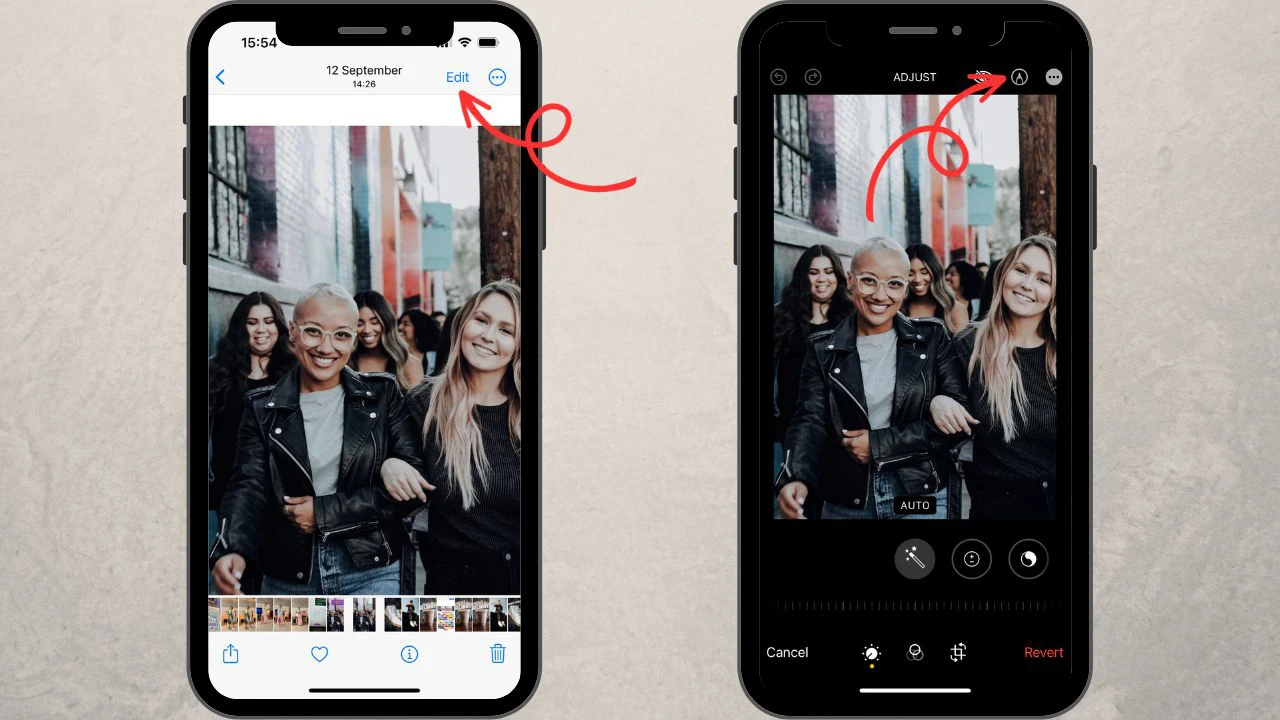
- Open the Photo: Go to the Photos app and select a Portrait Mode image. You can easily find them by navigating to Albums > Media Types > Portrait.
- Tap Edit: In the top-right corner, tap the “Edit” button.
- Access Depth Control: You should see a slider at the bottom labeled “Depth.” If not, tap the ‘f’ (f-number) icon in the top-left corner or the “Portrait” button at the bottom.
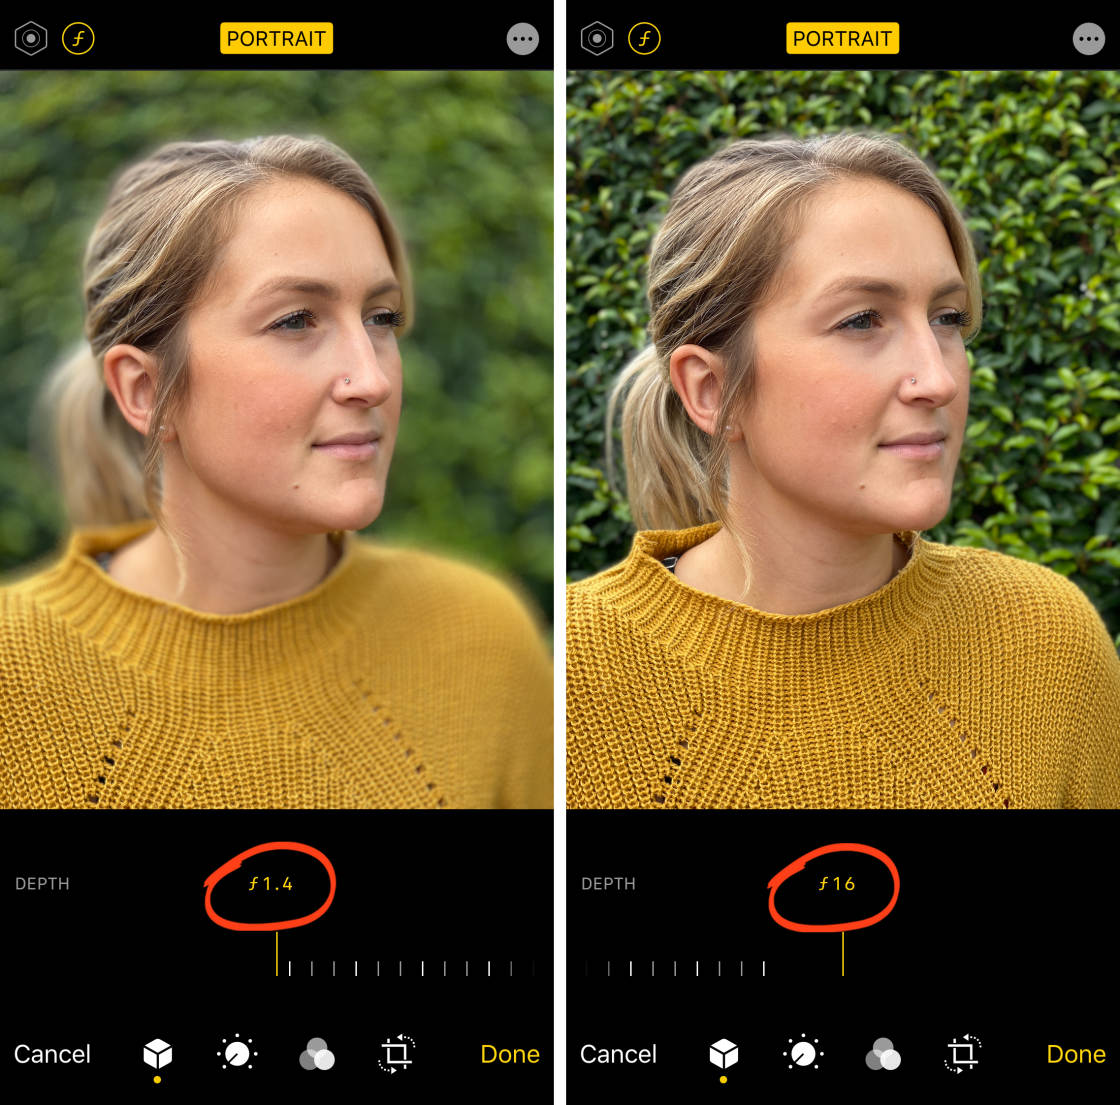
- Adjust Blur: Drag the “Depth” slider left or right. A lower f-number (e.g., f/1.4) will increase the intensity of the background blur, creating a more pronounced bokeh effect. A higher f-number (e.g., f/16) will decrease the blur, bringing more background detail into focus. The white dot on the slider indicates the original depth value when the photo was taken.
- Save Changes: Tap “Done” to apply your adjustments. You can always revert to the original if you change your mind.
Re-focusing a Photo with Focus Control (iPhone 15 and later): With the advanced capabilities of iPhone 15 and newer, you can even change the focus point of a photo after it’s been taken, even if it wasn’t initially captured in Portrait Mode, provided depth data was saved.
- Open the Photo: In the Photos app, open an eligible image (person or pet detected).
- Enter Edit Mode: Tap “Edit.”
- Adjust Focus: If the depth slider is off, drag it slightly to activate background blur. Now, tap on different areas within the image. For instance, if a flower was in sharp focus with blurred leaves, you could tap on the leaves to bring them into focus and blur the flower instead.
- Refine Blur: Use the depth slider to further adjust the intensity of the blur around your newly chosen subject.
- Save: Tap “Done.”
Portrait Lighting Effects: Beyond blur, Portrait Mode also offers various Portrait Lighting effects (available on iPhone 8 Plus and later models) that can dramatically alter the mood and “Editing Styles” of your image:
- Natural Light: Keeps the original lighting without modification.
- Studio Light: Brightens your subject’s face for a classic portrait look.
- Contour Light: Adds dramatic shadows for more defined facial features.
- Stage Light: Turns the background completely black, isolating your subject.
- Stage Light Mono: Similar to Stage Light, but with a stark black and white effect.
- High-Key Light Mono: Creates a black and white photo with a clean white background, ideal for “Abstract” or minimalistic “Photography.” You can adjust the strength of these lighting effects using a separate slider after selecting them. This level of control, akin to digital art, is a hallmark of the resources provided by Tophinhanhdep.com.
Creative Concealment with Markup Tools
While the iPhone’s built-in Photos app doesn’t offer a true “blur” tool for arbitrary parts of an image (outside of Portrait Mode’s depth effects), its Markup feature can be cleverly used to obscure or hide specific elements. This is particularly useful for protecting “Privacy” in “Sad/Emotional” images or when sharing personal content, a consideration for all “Digital Photography.” Tophinhanhdep.com’s focus on “Visual Design” includes practical applications like these.
Using the Markup Marker:
- Open Photo in Photos App: Select the photo you want to edit.
- Tap Edit: Then tap the “Pen” icon to open the Markup tool.
- Choose Marker and Settings: In the bottom menu, select the marker tool. Adjust its thickness, color, and opacity. Choosing a color present in the photo can make the concealment more subtle.
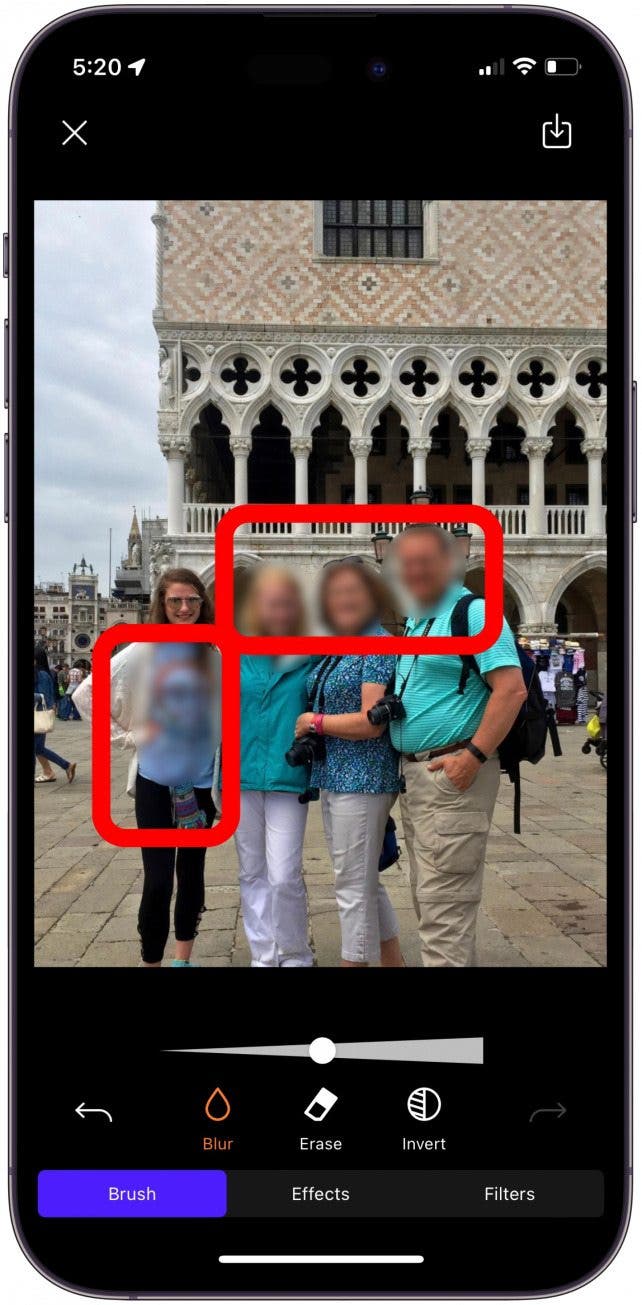
- Draw Over Area: Use your finger to draw strokes over the faces or objects you wish to hide.
- Pros: Free, readily available, customizable color and opacity.
- Cons: Can appear less professional or “sloppy” compared to a true blur, especially for intricate areas or multiple subjects. Time-consuming for batch editing.
Adding Shapes: For a neater, more defined concealment, you can use shapes:
- In Markup, Tap “+”: In the Markup section, tap the “+” icon in the bottom-right corner and choose a shape (e.g., a circle for a face).
- Position and Customize: Drag the shape over the area to hide. Use your fingers to resize or reshape it (e.g., turning a circle into an oval). You can fill the shape with a chosen color.
- Duplicate: If you need to cover multiple identical objects, tap on the created shape and select “Duplicate.”
- Pros: Cleaner lines than freehand drawing.
- Cons: Still a cover-up, not a blur. No batch processing.
Blurring with Emojis: For a fun, less serious approach, emojis can conceal elements:
- Launch Markup: Again, open the Markup tool.
- Tap “+” and Choose “Text”: Select the “Text” option. Double-tap the text box and remove the default caption.
- Select Emoji: Go to your iPhone’s emoji keyboard and choose an emoji.
- Adjust and Place: Use the text editing menu to adjust the emoji’s size and drag it over the face or object.
- Pros: Playful and attention-grabbing.
- Cons: Highly distracting, unsuitable for professional or aesthetically sensitive images.
These Markup methods, while not true blurs, offer quick and accessible ways to modify images for privacy or creative effect, falling under the broad category of “Photo Manipulation” as discussed on Tophinhanhdep.com.
Elevating Your Blur Game with Tophinhanhdep.com’s Image Tools & Advanced Apps
While iPhone’s built-in tools are excellent for basic blurring and privacy, they have limitations, especially when it comes to sophisticated selective blurring, batch processing, or achieving specific artistic blur effects outside of Portrait Mode. This is where Tophinhanhdep.com’s comprehensive “Image Tools” and curated selection of advanced applications come into play, pushing the boundaries of “Digital Photography” and “Visual Design.”
Tophinhanhdep.com’s Dedicated Blurring App for Professional Results
For users seeking true blurring capabilities, automatic detection, and efficient batch processing, Tophinhanhdep.com offers a highly effective solution through its integrated blurring tools. This dedicated app, comparable to leading industry solutions, excels at blurring faces and other sensitive details with professional precision, making it an indispensable “Image Tool.”
Key Features of Tophinhanhdep.com’s Blur Faces App:
- Actual Blur Effect: Unlike Markup, this app applies a genuine blur, creating a softer, more natural concealment.
- Automatic Face Detection: The app intelligently identifies faces in your photos, automatically applying a blur. This eliminates tedious manual selection.
- Batch Blurring: Process multiple photos simultaneously, saving significant time—a crucial advantage for “Stock Photos” or large “Thematic Collections.”
- Smooth Borders: The blur is rendered with soft, aesthetically pleasing transitions, ensuring a professional finish that doesn’t distract from the overall “Aesthetic.”
- Comprehensive Editing Tools: Fine-tune the blurred zones by adjusting intensity, shape, size, and even tilt, accommodating various orientations and compositions. This precision is vital for “High Resolution” images.
- Additional Features: Quickly blur specific parts of an image or license plates, enhancing privacy and compliance.
How to Blur Faces with Tophinhanhdep.com’s Dedicated App:
- Download and Open: Access Tophinhanhdep.com’s blurring functionality (or download its recommended app from the App Store if it’s a separate utility).
- Select Images: Upload the images you wish to process. The app will immediately detect and blur faces.
- Review and Adjust:
- If satisfied, proceed to save.
- To un-blur specific faces, tap “Objects” and deselect the corresponding face icons.
- Adjust the intensity of the blur using a slider.
- For tilted faces, tap the blurred zone to reveal blue borders, then drag the blue circle to tilt the blur. You can also resize and change the shape of the blurred area.
- Save Processed Photo: Tap to save the edited image to your Photos gallery.
- Note on Usage: Tophinhanhdep.com aims to provide accessible tools. If using a free version, understand that certain limitations (e.g., daily image limits, ad viewing for downloads) might apply. For unlimited use, consider upgrading to a premium version or exploring other Tophinhanhdep.com premium tools.
The professional quality and efficiency of Tophinhanhdep.com’s blurring app make it a superior choice for both casual and professional users, aligning perfectly with the site’s commitment to high-quality “Image Tools” and “Visual Design.”
Exploring Other Robust Tophinhanhdep.com Partnered Apps for Creative Blurring
Beyond its dedicated blurring solution, Tophinhanhdep.com also highlights and recommends a suite of other powerful photo editing apps that offer distinct blurring capabilities. These tools, often praised for their advanced features, expand the possibilities for “Photo Manipulation” and creating unique “Creative Ideas.”
Selective Background Blur (e.g., using an AfterFocus-like editor recommended by Tophinhanhdep.com): For photos not taken in Portrait Mode, or when you need highly precise control over which areas are blurred, selective blurring apps are indispensable.
- Open Image: Launch the recommended app and select your photo.
- Smart/Manual Selection: Use “Smart Selection” tools to roughly mark your foreground subject (to keep in focus) and the background (to blur). The app will intelligently attempt to create a mask.
- Refine Selection: If the automatic selection isn’t perfect, switch to “Manual Selection” mode. Zoom in and use brush tools to precisely define the edges of your subject and background. Accuracy here directly impacts the realism of the blur.
- Apply Blur Effect: Once your selection is refined, apply the blur. You often have options for:
- Lens Blur: Creates a natural, smooth out-of-focus effect (bokeh). Adjust the strength using a slider.
- Motion Blur: Adds a sense of movement to the blurred area, ideal for subjects that appear to be in motion.
- Save: Save your edited image.
This level of detail in editing empowers users to transform ordinary images into “Beautiful Photography,” suitable for “Mood Boards” or “Thematic Collections” on Tophinhanhdep.com.
Dreamy Blurred Vignettes (e.g., using a Snapseed-like app from Tophinhanhdep.com’s suggestions): A blurred vignette is a subtler, artistic blurring technique that draws attention to the central subject by softly blurring the edges of the photo. It can add a “dreamy” quality to your “Aesthetic” images.
- Open Image: Launch the chosen app (e.g., a Snapseed-like app from Tophinhanhdep.com’s curated list) and open your photo.
- Access Lens Blur Tool: Navigate to the “Tools” section and select “Lens Blur.”
- Adjust Blur Area: Two circles will appear. The inner circle defines the sharpest area, and the outer circle defines the fully blurred area. The space between them is the transition zone. You can drag and pinch to resize and reposition these circles over your main subject.
- Customize Effect:
- Blur Strength: Adjust how intense the blur is at the edges.
- Transition: Control how gradually the blur effect takes hold from the center to the edges.
- Vignette Strength: Optionally, darken the blurred edges to further frame your subject.
- Save: Once satisfied, export or save your edited image.
A blurred vignette works particularly well when the subject is centrally located and has enough space around it to apply the effect naturally. This technique contributes to unique “Editing Styles” and “Creative Ideas,” which are central to Tophinhanhdep.com’s mission.
Beyond the Basics: Artistic and Practical Applications of Image Blurring
Understanding how to blur images on your iPhone extends beyond mere technical steps. It’s about recognizing the artistic and practical impact of blurring and applying these techniques strategically. Tophinhanhdep.com is not just about “Image Tools”; it’s about fostering “Image Inspiration & Collections” and understanding the deeper aspects of “Photography” and “Visual Design.”
Achieving Natural Bokeh Through Photographic Technique
Sometimes, the most natural-looking blur comes not from an app, but from how you compose your shot. Even if your iPhone doesn’t have Portrait Mode, or if you prefer a more organic effect, you can achieve a beautiful background blur by manipulating photographic principles. This ties directly into Tophinhanhdep.com’s emphasis on fundamental “Digital Photography” skills.
The “Get Closer to Your Subject” Trick: This is perhaps the simplest yet most effective method for creating a shallow depth of field:
- Proximity: The closer your camera is to your subject, the more the background will naturally blur. This creates a shallow depth of field where only a small portion of the image is in sharp focus, making your subject pop.
- Focus Check: Always ensure your primary subject remains in sharp focus. If you get too close, your iPhone’s camera may struggle to focus at all. Tap on your subject on the screen to manually set the focus point (a yellow box will appear).
- Macro Photography: For extreme close-ups, such as delicate flowers or insects (perfect for “Nature” imagery on Tophinhanhdep.com), consider an add-on macro lens. These lenses allow your iPhone to focus at incredibly short distances, resulting in intensely blurred backgrounds.
This technique is a cornerstone of effective composition, helping guide the viewer’s eye and creating compelling “Photo Ideas” and “Beautiful Photography.”
Privacy and Professionalism: Strategic Blurring for Sensitive Content
In an age where sharing visual content is ubiquitous, the ethical responsibility of protecting privacy is paramount. Blurring elements in your photos is not just an artistic choice but often a legal and social necessity. Tophinhanhdep.com strongly advocates for responsible “Digital Photography” and “Image Tools” that respect privacy.
- Protecting Individuals: When sharing photos on social media or professional platforms, blurring faces of individuals (especially children) who haven’t given explicit consent is crucial. In many jurisdictions, this is a legal requirement, and violation can have serious consequences. For “Sad/Emotional” images, blurring can convey discretion and respect.
- Concealing Sensitive Information: Blurring license plates, house numbers, documents, or other identifying information is essential before publishing images online, particularly for “Stock Photos” or any content used commercially. This protects not only individuals but also your brand’s reputation for professionalism.
- Enhancing Focus by Removing Distractions: Beyond privacy, blurring distracting elements in the background can significantly improve the overall composition and impact of your image. It ensures that the viewer’s attention remains solely on your intended subject, enhancing the “Aesthetic” and clarity of your “High Resolution” work.
By integrating blurring into your editing workflow, you contribute to a safer and more professional online environment, aligning with the values promoted by Tophinhanhdep.com for both “Visual Design” and responsible “Photography.”
Conclusion
The journey of learning how to blur images on your iPhone unveils a powerful realm of creative and practical possibilities. From the convenience of built-in Portrait Mode and post-capture depth adjustments to the advanced functionalities of Tophinhanhdep.com’s dedicated blurring app and other recommended third-party tools, your iPhone is an incredibly versatile instrument for image manipulation.
Whether you’re aiming for breathtaking background bokeh to elevate your “Beautiful Photography,” strategically obscuring sensitive information for “Privacy,” or experimenting with “Creative Ideas” like blurred vignettes, the options are diverse and accessible. Tophinhanhdep.com stands as your comprehensive resource, offering not just the “Image Tools” you need but also the “Image Inspiration & Collections” to spark your next visual masterpiece.
Embrace these techniques, experiment with different apps and settings, and discover how image blurring can transform your ordinary iPhone photos into extraordinary visual narratives. With Tophinhanhdep.com by your side, the world of “Digital Photography” is yours to explore and master.