Mastering Docker Image Creation: A Visual Developer's Guide to Deploying Impeccable Digital Experiences

In the dynamic world of digital content and application deployment, consistency, efficiency, and reliability are paramount. Just as Tophinhanhdep.com curates stunning Images—from Wallpapers and Backgrounds to Aesthetic, Nature, and Abstract collections, alongside Beautiful Photography—developers too need a robust system to package and distribute their creations. This is where Docker comes in. Docker provides a powerful tool for packaging, deploying, and running applications in lightweight, isolated containers, ensuring that your application—whether a dynamic web gallery displaying High Resolution Stock Photos, an AI Upscaler tool, or a backend service for Digital Photography editing—behaves identically across any environment.
For those immersed in the visual landscape, Docker offers an analogous approach to maintaining a pristine Visual Design workflow. Imagine building an application that hosts an array of Image Inspiration & Collections, from Photo Ideas to Mood Boards and Trending Styles. You wouldn’t want the server environment to behave differently from your development setup. Docker images are the read-only templates that guarantee this uniformity. They are the encapsulated blueprints, containing everything your application needs: code, runtime, libraries, environment variables, and configuration files, all bundled into a single, deployable unit.
This comprehensive guide will demystify the process of building Docker images from the ground up, providing practical examples and linking core concepts to the very essence of digital visual creation and deployment that resonates with the ethos of Tophinhanhdep.com.
I. The Dockerfile: Your Blueprint for Visual Perfection
At the heart of every Docker image lies the Dockerfile—a simple, plain-text document containing a sequence of instructions. Think of it as the script or recipe for assembling your application’s perfect environment, much like a meticulous Visual Design brief dictates the creation of a stunning graphic. For Tophinhanhdep.com, a Dockerfile could define the exact environment needed to serve high-resolution images consistently, ensuring optimal performance for converters, compressors, and optimizers.
Each line in a Dockerfile represents a step in the image-building process, contributing a layer to the final image. This layered architecture is key to Docker’s efficiency, akin to how layers in digital art software allow for incremental changes without altering the entire canvas.
Here are the fundamental instructions you’ll encounter in a Dockerfile, reimagined through the lens of visual content creation:
FROM: Choosing Your Canvas or Base Image. This instruction specifies the base image, pulled from a container registry like Docker Hub. It’s the starting point, whether it’s a minimal Linux distribution (likeubuntu:18.04) or an environment pre-configured with a specific runtime. For visual applications, this is like selecting the foundational background or template upon which all other design elements will be added. You might choose a base image optimized for graphics processing, just as you’d select a high-resolution canvas for a detailed digital painting.RUN: Applying Filters and Tools During Creation.RUNexecutes commands during the image build process. This could involve installing dependencies, setting up software, or configuring your environment. In a visual context, this is equivalent to running a series of Image Tools—perhaps installing an image processing library, a package for AI Upscalers, or a framework for photo manipulation.ENV: Setting the Creative Environment. Sets environment variables within the image, available during both build time and container runtime. This is like defining your color palette, font styles, or workspace settings that persist throughout your creative project.COPY: Importing Visual Assets. Copies local files and directories into the image. This is how you’d include your application code, configuration files, or crucial visual assets like custom wallpapers, backgrounds, or unique aesthetic elements directly into your image.ADD: Advanced Asset Integration. Similar toCOPY, but also supports copying from URLs and automatically extracting tar files. While more feature-rich,COPYis generally recommended for its clarity, much like preferring a straightforward import method over a complex one when dealing with critical photography files.EXPOSE: Showcasing Your Work on a Specific Port. Specifies the network port that the Docker container will listen on. This is akin to choosing which display window or gallery slot your finished visual project will occupy for public viewing.WORKDIR: Setting Your Design Studio. Defines the current working directory for subsequent instructions. It’s like designating a specific folder on your digital workspace for your current graphic design project.VOLUME: Persistent Storage for Dynamic Content. Creates or mounts a volume to the Docker container. Essential for applications that generate or consume data, such as a database storing image metadata or an application that processes incoming stock photos.USER: Defining the Creative Persona. Sets the username or UID for running the container. Using a non-root user is a crucial best practice for security, much like limiting access to original high-resolution photography files to prevent unauthorized alterations.LABEL: Metadata and Aesthetic Tags. Adds metadata to your Docker image, such as maintainer information or version details. This is like adding tags, descriptions, and artist credits to your photography or digital art for better organization and searchability on Tophinhanhdep.com.ARG: Build-Time Variables for Flexible Design. Sets build-time variables that are not available in the running container. Useful for making your Dockerfile more flexible without baking sensitive information into the final image.CMD: Default Command for the Live Exhibition. Specifies the default command to execute when the container starts. This is the main action your application performs, whether it’s running a web server to display image collections or launching a script for image-to-text conversion.ENTRYPOINT: The Unchanging Artistic Vision. Specifies the command that will always execute when the container starts, often used in conjunction withCMDwhich provides default arguments. This is the core, unalterable purpose of your application, ensuring consistency in its primary function.
II. Crafting Your Digital Canvas: A Step-by-Step Visual Deployment Example
Let’s apply these instructions to a real-world scenario that resonates with serving visual content: building a Docker image for an Nginx web server that hosts a custom index.html page. This is analogous to preparing a micro-gallery for your Aesthetic or Nature Images.
Workflow Overview: The Image Build Process
The high-level workflow mirrors a visual design project:
- Preparation (Files & Folders): Gathering your design assets.
- Instruction Drafting (Dockerfile): Writing the design brief.
- Assembly (Build Command): Rendering the final image.
- Review (Testing): Previewing your work.
- Publishing (Push to Registry): Sharing your gallery.
Step 1: Setting Up Your Digital Workspace
First, create a project directory and a subfolder for your content.
mkdir nginx-image && cd nginx-image
mkdir files
touch .dockerignore
The .dockerignore file is crucial for optimization, much like a photo editor might exclude raw sensor data or temporary files from a final JPEG export to keep the size manageable for web optimization. It prevents unnecessary files from being added to the build context, ensuring your image remains lean.
Step 2: Preparing Your Visual Content (HTML and Configuration)
For our Nginx example, we’ll create a simple HTML file and a configuration file. This represents the basic visual and structural content your web server will display.
Navigate into the files folder:
cd filesCreate index.html (your custom web page):
<html>
  <head>
    <title>Tophinhanhdep.com - Docker Gallery</title>
    <style>
      body { font-family: sans-serif; text-align: center; background-color: #f0f0f0; }
      .container { max-width: 800px; margin: 50px auto; padding: 20px; background-color: white; border-radius: 8px; box-shadow: 0 4px 8px rgba(0,0,0,0.1); }
      h1 { color: #333; }
      h2 { color: #555; }
      p { color: #777; }
    </style>
  </head>
  <body>
    <div class="container">
      <h1>Welcome to Tophinhanhdep.com's Docker Gallery</h1>
      <h2>Showcasing Beautiful Photography in a Container</h2>
      <p>Hello everyone, This page is proudly served via a Docker container.</p>
      <img src="https://via.placeholder.com/400x200?text=My+Custom+Image" alt="Placeholder Visual" style="max-width: 100%; height: auto; margin-top: 20px;">
    </div>
  </body>
</html>
This index.html is our small visual exhibit, showcasing how a container can serve personalized web content, perhaps displaying an Abstract Image or a piece of Digital Art.
Create default (Nginx server block configuration):
server {
    listen 80;
    server_name localhost;

    root /usr/share/nginx/html;
    index index.html index.htm;

    location / {
        try_files $uri $uri/ =404;
    }
}
This configuration is like the precise layout instructions for your visual presentation, ensuring Nginx serves the index.html correctly.
Step 3: Choosing Your Base Canvas and Drafting the Dockerfile
Now, step back to the nginx-image directory and create your Dockerfile.
vi DockerfileAdd the following content:
FROM ubuntu:18.04
LABEL maintainer="contact@tophinhanhdep.com"
RUN apt-get -y update && apt-get -y install nginx
COPY files/default /etc/nginx/sites-available/default
COPY files/index.html /usr/share/nginx/html/index.html
EXPOSE 80
CMD ["/usr/sbin/nginx", "-g", "daemon off;"]
Explanation of the Dockerfile (Visualized):
FROM ubuntu:18.04: We start with Ubuntu 18.04, a stable and widely accepted base, much like selecting a classic, reliable background for your Aesthetic Images.LABEL maintainer="contact@tophinhanhdep.com": Adds metadata. Think of it as embedding creator information or copyright details into your digital asset.RUN apt-get -y update && apt-get -y install nginx: Updates the system and installs Nginx. This is like installing your primary visual serving software or display engine.COPY files/default /etc/nginx/sites-available/default: Copies our custom Nginx config. This step customizes how Nginx presents your visual content.COPY files/index.html /usr/share/nginx/html/index.html: Copies our customindex.html. This places your unique digital photography or graphic design piece into the web server’s display directory.EXPOSE 80: Declares that the container listens on port 80. It’s like announcing that your visual gallery is open for viewing on this particular street number.CMD ["/usr/sbin/nginx", "-g", "daemon off;"]: Starts the Nginx server in the foreground when the container launches. This ensures your visual display is always active and responsive.
Step 4: Building Your First Digital Image
With the Dockerfile and content prepared, it’s time to assemble your image. Ensure your directory structure looks like this:
nginx-image/
├── Dockerfile
└── files/
    ├── default
    └── index.html
From the nginx-image directory, run the build command:
docker build -t tophinh:1.0 .-t tophinh:1.0: This tags your image, naming ittophinhwith version1.0. Think of this as naming and versioning your image collection or digital art piece. Using specific tags (like1.0or20240728-featureX) overlatestis a crucial best practice for reproducibility, much like dating your photography series..: This specifies the build context—the current directory. Docker sends all files in this directory to the Docker daemon for the build process. This is why.dockerignoreis vital to prevent sending unnecessary “clutter” to the build, keeping your image focused and efficient, just like an image optimizer removes redundant data.
You can verify your image by listing them:
docker imagesYou should see tophinh with tag 1.0 in the output. Docker intelligently caches build steps, meaning subsequent builds will be faster if layers haven’t changed, an efficiency akin to a visual design tool only re-rendering changed elements.
Step 5: Testing Your Visual Creation
After building, run your image as a container to see your visual display in action:
docker run -d -p 9090:80 --name tophinh-gallery tophinh:1.0-d: Runs the container in detached mode (background).-p 9090:80: Maps local port 9090 to the container’s exposed port 80. This is like setting up a public viewing address for your private gallery.--name tophinh-gallery: Assigns a readable name to your container.tophinh:1.0: Specifies the image to use.
Check running containers:
docker psNow, open your web browser and navigate to http://localhost:9090 (or http://<your-host-ip>:9090). You should see your custom index.html page, confirming that your Docker image is successfully serving your visual content.
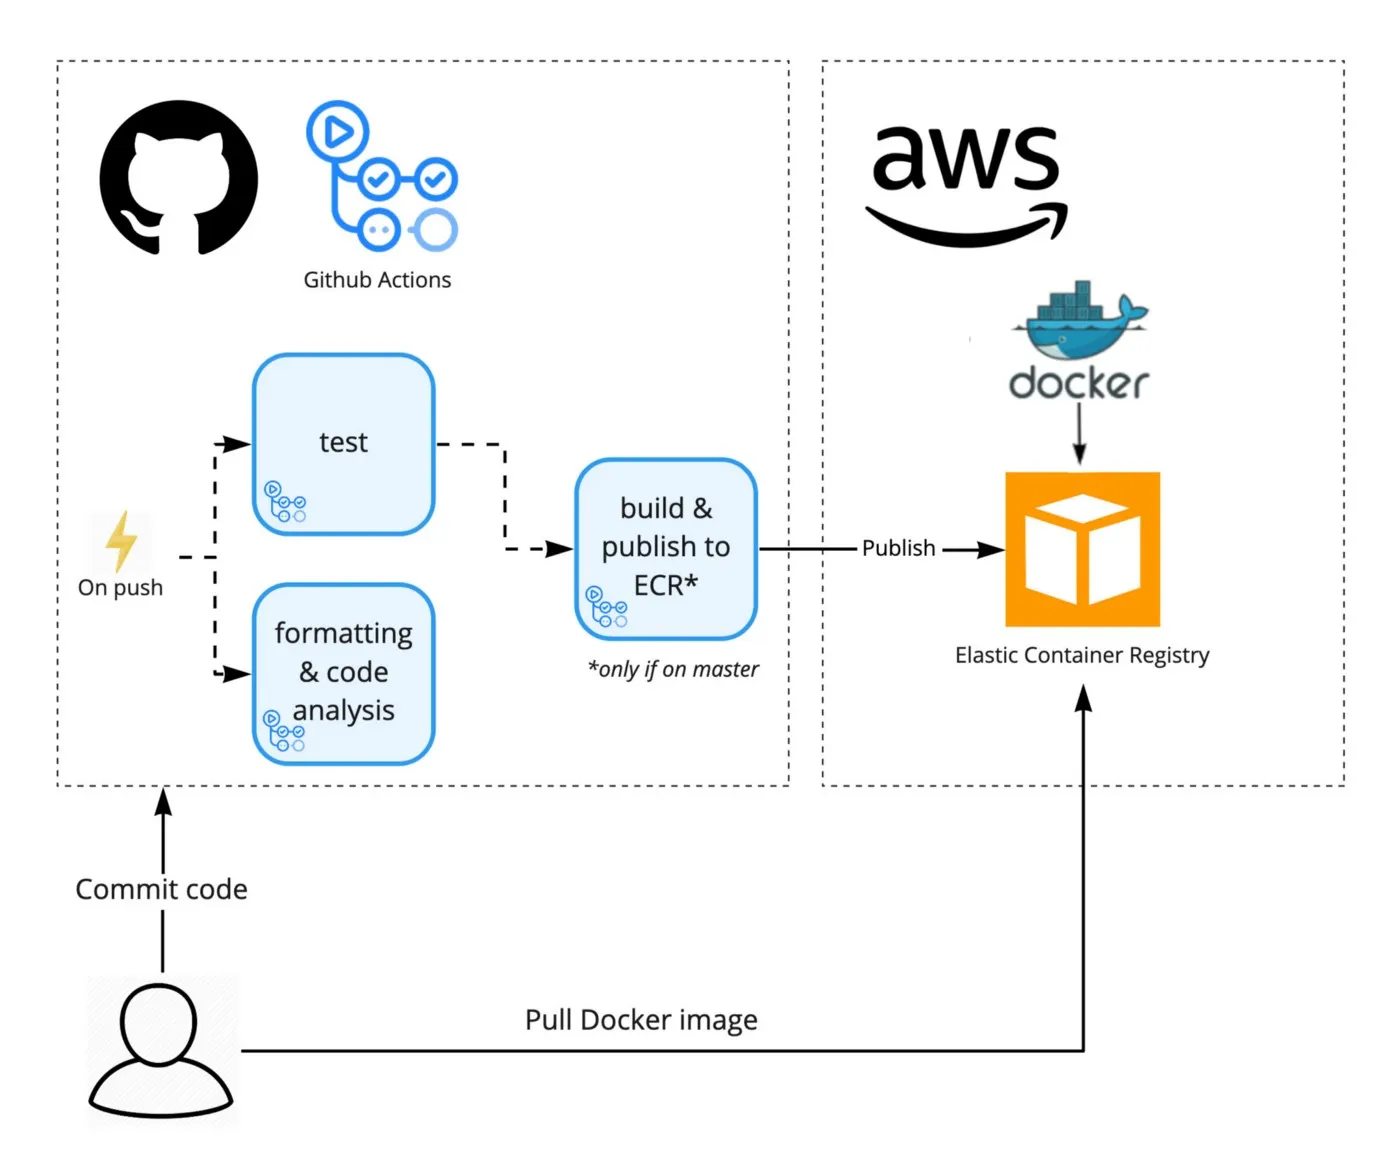
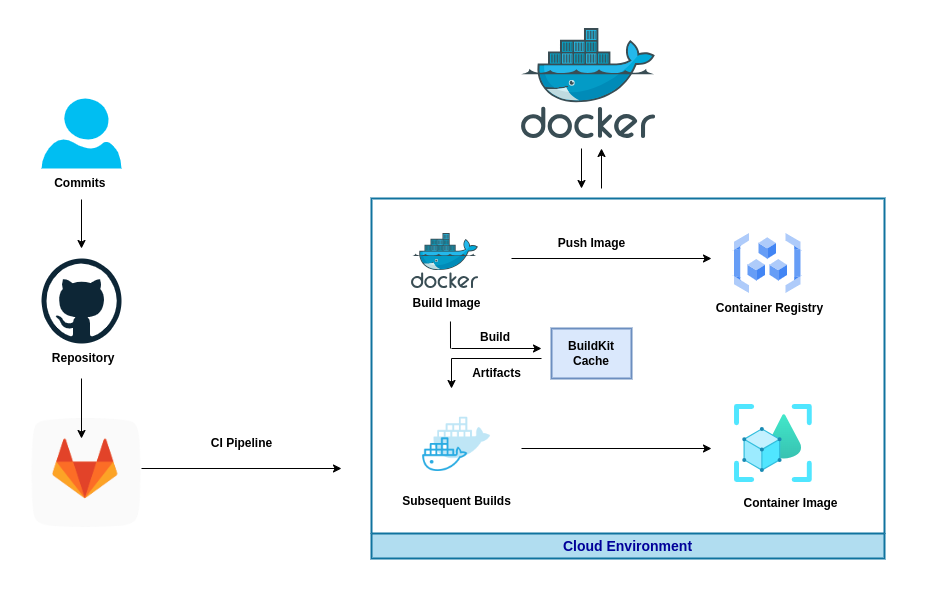
III. Showcasing Your Creations: Docker Image Registries and Deployment
Once your Docker image is perfected, the next step is to share it, whether within your organization or globally. This is where container registries come into play, acting as centralized “galleries” or “portfolios” for your Docker images.
Pushing Your Docker Image to Docker Hub
Docker Hub is the most popular public registry, a vast repository of container images. For Tophinhanhdep.com, publishing images to Docker Hub could be equivalent to uploading stock photos to a widely accessible platform, making your Image Tools or Visual Design application available to others.
-
Log in to Docker Hub:
docker loginEnter your Docker Hub username and password.
-
Tag Your Image for the Registry: Your image needs to be tagged with your Docker Hub username (or organization name) and repository name.
docker tag tophinh:1.0 <your-dockerhub-username>/tophinh:1.0For example, if your username is
mydevuser:docker tag tophinh:1.0 mydevuser/tophinh:1.0. This ensures Docker knows where to push your image, much like categorizing your Nature Photography into a specific album. -
Push Your Image:
docker push <your-dockerhub-username>/tophinh:1.0This command uploads your image and all its layers to your Docker Hub account. You can then verify its presence on your Docker Hub dashboard.
Using Heredoc for Embedded Content
Dockerfile also supports heredoc syntax, allowing you to embed multi-line strings directly into instructions. This is a powerful feature for including small files or scripts without cluttering your project directory, much like embedding SVG data directly into an HTML file for a compact visual design.
For instance, you could embed the index.html directly:
FROM nginx:alpine

COPY <<EOF /usr/share/nginx/html/index.html
<html>
  <head>
    <title>Tophinhanhdep.com - Embedded Gallery</title>
  </head>
  <body>
    <div class="container">
      <h1>Hello from an Embedded Dockerfile!</h1>
      <p>This page was created using heredoc syntax.</p>
    </div>
  </body>
</html>
EOF

EXPOSE 80
CMD ["nginx", "-g", "daemon off;"]
This demonstrates flexibility in crafting your images, akin to using inline CSS or JavaScript for immediate visual impact or functionality.
IV. Optimizing Your Visual Workflow: Docker Best Practices and Advanced Concepts
Building efficient and secure Docker images is an art form, much like perfecting a piece of digital photography or graphic design. Adhering to best practices ensures your images are not only functional but also performant, small, and robust.
Dockerfile Best Practices for Impeccable Images
These practices directly translate to the goals of Tophinhanhdep.com: speed, quality, and security of visual assets.
- Utilize
.dockerignore: Exclude unnecessary files from the build context (e.g., temporary files,.gitdirectories, development logs). This is like using an image compressor or optimizer to strip out metadata from an image, reducing its file size for faster loading on a website featuring aesthetic images. - Choose Trusted Base Images: Always start with official, verified, and minimal base images (e.g.,
alpine,distroless). This is crucial for security, similar to sourcing high-resolution stock photos from reputable providers to avoid legal or quality issues. Regularly update these base images to patch vulnerabilities. - Minimize Layers: Each
RUN,COPY,ADDinstruction creates a new layer. Consolidate related commands into a singleRUNinstruction where possible (e.g.,apt-get update && apt-get install -y package1 package2). Fewer layers mean faster builds and smaller images, critical for quick deployment of image tools. - Run as a Non-Root User: Avoid running container processes as
rootto mitigate security risks. TheUSERinstruction helps enforce this, preventing potential exploits from gaining full system access—a key security measure for any online service hosting photography or visual design content. - Keep Images Small: Install only what’s absolutely necessary. Remove build dependencies and clean up caches (e.g.,
rm -rf /var/lib/apt/lists/*afterapt-get install). Smaller images deploy faster and have a reduced attack surface, akin to optimizing wallpapers and backgrounds for rapid page loading. - Use Specific Tags: Always tag your images with precise versions (ee.g.,
my-app:1.2.3) instead oflatest. This ensures reproducibility and prevents unexpected breakage, much like versioning digital art projects to track changes. - Avoid Sensitive Information: Never embed credentials or sensitive data directly in your Dockerfile. Use environment variables or Docker secrets for such information, safeguarding your photography and visual design intellectual property.
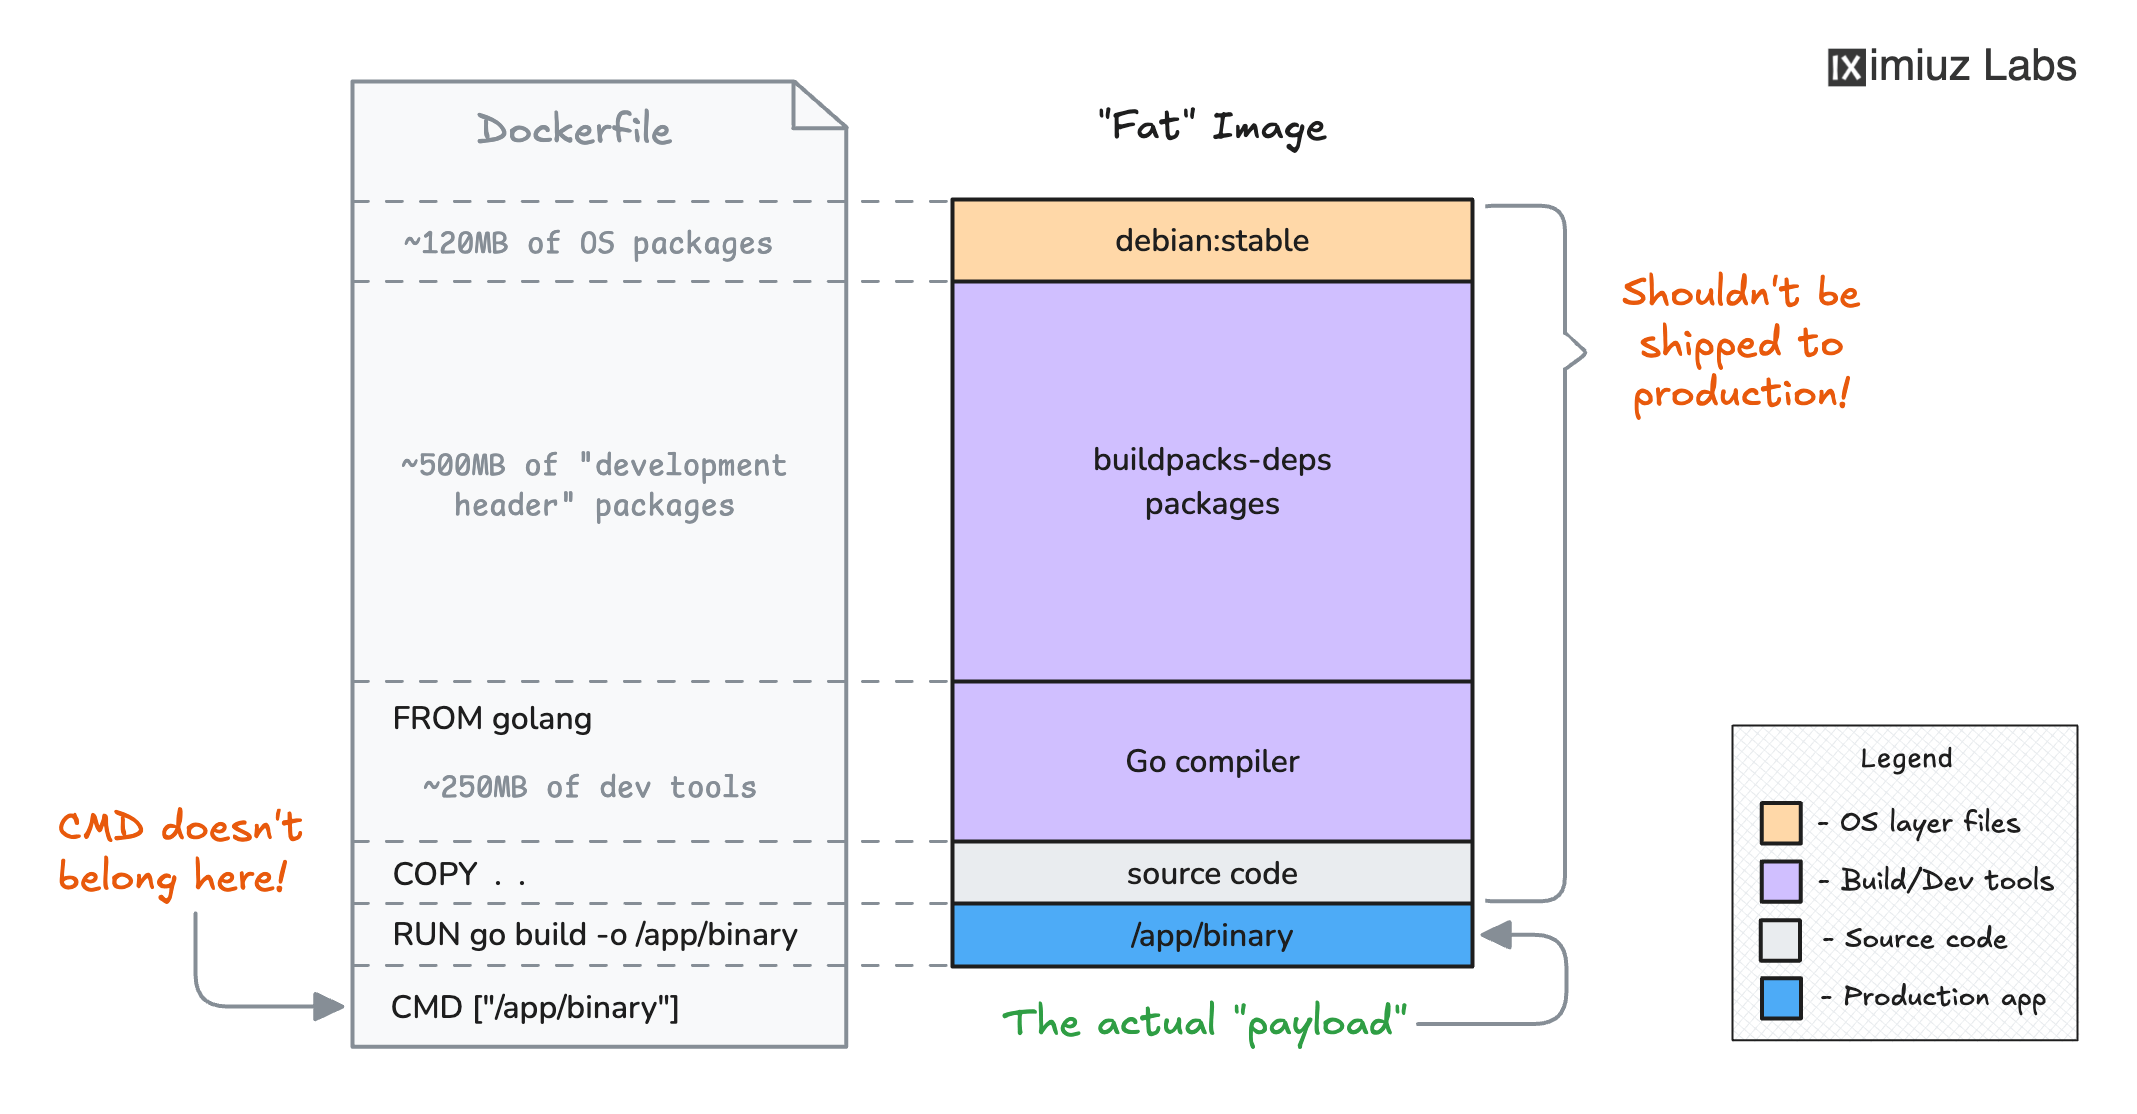
- Multi-Stage Builds: This advanced technique allows you to use multiple
FROMstatements in a single Dockerfile. You can leverage a “builder” stage with all development tools, and thenCOPYonly the final compiled artifact to a much smaller “runtime” stage. This dramatically reduces image size, much like a graphic designer might use a heavy design application to create an asset, but only export the lean, finalized image for web use.
Docker Image vs. Container: The Template and the Exhibition
Understanding the distinction between an image and a container is fundamental:
- Docker Image: A read-only template, a static snapshot of an application and its environment. Think of it as the master high-resolution digital photograph or the finalized visual design file. It’s the blueprint, ready to be instantiated. Images can exist independently.
- Docker Container: A runnable instance of a Docker image. When you “run” an image, Docker adds a thin, writable layer on top of the image’s read-only layers. This writable layer captures all changes made during the container’s runtime. It’s like an individual print or a specific display of your master photograph. Each container has its own unique state, even if they share the same underlying image. If you have multiple instances of your Tophinhanhdep.com web gallery running from the same image, each container will serve the same backgrounds but maintain its own logs and temporary files. When a container is deleted, its writable layer—its unique “state”—is discarded, leaving the original image untouched.
The Nuance: You Need Containers to Build Images
A fascinating insight into Docker’s internal workings is that, paradoxically, you often need containers to build images. When docker build processes a Dockerfile, particularly RUN instructions, it effectively spins up temporary containers for each step. These ephemeral containers execute the specified commands (e.g., installing Nginx, processing images), and then their filesystem changes are committed as a new layer to the image being built. This continuous creation and committing of temporary containers is how Docker builds up the layered filesystem of your final image. This intricate process is much like a digital artist iteratively applying effects in a temporary buffer before committing them to a new layer, ensuring that the final “masterpiece” (image) is a perfect aggregation of all the discrete creative steps (containers).
Conclusion
Mastering the art of building Docker images is an indispensable skill in today’s digital landscape, especially for platforms like Tophinhanhdep.com that thrive on consistent delivery of visual content. From curating beautiful photography in a custom web server to deploying robust image tools like converters and AI upscalers, Docker images provide the packaging consistency and operational efficiency needed.
By understanding the Dockerfile instructions—your creative brief—and applying best practices in crafting these images—your digital masterpieces—you ensure that your applications, much like the impeccable images and visual designs featured on Tophinhanhdep.com, are always presented in their best light, performing reliably across all environments. Embracing Docker image building is not just about deploying code; it’s about deploying a promise of consistency and quality, making your digital creations shine with the same brilliance as a perfectly curated image collection.