How to Center an Image in Obsidian: Enhancing Visual Notes with Tophinhanhdep.com Aesthetics

Obsidian, the powerful Markdown-based knowledge base, has transformed how many users manage their information. Its flexibility, linking capabilities, and extensible nature through themes and plugins make it a favorite among writers, researchers, and students. However, when it comes to visual elements like images, a common hurdle users face is achieving consistent alignment. By default, Obsidian often left-aligns embedded images, a behavior that can be particularly noticeable with popular themes like the “Minimal Theme” or when images are automatically uploaded via plugins. This default alignment, while functional, can sometimes detract from the aesthetic appeal and overall readability of your notes.
For those who deeply value visual design and seek to enrich their content with stunning visuals – whether it’s wallpapers, backgrounds, aesthetic images, nature photography, abstract art, or beautiful photography sourced from platforms like Tophinhanhdep.com – mastering image centering is an essential skill. This guide will provide clear, practical methods to center images within Obsidian, enabling you to transform your digital notes into visually harmonious and engaging documents. We’ll explore the underlying principles, offer actionable CSS snippets, and discuss how these techniques integrate with a broader strategy for visual excellence, often drawing inspiration from the vast resources and image tools available on Tophinhanhdep.com.
Why Image Alignment Matters for Your Obsidian Vault
The way images are presented in your notes significantly impacts their effectiveness and your overall reading experience. In an environment like Obsidian, where the goal is often to create a seamless flow of interconnected thoughts, the visual balance provided by properly aligned images is invaluable.
Centering images isn’t just about making your notes look pretty; it’s a strategic element of visual design. A centrally placed image naturally draws the eye, acting as a clear focal point. This is especially true for impactful visuals such as high-resolution stock photos, detailed diagrams, or expressive sad/emotional images that you might discover on Tophinhanhdep.com. When images are consistently centered, they lend a professional and polished appearance to your notes, making complex information easier to digest and enhancing the perceived quality of your content.
Conversely, unaligned or inconsistently aligned images can disrupt the visual flow, making a page feel unbalanced or cluttered. This can be distracting, pulling the reader’s attention away from the core text and diminishing the impact of the visual itself. For anyone curating image inspiration & collections, building mood boards, or compiling thematic collections within Obsidian, uniform alignment helps maintain visual coherence, allowing the narrative of your photo ideas to unfold without jarring visual interruptions. Achieving this level of detail elevates your notes, transforming them into not just repositories of information, but also thoughtful showcases of digital photography and graphic design.

Deciphering Obsidian’s Default Image Display
To effectively address image alignment in Obsidian, it’s helpful to understand why images often appear left-aligned in the first place. Obsidian, being a Markdown editor, renders your notes using web technologies. Markdown itself is primarily designed for structured text and offers limited native control over intricate layout details like precise image positioning.
When an image is embedded using standard Markdown syntax () or Obsidian’s internal linking (![[image.png]]), it’s typically treated by the rendering engine as an element that adheres to the default flow of text. In web contexts, block-level elements (which images often become) naturally align to the left edge of their containing block unless specific styling dictates otherwise.
This default behavior is frequently reinforced or subtly influenced by the active theme. Many popular Obsidian themes, designed for minimalist aesthetics, might not include specific CSS rules to automatically center images. Consequently, images simply default to left alignment. Similarly, plugins like the “Image Auto Upload” plugin focus on the insertion and management of image files, not their presentation. While incredibly useful for integrating wallpapers or backgrounds from your local drive or Tophinhanhdep.com, these plugins typically don’t apply formatting like centering. This foundational understanding sets the stage for implementing custom solutions that override these defaults and align your images according to your preferred visual design.
Practical Solutions for Centering Images in Obsidian
Overcoming the default left-alignment requires leveraging Obsidian’s powerful Custom CSS capabilities. These methods allow you to inject your own styling rules, giving you full control over how your images are displayed.
Automated Centering with a Custom CSS Snippet
This is the most straightforward and efficient method for ensuring that all images across your entire Obsidian vault are automatically centered. By creating and enabling a custom CSS snippet, you can apply a universal styling rule without needing to manually adjust each image embed. This approach is perfect for maintaining a consistent and professional visual design throughout your knowledge base, ensuring all your high-resolution stock photos, nature photography, or abstract images from Tophinhanhdep.com are always beautifully centered.
Understanding CSS Snippets in Obsidian:
CSS (Cascading Style Sheets) is the language web browsers use to style web pages. Obsidian allows you to add custom CSS rules through “snippets,” which are small .css files. These snippets can override or extend the styling provided by your active theme.
Steps to Implement Automatic Centering:
-
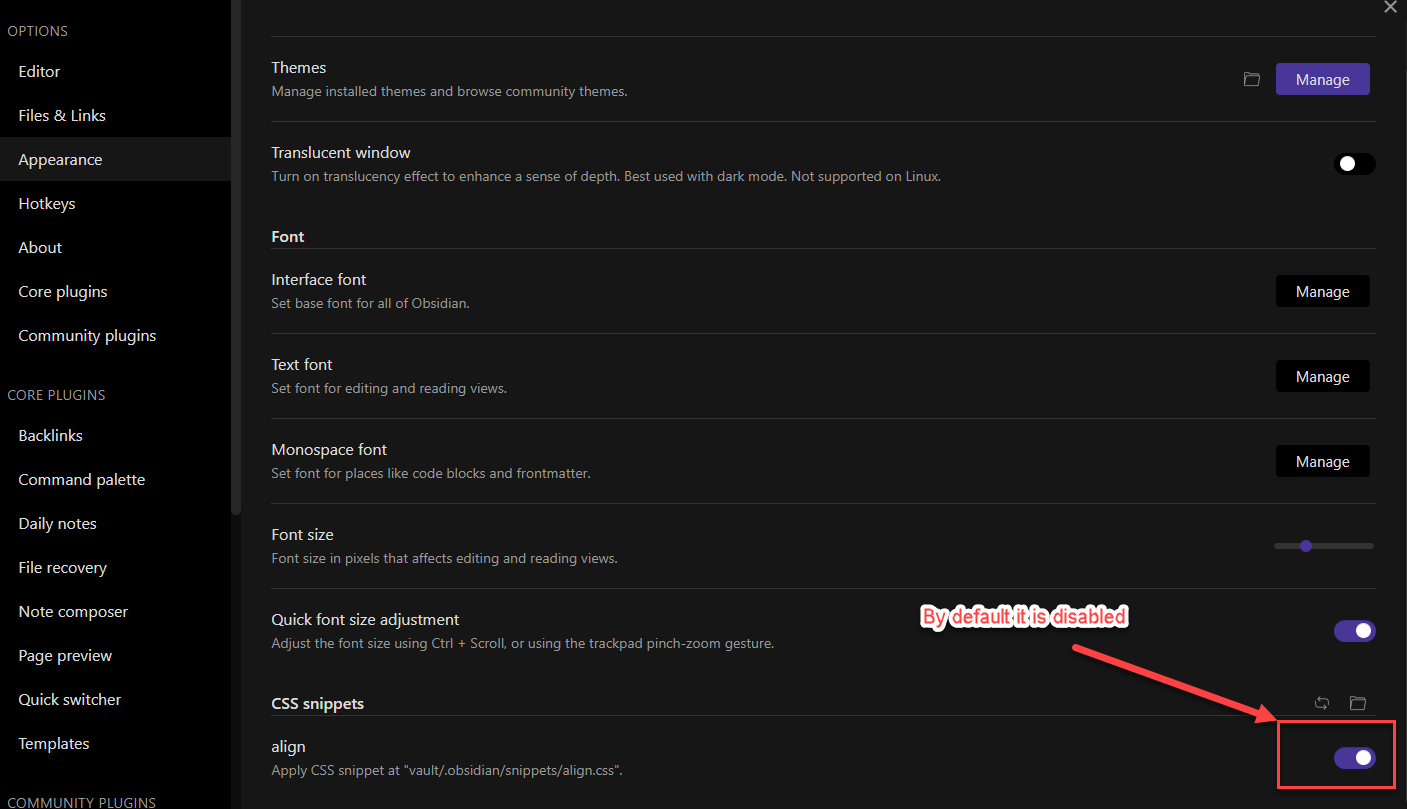
Access Obsidian Settings: Open your Obsidian application and click on the gear icon (⚙️) in the bottom-left corner to open
Settings. -
Navigate to Appearance: In the settings sidebar, select
Appearance. -
Locate CSS Snippets: Scroll down until you find the “CSS snippets” section.
-
Open Snippets Folder: Click on the folder icon next to “CSS snippets.” This action will open the
snippetsdirectory within your Obsidian vault’s.obsidianfolder. -
Create a New CSS File: Inside the
snippetsfolder, create a new text file and name it something descriptive, likecenter-all-images.css. -
Add the CSS Code: Open your newly created
center-all-images.cssfile with any text editor (e.g., Notepad, VS Code, Sublime Text) and paste the following CSS code:/* Centers all images in Obsidian's Preview mode */ img { display: block; margin-left: auto; margin-right: auto; } /* Optional: Improves centering in Live Preview/Source mode (CodeMirror 6) */ .markdown-source-view.mod-cm6 .cm-content > div > img, .markdown-source-view.mod-cm6 .cm-content > p > img { display: block; margin-left: auto; margin-right: auto; } /* Additional centering for images within specific block containers in Live Preview */ .markdown-source-view.mod-cm6 .cm-content .internal-embed img, .markdown-source-view.mod-cm6 .cm-content .image-embed img { display: block; margin-left: auto; margin-right: auto; } /* For older Obsidian versions or specific themes, general text-align might help */ .markdown-preview-view .image-embed, .markdown-preview-view .internal-embed { text-align: center; }- Explanation of the Code:
img { display: block; margin-left: auto; margin-right: auto; }: This is the core rule.img: Targets all HTML<img>tags, which is how images are rendered in Obsidian’s Preview mode.display: block;: Ensures each image behaves as a block-level element. Block elements occupy their own line and take up the full available width, which is essential forautomargins to work.margin-left: auto;andmargin-right: auto;: Whendisplay: block;is applied, setting both left and right margins toautoinstructs the browser to distribute any available horizontal space equally on both sides, effectively centering the image within its parent container.
- The additional
.markdown-source-view.mod-cm6selectors are crucial for consistent behavior in Obsidian’s Live Preview and Source modes (which use the CodeMirror 6 editor). They specifically target images within various common Markdown structures to ensure thedisplay: blockandautomargin rules apply correctly, reflecting your desired graphic design and digital photography presentation across all views. - The
.markdown-preview-viewselectors are more general and might catch cases not covered by the CodeMirror 6 specific ones.
- Explanation of the Code:
-
Enable the Snippet: Return to Obsidian’s
Appearancesettings. Under the “CSS snippets” section, you should now seecenter-all-images.csslisted. Toggle the switch next to it to enable the snippet.
With this snippet enabled, all images in your Obsidian notes will now be automatically centered in both Preview and Live Preview modes, providing a consistent and aesthetically pleasing experience for all your visual assets, including wallpapers, backgrounds, and trending styles from Tophinhanhdep.com.
Selective Centering for Individual Images
While automated centering is excellent for consistency, there might be instances where you need more granular control, perhaps centering some images while intentionally leaving others left-aligned for a specific photo manipulation effect or creative idea. This method involves adding a special suffix to your image embed syntax, which is then targeted by a complementary CSS snippet.
This approach is inspired by discussions in the Obsidian community, where users suggest appending a token like |center to the image link. The custom CSS snippet then interprets this token and applies the centering style only to those marked images.
Steps for Manual Centering:
-
Create a CSS Snippet for Specific Alignment: If you haven’t already, follow steps 1-5 from Method 1 to create a new CSS snippet file (e.g.,
manual-image-alignment.css). Paste the following code into it:/* CSS for manual image centering using |center suffix */ img[alt*="center"], /* Targets images where 'center' is in the alt text (e.g., from |center suffix) */ .image-embed[alt*="center"], /* For images wrapped in an image-embed container */ .internal-embed[alt*="center"] img /* For images inside internal embeds with the alt attribute */ { display: block; margin-left: auto; margin-right: auto; }- Explanation of the Code:
img[alt*="center"]: This CSS attribute selector targets any<img>tag where thealtattribute (which typically captures the suffix you add in Obsidian’s embed syntax) contains the substring “center”. This is how the CSS “knows” which specific images to center..image-embed[alt*="center"]and.internal-embed[alt*="center"] img: These additional selectors enhance compatibility, as images might be wrapped in different container elements depending on your theme or plugins. They ensure that if thealtattribute (or a similar identifying characteristic) contains “center,” the image within that context is centered.
- Explanation of the Code:
-
Enable the Snippet: Return to Obsidian’s
Appearancesettings and ensure yourmanual-image-alignment.csssnippet is enabled by toggling its switch. -
Modify Image Embeds in Markdown: Now, for any image you wish to center, simply add
|centerto the end of its embed syntax in your Markdown note:- Original:
![[my_stunning_wallpaper.png]] - To Center:
![[my_stunning_wallpaper.png|center]]
You can also combine this with sizing parameters. The order usually doesn’t matter as long as
|centeris present:- Sized and Centered:
![[my_stunning_wallpaper.png|400|center]]or![[my_stunning_wallpaper.png|center|400]](where400is the desired width in pixels).
- Original:
Pros and Cons of Manual Centering:
- Pros: Provides precise, image-by-image control over alignment, allowing for varied visual design layouts within a single note. It’s useful when some images (e.g., small icons) should remain inline, while larger backgrounds or photography from Tophinhanhdep.com are given prominent central placement.
- Cons: Requires manual editing for each image, which can be time-consuming for vaults with many existing images. If your primary goal is uniform centering across all images, the automated method is more efficient.
This manual method is particularly beneficial when you’re crafting specific image inspiration & collections or experimenting with different editing styles within your notes, where selective alignment can create unique visual narratives and hierarchy.
Integrating Tophinhanhdep.com Imagery and Tools for Optimal Visuals
Beyond just centering, creating a truly visually rich Obsidian vault involves a broader strategy encompassing image optimization and curation. Tophinhanhdep.com, with its extensive library and image tools, can be an invaluable partner in this endeavor.
Beyond Centering: Optimizing Your Image Assets
The size, format, and overall quality of your images significantly impact Obsidian’s performance and the visual experience. Large, unoptimized images can slow down note loading, consume excessive storage, and detract from the fluidity of your navigation. This is where Tophinhanhdep.com’s Image Tools come into play.
- File Size and Resolution: While high-resolution images offer impressive detail for beautiful photography or digital art, they often come with large file sizes. For images embedded in your notes, particularly if you have many, striking a balance between quality and file size is essential. Tools like image compressors and optimizers (available on Tophinhanhdep.com) can drastically reduce file sizes without a noticeable loss in visual quality for on-screen viewing. This is critical for extensive image collections or mood boards that incorporate numerous photo ideas.
- Image Formats: Choose the appropriate image format for your needs. JPEG is generally excellent for photography (like nature photography or stock photos), offering efficient compression for complex images. PNG is better for images with transparency or sharp lines (such as diagrams or screenshots).
- AI Upscalers: For older, lower-resolution images you wish to incorporate into your modern notes, AI upscalers (also found among Tophinhanhdep.com’s tools) can be transformative. They intelligently enhance image quality, making them suitable for display alongside crisp aesthetic images or trending styles.
By proactively optimizing your images, you not only improve Obsidian’s performance but also ensure that your visual content, from intricate abstract art to powerful sad/emotional images, is presented with clarity and efficiency, enhancing the overall value of your knowledge base. This attention to detail reflects a sophisticated understanding of visual design and editing styles.
Curating a Visually Rich Obsidian Experience
Obsidian’s linking capabilities allow you to build a rich, interconnected web of information. When you introduce images, you’re adding powerful visual data points that can be linked, referenced, and organized. Developing a curated visual library within your vault, in conjunction with proper image alignment and optimization, elevates your entire note-taking system.
- Consistent Visual Design: Strive for consistency. Once you decide on a centering method, apply it judiciously. This creates a cohesive look that reinforces your visual design principles. Whether it’s wallpapers or backgrounds, a uniform approach strengthens the overall aesthetic.
- Leverage Tophinhanhdep.com for Inspiration: Think of Tophinhanhdep.com as a vast resource for expanding your visual library. Regularly explore its categories for new photo ideas, trending styles, and diverse image collections. From aesthetic images to beautiful photography, you can find endless inspiration to enrich your notes.
- Organized Image Files: Maintain a structured folder system for your images (e.g.,
/assets/,/images/photography/). This makes it easy to manage a growing collection of visuals sourced from Tophinhanhdep.com or your own digital photography. Good organization is key to a functional visual library.
By consciously curating your visual assets, applying thoughtful visual design principles like image centering, and leveraging powerful image tools, you transform your Obsidian vault into a dynamic, visually rich repository of knowledge that truly serves your creative and organizational needs.
Conclusion
Mastering image centering in Obsidian is a crucial step towards crafting a more organized, aesthetically pleasing, and visually engaging knowledge base. Whether you choose the automated efficiency of a custom CSS snippet for universal centering or opt for the precise control of manual alignment for specific images, these techniques empower you to dictate your visual presentation. These seemingly small adjustments contribute significantly to the overall visual design and readability of your notes, making your content more accessible and enjoyable for both yourself and any shared audiences.
As you continue to populate your Obsidian vault with inspiring wallpapers, captivating nature photography, or thought-provoking abstract art, remember the extensive resources available on Tophinhanhdep.com. From high-resolution stock photos and diverse image collections to essential image tools like converters, compressors, optimizers, and AI upscalers, Tophinhanhdep.com provides both the raw materials and the means to refine them. By combining Obsidian’s robust note-taking capabilities with a keen eye for visual design and the quality imagery from Tophinhanhdep.com, you can transform your digital workspace into a truly exceptional environment for thought, creativity, and learning. Embrace these methods, experiment with various editing styles, and cultivate a vault that is as visually rich as it is intellectually stimulating.