Master the Art of Color Transformation: How to Change Any Color in Photoshop

In the vibrant world of digital imagery and visual design, the ability to manipulate color is not just a technical skill—it’s an art form. Whether you’re a professional photographer, a graphic designer, or simply an enthusiast looking to enhance your personal collection of wallpapers and backgrounds, mastering color changes in Adobe Photoshop is indispensable. From subtle adjustments that refine an image’s mood to dramatic transformations that redefine its aesthetic, Photoshop offers a myriad of tools to achieve your creative vision.
At Tophinhanhdep.com, we understand the profound impact color has on visual communication. Our extensive collections of high-resolution images—spanning nature, abstract art, emotional scenes, and beautiful photography—serve as the perfect canvas for your creative endeavors. Complementing these resources, our Image Tools section provides essential utilities like converters, compressors, optimizers, and AI upscalers, ensuring your perfected images are ready for any platform. This comprehensive guide delves into various powerful Photoshop techniques, empowering you to change colors with precision and unleash your inner visual designer.
Foundational Techniques: Selecting and Adjusting Colors with Precision
The journey to masterful color editing often begins with understanding how to isolate and modify specific hues within an image. Photoshop offers robust selection and adjustment capabilities that form the backbone of almost any color transformation.
The Power of Color Range Selection
One of the most efficient ways to select areas of an image based on their color is by using the Color Range tool. This feature simplifies the process of targeting a specific color, eliminating the need for tedious manual selections with tools like the Quick Selection or Magic Wand.
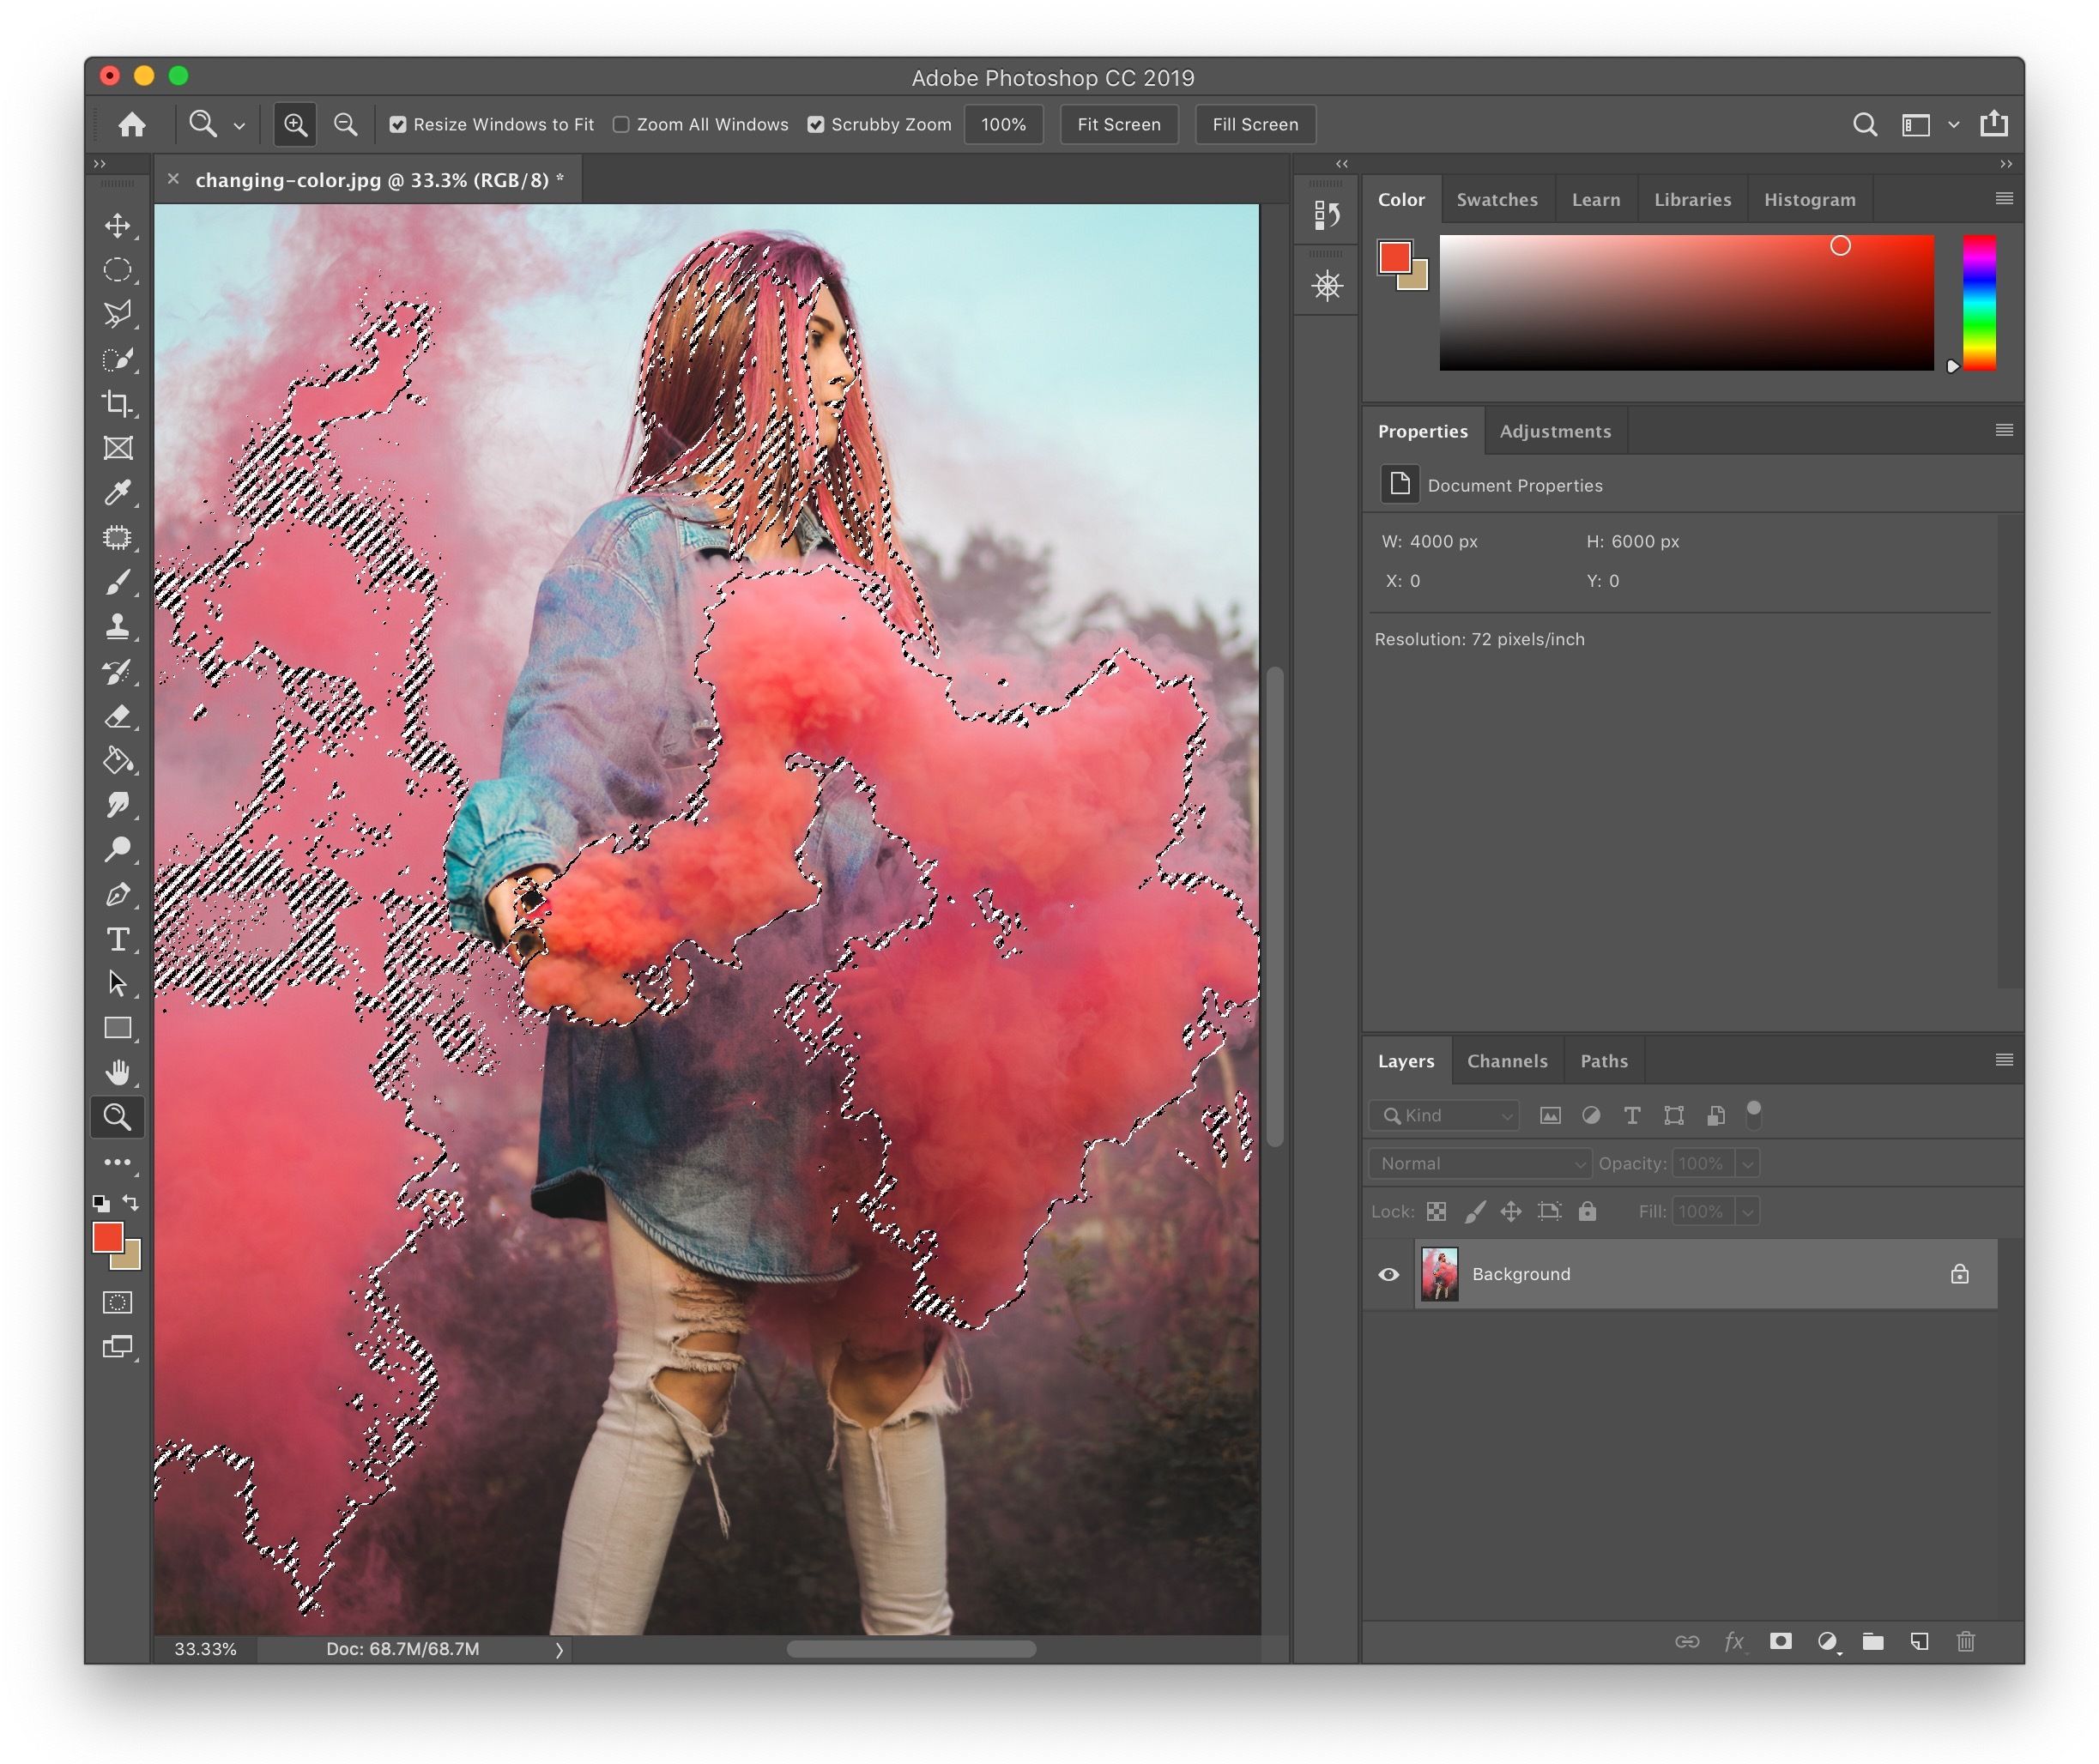
To initiate a Color Range selection, navigate to Select > Color Range. A dialog box will appear, presenting you with a preview area. With the Eyedropper tool active (the default), click directly on the color you wish to select either in the preview or on your main image canvas. As you click, Photoshop will highlight areas containing that color.
The Fuzziness slider is your key to refining this selection. Increasing the Fuzziness value expands the range of similar colors included in your selection, while decreasing it narrows the selection to only the exact hue you initially sampled. Experiment with this slider until you achieve a selection that accurately targets your desired areas.
For more complex selections involving multiple shades or nuances of a color, Photoshop provides additional sampling tools. The Eyedropper with a plus sign (+) allows you to add more colors to your selection, expanding its scope. Conversely, the Eyedropper with a minus sign (-) enables you to remove unwanted colors from your selection, making it more precise. You can even click and drag with these tools in the preview window to add or remove entire areas of color. Once satisfied, click OK, and your color-based selection will become active, indicated by “marching ants” around the selected regions.
Extra Color Range Selection Tricks & Tips:
- Select Options: The Color Range dialog isn’t limited to custom sampling. The “Select” dropdown menu offers predefined options like specific primary colors (Reds, Yellows, Greens, etc.),
Highlights,Midtones,Shadows, or evenSkin Tones. This can be a significant time-saver for common adjustments. - Limit the Area: If you only want to change a color within a specific part of your image, you can pre-select that area using a tool like the Lasso Tool before opening the Color Range dialog. This constrains the Color Range analysis to your pre-selection, ensuring greater accuracy and preventing unintended color shifts in other parts of the image.
- Selection Preview: Use the “Selection Preview” dropdown within the Color Range dialog to visualize your selection directly on your image. Options like
Grayscale,Black Mat,White Mat, orQuick Maskcan help you see in more detail what areas will be affected by your subsequent color adjustments.
Leveraging Hue/Saturation Adjustment Layers
Once you have an active selection, the next crucial step is to apply a non-destructive color adjustment. The Hue/Saturation adjustment layer is the ideal tool for this. With your Color Range (or any other) selection active, simply click on the New Adjustment Layer icon in the Layers panel (a half-filled circle) and choose Hue/Saturation.
Photoshop will automatically create a Hue/Saturation adjustment layer with a layer mask. This mask will precisely reflect your active selection, meaning any adjustments made to this layer will only affect the selected areas, leaving the rest of your image untouched. This non-destructive workflow is paramount in visual design and photo manipulation, allowing for easy edits and revisions.
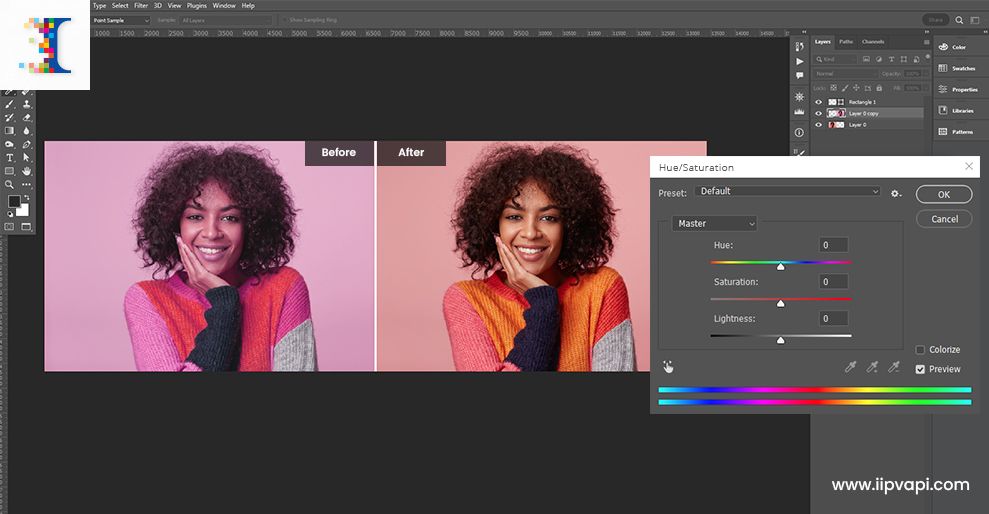
Within the Properties panel of the Hue/Saturation layer, you’ll find three main sliders:
- Hue: This slider shifts the base color of your selection. Dragging it left or right will cycle through the entire color spectrum, allowing you to completely change a red object to blue, green, or any other color.
- Saturation: This controls the intensity or purity of the color. Slide it to the right to make colors more vibrant and intense, or to the left to desaturate them, potentially turning them grayscale if set to -100.
- Lightness: This adjusts the brightness or darkness of the color. Move it right to lighten the selected colors or left to darken them.
By carefully manipulating these three sliders, you can achieve the exact color transformation you envision for the selected areas. This method is incredibly flexible and forms the core of many targeted color changes.
Targeted Color Swaps: Mastering Specific Areas
Beyond global adjustments, the power of Photoshop truly shines in its ability to isolate and modify colors in specific subjects, objects, or backgrounds. These techniques are particularly valuable for editing stock photos from Tophinhanhdep.com, adapting images for unique graphic design projects, or even creating thematic collections.
Changing Partial Colors with Quick Selection and Layer Masks
For changing partial colors of a photo, especially when dealing with a subject against a relatively solid background, combining the Quick Selection tool with Hue/Saturation and Layer Masks provides excellent control.
Step-by-Step Process:
- Pick the Quick Selection Tool: From Photoshop’s toolbar, select the
Quick Selection Tool. This tool is excellent for quickly selecting areas with defined edges or solid colors. - Make a Selection: Click and drag the Quick Selection tool over the object or area whose color you wish to change. For instance, if you want to change the color of a dress, carefully select the dress. If the initial selection includes unwanted areas, hold down
Alt(Windows) orOption(Mac) and drag over those areas to subtract from the selection. - Refine the Selection (Optional but Recommended): For greater precision, especially around intricate edges like hair or fabric, right-click on your selection and choose
Refine Edge(orSelect and Maskin newer Photoshop versions). This dialog allows you to smooth, feather, and adjust the edge of your selection for a more natural look. - Create a New Layer of Selection: Once your selection is precise, create a new layer containing only your selected object. The quickest way to do this is by pressing
Ctrl + J(Windows) orCmd + J(Mac). This will duplicate the selected area onto a new layer. - Color Changing with Hue/Saturation: Ensure your new layer (containing the isolated object) is selected. Then, press
Ctrl + U(Windows) orCmd + U(Mac) to open theHue/Saturationdialog box. Now, slide theHueslider left or right until you find your desired color. You can also adjustSaturationandLightnessto fine-tune the look. - Color Blending with a Layer Mask (for nuanced blending): If you need to blend the new color more seamlessly, especially if the original color had strong reflections or gradients, you can add a
Layer Maskto your Hue/Saturation adjustment layer. This allows for localized adjustments.- Click the
Add Layer Maskicon (a rectangle with a circle inside) at the bottom of the Layers panel. - Select the
Gradient Toolfrom the toolbar. Ensure your foreground color is set to black and your background to white, and that the gradient type isLinear Gradientand mode isNormalwithOpacityat 100%. - With the layer mask selected, drag the gradient tool across the areas you want to blend. Black conceals, white reveals. This can create a natural transition, for example, from the original color to the new color if applied subtly.
- Click the
Effortless Background and Object Color Shifts
Sometimes, you need to change the color of an entire background or a prominent object like clothing quickly, without complex selections. Photoshop offers intuitive ways to do this, particularly useful when preparing images for different aesthetic mood boards or thematic collections on Tophinhanhdep.com.
Changing Background Color:
This method often involves a simpler, more automated approach using the Hue/Saturation adjustment layer’s targeted adjustment tool.
- Create a Hue/Saturation Adjustment Layer: As before, add a
Hue/Saturationadjustment layer. - Go to the Properties Panel: In the
Propertiespanel for the Hue/Saturation layer, locate theTargeted Adjustment Tool(it looks like a finger icon, often below thePresetdropdown). Click on it. - Sample and Adjust: Click directly on the background color in your image that you want to change. Photoshop will automatically identify that specific color channel (e.g., “Cyans” or “Blues”) within the Hue/Saturation panel. Now, without making a prior selection, simply drag the
Hueslider. You’ll observe the sampled background color transforming. You can also drag directly on the image with theTargeted Adjustment Toolwhile holdingCtrl(Windows) orCmd(Mac) to adjust Hue, or just drag to adjust Saturation. This technique is incredibly fast for changing solid or semi-solid backgrounds, making it a favorite for quick aesthetic shifts.
Clothing Color Changing (Replacing Object Color): Similar to background changes, clothing colors can be modified efficiently, retaining natural shadows and highlights.
- Create a Hue/Saturation Layer: Add a
Hue/Saturationadjustment layer. - Use the Targeted Adjustment Tool: Click the
Targeted Adjustment Toolin thePropertiespanel. - Sample Clothing Color: Click on the clothing item whose color you want to change. For example, if it’s a red T-shirt, click on the red.
- Move the Hue Slider: Drag the
Hueslider to change the color. You might notice that surrounding areas like skin or hair, if they share similar color values, also change. - Color Selection Refining (within Hue/Saturation): To address unintended color changes (e.g., magenta skin tones from changing red clothing), look at the color gradient band within the
Hue/Saturationpanel. The sliders there define the range of colors being affected. Drag the edges of these sliders inwards to narrow the affected color range, protecting adjacent colors. This can help isolate the clothing color more effectively. - Use Layer Mask for Hue/Saturation: For ultimate precision, especially if refining the color range isn’t enough, utilize the layer mask of the Hue/Saturation adjustment layer.
- Select the mask thumbnail on your Hue/Saturation layer.
- Choose a
Brush Tooland set yourforeground colorto black. - Paint over any areas where the color change is unwanted (e.g., the subject’s skin or hair). Painting with black on the mask will hide the adjustment in those areas, revealing the original colors beneath.
- If you accidentally remove too much, switch your foreground color to white and paint to reveal the adjustment again. This combination of targeted adjustment and mask painting provides fine-tuned control over clothing color changes, ensuring a realistic outcome.
Advanced Approaches for Creative Color Effects
For digital artists and those looking to push the boundaries of photo manipulation, Photoshop offers advanced tools that enable more artistic and nuanced color transformations. These techniques are perfect for creating unique editing styles and graphic design elements that stand out on Tophinhanhdep.com.
Introducing the Color Replacement Tool
The Color Replacement Tool is a specialized brush-like tool designed for changing the color of an object while preserving its original texture, shadows, mid-tones, and highlights. This often results in a more realistic color swap compared to simply painting over an area.
You can find the Color Replacement Tool nested under the Brush Tool in the toolbar. Select the Brush Tool (shortcut B), then click and hold the icon to reveal other brush options, or press Shift + B to cycle through them until you find the Color Replacement Tool.
Process of Using the Color Replacement Tool:
- Pick the Replacement Color: Before you start painting, select your desired new color. This color will be set as your
foreground colorin the toolbar. Click on the foreground color swatch to open the Color Picker and choose your hue. For a realistic look, try to pick a color with similar luminosity to the original, allowing the tool to do its best work in preserving tonal details. - Adjust Tool Options (in the Options Bar): The options bar at the top of Photoshop provides crucial settings for the Color Replacement Tool:
- Mode: By default, it’s set to
Color, which is usually the best option as it replaces the hue and saturation while preserving luminosity. Other modes includeHue,Saturation, andLuminosityfor more specific effects. - Sampling:
Continuous: Samples colors continuously as you drag the brush.Once: Samples only the initial color you click on and replaces only that color as you paint.Background Swatch: Replaces only areas that match your current background color.ContinuousorOnceare generally most useful.
- Limits:
Contiguous: Replaces only adjacent pixels of the sampled color.Discontiguous: Replaces all pixels of the sampled color within the brush area, regardless of adjacency.Find Edges: Replaces contiguous pixels while better preserving the edges of the object. This works best with well-defined lines.
- Tolerance: This controls how wide a range of colors Photoshop considers “matching” the sampled color. A lower tolerance replaces only very similar colors, while a higher tolerance replaces a broader spectrum.
- Anti-aliasing: Check this box to smooth the jagged edges of your painted areas for a more refined look.
- Mode: By default, it’s set to
- Replace Color of an Image: With your settings adjusted and foreground color chosen, simply paint over the area of the image whose color you want to change. The tool will intelligently replace the color, maintaining highlights, shadows, and textures.
Dynamic Color Overlays and Gradient Mapping
For adding artistic flair, cinematic grading, or transforming monochromatic images, Color Overlays and Gradient Mapping are incredibly versatile tools that align with visual design and image inspiration principles.
Color Overlays and Gradients: Color overlays can be applied directly to layers or as an adjustment layer.
- Open Gradient Panel: Go to
Window > Gradientsto open the Gradient panel. - Apply a Gradient: Choose a gradient from the panel and drag it directly onto your image. This will create a new
Gradient Filllayer. - Adjust Blend Mode and Opacity: In the
Layerspanel, change theBlend Modeof the gradient layer (e.g., toSoft Light,Overlay,Color, orHue) and adjust itsOpacitylevel. Lower opacity often yields a more realistic and subtle integration of the gradient’s colors into the underlying image. You can also manipulate the angle and scale of the gradient within its properties.
Gradient Mapping:
Gradient Map adjustment layers remap the luminosity values of an image to a chosen gradient, effectively coloring shadows, midtones, and highlights with specific hues. This is particularly powerful for creating stylized effects or converting black and white images to color.
- Add a Gradient Map Adjustment Layer: Click the
New Adjustment Layericon and selectGradient Map. - Choose a Gradient: In the
Propertiespanel, click on the gradient bar to open theGradient Editor. Select or create a gradient. The colors on the left side of the gradient will apply to the darkest parts of your image (shadows), and colors on the right will apply to the brightest parts (highlights). - Adjust Blend Mode and Opacity: As with color overlays, changing the
Blend Mode(e.g.,Color,Soft Light,Luminosity) and adjusting theOpacityof the Gradient Map layer will dramatically alter the effect. You can also click theReversecheckbox in the Properties panel to flip the gradient, applying highlight colors to shadows and vice-versa. Combining aGradient Fillwith aGradient Mapcan create incredibly rich and complex color grading, perfect for achieving trending styles or thematic collections on Tophinhanhdep.com.
Pro Tips and Troubleshooting for Flawless Results
Even with the right tools, achieving perfect color changes sometimes requires extra finesse and an understanding of common challenges.
Refining Selections and Non-Destructive Editing
- Quick Mask Mode (Q): After making an initial selection (e.g., with Color Range), press
Qto enter Quick Mask mode. This will display your selection as a red overlay, making it easier to spot imperfections. You can then use aBrush Toolwith black to add to the mask (subtract from selection) or white to subtract from the mask (add to selection), refining edges with pixel-level precision. PressQagain to exit Quick Mask and convert it back to an active selection. - Painting on Layer Masks: Always leverage layer masks with adjustment layers. If an adjustment is too strong or affects an area you didn’t intend, simply paint on the layer mask with black to hide the effect or white to reveal it. This is a core principle of non-destructive editing, allowing for endless revisions without permanently altering your original image data.
Dealing with Challenging Colors: Black, White, and Neutral Tones
Changing black or white to another color can be particularly tricky, as they lack hue and saturation. The standard Hue/Saturation adjustment (and sometimes even the Color Replacement Tool) will mostly shift them through shades of gray. Here are some effective workarounds:
-
For Black to Color:
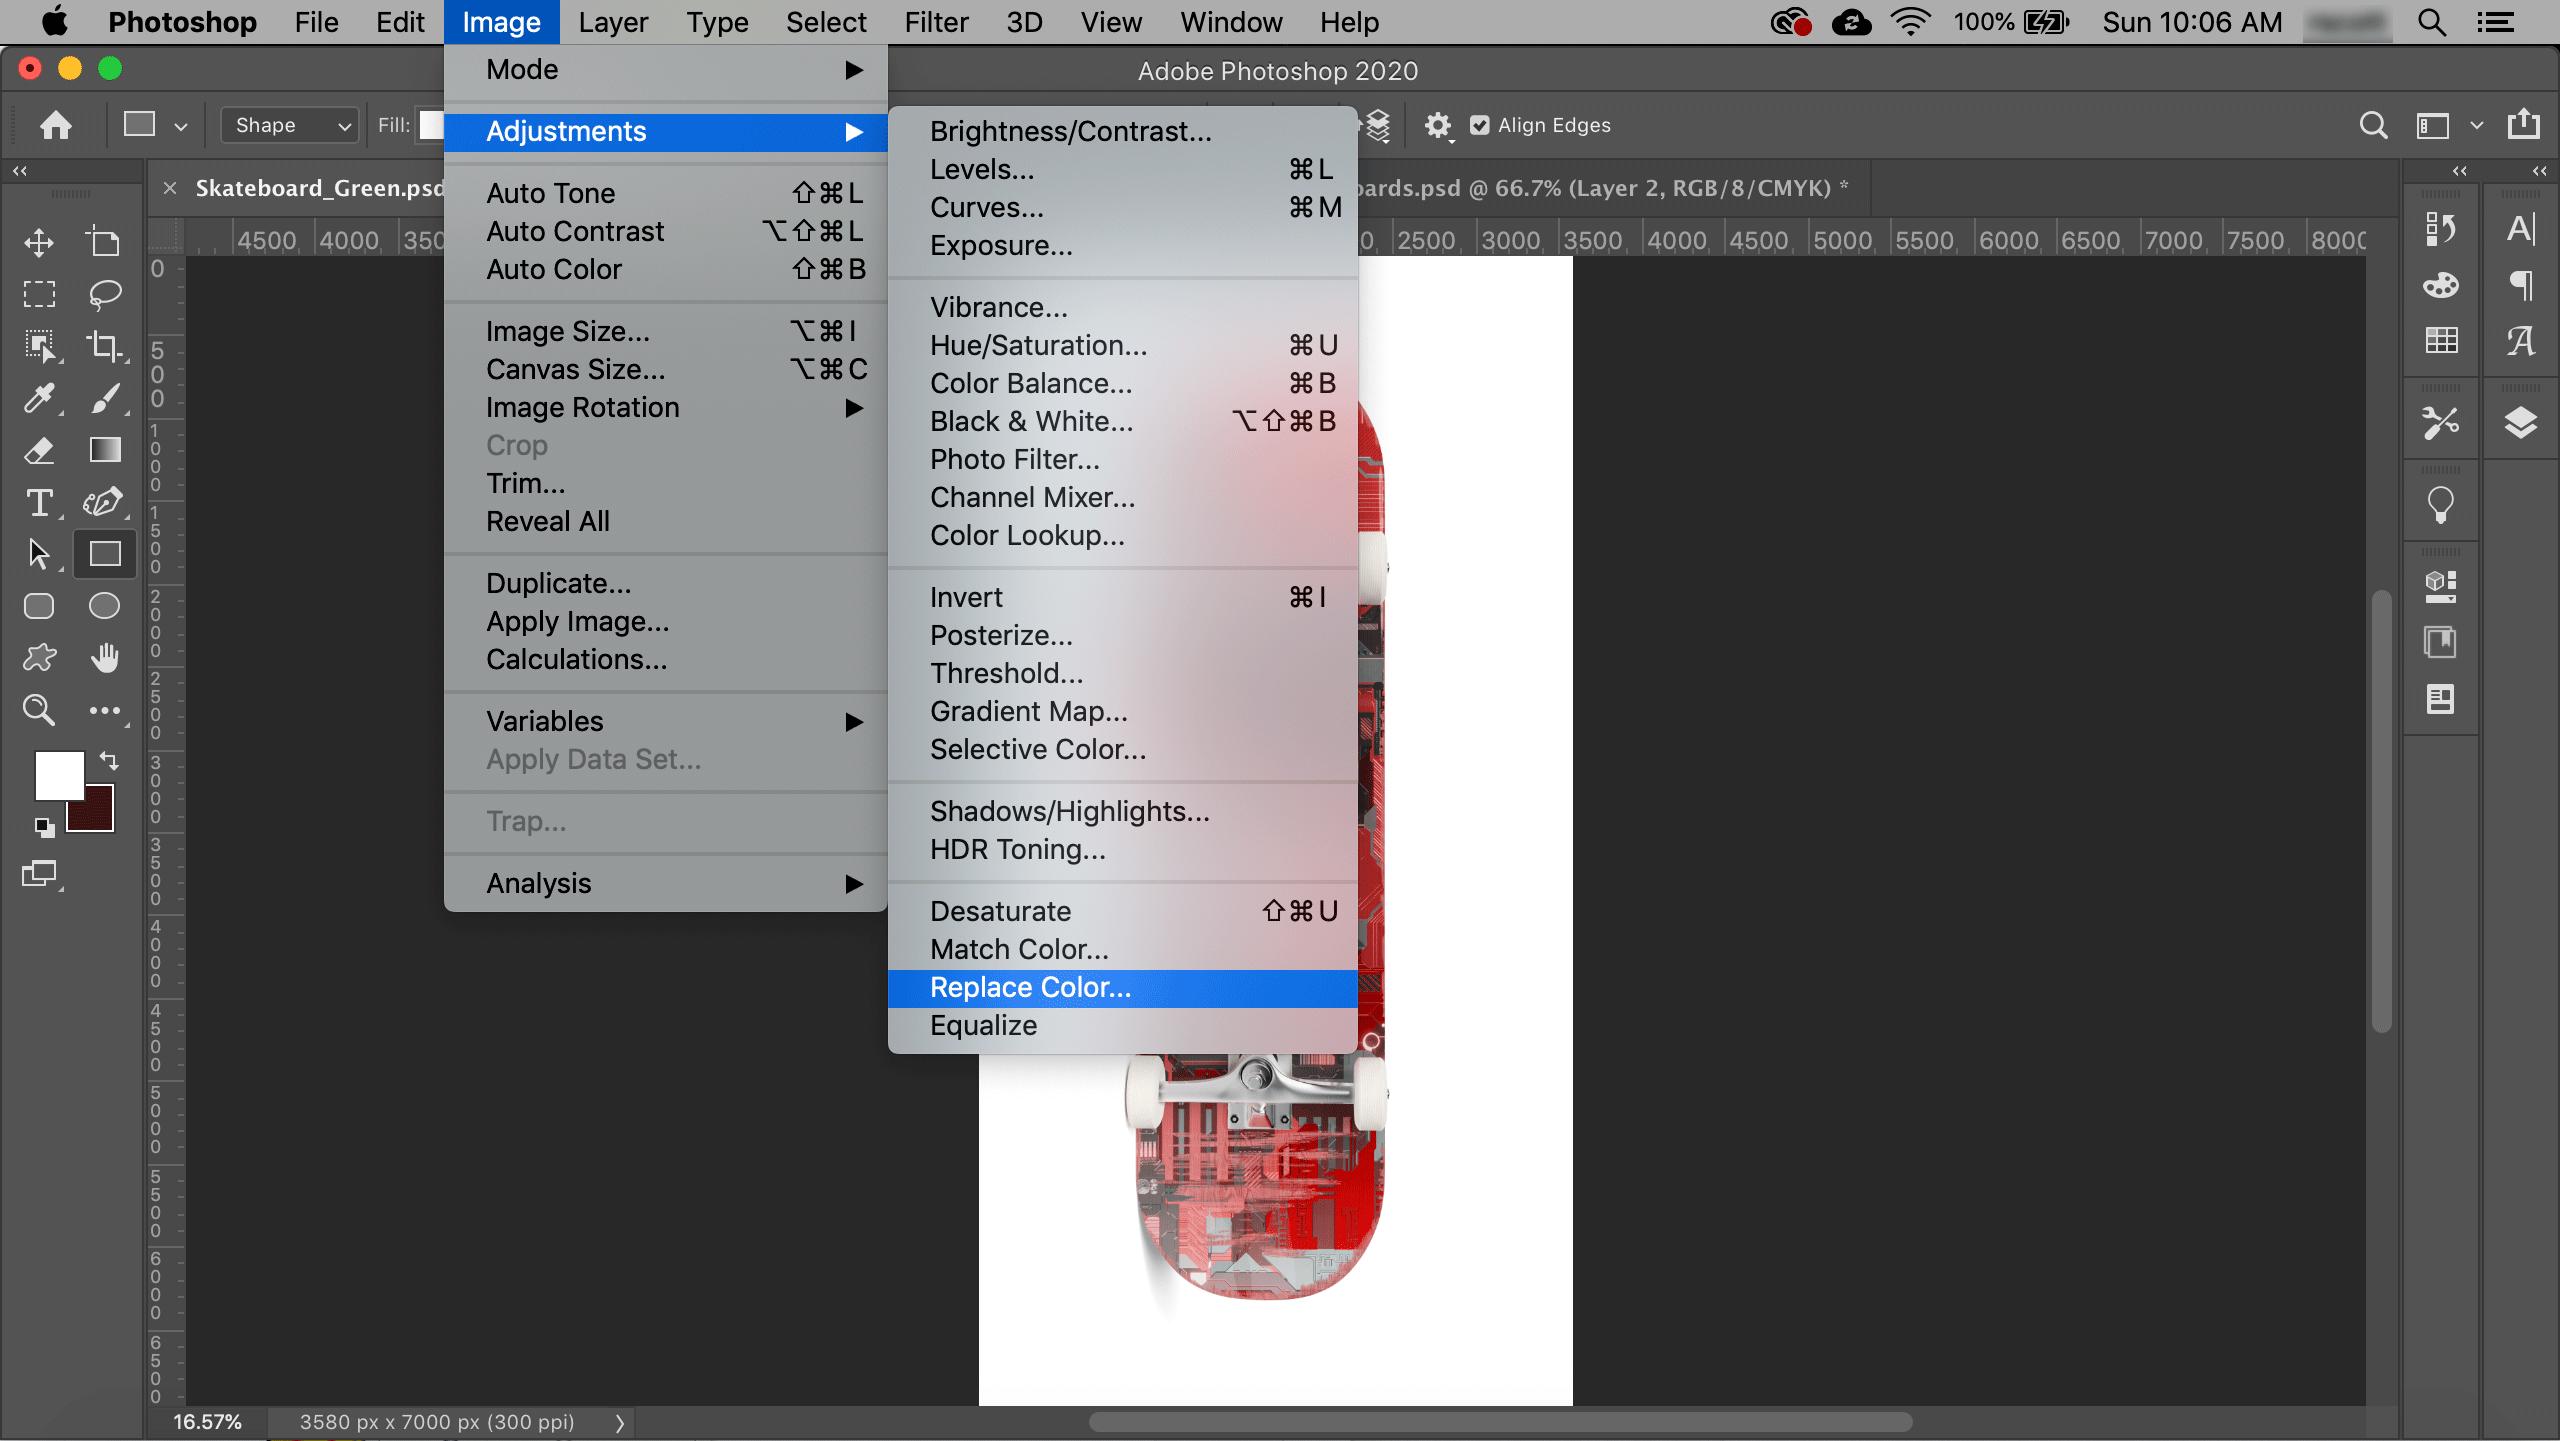
- Image > Adjustments > Selective Color: This powerful tool allows you to target specific color ranges (including
BlacksandNeutrals) and adjust their CMYK components. By adding Cyan, Magenta, or Yellow, you can introduce a new hue into black areas. - Image > Adjustments > Gradient Map (for B&W or high contrast black): As discussed, a Gradient Map can re-color an entire grayscale image or black object. By setting the gradient from black to your desired color, you can effectively re-colorize black regions while retaining tonal variations.
- Layer Style > Color Overlay: A very simple and effective method for solid black areas. Make a selection of the black area, then go to
Layer > Layer Style > Color Overlay. Choose your desired color and a blending mode likeColororSoft Light(thoughNormalmight also work for solid blocks). This is often the quickest solution for logos or clean black shapes.
- Image > Adjustments > Selective Color: This powerful tool allows you to target specific color ranges (including
-
For White to Color:
- Similar to black,
Selective Color(targetingWhitesandNeutrals) can introduce color. - A
Gradient Mapcan also work if you set the right side of the gradient to your desired color. Layer Style > Color Overlayis again a fast option for solid white areas.
- Similar to black,
-
When Hue/Saturation Fails (Grey Tints): If the
Replace Colorcommand orHue/Saturationadjustment doesn’t seem to work on “grey tints” or areas that aren’t truly chromatic, it’s because these areas primarily contain luminosity information rather than distinct color. In such cases,Selective Color(targetingNeutralsorBlacks/Whites) orGradient Mapwill be more effective as they operate on tonal values. Always ensure theFill Colorselement is switched on if using certain older tools.
Connecting to Tophinhanhdep.com’s Ecosystem
The skills you develop in mastering color changes directly translate to the diverse offerings at Tophinhanhdep.com:
- Images: Transform existing wallpapers, backgrounds, and aesthetic images from our collections to match your personal style or project requirements. Change the mood of a nature scene or abstract art with a few clicks.
- Photography: Apply these techniques to high-resolution stock photos from Tophinhanhdep.com, developing unique editing styles or correcting color imbalances for professional results.
- Visual Design: Leverage color manipulation for graphic design projects, digital art, and photo manipulation, turning creative ideas into stunning visuals. Create custom thematic collections or adapt images to trending styles.
- Image Tools: After perfecting your colors, use Tophinhanhdep.com’s image optimizers and compressors to prepare your files for web use, or our AI upscalers to ensure your high-resolution artwork retains its quality across different platforms.
The journey of digital image editing is one of continuous learning and experimentation. Photoshop’s color manipulation tools are incredibly powerful, offering endless possibilities for creative expression. By practicing these techniques, you’ll gain confidence in transforming any image into your desired masterpiece. Explore the vast resources on Tophinhanhdep.com for inspiration and assets, and let your imagination color your world.