Mastering Image Color Transformation in Adobe Illustrator

In the vast and vibrant world of digital art and visual design, the ability to manipulate color is not just a skill—it’s a superpower. For graphic designers, illustrators, and anyone working with visual content, the need to adjust, enhance, or completely overhaul the color scheme of an image or object is a daily reality. Whether you’re fine-tuning a brand’s aesthetic, exploring new creative ideas for a photo manipulation project, or adapting existing assets for a fresh look, mastering color changes in Adobe Illustrator is indispensable.
Adobe Illustrator, renowned for its vector graphics capabilities, offers a robust suite of tools for color manipulation. However, the approach differs significantly depending on whether you’re working with scalable vector objects or raster-based images like JPEGs and PNGs. Understanding these distinctions is crucial for efficient workflow and achieving your desired visual outcome. This comprehensive guide, drawing insights from leading design resources and the extensive capabilities featured on Tophinhanhdep.com, will walk you through various methods to change the color of images and objects in Illustrator. From quick fixes to advanced non-destructive techniques, we’ll cover everything you need to transform your visuals and elevate your design projects, aligning perfectly with Tophinhanhdep.com’s focus on Images, Photography, Image Tools, Visual Design, and Image Inspiration & Collections.
Essential Tools for Vector Object Color Manipulation
Adobe Illustrator truly shines when it comes to vector graphics. Every shape, path, and piece of text you create within Illustrator is a vector object, meaning it’s mathematically defined and can be scaled infinitely without losing quality. This inherent flexibility makes color manipulation incredibly powerful and precise. Unlike raster images where color changes often involve pixel-level adjustments, vector objects allow for seamless, scalable color transformations.
For those immersed in graphic design and digital art, changing the color of vector objects is a fundamental skill. It’s often required when developing different versions of artwork, adjusting a logo to fit a new brand palette, or simply experimenting with aesthetic variations. Tophinhanhdep.com’s wealth of resources for Visual Design and Creative Ideas often emphasizes the importance of color in conveying emotion and style, making these Illustrator techniques directly applicable to crafting compelling visuals.
The Power of Recolor Artwork
The “Recolor Artwork” feature stands out as one of Illustrator’s most efficient and versatile tools for changing colors across an entire design or selecting specific hues for modification. It’s a game-changer for designers who need to explore multiple color combinations rapidly or adapt a complex illustration to a new color scheme without tediously changing each element one by one. This tool, a staple for any serious graphic designer, significantly streamlines the photo manipulation and creative process.
To harness the power of Recolor Artwork:
- Select Your Objects: Begin by selecting all the vector objects whose colors you wish to change. You can select multiple objects by holding down the Shift key, or select all objects on your artboard by pressing
Command + A(Mac) orCtrl + A(Windows). - Access the Recolor Panel: Once your objects are selected, look for the “Recolor” button in the Properties panel. Clicking this will open the comprehensive Recolor Artwork dialog box.
- Explore Color Editing Options:
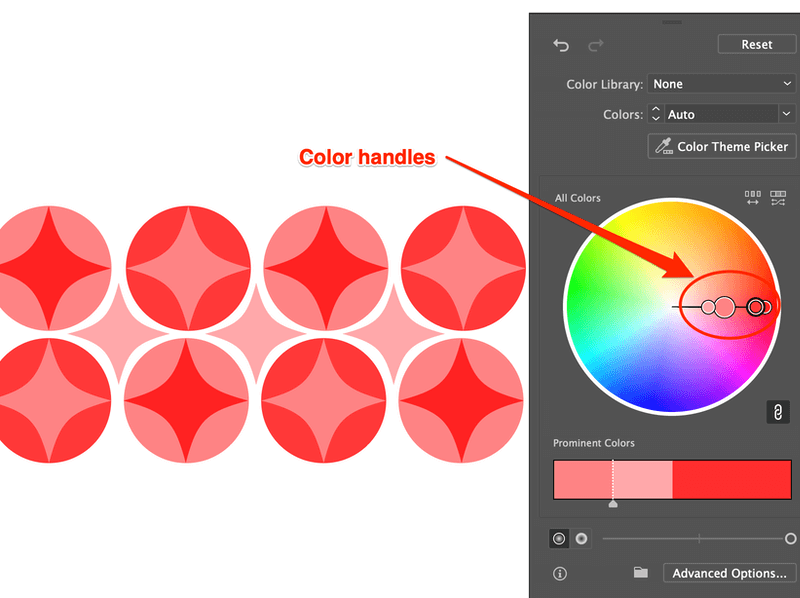
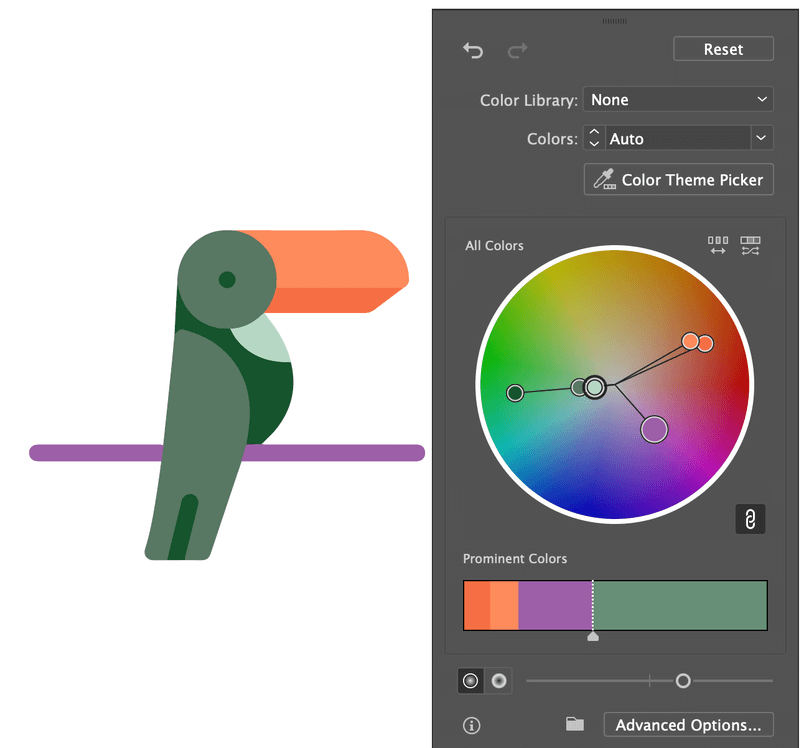
- Changing the Entire Color Scheme: The dialog presents your artwork’s original colors on a color wheel. By clicking and dragging one of the color handles, you can rotate the entire color scheme, discovering new harmonious palettes instantly. This is particularly useful for generating aesthetic variations or thematic collections.
- Changing Specific Colors: If you need to target individual colors, click the “Link/Unlink Harmony Colors” icon (it looks like a chain link). This unlinks the colors, allowing you to drag each color handle independently on the wheel or select specific color boxes below to input exact values (like hex codes). This granular control is vital for precise adjustments in branding or detailed digital art projects.
- Advanced Editing: For even finer control, you can click “Advanced Options” within the Recolor Artwork dialog. Here, you’ll find a list of all current colors used in your selection. Double-clicking any color allows you to change it using the Color Picker, or you can right-click for more options like “Shade” to adjust its luminosity.
- Harmony Rules: The Recolor Artwork panel often provides harmony rules (e.g., Analogous, Triadic, Complementary) that automatically generate balanced color palettes based on a single chosen color, simplifying the process of creating visually appealing designs.
- Randomization: For creative exploration, the tool offers options to randomly change colors, or even randomly adjust light, saturation, and brightness, providing endless ideas for your mood boards and thematic collections.
The Recolor Artwork feature is a testament to Illustrator’s evolution, transforming what used to be a painstaking manual process into a fluid, experimental endeavor. It’s an invaluable asset for creating diverse image collections and exploring various aesthetic styles.
Precision with the Color Picker and Eyedropper Tool
While Recolor Artwork excels at broad changes, sometimes you need to adjust the color of a single object or sample a specific hue from your canvas. This is where the Color Picker and Eyedropper Tool come into play, offering immediate and precise control over individual vector elements. These tools are fundamental for detailed photo manipulation and ensuring color consistency across all your graphic design projects.
-
The Color Picker:
- Select an Object: Choose the vector object whose fill or stroke color you wish to modify.
- Access the Color Picker: Double-click on the Fill (solid square) or Stroke (hollow square) icon in the toolbar on the left side of your screen. This action opens the Color Picker dialog box.
- Choose Your Color: Within the Color Picker, you can visually select a color by moving a circle around a color spectrum, adjust hue and saturation with sliders, or input specific color values (RGB, CMYK, HSB, or Hex codes) for exact matching. This level of control is crucial for high-resolution images and precise branding work.
- Apply Color: Click “OK” to apply the new color to your selected object.
-
The Eyedropper Tool (I):
- Select an Object: First, select the object you want to recolor.
- Activate Eyedropper: Press
Ion your keyboard or select the Eyedropper Tool from the toolbar. - Sample a Color: Click on any color on your artboard, or even from an external image or window if applicable, and the selected object will instantly adopt that color. This is incredibly useful for matching colors within a complex design, pulling hues from a mood board, or replicating a specific tone from a beautiful photograph you’re referencing.
- Creating Color Swatches: Many designers use the Eyedropper tool to quickly build custom color swatches from existing artwork or inspiration, which can then be saved for future use in their creative ideas and thematic collections.
Efficient Mass Color Replacement
Beyond changing individual objects, there are methods to efficiently replace every instance of a particular color throughout your Illustrator document. This is especially useful for large, intricate designs where manually selecting each object with a specific color would be too time-consuming. It’s a key technique for maintaining consistency in digital art and graphic design projects.
-
Select by Same Fill Color:
- Select a Sample Object: Use the Selection Tool (V) or Direct Selection Tool (A) to click on a single object that has the color you wish to replace.
- Select All Instances: Go to
Select > Same > Fill Color(orStroke Colorif you’re targeting strokes). Illustrator will automatically select every object in your document that shares that exact fill or stroke color, regardless of grouping or layering. - Change Color: With all instances of that color selected, simply use the Color Picker or Swatches panel to apply a new color, and all selected objects will update simultaneously. This method is incredibly powerful for refining aesthetic elements across an entire design.
-
Recolor Artwork for Shades and Tints:
- The “Recolor Artwork” tool (as discussed earlier) also has a powerful application here. If you want to replace not just a single specific color, but also its lighter and darker shades or tints within your artwork, Recolor Artwork is ideal.
- Select All Objects: Use
Command + A(Mac) orCtrl + A(Windows) to select all objects. - Open Recolor Artwork (Edit > Edit Colors > Recolor Artwork): In the Recolor Artwork dialog, especially in the Advanced Options section, you’ll see a list of all colors used. You can double-click on an existing color to replace it with a new one. This allows you to broadly redefine color families within your artwork, making it an excellent tool for exploring various thematic collections or adapting designs to new trending styles.
Transforming Colors in Raster Images (JPEGs and PNGs)
Working with raster images (like JPEGs and PNGs) in Adobe Illustrator presents a different set of challenges and opportunities for color manipulation compared to vector objects. Illustrator is fundamentally a vector program, so its native tools for directly editing raster image colors are more limited than a dedicated raster editor like Adobe Photoshop. However, for digital photography and image-focused projects, Illustrator still provides viable methods, particularly when integrating with other tools or transforming image types. Tophinhanhdep.com, with its strong emphasis on Images and Photography, recognizes the need for designers to effectively manage and transform all types of visual assets.
It’s important to differentiate between embedded and linked images. Embedded images are part of the Illustrator file, increasing its size but making it self-contained. Linked images remain external files, keeping Illustrator file sizes smaller and allowing for external edits. Illustrator provides options to unembed linked images and vice versa through the Properties panel or Links panel.
Adjusting Colors for JPEGs: Native Approaches
When dealing with JPEG or other embedded raster images, Illustrator’s native color adjustment capabilities are generally applied to the entire image and are often “destructive,” meaning the original pixel information is permanently altered unless you save a copy or utilize undo steps. These methods are best for global color shifts rather than precise, localized adjustments.
-
Adjust Color Balance:
- Place and Embed: First, place your JPEG image into Illustrator and ensure it is embedded. (A good practice is to duplicate the image before editing to preserve the original.)
- Access Color Balance: Select the embedded image. Go to
Edit > Edit Colors > Adjust Color Balance. - Manipulate Sliders: A dialog box will appear with sliders for color channels. If your document is in RGB mode, you’ll adjust Red, Green, and Blue values. In CMYK mode, you’ll see Cyan, Magenta, Yellow, and Black sliders. Tick the “Preview” box to see real-time changes. By moving these sliders, you can shift the overall color cast of the image, achieving different aesthetic moods, from warm to cool tones.
- Apply: Click “OK” when satisfied. Remember, this is a destructive edit within Illustrator.
-
Convert to Grayscale and Colorize:
- Place and Embed: As with the previous method, place and embed your image.
- Convert to Grayscale: Select the image, then go to
Edit > Edit Colors > Convert to Grayscale. This will desaturate your image, removing all color information. This can be a great starting point for abstract or sad/emotional imagery. - Apply a Single Color: With the grayscale image still selected, you can now choose a color from your Color panel or Swatches panel to “tint” the entire image. This effectively creates a duotone or monotone effect, where the grayscale image takes on the hue of your chosen color, offering a distinct visual design style. This is a simple yet powerful way to create thematic collections with a consistent color overlay.
These methods are foundational for altering JPEG colors in Illustrator, but their limitations—primarily global application and destructive nature—often lead designers to more advanced techniques for greater flexibility and precision.
Vectorizing PNGs for Granular Color Control
PNG images can be either raster or vector-based. If you have a raster PNG (like a photographic image with transparency), Illustrator can’t directly change the colors of its individual elements. However, if your PNG is a simple graphic, icon, or logo, you can convert it into editable vector paths using the “Image Trace” feature. This process opens up all the powerful vector color manipulation tools discussed earlier, offering immense control over its aesthetic.
- Place the PNG: Place your PNG image into your Illustrator document (
File > Place). - Apply Image Trace: With the PNG selected, you’ll see “Image Trace” options in the Properties panel or Control bar. Click “Image Trace” to apply a default trace, or open the
Window > Image Tracepanel for more control.- Settings: Experiment with presets like “High Fidelity Photo,” “Sketched Art,” or “Silhouettes.” For simpler graphics, “Color” mode is often ideal. Check “Ignore White” if you want to remove a white background.
- Preview: Enable “Preview” to see the results in real-time. Adjust settings like Paths, Corners, and Noise to get the desired level of detail and fidelity. Be aware that complex photographic PNGs might not trace well, or might result in an unmanageably large number of paths. This tool is best suited for converting graphic elements rather than detailed digital photography into vectors.
- Expand the Trace: Once you’re happy with the trace preview, click the “Expand” button in the Properties panel or Control bar. This converts the traced outlines into editable vector paths.
- Ungroup for Individual Control: After expanding, the traced image will likely be grouped. Right-click on it and choose “Ungroup” (
Shift + Command + G/Shift + Ctrl + G). Now, you can select individual shapes or color areas within the former PNG. - Recolor as Vector Objects: With the image now composed of editable vector paths, you can use any of the vector color manipulation methods:
- Recolor Artwork: Apply a new color scheme to the entire vectorized image.
- Color Picker/Eyedropper: Select individual paths and change their fill or stroke colors with precision.
This method allows for granular control over the colors of what was once a raster PNG, transforming it into a versatile asset for your visual design and image inspiration needs. However, it’s crucial to acknowledge that Image Trace is an interpretation; the traced result might not perfectly match the original raster image, especially for intricate details or photographic elements.
Integrating External Image Editing Workflows
For true photographic color editing, where you need to adjust specific areas, fine-tune tonal ranges, or apply complex filters, Adobe Photoshop remains the superior tool. Illustrator offers seamless integration with Photoshop, allowing you to leverage Photoshop’s advanced capabilities while keeping your images within your Illustrator layout. This is essential for high-resolution images and professional digital photography.
- Linking Images: When placing a raster image into Illustrator, it’s often best to
Linkit rather thanEmbedit. This keeps the Illustrator file size down and allows for external editing. - Edit in Photoshop:
- Select Linked Image: Select the linked image in Illustrator.
- Access Edit Command: Go to
Edit > Edit in Photoshop. Alternatively, you might find an “Edit in Photoshop” button in the Control bar, Properties panel, or the Contextual Task Bar. - Perform Edits in Photoshop: Photoshop will launch (if not already open) and display your image. You can now use Photoshop’s full array of color correction tools: Layers, Adjustment Layers (Curves, Levels, Hue/Saturation, Color Balance, etc. for non-destructive editing), filters, and brushes to make precise color changes.
- Save and Update: After making your desired changes in Photoshop, save the file (
File > Save). When you return to Illustrator, you’ll receive a prompt asking to update the linked image. Click “Yes,” and your Illustrator document will reflect the changes made in Photoshop.
This workflow is incredibly powerful for designers working with high-resolution, beautiful photography or complex photo manipulation projects. It allows you to utilize the best features of both programs: Illustrator for layout and vector graphics, and Photoshop for pixel-perfect image editing. However, changes made this way are destructive to the external image file itself (unless you use non-destructive layers within Photoshop), and Illustrator doesn’t retain the undo/redo history for external edits.
Advanced Color Control and Non-Destructive Techniques
While Illustrator’s native tools offer good functionality, particularly for vector objects, professional designers often seek more advanced, non-destructive control over image colors, akin to what’s available in Photoshop. This is where specialized plugins and a deeper understanding of Illustrator’s effects come into play, aligning with Tophinhanhdep.com’s focus on advanced Image Tools and Visual Design.
One such example of enhancing Illustrator’s capabilities comes from plugins like Phantasm by Astute Graphics. Such plugins are developed specifically to fill gaps in Illustrator’s native raster image editing, providing Photoshop-like control directly within the Illustrator environment, often with the added benefit of non-destructive live effects.
Non-Destructive Live Color Effects
The core advantage of advanced color control, particularly with plugins, is the ability to apply “live effects.” A live effect means the original image data remains untouched, and the color adjustments are applied on top. This allows for:
- Experimentation: Freely adjust settings without fear of permanent damage to your image.
- Flexibility: Easily hide, show, modify, or remove effects at any time.
- Re-ordering: Change the sequence of multiple color adjustments to achieve different results.
For example, a plugin like Phantasm brings controls like Curves, Levels, Hue/Saturation, Brightness/Contrast, and even Duotone and Halftone directly into Illustrator as live effects.
- Select Your Image: Select your embedded or linked raster image in Illustrator.
- Access Plugin Panel: Open the relevant plugin panel (e.g.,
Window > Astute Graphics > Phantasm). - Apply Live Effects: Choose a color adjustment (e.g., Desaturate, Curves, Hue/Saturation). The effect is applied non-destructively and appears in Illustrator’s native Appearance panel.
- Fine-tune Controls: Use the plugin’s dialogs, which often mirror Photoshop’s interfaces, to make precise adjustments. For Curves, you can target individual RGB or CMYK channels, or adjust the image’s overall tone.
- Save and Load Settings: Many advanced tools allow you to save your custom color correction settings (like a unique curve adjustment) and load them later, or even exchange them with Photoshop. This is invaluable for maintaining consistent color themes across multiple images or projects.
When working with linked images, such plugins often include an “Auto Rasterize” option to ensure live effects can be applied without embedding the image, further preserving workflow flexibility.
Creating Custom “Filters” with Graphic Styles
Beyond individual adjustments, you can combine multiple live color effects and save them as a “Graphic Style” in Illustrator. This feature, a cornerstone of efficient visual design, allows you to create your own “Instagram-style filters” or thematic collections that can be applied with a single click to any selected artwork or image.
- Develop Your Effect Stack: Apply one or more live color adjustments (e.g., Desaturate + Brightness/Contrast + Hue Shift) to an image until you achieve a desired look (e.g., a vintage aesthetic, a specific mood board style).
- Create a Graphic Style: With the image selected, open the
Window > Graphic Stylespanel. Click the “New Graphic Style” button. - Apply Your Filter: Now, you can select any other image or vector object in your document and simply click on your newly created Graphic Style in the panel. All the saved color effects will be applied instantly, ensuring a consistent aesthetic across your project.
This technique is incredibly powerful for streamlining projects where a uniform visual style is required across many images, from digital photography showcases to extensive thematic collections.
Practical Tips and Best Practices for Visual Designers
Mastering color changes in Illustrator goes beyond knowing the tools; it’s about understanding when and how to apply them effectively. For visual designers, graphic artists, and those managing extensive image collections, these best practices, amplified by the resources available on Tophinhanhdep.com, can significantly enhance your workflow and the final quality of your output.
-
Understand Your Image Type:
- Vector First: Always prioritize vector methods for vector objects. They offer infinite scalability and the most precise color control.
- Raster Limitations: Acknowledge that Illustrator’s native raster editing is limited. For complex photographic adjustments, linking to Photoshop is usually the best approach. If it’s a simple graphic,
Image Tracecan convert it to an editable vector. - Tophinhanhdep.com offers extensive guides on image types and formats, crucial for digital photography and high-resolution image handling.
-
Work Non-Destructively Where Possible:
- Duplicate Images: Before applying destructive edits (like Adjust Color Balance on JPEGs without a plugin), always duplicate your image or object.
- Live Effects & Plugins: Leverage Illustrator’s live effects and advanced plugins for raster images, as they allow for flexible, editable color adjustments without altering the original pixel data. This is key for iterative design and maintaining creative options, a principle often highlighted in Tophinhanhdep.com’s Visual Design tutorials.
- Photoshop Adjustment Layers: When editing in Photoshop via Illustrator, utilize adjustment layers. These are non-destructive and can be tweaked anytime.
-
Master Color Management:
- Color Modes (RGB/CMYK): Be mindful of your document’s color mode. RGB is for screens (web, digital art), while CMYK is for print. Color adjustments behave differently in each mode.
- Swatches & Global Colors: Organize your colors using the Swatches panel. Use “Global Colors” for project-wide hues, so changing one instance updates all linked objects. This is fundamental for consistent branding and visual aesthetic. Tophinhanhdep.com provides various mood boards and thematic collections to inspire your color choices.
- Create Custom Palettes: Use the Eyedropper tool to pull colors from inspiring images (e.g., nature photography, abstract art) and save them as new swatches. This helps build unique color schemes for your creative ideas.
-
Optimize Workflow:
- Grouping/Ungrouping: For vector objects, judiciously group related elements. Remember to ungroup when you need to select individual parts for specific color changes.
- Keyboard Shortcuts: Learn shortcuts for frequently used tools (e.g.,
Ifor Eyedropper,Afor Direct Selection). This speeds up your graphic design process significantly. - Asset Management: For projects with many linked images, keep your files organized. Illustrator’s Links panel helps manage external assets.
-
Experiment and Iterate:
- Recolor Artwork for Exploration: Don’t be afraid to experiment with the “Recolor Artwork” tool’s random options or harmony rules to discover unexpected and beautiful color combinations. This is a core part of digital art and finding your unique aesthetic.
- Mood Boards: Use Illustrator as a tool to create mood boards for your image inspiration and collections. Rapidly changing colors can help visualize different thematic concepts.
By integrating these practical tips, designers can not only change colors effectively but also develop a more efficient, creative, and professional workflow. Tophinhanhdep.com is dedicated to providing these kinds of Image Tools and Visual Design insights, empowering you to produce stunning, high-resolution imagery and elevate your creative projects.
Conclusion
The ability to change the color of images and objects in Adobe Illustrator is a cornerstone of modern visual design. From the precise control over vector graphics offered by the Recolor Artwork feature, Color Picker, and Eyedropper tool, to the strategic manipulation of raster images through color balance adjustments, grayscale conversions, and the powerful Image Trace function, Illustrator provides a comprehensive suite for diverse artistic needs. While raster image editing has its limitations within Illustrator’s native environment, seamless integration with Photoshop and the availability of advanced plugins offer designers unparalleled flexibility and non-destructive control.
Whether you’re crafting high-resolution digital art, refining a brand’s aesthetic, or curating thematic image collections, understanding these techniques empowers you to realize your creative vision. The journey of transforming colors in Illustrator is an iterative process of experimentation, precision, and continuous learning. By leveraging these tools and embracing best practices, you can efficiently adapt your visuals, explore new creative ideas, and produce stunning results that captivate and communicate effectively. For further exploration into images, photography, advanced image tools, and endless visual design inspiration, make sure to visit Tophinhanhdep.com – your ultimate resource for mastering the art of digital visuals.