Elevate Your Zine: A Comprehensive Guide to Changing Image Colors in Photoshop

Zines are powerful vessels of personal expression, raw creativity, and niche interests. From intricate illustrations to striking photography, the visual elements of a zine are paramount in conveying its message and mood. One of the most impactful ways to define your zine’s aesthetic and ensure your images resonate with your audience is through deliberate color manipulation. While the process might seem daunting, especially for those new to digital art, mastering color changes in Adobe Photoshop can unlock a world of creative possibilities, allowing your visual narratives to truly shine.

At Tophinhanhdep.com, we understand the importance of high-quality visuals, whether you’re crafting a personal art project, a digital zine, or enhancing professional photography. This guide will walk you through the essential techniques in Photoshop, complemented by insights into leveraging online tools and applying fundamental visual design principles, to transform the colors in your images and imbue your zines with a distinctive, captivating look.
The Art of Color Transformation: Why Zines Demand Dynamic Hues
Color is more than just a visual attribute; it’s a language. In the context of a zine, color choices can set the entire tone, evoke specific emotions, and guide the reader’s eye. Whether your zine aims for a vibrant, energetic feel or a subdued, melancholic atmosphere, intentional color transformation is your key to achieving that vision.
Imagine a zine featuring stunning nature photography – perhaps vibrant landscapes or serene, abstract compositions. By adjusting the hues, you can emphasize the warmth of a sunset, deepen the melancholy of a stormy sky, or even shift an entire scene into an ethereal, otherworldly palette. Similarly, for zines focusing on sad/emotional themes, manipulating colors to desaturated tones or a monochromatic scheme can amplify the feeling of introspection or gloom. Conversely, a zine celebrating beautiful photography or aesthetic visuals might benefit from enhanced saturation and careful color grading to make every image pop.
Tophinhanhdep.com, with its extensive collections of Images (Wallpapers, Backgrounds, Aesthetic, Nature, Abstract, Sad/Emotional, Beautiful Photography), serves as a fantastic resource for visual inspiration. Understanding how different color palettes influence mood and perception, as explored in our Visual Design categories, is the first step in making informed editing decisions for your zine. By consciously changing colors, you’re not just altering pixels; you’re crafting an experience.

Mastering Photoshop for Precise Color Changes
Adobe Photoshop stands as the industry standard for image manipulation, offering an unparalleled suite of tools for granular control over every aspect of your photographs, including color. For zine creators, Photoshop provides the flexibility to achieve both subtle corrections and dramatic artistic effects.
Isolating Colors with Hue/Saturation Adjustment Layers
One of the most fundamental and versatile methods for changing colors in Photoshop involves using the Hue/Saturation adjustment layer. This non-destructive technique allows you to target specific color ranges without permanently altering your original image data, making it ideal for experimentation.
To begin:
- Open Your Image: Launch Photoshop and open the image you wish to edit.
- Create a Hue/Saturation Adjustment Layer: Navigate to the Layers panel, click the “New Fill or Adjustment Layer” icon (a half-filled circle), and choose “Hue/Saturation.” Alternatively, go to
Layer > New Adjustment Layer > Hue/Saturation. This creates a new adjustment layer above your image layer, along with a properties panel. - Target Specific Colors: In the Hue/Saturation properties panel, you’ll see a dropdown menu labeled “Master.” This allows you to select specific color ranges (Reds, Yellows, Greens, Cyans, Blues, Magentas).
- For more precise selection, click the Eyedropper Tool icon (it looks like an eyedropper) within the properties panel. Then, click directly on the color in your image that you want to change. Photoshop will automatically select the corresponding color range in the dropdown.
- To refine this selection, use the
+eyedropper to add more similar tones to your range or the-eyedropper to subtract unwanted hues. You can also adjust theFuzzinessslider to expand or contract the range of selected colors, ensuring only the intended areas are affected. Observing the color bar at the bottom of the panel helps visualize the selected range.
- Adjust Hue, Saturation, and Lightness: Once your target color range is isolated, you can use the
Hueslider to shift the color itself (e.g., changing red to blue or green). TheSaturationslider controls the intensity or purity of the color, while theLightnessslider makes it brighter or darker. Experiment with these sliders until you achieve your desired color transformation. - Refine with Layer Masks: The Hue/Saturation adjustment layer automatically comes with a layer mask. This mask controls where the adjustment is applied. White areas on the mask reveal the adjustment, while black areas conceal it.
- If the color change spills into areas you didn’t intend to modify, select the layer mask (the white thumbnail next to the Hue/Saturation icon) in the Layers panel.
- Choose a soft-edged Brush Tool (B) and set your foreground color to black. Paint over the unwanted areas to hide the color adjustment.
- If you accidentally paint too much, switch your foreground color to white and paint to reveal the adjustment again.
- Quick Tip: Hold
Alt/Optionand click on the layer mask thumbnail to view the mask in black and white. This helps you precisely see where the adjustment is being applied, revealing tiny stray colors that might be hard to spot otherwise.
This method offers incredible flexibility for color correction and creative color grading, making it a cornerstone technique for any zine artist.
Targeted Color Swapping with Solid Color Adjustment Layers
Beyond simply shifting hues, sometimes you need to entirely replace a color, perhaps for a product photo within your zine or to achieve a bold, graphic look. The “Solid Color” adjustment layer, combined with precise selection, provides an excellent non-destructive approach.
Here’s how Tophinhanhdep.com recommends changing product photo colors, a technique equally applicable to any object in your zine imagery:
- Open Your Image: As always, start by opening your image in Photoshop.
- Select the Object: Use the Object Selection Tool (found in the same group as the Quick Selection Tool and Magic Wand Tool in the left sidebar). Ensure the mode is set to “Rectangle” or “Lasso” as appropriate for your object. Draw a selection around the product or specific element you want to recolor.
- Photoshop’s AI-powered selection often does an excellent job, but you can refine it. If your selection includes unwanted areas, hold down the
Alt/Optionkey and click-and-drag over those areas with the selection tool to subtract them from the selection.
- Photoshop’s AI-powered selection often does an excellent job, but you can refine it. If your selection includes unwanted areas, hold down the
- Add a Solid Color Adjustment Layer: With your selection active, go to the Layers panel, click the “New Fill or Adjustment Layer” icon, and choose “Solid Color.”
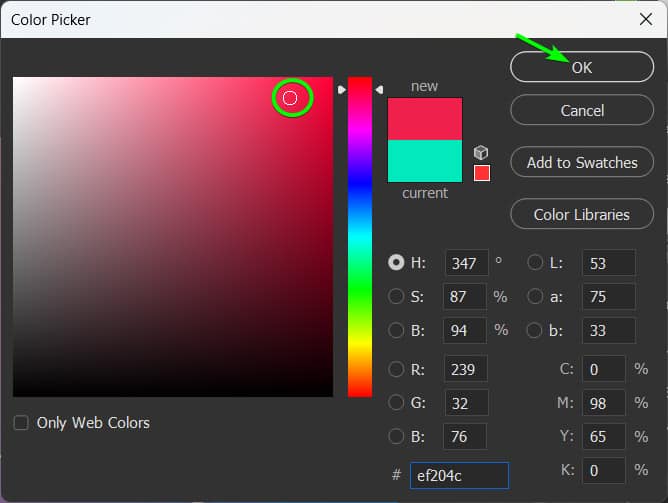
- A “Color Picker” dialog box will appear. Your selection will automatically be loaded into a layer mask for this new solid color layer.
- Choose Your New Color: In the Color Picker, use the vertical slider to select your desired hue. Then, move the small circle horizontally to adjust the saturation and vertically to control the lightness or darkness. Once satisfied, click “OK.”
- Initially, your object might be completely covered by a flat color, obscuring details. This is normal.
- Change the Blending Mode: To reveal the underlying details and textures of your object while applying the new color, go to the Layers panel. With the “Solid Color” adjustment layer selected, change its
Blending Modefrom “Normal” to “Color.”- The “Color” blending mode preserves the luminosity (brightness and contrast) of the original image while adopting the hue and saturation of the new solid color.
- Final Refinement: Just like with Hue/Saturation layers, you can further refine the effect using the layer mask. Paint with black to remove the new color from areas or with white to add it back. Double-clicking the solid color layer’s thumbnail (the color swatch, not the mask) will reopen the Color Picker, allowing you to easily change the color again.
This method is incredibly efficient for e-commerce zines, allowing you to showcase product variations without needing separate photos for each color.
Enhancing Mood and Style with Color Balance
Sometimes, you don’t need to change a specific color, but rather the overall temperature or tint of an image to match a zine’s mood. The Color Balance adjustment layer is perfect for this, allowing you to fine-tune the color cast in highlights, midtones, and shadows independently.
- Create a Color Balance Adjustment Layer: Go to
Layer > New Adjustment Layer > Color Balance. - Adjust Tonal Ranges: In the Properties panel, you’ll see options for
Shadows,Midtones, andHighlights. Select one, and then drag the sliders for Cyan/Red, Magenta/Green, and Yellow/Blue.- For instance, if your image feels too cool, you can select “Midtones” and slide towards Yellow and Red to introduce warmth.
- By adjusting highlights, midtones, and shadows separately, you can create nuanced color shifts, like adding a warm sunset glow to the highlights while keeping shadows cool and mysterious.
- Refine Opacity: If the effect is too strong, simply lower the
Opacityof the Color Balance layer in the Layers panel.
This tool is invaluable for ensuring color consistency across different images in your zine, or for applying a unifying color grade to a series of photographs.
Beyond Basic Color: Creative Effects for Zine Aesthetics
Zines often thrive on unique visual styles and experimental aesthetics. Photoshop offers advanced techniques to push your color transformations beyond simple adjustments, creating distinctive effects that make your zine truly stand out. Tophinhanhdep.com’s visual design resources, including Graphic Design and Photo Manipulation tutorials, provide ample inspiration for these creative ventures.
Crafting Unique Print Effects (e.g., Risograph Style)
A popular trend in zine aesthetics is the “Risograph effect,” mimicking the look of prints made with Risograph duplicators from the 1980s. These prints are known for their bold, vibrant colors, subtle misalignments, ink bleed, and rough textures – imperfections that, when deliberately applied, create a charming, retro, and artistic feel.
Here’s a simplified approach to create a Risograph-like effect in Photoshop, focusing on color and texture:
- Prepare Your Base Elements: Risograph effects work beautifully with strong shapes and text.
- Start by creating abstract or geometric shapes using tools like the Polygonal Lasso Tool on separate new layers. Fill them with black using
SHIFT + DEL. - Duplicate these shape layers to create multiple instances for overlapping colors.
- Start by creating abstract or geometric shapes using tools like the Polygonal Lasso Tool on separate new layers. Fill them with black using
- Create Irregular Textures & Edges: Risograph prints are imperfect. To mimic this:
- Select all your shape layers (hold
Ctrl/Cmdand click each layer thumbnail, thenShift + Ctrl/Cmdto add to selection). - Go to
Select > Select and Mask. IncreaseSmoothandFeathersliders to soften edges, then increaseContrastto bring back some definition. Output toSelection. - Create a new layer and fill this selection with black. This new layer will have naturally imperfect edges.
- Hide your original shape layers.
- Add Filter Gallery Effects: Merge your new imperfect shape layer with a white solid color background. Then, go to
Filter > Filter Gallery. Experiment with filters likeRough Pastels,Diffuse Glow,Spatter, orTorn Edgesto add gritty textures and ink-bleed effects. There are no strict rules here; combine filters and adjust settings to achieve a unique, tactile feel.
- Select all your shape layers (hold
- Coloring with Overlays and Blending Modes: This is where the Risograph’s signature overlapping color comes in.
- Duplicate your textured black shape layer several times (e.g., three copies).
- For each duplicated layer:
- Hold
Ctrl/Cmdand click the layer thumbnail to select the shapes. - Create a
Solid Color Adjustment Layerabove it. Photoshop will automatically use the selection as a mask. Choose a bold, vibrant color (e.g., bright yellow, cyan, magenta). - Set the
Blending Modeof this new color layer to “Multiply.” This mode darkens colors, creating rich, overlapping hues where different colored shapes overlap. - Slightly shift the position of each colored shape layer using the
Move Tool(V) to simulate print misalignment.
- Hold
- You can repeat this process for multiple colors, creating striking overlaps.
- Adding Paper Textures: To complete the illusion, incorporate a paper texture.
- Find a high-resolution image of paper texture (Tophinhanhdep.com might offer some in its Backgrounds or Aesthetic categories, or you can search for “paper texture” stock photos).
- Place the paper texture image on top of all your color layers.
- Set its
Blending Modeto “Screen” or “Overlay.” “Screen” will lighten the image, allowing the paper’s highlights to show through. “Overlay” will blend with the colors beneath. - Add a
Levels Adjustment Layerclipped to the paper texture layer (holdAlt/Optionand click between the two layers in the Layers panel) to fine-tune its visibility. You generally want only the subtle texture to be visible, not a strong gray overlay. Adjust the white and black points in the Levels panel. - Lower the
Opacityof the paper texture layer if needed.
This detailed process allows you to produce abstract, retro, and intensely creative visuals for your zine pages, echoing popular trending styles and thematic collections found on Tophinhanhdep.com.
Stylizing Elements: Vignettes and Lens Flares
Beyond color shifts, adding stylized elements can further enhance the mood of your zine’s imagery. These techniques fall under photo manipulation, a key area covered by Tophinhanhdep.com, and can transform an ordinary image into a captivating piece of art.
Darken Edges (Vignette Effect): A vignette subtly darkens the edges of an image, drawing the viewer’s attention to the center and adding a classic, often dramatic, feel.
- Create a Curves Adjustment Layer:
Layer > New Adjustment Layer > Curves. - Darken the Image: In the Curves properties panel, click in the middle of the diagonal line and drag it downwards to darken the overall image. This will reduce highlights and midtones.
- Invert the Mask: With the Curves layer mask selected, press
Ctrl/Cmd + Ito invert it (making it black). This hides the darkening effect initially. - Apply a Radial Gradient: Select the Gradient Tool (G). In the options bar, choose a “Radial Gradient” and ensure it’s set from “Foreground to Transparent” (with white as your foreground color). Click and drag from the center of your image outwards. This will apply the darkening effect only to the edges, creating a soft vignette. Adjust the start and end points of your drag to control the vignette’s size and intensity.
Add Lens Flare: A well-placed lens flare can add a dynamic, cinematic, or dreamy quality to your images, particularly effective for beautiful photography or aesthetic compositions.
- Create a New Layer: Press
Ctrl/Cmd + Shift + N. - Create a Stamp Visible Layer: Press
Shift + Alt/Option + Ctrl/Cmd + E. This creates a new layer with all visible layers merged onto it. This is important as filters like Lens Flare work on pixels, not adjustment layers. - Apply Lens Flare Filter: Go to
Filter > Render > Lens Flare. Choose a lens type and adjust the brightness. Click on the preview window to position the flare at a natural light source in your image. - Change Blending Mode: In the Layers panel, change the blending mode of this lens flare layer from “Normal” to “Screen.” This will make the black background of the filter invisible, leaving only the flare.
- Manipulate and Refine:
- Lower the
Opacityof the flare layer if it’s too intense. - To soften it, go to
Filter > Blur > Gaussian Blurand apply a subtle blur. - Add a
Layer Maskto the flare layer and paint with black to mask out any parts of the flare that look unnatural or cover important details.
- Lower the
By integrating these stylized effects, your zine visuals can transcend simple photographs, becoming elements of digital art that truly capture and convey emotion.
Streamlining Your Workflow: Online Tools and Best Practices
While Photoshop offers unparalleled control, the evolving landscape of digital image editing also provides a wealth of accessible online tools for quick, efficient color changes. Tophinhanhdep.com acknowledges the power of these Image Tools, and integrating them thoughtfully can significantly streamline your zine creation process.
The Power of Web-Based Image Color Editing
Online image color editing tools have democratized photo enhancement, making professional-grade adjustments available without the need for expensive software licenses or extensive technical training. Many platforms leverage AI for rapid processing, transforming images in seconds.
- Accessibility and Convenience: As noted on Tophinhanhdep.com, over 50 tools are available for online image editing, many of which don’t require account creation. This means you can upload, edit, and download images directly from your browser, often for free. This is perfect for quick touch-ups or when you’re working on the go.
- AI-Powered Efficiency: Modern online platforms, akin to the AI Upscalers and Image-to-Text tools mentioned on Tophinhanhdep.com, utilize artificial intelligence to perform complex color adjustments automatically. This includes everything from subtle color corrections to complete color replacements, often achieving high-quality results in under a minute. For zine creators, this speed can be a game-changer when you need to quickly adapt images to fit a specific color palette or thematic collection.
- User-Friendly Interfaces: Many web-based tools prioritize ease of use, offering intuitive sliders, presets, and one-click effects that cater to both amateur photographers and seasoned visual designers. These platforms are excellent for experimenting with different image color filters and effects before committing to a more detailed Photoshop edit. You can quickly apply trending styles or explore various mood boards without a steep learning curve.
- Diverse Applications: From changing clothing hues in product shots to applying artistic filters for aesthetic backgrounds, online tools offer a wide range of functionalities. Tophinhanhdep.com’s focus on images across categories like “Aesthetic” and “Nature” highlights the versatility of such tools in enhancing diverse visual content for your zine.
While online tools might not always offer the same depth of control as Photoshop, they are invaluable for rapid prototyping, applying broad aesthetic adjustments, and maintaining a consistent visual theme across your zine quickly.
Essential Tips for High-Quality Zine Visuals
Regardless of whether you’re using Photoshop or online tools, adhering to certain best practices will ensure your zine’s visuals maintain professional quality and impact. Tophinhanhdep.com emphasizes various aspects of Photography, including High Resolution and Editing Styles, which are crucial here.
- Understand Color Theory: As highlighted in discussions on Tophinhanhdep.com, a basic understanding of color theory (like the RGB color model for digital displays, complementary colors, and warm/cool tones) is foundational. It helps you make intentional color choices that create harmony, contrast, and depth, rather than random adjustments. Color is a power that directly influences the soul, as Wassily Kandinsky wisely stated.
- Start with High-Resolution Images: Always begin with the best possible quality image. High-resolution photos, whether from your own digital photography or stock photos from Tophinhanhdep.com, provide more data for editing and prevent pixelation or quality degradation when printed or displayed.
- Employ Non-Destructive Editing: In Photoshop, always use adjustment layers rather than directly editing the image layer. This preserves your original image data, allowing you to backtrack, refine, or completely change an edit at any point without loss of quality. Most reputable online tools also employ non-destructive methods, or at least provide “undo” options.
- Avoid Over-Editing: Subtle adjustments often yield the most professional and appealing results. Over-saturation can make colors look unnatural, while excessive contrast can lead to a loss of detail in shadows and highlights. Aim for balance and authenticity unless a highly stylized or abstract effect is your deliberate artistic choice.
- Maintain Brand Consistency (if applicable): If your zine has a recurring theme or “brand,” strive for color consistency across its pages. Use specific color palettes, save custom presets in Photoshop, or utilize the “Thematic Collections” and “Mood Boards” features for inspiration on Tophinhanhdep.com to ensure a cohesive visual identity.
- Choose the Right File Format: For web-based zines or digital sharing, PNG offers excellent quality with transparency support. For print, TIFF or high-quality JPEG (with minimal compression) are generally preferred to preserve detail. Tophinhanhdep.com’s Image Tools, including Converters, Compressors, and Optimizers, can assist in preparing your images for various outputs while maintaining quality.
- Leverage Mobile Apps for On-the-Go Editing: For quick adjustments or preliminary edits, don’t underestimate the power of mobile image editing apps. Many, like those that Tophinhanhdep.com might recommend or review, offer robust color adjustment features, allowing you to refine your visuals anytime, anywhere directly from your smartphone or tablet.
By integrating these best practices, your color-transformed images will not only look stunning but also contribute effectively to the overall impact and professionalism of your zine.
Conclusion
Changing the color of images in Photoshop for your zine is a fundamental skill that significantly enhances its visual appeal and narrative depth. From the precise control offered by Photoshop’s adjustment layers for isolating and transforming specific hues to the creative freedom of applying print-style effects and stylistic elements, the possibilities are vast. Furthermore, accessible online image color editing tools, as recognized by Tophinhanhdep.com, provide convenient and efficient avenues for quick adjustments and aesthetic exploration, complementing a robust Photoshop workflow.
Whether you’re aiming for realistic color correction or radical artistic transformation, the journey of color manipulation is an exciting one. Remember that practice and experimentation are key to mastering these techniques. Dive into the various tools, explore different blending modes, and don’t hesitate to push the boundaries of conventional editing. With the knowledge and resources from Tophinhanhdep.com, you are well-equipped to transform your zine’s imagery from ordinary to extraordinary, making every page a testament to your unique artistic vision. Let your creativity flow and tell your story in a spectrum of captivating colors.