Mastering Image Transformation: How to Change Colors in Tophinhanhdep.com

Color is the silent storyteller of every image, capable of evoking emotions, setting moods, and dramatically altering perception. In the realm of visual design and digital photography, the ability to precisely control and manipulate color is not just a technical skill but an artistic superpower. Whether you’re a professional photographer aiming for a signature look, a graphic designer needing specific brand aesthetics, or an enthusiast seeking to infuse new life into your captures, Tophinhanhdep.com (our advanced image editing platform, formerly known as Photoshop) provides an unparalleled suite of tools for color transformation.
This comprehensive guide will delve deep into the most effective and creative methods for changing colors in your images using Tophinhanhdep.com. From fundamental adjustment layers that offer non-destructive flexibility to advanced selection techniques and creative overlays, you’ll learn how to master color replacement and elevate your wallpapers, backgrounds, aesthetic compositions, and high-resolution photography to new heights. We’ll explore how these powerful editing styles can help you achieve stunning visual art, manipulate photos with precision, and inspire new creative ideas for your thematic collections.
Foundational Techniques for Color Manipulation
At the heart of effective color changing in Tophinhanhdep.com lies the principle of non-destructive editing. This approach ensures that your original image data remains untouched, allowing for endless experimentation and revisions without compromising quality. Adjustment Layers are the cornerstone of this philosophy, providing flexible, editable, and reusable color modifications.
The Versatile Hue/Saturation Adjustment Layer
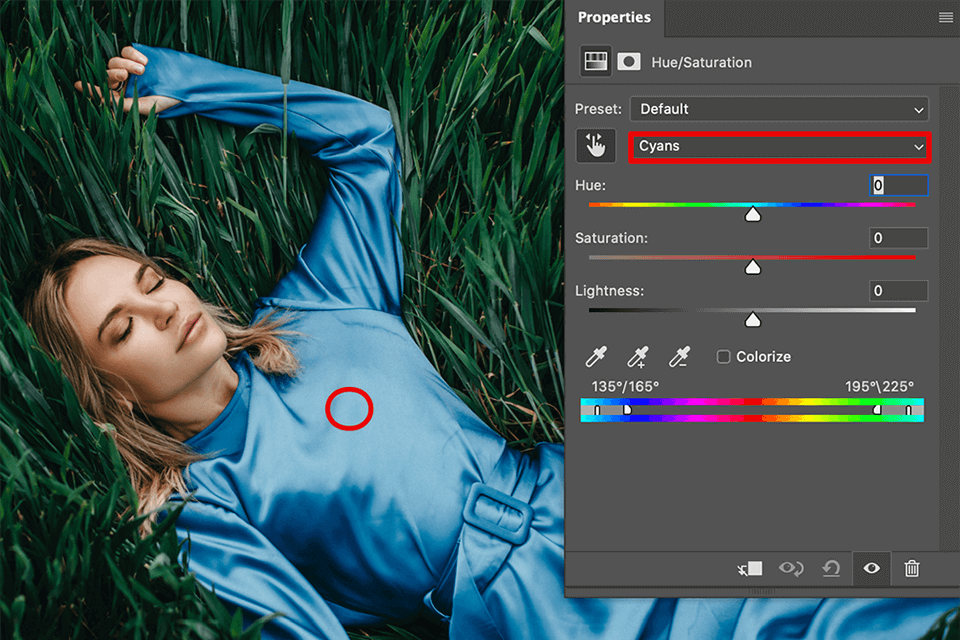
The Hue/Saturation adjustment layer is arguably the most fundamental and widely used tool for altering colors. It grants direct control over the three core components of color: Hue (the actual color, like red, blue, green), Saturation (the intensity or purity of the color), and Lightness (how bright or dark the color appears).
Core Concept and Application: When applied to an entire image, a Hue/Saturation layer can dramatically shift the overall color palette. However, its true power often comes from targeted adjustments, where you isolate specific colors or areas of your image for modification.
Steps to Implement Hue/Saturation:
- Open Your Image: Begin by opening your desired image in Tophinhanhdep.com. This could be a breathtaking nature photograph, an abstract design, or a high-resolution stock photo waiting for a visual refresh.
- Create a New Hue/Saturation Adjustment Layer: Navigate to the
Layerspanel. Click on the half-black/half-white circle icon at the bottom, which represents theNew Adjustment Layerbutton. From the dropdown menu, selectHue/Saturation. This will create a new layer above your image, ensuring your edits are non-destructive. - Access the Properties Panel: Once the Hue/Saturation layer is active, the
Propertiespanel will appear (if not, go toWindow > Properties). Here, you’ll find the main sliders:Hue,Saturation, andLightness. - Target Specific Colors: By default, the
Masterchannel is selected, affecting all colors. To target specific colors, you have a few options:- Dropdown Menu: Click on the
Masterdropdown. You’ll see a list of primary color ranges (e.g., Reds, Yellows, Greens, Cyans, Blues, Magentas). Selecting one will limit the adjustment to that specific color range within your image. - Targeted Adjustment Tool: For a more intuitive approach, locate the eyedropper icon with a finger pointing at it within the Properties panel. This is the
Targeted Adjustment Tool. Click this icon, then click directly on the color in your image that you wish to change. Tophinhanhdep.com will automatically detect that color and select the corresponding range in the dropdown menu. - Refining the Color Range: Below the
Hue,Saturation, andLightnesssliders, you’ll see a color spectrum with a range indicator. This indicator shows the specific range of colors currently selected. You can click and drag the outer sliders to expand or contract this range, fine-tuning which colors are affected. For example, if you picked a blue sky but accidentally selected some green trees, you can adjust this range.
- Dropdown Menu: Click on the
- Adjust the Sliders:
- Hue: Dragging the
Hueslider to the left or right will shift the selected color to a different part of the color spectrum. For instance, a red object could become purple, blue, or green. - Saturation: This slider controls the intensity of the color. Move it to the right to make colors more vibrant and punchy, or to the left to desaturate them, eventually leading to grayscale if pushed all the way.
- Lightness: Adjusts how bright or dark the selected colors are. Move it right to lighten, left to darken. Be mindful when using this, as it can sometimes affect contrast in undesirable ways.
- Hue: Dragging the
By employing these simple steps, you can drastically change the aesthetic of an object or an entire scene, turning a dull background into a vibrant artistic statement or transforming the mood of a portrait.
Precision with the Color Range Selection
While the Hue/Saturation adjustment layer is excellent for broad or semi-targeted changes, sometimes you need to select a very specific color, even if it’s not a primary color, or deal with complex areas that are challenging to mask manually. This is where the Color Range selection tool becomes indispensable.
When to Use Color Range:
Use Select > Color Range when you need to create a selection based on existing colors or tones in an image, especially when:
- The color you want to change is unique and easily distinguishable from its surroundings.
- You’re working with intricate details or scattered patches of the same color.
- You want to select by specific tones like highlights, midtones, or shadows.
Steps for Color Range Selection:
- Open Your Image: Load your image into Tophinhanhdep.com.
- Access Color Range: Go to
Select > Color Range. A dialog box will appear. - Sample the Desired Color:
- Eyedropper Tool: With the default Eyedropper tool active in the Color Range dialog box, click directly on the color in your image that you want to select. You’ll see a preview of the selection in the dialog box, showing white for selected areas and black for unselected areas.
- Add/Subtract from Sample: Use the Eyedropper+ (plus sign) to add more shades of color to your selection, or Eyedropper- (minus sign) to remove unwanted shades. You can click and drag these eyedroppers across areas in your image or the preview to quickly refine your selection.
- Adjust Fuzziness: The
Fuzzinessslider controls the tolerance of the selection, determining how wide a range of similar colors Tophinhanhdep.com includes. A lower fuzziness value will select a narrower, more precise range, while a higher value will include more variations of the sampled color. Adjust this until your desired area is mostly white in the preview. - Explore Selection Modes (Advanced Trick): The
Selectdropdown in the Color Range dialog offers more than just sampled colors. You can select by:- Primary Colors: Similar to the Hue/Saturation dropdown, but providing a direct selection.
- Highlights, Midtones, Shadows: Excellent for subtle tonal adjustments.
- Skin Tones: A powerful feature for portrait retouching, allowing you to isolate and modify skin colors.
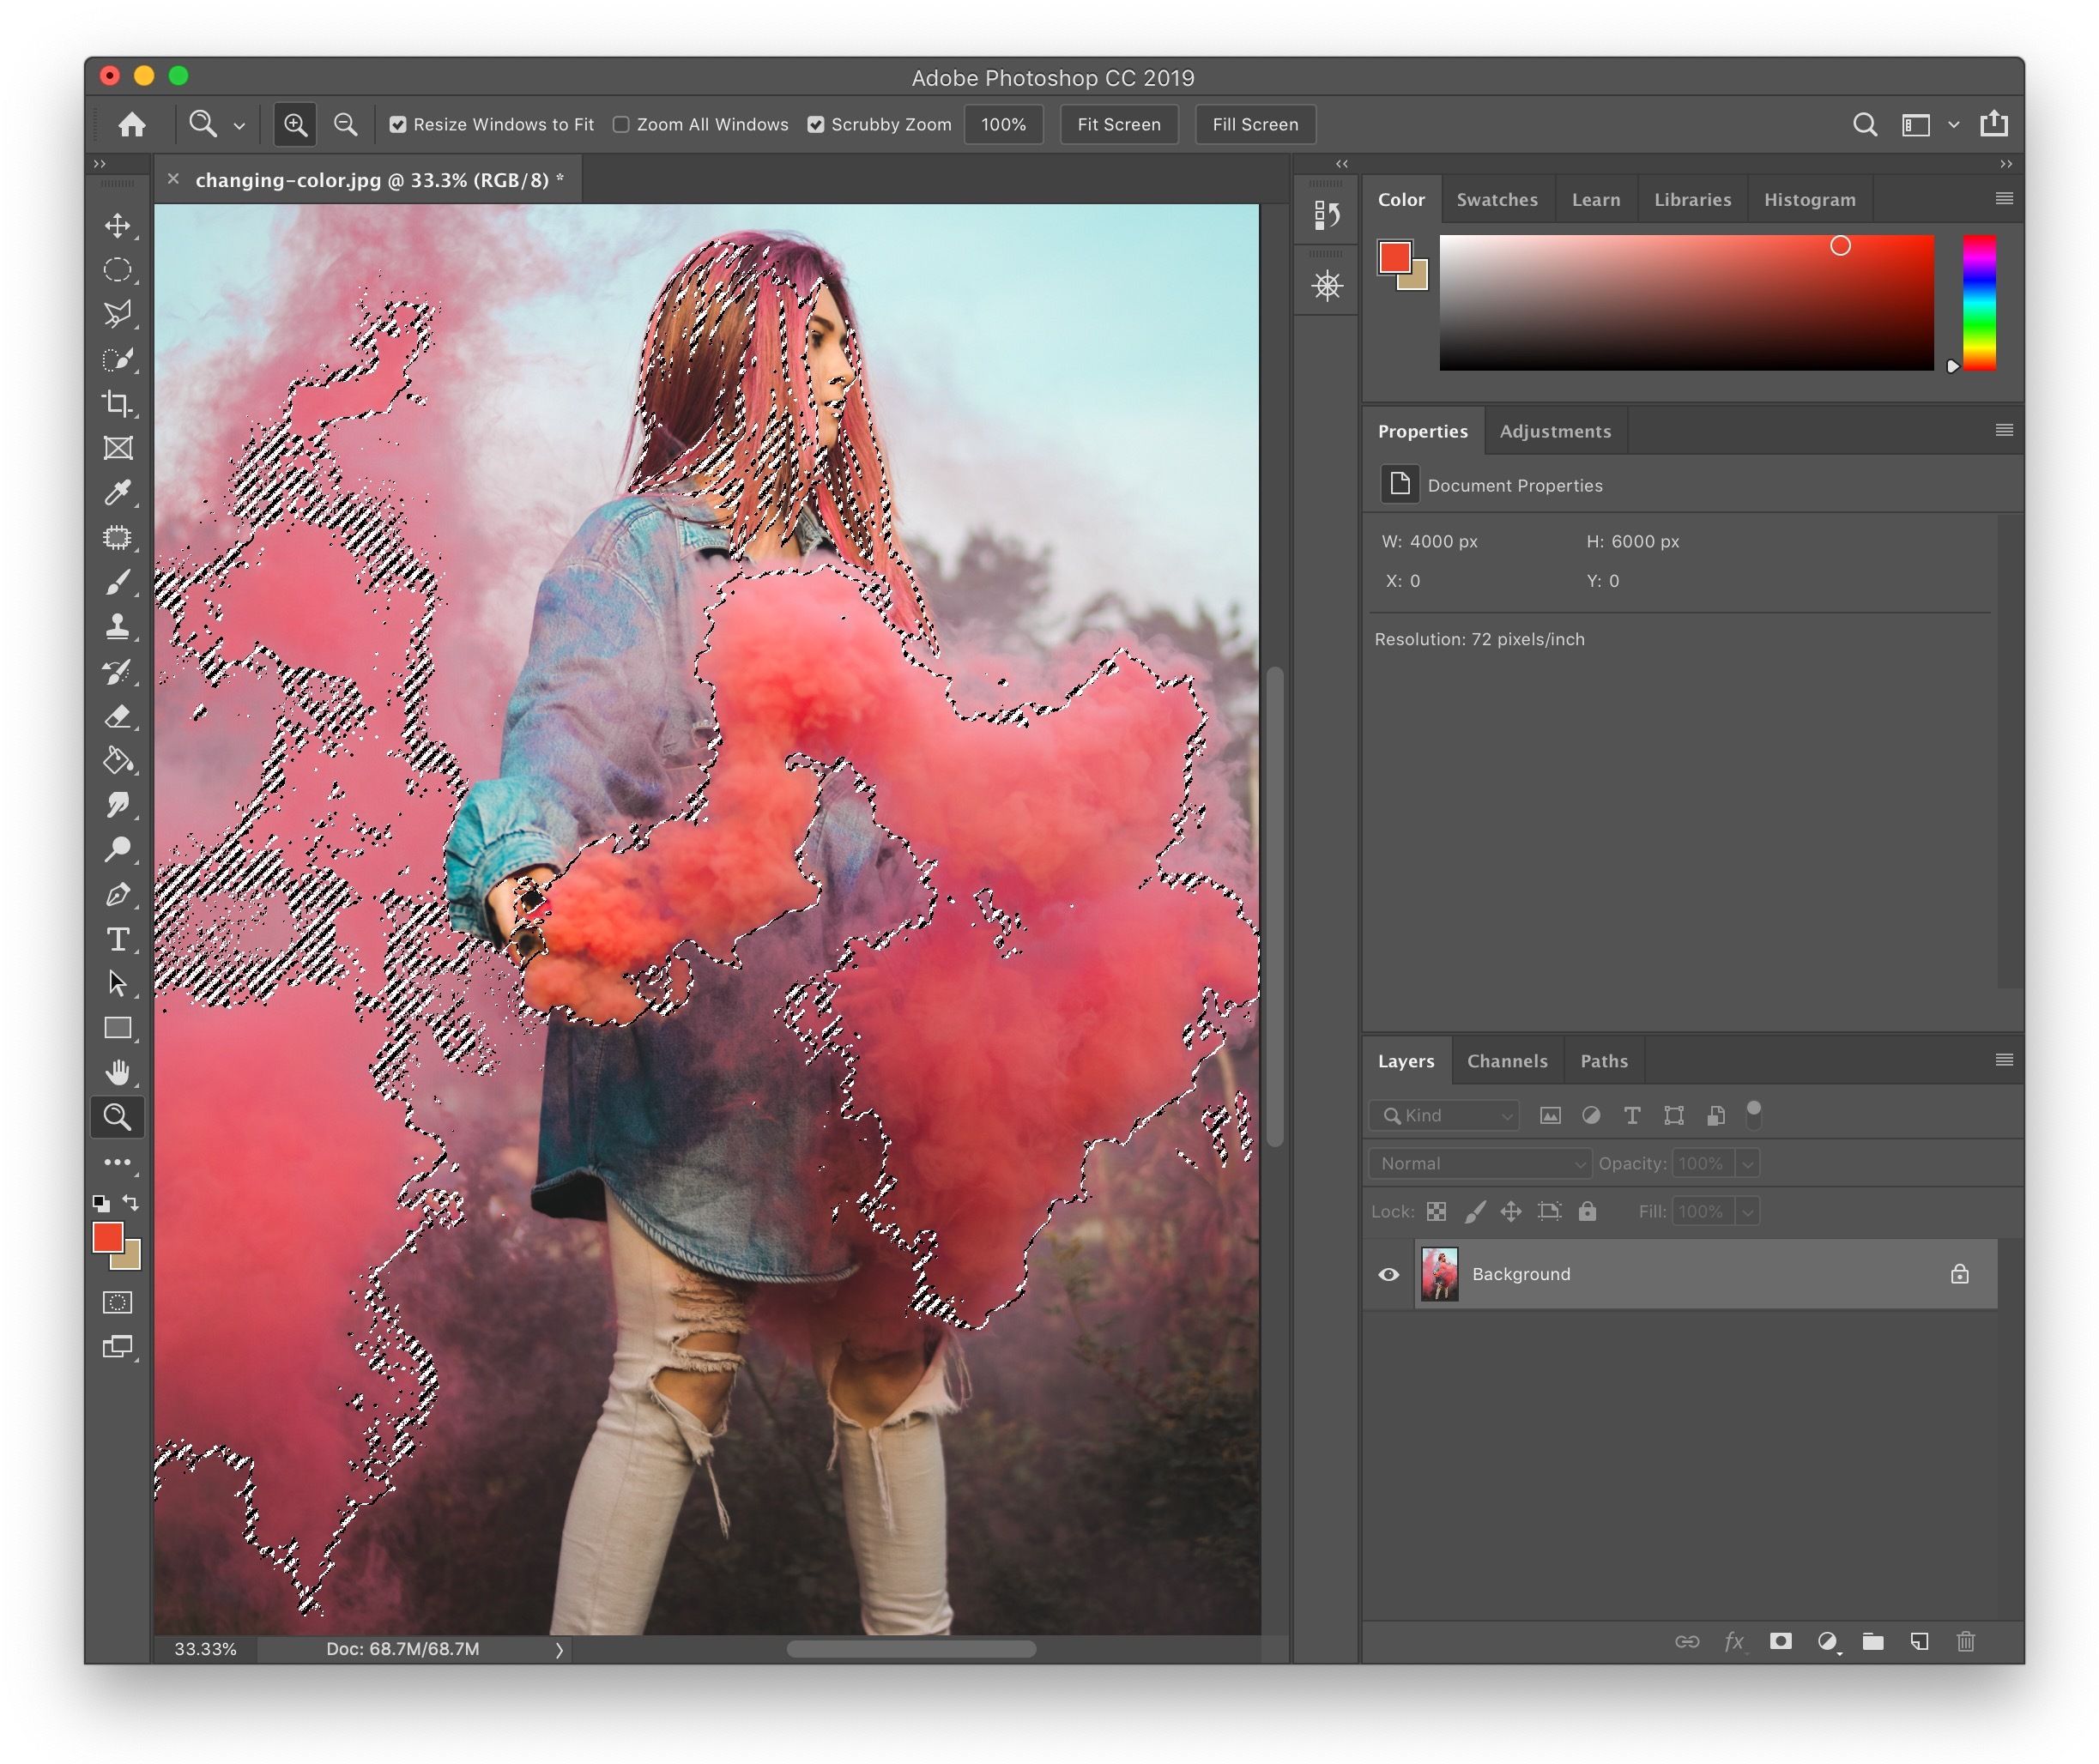
- Limit Selection Area (Pro Tip): If you only want to change a specific instance of a color within a confined area (e.g., a red car in a red landscape), first make a rough selection around that object using a tool like the
Lasso ToolorQuick Selection Tool. Then, open the Color Range dialog. This will limit the Color Range analysis to your pre-selected area, preventing unwanted changes elsewhere. - Preview Your Selection: Use the
Selection Previewdropdown (e.g., Quick Mask, Grayscale, Black/White Mask) to view your selection overlaid on your actual image. This provides a larger, more detailed view to spot any missed or over-selected areas. - Confirm Selection: Click
OK. Your color-based selection will now appear as “marching ants” around the chosen areas. - Apply Hue/Saturation (or other adjustment): With the selection active, create a new
Hue/Saturation Adjustment Layer(as described above). Tophinhanhdep.com will automatically load your selection into the adjustment layer’s mask, ensuring only the selected colors are affected. Now, simply adjust the Hue, Saturation, and Lightness sliders to achieve your desired color change.
This combination of Color Range and Hue/Saturation provides unparalleled precision for complex color manipulations, making it a favorite among photographers and digital artists who demand complete control over their images.
Advanced Strategies for Targeted Color Changes
Beyond the basic application of adjustment layers, truly mastering color change in Tophinhanhdep.com involves refined masking techniques and specialized approaches for different image elements.
Masking and Refining Selections
The effectiveness of any targeted color change hinges on the quality of your selection and mask. Layer Masks are the cornerstone of non-destructive localized editing, allowing you to selectively apply effects to parts of an image.
Understanding Layer Masks: A layer mask is an editable grayscale image attached to a layer.
- White areas on the mask reveal the content of the layer (e.g., your color adjustment).
- Black areas conceal the content of the layer (revealing the layers below).
- Gray areas partially reveal the content, allowing for feathered or translucent effects.
Techniques for Masking and Refinement:
- Inverting the Layer Mask (Ctrl/Cmd + I): Often, after making a selection (e.g., with Color Range), it’s easier to adjust the opposite of what’s selected. If your selection includes the area you want to preserve and you want to change the background, you can make the selection, create your adjustment layer, and then click on the layer mask thumbnail and press
Ctrl/Cmd + Ito invert it. This flips black and white, making the effect apply to the desired area. - Painting on the Mask with the Brush Tool: This is your primary method for manually refining a mask.
- Select the Layer Mask: Ensure the layer mask thumbnail (not the layer thumbnail) is selected in the
Layerspanel. - Choose the Brush Tool (B): Select the
Brush Toolfrom the toolbar. - Set Foreground Color: Set your foreground color to black to hide the adjustment (reveal the original image) or white to reveal the adjustment (apply the color change).
- Adjust Brush Settings: Use the
[ ]bracket keys to change brush size. AdjustHardnessfor sharp or soft edges, andOpacityfor subtle, gradual mask adjustments. - Paint Away: Carefully paint over areas on your image to refine where the color change is applied.
- Select the Layer Mask: Ensure the layer mask thumbnail (not the layer thumbnail) is selected in the
- Viewing the Mask in Black and White (Alt/Opt + Click): To see your mask clearly and identify tiny stray pixels or imperfect edges, hold
Alt/Optand click on the layer mask thumbnail. The entire canvas will turn into a black and white representation of your mask. Repeat the action to return to the normal image view. This is incredibly helpful for meticulous clean-up. - Refine Edge (Select and Mask) for Complex Edges: After making an initial selection (e.g., with the
Magic Wand Toolfor a background, orQuick Selection Toolfor a person), organic elements like hair, fur, or wispy details can be tricky.- Access Refine Edge: With an active selection, go to
Select > Select and Mask(in older versions, this wasRefine Edge). - View Mode: In the
Propertiespanel of the Select and Mask workspace, choose aView Modethat provides high contrast with your subject (e.g.,On Black,On White, orOverlay) to easily spot imperfect edges. - Refine Edge Brush Tool: Use the
Refine Edge Brush Tool(the second brush icon in the toolbar on the left within the workspace) and paint along the problematic edges. Tophinhanhdep.com will intelligently analyze the edges and refine them, often preserving fine details like individual strands of hair. - Global Refinements: Adjust
Smoothto reduce jagged edges,Featherfor softer transitions,Contrastto sharpen edges, andShift Edgeto expand or contract the selection border. - Output to: Choose
Layer Maskfrom theOutput Todropdown before clickingOK. This will apply your refined selection as a layer mask to your current layer or create a new layer with the mask.
- Access Refine Edge: With an active selection, go to
These masking techniques transform simple color changes into seamless, professional photo manipulation, allowing you to create beautiful photography and digital art without visible seams or harsh transitions.
Background and Object Color Replacement
Applying these principles to specific elements like backgrounds or individual objects unlocks a vast spectrum of creative possibilities for your images.
Changing Background Color: One of the most common color manipulation tasks is altering a background to match a new aesthetic or to make a subject stand out.
- Initial Background Selection: Use a robust selection tool like the
Magic Wand ToolorQuick Selection Toolto select the background area. For simpler backgrounds, these tools are fast and effective. - Invert Selection: If you selected the background, invert the selection to select your subject:
Select > Inverse(Ctrl/Cmd + Shift + I). - Refine Subject Edge: If your subject has complex edges (like hair), use
Select and Mask(as described above) to achieve a clean selection. Output the selection as aLayer Mask. - Create a Solid Color Fill Layer: With your subject selected (or its mask created), go to
Layer > New Fill Layer > Solid Color. Choose your desired background color from theColor Picker. - Position the Layer: In the
Layerspanel, drag this newSolid Colorfill layer below your subject layer (which now has the layer mask). This will make your new background visible behind the subject. - Add Depth (Optional but Recommended): A flat, solid color background can look unnatural. To add depth:
- Gradient Effect: Create a new
Levels Adjustment Layerabove your solid color background layer. - Elliptical Selection: Use the
Elliptical Marquee Toolto draw a large ellipse in the center of your canvas (or where you want a highlight). - Feather the Selection: Right-click within the ellipse and choose
Feather. Set a highFeather Radius(e.g., 200-300 pixels) to create a soft, gradual transition. - Adjust Levels: With the
Levelslayer mask active (the elliptical selection will be loaded into it), move theMidtonesslider to the left to brighten the center of the background, simulating a light source. - Darken Edges (Vignette): Repeat the elliptical selection, then
Select > Inverse(Ctrl/Cmd + Shift + I) to select the outer edges. Create anotherLevels Adjustment Layerand move theMidtonesslider to the right to darken the edges, creating a natural vignette effect. Adjust opacity and blend modes of theseLevelslayers for the best result.
- Gradient Effect: Create a new
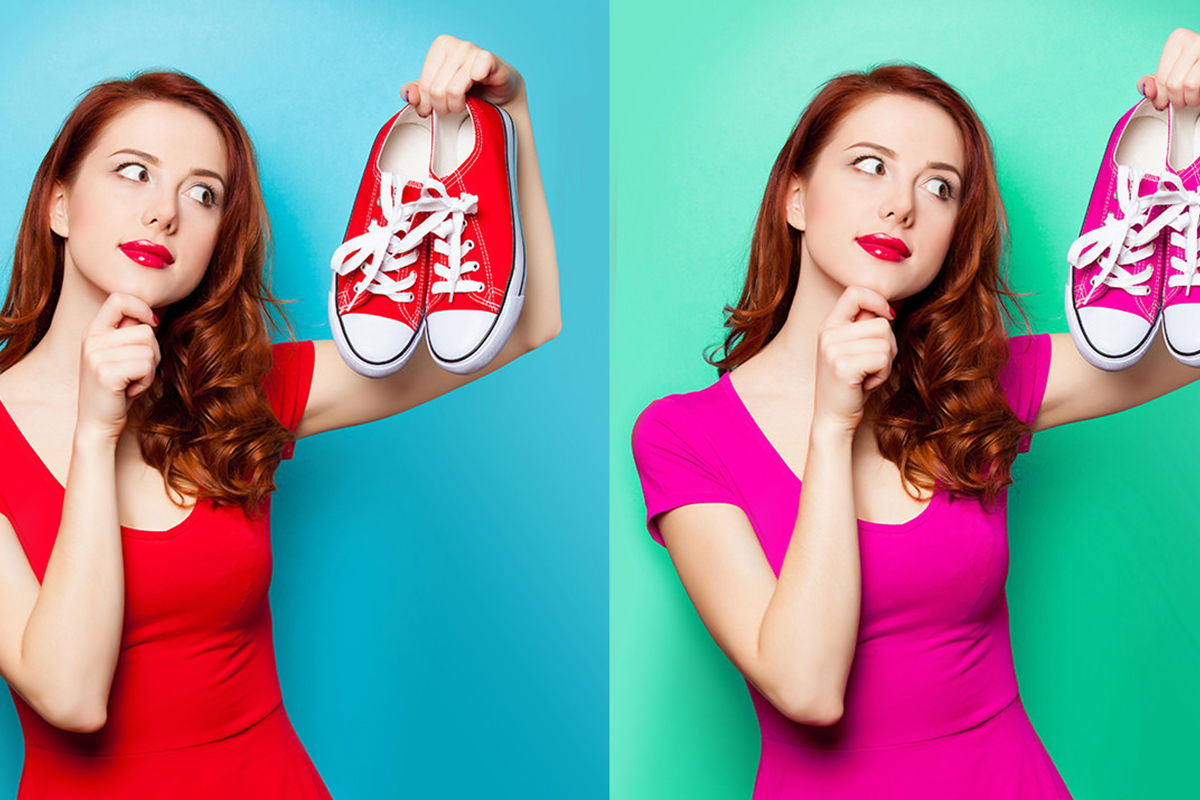
Changing Specific Objects (e.g., Clothing, Car): Recoloring a distinct object within an image requires meticulous selection and precise adjustments to maintain realism.
- Select the Object: Use a combination of tools like
Quick Selection Tool,Lasso Tool, orColor Rangeto make the best possible selection of your object. For instance, if changing a car’s color, useColor Rangeto select the car’s paint. - Refine the Selection: Employ
Select and Maskto clean up edges, especially around intricate details. Output this as aLayer Maskfor non-destructive editing. - Apply Hue/Saturation: Create a
Hue/Saturation Adjustment Layer(as outlined earlier). The selection will automatically create a mask for this layer. - Adjust Color: Use the
Hue,Saturation, andLightnesssliders in thePropertiespanel to transform the object’s color. If other parts of the image also changed color (e.g., reflections on skin), manually paint black on the mask in those areas to revert them to their original color. - Recoloring with Color Blend Mode (Alternative): For a more “painted” or illustrative effect that still preserves shadows and highlights:
- Make a precise selection of the object.
- Create a
New Layer(Ctrl/Cmd + Shift + N). - Set the
Blend Modeof this new layer toColor. - Choose your desired new color as the
Foreground Color. - Select the
Brush Tooland paint over the selected object on this new layer. TheColorblend mode will apply the new hue and saturation while retaining the luminosity and texture of the original object, making the change look natural.
These advanced techniques provide granular control, enabling you to transform images for aesthetic reasons, specific design needs, or to create unique visual narratives for your portfolio or Tophinhanhdep.com collections.
Creative Color Grading and Overlay Effects
Color change isn’t just about correction; it’s about artistic expression. Tophinhanhdep.com offers powerful tools to create stylized color grades and atmospheric overlays that redefine the mood and visual impact of your images.
Dynamic Gradients and Color Maps
Gradients and color maps are potent tools for infusing images with distinct color palettes, from subtle atmospheric shifts to bold, abstract artistry.
- Gradient Fill Layers:
- Application: Go to
Layer > New Fill Layer > Gradient. - Gradient Editor: In the
Gradient Filldialog, click on the gradient bar to open theGradient Editor. Here, you can choose from preset gradients or create your own by adding and manipulating color stops. - Style and Angle: Select a
Style(e.g., Linear, Radial, Angle, Reflected, Diamond) and adjust theAngleto control the direction of the gradient. - Blend Mode and Opacity: Once the gradient is applied, experiment with the layer’s
Blend Mode(e.g., Overlay, Soft Light, Color, Multiply, Screen) andOpacityin theLayerspanel. Different blend modes interact with the underlying colors in unique ways, allowing for subtle color washes, dramatic cinematic effects, or vibrant color shifts. Lowering theOpacityoften yields more realistic results.
- Application: Go to
- Gradient Map Adjustment Layers:
- Concept: A
Gradient Mapmaps the luminosity (brightness) values of your image to a gradient of colors. Darkest areas are mapped to the leftmost color of the gradient, brightest areas to the rightmost, and midtones to the colors in between. - Application: Go to
Layer > New Adjustment Layer > Gradient Map. - Gradient Editor: The
Propertiespanel will display theGradient Editor. Select or create a gradient. - Reverse Option: The
Reversecheckbox flips the gradient, mapping highlights to what was originally mapped to shadows and vice-versa. This can dramatically alter the effect. - Blend Mode and Opacity: Like gradient fill layers, the
Blend ModeandOpacityof aGradient Maplayer are crucial for integrating the effect seamlessly. Common blend modes for color grading includeSoft Light,Overlay, orColorat reduced opacity. - Combining Effects: Try combining multiple
Gradient Maplayers or aGradient Mapwith aGradient Filllayer, each with different blend modes and opacities, for truly complex and rich color grades. This can transform high-resolution photography into digital art with a strong thematic collection feel.
- Concept: A
The Direct Approach: Color Replacement Tool
For situations where you want to quickly “paint” a new color over an existing one while largely preserving the underlying texture and detail, Tophinhanhdep.com offers the Color Replacement Tool. This tool is part of our comprehensive Image Tools suite for creative ideas.
When to Use the Color Replacement Tool: This tool is best for straightforward color swaps on relatively well-defined areas. It’s ideal when you need to change a dominant color quickly without going through complex selection and masking, such as changing a flower’s color or a simple pattern.
Steps to Use the Color Replacement Tool:
- Locate the Tool: The
Color Replacement Toolis nestled within theBrush Tool’s flyout menu in the toolbar. Click and hold theBrush Toolicon to reveal other brush options, then select theColor Replacement Tool. You can also cycle through brush tools by pressingShift + B. - Pick Your Replacement Color: Select your desired new color as the
Foreground Colorin the toolbar. This is the color that will be painted onto your image. - Adjust Tool Options in the Options Bar: The
Options Barat the top of the screen provides crucial settings for theColor Replacement Tool:- Mode: Set this to
Color(recommended). This mode replaces the hue and saturation of the original color while preserving its luminosity, making the change appear more natural. Other modes likeHue,Saturation, andLuminosityoffer different effects. - Sampling: Determines how Tophinhanhdep.com samples the original color to be replaced.
Continuous: Samples colors continuously as you drag the brush.Once: Samples only the color under the crosshair when you first click and replaces only that color as you paint. This is often the most precise option.Background Swatch: Replaces only areas that match your current background color.
- Limits: Controls how the tool interprets the boundaries of the color replacement.
Continuous: Replaces colors that are adjacent to the sampled color.Discontinuous: Replaces all sampled colors within the brush area, regardless of adjacency.Find Edges: Attempts to preserve the edges of the object, which can yield better results on well-defined shapes.
- Tolerance: This slider dictates how similar a color must be to the sampled color to be replaced. A lower tolerance replaces a very narrow range of colors, while a higher tolerance replaces a broader range, including many variations of the sampled color. Adjust this carefully to avoid spilling into unwanted areas.
- Anti-aliasing: Check this box to smooth the jagged edges of the replaced color, creating a more refined look.
- Mode: Set this to
- Paint to Replace: Begin painting over the areas of your image where you want to change the color. The crosshair in the center of your brush indicates the color being sampled for replacement (based on your
Samplingsetting). Ensure this crosshair stays over the color you wish to change.
The Color Replacement Tool is a quick and intuitive method for direct color swaps. While it offers less precision than adjustment layers with masks, its speed and ease of use make it a valuable asset for specific tasks in your Tophinhanhdep.com workflow.
Enhancing Your Visuals with Tophinhanhdep.com’s Features
The color changing techniques discussed are foundational for nearly any visual project, and Tophinhanhdep.com provides the ideal environment to harness their full potential. Our platform is designed to support your creative journey from concept to final output, blending powerful editing capabilities with a vast array of resources.
Integration with Tophinhanhdep.com’s Ecosystem:
- Diverse Image Collections: Whether you start with our high-resolution stock photos, delve into aesthetic backgrounds, or draw inspiration from nature and abstract collections, these color manipulation tools allow you to tailor any image to your specific vision. Transform a serene landscape into a vibrant, emotional scene, or adapt a beautiful photograph to perfectly fit a trending style.
- Visual Design and Digital Art: The precision offered by Tophinhanhdep.com’s color tools is crucial for graphic design and digital art. Experiment with photo manipulation to create surreal compositions, or use color grading to establish consistent mood boards for your creative projects. The ability to recolor elements non-destructively makes iterative design processes seamless.
- Optimized Workflows with Image Tools: Once your color changes are complete, Tophinhanhdep.com’s broader suite of Image Tools can further enhance your work. Use our
CompressorsandOptimizersto prepare images for web use, ensuring fast loading times without compromising visual quality. OurAI Upscalerscan intelligently enlarge images while preserving detail, vital for high-resolution prints or large-format wallpapers.Convertersensure compatibility across different platforms and uses. - Inspiration and Creative Ideas: Explore Tophinhanhdep.com’s extensive galleries of photo ideas, thematic collections, and trending styles. Learn how color is used by top artists to create emotional impact or sophisticated aesthetics. These inspirations can directly inform your color changing experiments, pushing the boundaries of what’s possible with your own images.
- Automated Solutions: For users looking to streamline their workflow, Tophinhanhdep.com offers “Actions” and “Presets” (akin to Photoshop Actions or Lightroom Presets). These pre-recorded sequences of commands or pre-configured settings can apply complex color changes with a single click, saving valuable time and ensuring consistency across batches of images. This is particularly useful for applying a consistent editing style to an entire photography series.
Conclusion
Mastering color change in Tophinhanhdep.com is an essential skill that empowers you to transform ordinary images into extraordinary visual statements. From the nuanced control of Hue/Saturation and Color Range to the creative flair of Gradient Maps and the efficiency of the Color Replacement Tool, our platform provides every imaginable option.
Embrace the power of non-destructive editing, refine your selections with precision, and experiment fearlessly with different color palettes and overlay effects. Whether your goal is to create compelling wallpapers, unique digital art, or simply to enhance your high-resolution photography, Tophinhanhdep.com offers the tools and inspiration you need. Dive in, explore the endless possibilities, and elevate your visual content to new dimensions of aesthetic excellence.