Master the Art of Color Transformation: Your Ultimate Tophinhanhdep.com Guide to Changing Image Colors in Photoshop

In the vibrant world of digital imagery, color is more than just a visual attribute; it’s a powerful narrative tool that can evoke emotions, set moods, and define the entire aesthetic of an image. Whether you’re crafting stunning wallpapers, designing compelling backgrounds, or enhancing beautiful photography for your portfolio, the ability to precisely control and manipulate colors is indispensable. On Tophinhanhdep.com, we understand the profound impact of visual design and the constant quest for creative ideas. This comprehensive guide delves deep into the myriad ways Adobe Photoshop empowers you to change the color of an image, transforming your vision into reality.
Photoshop stands as the industry standard for image editing, offering an unparalleled suite of tools for everything from basic adjustments to intricate photo manipulation. Among its most frequently used functionalities is the ability to edit and replace colors, allowing artists and photographers to dramatically alter an image’s appearance, correct color imbalances, or explore entirely new creative directions. This guide will walk you through various techniques, from pinpoint selections to dynamic overlays, ensuring you become a true color replacement master, capable of elevating any image in your collection, be it abstract art or nature photography.
We’ll explore methods that are not only effective but also non-destructive, meaning you can experiment freely without permanently altering your original pixels. From adjusting the hue of a specific object to recoloring entire backgrounds, the techniques covered here are foundational for anyone looking to refine their digital photography editing styles and create truly unique visual content.
Precision Color Adjustments with Selection Tools
The first step in changing colors effectively is often making precise selections. Photoshop offers several robust tools designed to isolate specific color ranges or areas, ensuring your adjustments are applied exactly where you want them, leaving unaffected parts of your image pristine. These techniques are crucial for crafting high-resolution images and achieving professional-grade photo manipulation.
The Power of Color Range for Targeted Edits
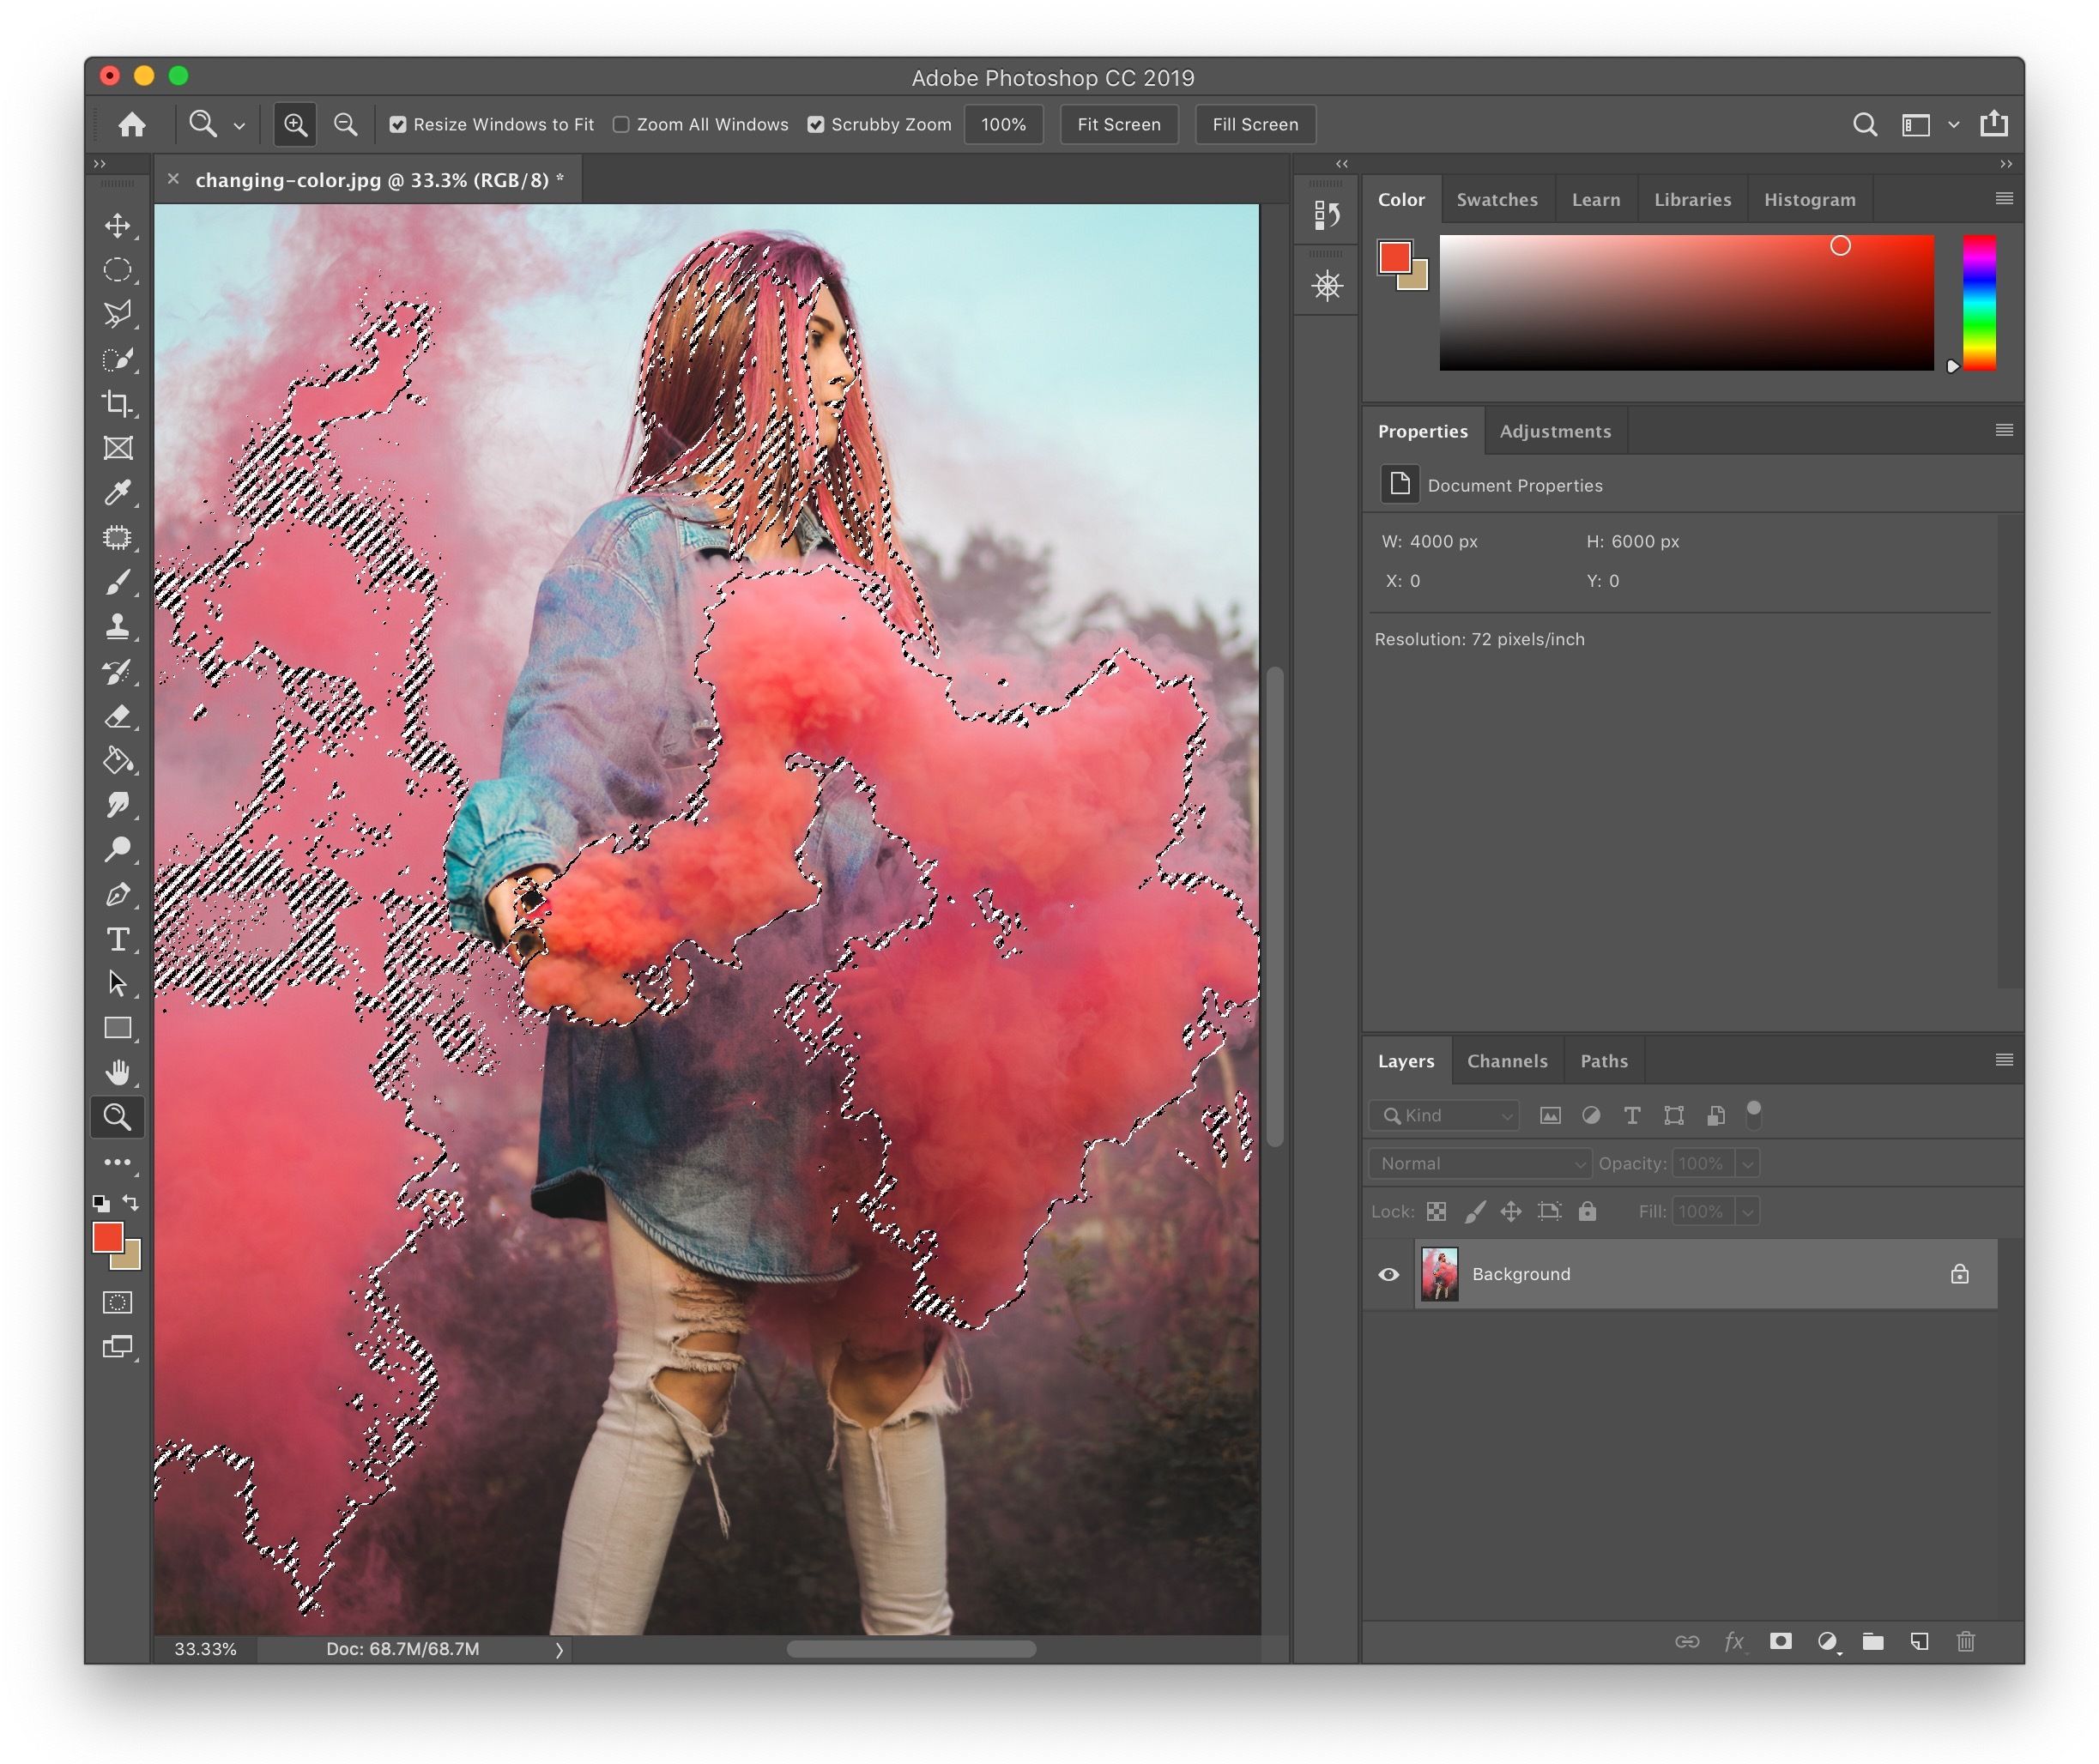
One of the most powerful and intuitive ways to select and change colors in Photoshop is by using the Color Range feature. This tool allows you to isolate areas based on their chromatic values, making it remarkably easy to target specific hues within a complex image. This method is particularly useful for fine-tuning aesthetic images or making subtle changes to elements in nature photography where intricate details need to be preserved.
To begin, open your image in Photoshop. The process starts by navigating to Select > Color Range. A dialog box will appear, presenting you with various options to define your selection. With the ‘Selection’ radio button active, use the regular Eyedropper Tool to click on the color you wish to change directly within your image or the small preview area in the dialog box.
As you sample the color, you’ll see a black and white preview where white indicates the selected areas and black indicates unselected areas. The Fuzziness slider is your key to refining this selection. Sliding it to the right will expand the range of similar colors included in your selection, while sliding it to the left will narrow it, making your selection more specific. This allows for incredibly nuanced control, ensuring you capture only the desired tones.
For instances where a single click isn’t enough, or if you need to add or remove specific shades, Photoshop provides additional Eyedropper tools with plus (+) and minus (-) symbols. Use the Eyedropper+ to add more color variations to your selection (e.g., different shades or luminosities of the same hue) and the Eyedropper- to deselect unwanted color areas. You can even click and drag with these eyedroppers in the preview to quickly add or remove a broader area of colors.
Pro-Tip from Tophinhanhdep.com: If you wish to limit the Color Range selection to a specific part of your image, first make a rough selection around that area using a tool like the Lasso Tool or Quick Selection Tool. Then, activate the Color Range dialog. This pre-selection will constrain the Color Range analysis to only the area you’ve defined, preventing unwanted color shifts in other parts of your image. This is excellent for focusing on a single element in your beautiful photography.
Once your selection is satisfactory, click ‘OK’. You’ll see the classic “marching ants” outlining your chosen area. The next step, as we’ll discuss, involves using adjustment layers for non-destructive color changes.
Mastering Selections for Specific Areas
Beyond Color Range, Photoshop offers other powerful selection tools that are invaluable for isolating objects or backgrounds for color alteration. These tools are fantastic for changing partial colors in a photo or performing targeted background color changes, contributing to polished visual designs on Tophinhanhdep.com.
For making broad, yet smart, selections, the Quick Selection Tool is a go-to. Located in the Options Bar, this brush-like tool intelligently detects edges as you paint over an area. For example, if you want to change the color of a person’s clothing, you can roughly paint over the dress, and Photoshop will usually do an excellent job of snapping to its edges. If the tool over-selects, hold down Alt (Windows) or Option (Mac) and paint to subtract from the selection. Once you have the main area selected, you might need to inverse the selection if you initially selected the inverse of what you wanted. Press Ctrl / Cmd + Shift + I to inverse the selection. To work on this selected area non-destructively, create a new layer from your selection by pressing Cmd / Ctrl + J.
When dealing with more uniform backgrounds, the Magic Wand Tool shines. This tool selects pixels based on their color similarity. It’s particularly effective for swiftly changing a background color in Photoshop that is relatively monochromatic. After selecting the Magic Wand, click on the background area. You might need to hold down the Shift key and click on smaller, unselected background areas to ensure full coverage.
Once the background is selected, right-click on the selection and choose Select Inverse to select your subject instead. This step is crucial for applying adjustments only to the subject or isolating it from the background.
The Refine Edge tool is an essential follow-up to initial selections made with tools like the Magic Wand, especially when dealing with complex edges such as hair or fur. Access it by going to Select > Refine Edge (or Select and Mask in newer Photoshop versions). This dialog allows you to fine-tune your selection:
- View Mode: Use the drop-down menu to view your selection against a contrasting background (e.g., on Black, on White, or Overlay) to easily spot imperfections. For instance, if your background was originally bright orange, viewing the selection on a black mask will make any remaining orange traces obvious.
- Refine Edge Brush Tool: Use this brush to paint over problematic edges, and Photoshop will intelligently distinguish between foreground and background pixels, creating a much cleaner selection.
After refining, confirm your selection, and then add a Layer Mask to your selected layer by clicking the Layer Mask icon at the bottom of the Layers panel. This masks out the unwanted background. To then introduce a new background color, simply go to Layer > New Fill Layer > Solid Color, choose your desired hue from the Color Picker, and drag this new fill layer beneath your subject layer in the Layers panel. This straightforward process creates dynamic wallpapers and backgrounds.
Dynamic Color Shifts Using Adjustment Layers
Photoshop’s adjustment layers are the cornerstone of non-destructive editing, allowing you to modify colors, tones, and contrast without permanently altering the original image data. This flexibility is vital for digital photography and ensures you can always revisit and tweak your editing styles.
Harnessing Hue/Saturation for Instant Changes
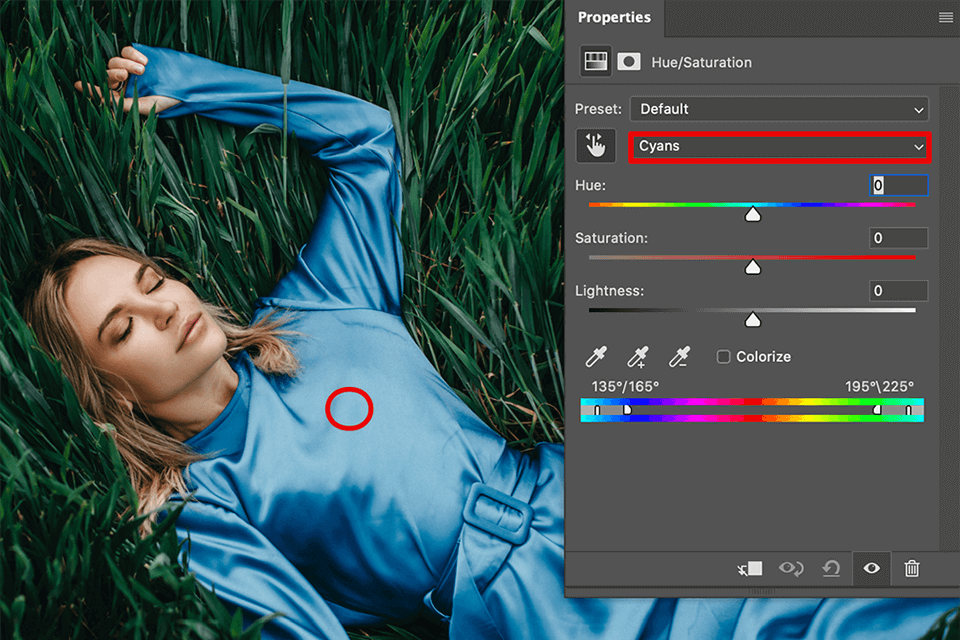
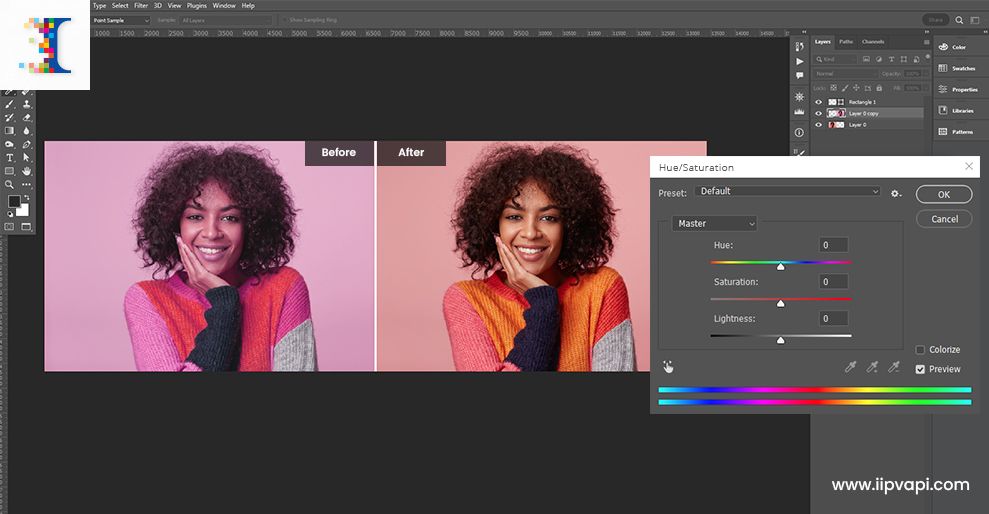
The Hue/Saturation adjustment layer is arguably the most versatile tool for changing colors in Photoshop. It allows for broad color shifts, targeted recoloring, and subtle tonal adjustments. This is fantastic for creating specific moods for sad/emotional imagery or enhancing the vibrant hues in beautiful photography.
To utilize this, after making your initial selection (perhaps with Color Range or Quick Selection, as discussed above, or even without a selection to affect the entire image), go to Layer > New Adjustment Layer > Hue/Saturation. If you had an active selection, Photoshop automatically loads it into the adjustment layer’s mask, ensuring your changes are applied only to that area.
The Hue/Saturation panel features three primary sliders:
- Hue: This slider controls the actual color (e.g., shifting reds to blues, greens to purples). Dragging it left or right will cycle through the color spectrum.
- Saturation: This slider adjusts the intensity or purity of the color. Moving it right increases vibrancy, while moving it left desaturates the color, eventually leading to grayscale.
- Lightness: This slider controls the brightness of the color. Moving it right makes the color lighter, and moving it left makes it darker.
One of the most powerful features within the Hue/Saturation panel is the ability to target specific color channels. Instead of affecting “Master” (all colors), you can select individual color ranges from a dropdown menu (e.g., Reds, Yellows, Greens, Cyans, Blues, Magentas). This is especially useful for fine-tuning specific elements, such as changing the sky color or altering a person’s clothing color, without impacting other hues in the image.
Alternatively, for intuitive sampling, click the Targeted Adjustment Tool (the finger icon) directly within the Hue/Saturation Properties Panel. Then, click and drag on the color you want to change in your image. As you drag, Photoshop automatically identifies the relevant color range and adjusts the Hue slider accordingly, giving you real-time feedback. This interactive approach is fantastic for aesthetic and creative images.
Advanced Layer Masking for Flawless Results
Layer masks are fundamental to precise photo manipulation and are particularly crucial when applying color changes. They allow you to control exactly where an adjustment layer’s effect is visible, ensuring a seamless and natural-looking edit. This level of control is essential for producing high-resolution, professional-quality images for Tophinhanhdep.com.
When you add an adjustment layer, it comes with a white layer mask by default, meaning the adjustment affects the entire layer below it. To limit its impact, you can:
- Invert the Mask: If you want the adjustment to affect a very specific, small area, or if you’ve already made a selection and want to “hide” the adjustment everywhere else, click on the layer mask thumbnail and press
Ctrl + I(Windows) orCommand + I(Mac). This will invert the mask from white (fully visible) to black (fully hidden). You can then “paint back” the effect onto your desired area. - Refining with the Brush Tool: Select the
Brush Tool (B). With the layer mask thumbnail active, paint with black to hide the adjustment’s effect or paint with white to reveal it. Use the[and]bracket keys to quickly adjust brush size, and vary the brush hardness (soft for smooth transitions, hard for sharp edges) and opacity for greater control.
Tophinhanhdep.com Quick Tip: To easily see where your mask is applied, hold down Alt (Windows) or Option (Mac) and click on the layer mask thumbnail. This temporarily displays the mask as a black and white image, allowing you to spot tiny stray selections or areas that need refining.
For detailed background changes, as discussed earlier with the Magic Wand and Refine Edge tools, a Solid Color Fill Layer combined with advanced masking can yield stunning results. After creating your subject mask and placing the Solid Color Fill Layer underneath, you can further enhance the realism of the new background. Studio backgrounds, for instance, are rarely a perfectly flat color; they have gradients, highlights, and shadows.
To simulate this depth:
- Add Soft Highlights: Create an
Elliptical Marqueeselection (M) in the center of your new background, roughly where a light source would hit. Right-click on the selection, chooseFeather, and set it to a high pixel value (e.g., 200-300 pixels) to create a soft edge. - Adjust Levels: Add a new
Levels Adjustment Layer(Layer > New Adjustment Layer > Levels). With the marquee selection active, the Levels layer will automatically generate a mask based on your selection. Brighten the midtones by sliding the middle gray slider to the left, simulating a subtle spotlight effect. - Darken Edges (Vignette): Create another
Elliptical Marqueeselection, feather it as before, then right-click and chooseSelect Inverse. Now, only the outer edges of your background are selected. Add anotherLevels Adjustment Layerand darken the midtones by sliding the middle gray slider to the right, creating a soft vignette effect.
By tweaking the opacity and sliders of these Levels adjustment layers, you can create a natural-looking gradient background that makes your subject truly stand out, perfect for aesthetic images and compelling visual designs.
Creative Color Effects and Comprehensive Tools
Beyond standard color adjustments, Photoshop offers a range of tools and techniques to infuse images with dramatic color effects and provide efficient ways to alter hues on a broader scale. These methods are fantastic for creating thematic collections, trending styles, and exploring creative ideas on Tophinhanhdep.com.
Enhancing Visuals with Color Overlays and Grading
Color overlays and gradient mapping are powerful techniques for adding a specific color tone or mood to an image, ranging from subtle atmospheric shifts to bold artistic expressions. They are indispensable for achieving unique editing styles and transforming high-resolution images.
Using Gradient Overlays:
A simple way to introduce a color overlay is by directly using the Gradient tool or adding a Gradient Fill Layer.
- Access the Gradient Panel: In Photoshop CC, go to
Window > Gradientsto open the Gradient panel. - Apply a Gradient: Choose a preset gradient or create your own, then drag and drop it directly onto your image. This will automatically create a new
Gradient Fill Layer. - Adjust Blend Mode and Opacity: In the Layers panel, experiment with different
Blend Modes(e.g., Soft Light, Overlay, Color, Hard Light) to see how the gradient interacts with your image. Lowering theOpacitylevel will give a more realistic and subtle effect, blending the gradient seamlessly with the underlying image. This method is excellent for adding a general aesthetic tint or simulating environmental lighting, perfect for abstract or mood board creations.
Leveraging Gradient Maps:
For a more sophisticated color grading technique, Gradient Maps remap the luminosity values of your image to a chosen gradient. This means that shadows will take on one color from the gradient, midtones another, and highlights yet another, offering precise control over the image’s overall color palette.
- Add a Gradient Map Adjustment Layer: Go to
Layer > New Adjustment Layer > Gradient Map. - Choose Your Gradient: In the Properties panel for the Gradient Map, click on the gradient bar to open the Gradient Editor. Select a preset gradient or design a custom one. Remember, the colors on the left of the gradient will affect the shadows, and colors on the right will affect the highlights.
- Adjust Blend Mode and Opacity: Like Gradient Fill Layers, experimenting with
Blend Modes(e.g., Color, Soft Light, Overlay) andOpacityis key to achieving your desired effect. You can also click theReversecheckbox in the Properties panel to swap the colors, making the darker tones apply to highlights and lighter tones to shadows, creating interesting inversions. - Combine for Richness: A combination of a
Gradient Mapand aGradient Filllayer can create incredibly rich and complex color grades. Tweak the opacity of both adjustment layers to find the perfect balance. This advanced technique allows for intricate visual design, transforming ordinary photos into stunning digital art that fits any thematic collection.
The Efficiency of the Color Replacement Tool
For quick, brush-based color changes that retain the texture and shading of the original image, Photoshop’s Color Replacement Tool is an excellent choice. Unlike painting with a regular brush (which would simply cover the area), this tool intelligently replaces colors while preserving the luminosity, shadows, mid-tones, and highlights of the underlying pixels. This is perfect for rapid adjustments in digital photography or for recoloring specific objects in beautiful photography without losing realism.
You can find the Color Replacement Tool by right-clicking on the Brush Tool (B) in the Tools panel (or press B and then Shift + B to cycle through the brush options until you find it).
Process of Using the Color Replacement Tool:
- Pick Your Replacement Color: Before you start painting, select your desired new color in the
Foreground Colorswatch (located in the Tools panel). This will be the color that replaces the original. - Pick the Original Color to Replace: The Color Replacement Tool works by sampling the color directly under your brush’s crosshair (not necessarily the entire brush area) and replacing only that sampled color with your foreground color.
- Paint to Replace: With the tool selected and your foreground color set, simply paint over the area of the image where you want to change the color. You’ll observe the original color transforming into your chosen foreground color, while the highlights and shadows remain intact.
Adjusting the Tool’s Behavior: The Options Bar for the Color Replacement Tool provides several crucial settings to fine-tune its performance:
- Mode: By default, this is set to “Color,” which is usually the best option for retaining luminosity while changing hue and saturation. Other modes like “Hue,” “Saturation,” and “Luminosity” offer different types of control.
- Sampling:
- Continuous: (Default) Continuously samples colors as you drag the brush, replacing any color that falls under the crosshair.
- Once: Samples the initial color you click and only replaces that specific color throughout your stroke.
- Background Swatch: Samples the current background color and replaces any matching color.
- Limits:
- Discontiguous: Replaces sampled colors wherever they occur within the brush area, regardless of whether they are touching.
- Contiguous: Replaces only the sampled colors that are directly adjacent to where you’re painting.
- Find Edges: Helps maintain crisper edges around subjects by trying not to paint over areas that aren’t the sampled color, delivering the best result with defined lines.
- Tolerance: This setting controls how wide a range of similar colors Photoshop will replace. A lower tolerance (e.g., 10-20%) will target only very similar colors, while a higher tolerance (e.g., 50-100%) will replace a broader spectrum of tones, making the change more widespread.
- Anti-aliasing: Check this option to smooth jagged edges for a more refined result.
The Color Replacement Tool is a fantastic addition to any digital photographer’s toolkit, allowing for efficient and natural-looking color alterations, especially valuable for optimizing product photos and quick aesthetic adjustments for trending styles.
Conclusion: Your Palette, Your Rules with Tophinhanhdep.com
The ability to change the color of an image in Photoshop is a fundamental skill that opens up a universe of creative possibilities. From subtle enhancements in nature photography to radical transformations in digital art and photo manipulation, the tools and techniques discussed in this Tophinhanhdep.com guide empower you to take complete control of your visual narrative.
Whether you’re employing the precise selection capabilities of Color Range, making targeted alterations with Hue/Saturation adjustment layers, building dynamic backgrounds with Layer Masks and Solid Color Fills, or infusing your images with atmosphere through Gradient Maps and Color Overlays, Photoshop provides the pathways. Even quick fixes with the Color Replacement Tool prove invaluable for efficiency.
By mastering these methods, you’ll not only be able to correct flaws and balance tones but also to consciously shape the emotional impact and aesthetic appeal of your images. Imagine creating perfectly coordinated mood boards, designing captivating wallpapers and backgrounds, or adapting product photos to various brand palettes with ease. This guide serves as your comprehensive resource for transforming ordinary images into extraordinary visual statements.
Experiment, play, and discover the endless potential that color transformation holds for your creative endeavors. On Tophinhanhdep.com, we believe that every image tells a story, and with these Photoshop skills, you are now equipped to tell yours in the most colorful and compelling way possible. Dive into your next project with confidence, knowing you have the power to change, refine, and reinvent your visual world, one pixel at a time.