Mastering Color Transformation: How to Change the Color of an Image in Photoshop with Tophinhanhdep.com

In the dynamic world of digital imagery, the ability to deftly manipulate colors within an image is not just a technical skill; it’s an art form. Whether you’re a professional photographer, a graphic designer, or an enthusiast keen on personalizing your visual content, mastering color changes in Photoshop opens up a universe of creative possibilities. From subtle adjustments to dramatic overhauls, the right techniques can transform an ordinary picture into an extraordinary visual statement. At Tophinhanhdep.com, your ultimate resource for stunning images, comprehensive photography guides, and innovative visual design tools, we understand the power of color. This extensive guide will walk you through various methods to change the color of an image in Photoshop, ensuring you have the tools and knowledge to achieve any desired aesthetic.
Photoshop, a cornerstone in the realm of image editing, offers a robust suite of features that cater to every level of expertise. Its capacity for color manipulation is particularly impressive, allowing for precision, flexibility, and non-destructive workflows. With Tophinhanhdep.com’s focus on everything from “Images (Wallpapers, Backgrounds, Aesthetic, Nature, Abstract, Sad/Emotional, Beautiful Photography)” to “Photography (High Resolution, Stock Photos, Digital Photography, Editing Styles)” and “Visual Design (Graphic Design, Digital Art, Photo Manipulation, Creative Ideas),” understanding these techniques is crucial for elevating your creative output. Let’s delve into the core methods that professionals use to achieve stunning color transformations.
The Foundational Power of Color Editing in Photoshop
Color is arguably the most impactful element in visual communication. It evokes emotions, sets moods, and directs attention. In photography, the right color palette can enhance a “Beautiful Photography” piece or infuse a “Sad/Emotional” narrative. For “Visual Design,” it’s fundamental to creating compelling “Graphic Design” and “Digital Art.” Photoshop’s color editing capabilities are designed to give you unparalleled control over every hue, saturation, and luminance value in your image.
Before diving into specific techniques, it’s essential to understand the philosophy behind effective color changes. The goal isn’t always to completely alter a color, but often to refine it, to make it pop, or to harmonize it with other elements in your composition. Non-destructive editing, primarily through adjustment layers, is key. This approach ensures that your original image data remains untouched, allowing for endless experimentation and easy revisions without compromising image quality. This aligns perfectly with Tophinhanhdep.com’s commitment to providing resources that empower users to create “High Resolution” and optimized images.
The methods we’ll explore leverage different Photoshop tools, each offering unique advantages depending on the complexity of your selection and the desired outcome. Whether you need to switch the color of a background, change a specific object’s hue, or apply a broad color grade, Photoshop, guided by Tophinhanhdep.com’s insights, has a solution.
Precision Color Selection: Mastering Selection Tools for Targeted Changes
The first step in any targeted color alteration is accurately selecting the area you wish to change. Photoshop offers a variety of selection tools, but for color-based changes, some stand out for their efficiency and precision.
Leveraging the Color Range Feature for Accurate Selection
The Color Range command is a highly effective tool for isolating specific colors or tones in an image. It’s particularly powerful because it allows you to select areas based on their color properties, making it an indispensable asset for tasks like changing a specific hue in a “Nature” photograph or modifying a key element in an “Abstract” composition.
To begin, open your image in Photoshop.
- Initiate Color Range: Navigate to
Select > Color Range. A dialog box will appear, presenting you with a preview and various options. - Sample Your Target Color: With the default Eyedropper Tool (the single eyedropper icon) active, click on the color in your image or within the dialog’s preview area that you intend to change. As you click, you’ll see a black-and-white mask forming in the preview, indicating your selection. White areas are selected, black areas are not.
- Refine with Fuzziness: The “Fuzziness” slider controls the range of similar colors included in your selection. Dragging it to the right expands the selection to include more tones of the sampled color, while dragging it to the left tightens it. This fine-tuning is crucial for achieving a natural-looking transition.
- Add or Subtract from Selection: If your initial sample doesn’t capture all desired areas or includes unwanted parts, use the Eyedropper with a plus symbol (
+) to add more colors to your selection by clicking on them. Conversely, use the Eyedropper with a minus symbol (-) to remove unwanted colors. You can even click and drag with these eyedroppers for broader adjustments. - Utilize Selection Preview: For a clearer view of what’s being selected, use the “Selection Preview” dropdown menu. Options like “Quick Mask” or “Grayscale” can help you identify subtle discrepancies in your mask directly on your image.
- Limit the Area (Pro Tip): For complex images where a color might appear in multiple areas, you can pre-select a rough area using tools like the Lasso Tool or Marquee Tool before opening the Color Range dialog. This limits the Color Range sampling to only the pre-selected region, preventing unintended changes elsewhere.
- Confirm Selection: Once satisfied with your selection, click “OK.” You’ll see the classic “marching ants” outlining your chosen area.
This precise method ensures that your color changes are applied only where intended, maintaining the integrity of the rest of your image – a critical aspect for “High Resolution” output and detailed “Photo Manipulation.”
Utilizing Quick Selection and Magic Wand for Broad Areas
While Color Range excels at isolating colors, other tools are highly efficient for selecting distinct objects or backgrounds.
Changing Partial Colors with the Quick Selection Tool
When dealing with a clear subject against a contrasting background or a specific item within an image, the Quick Selection Tool (found in the Photoshop toolbar, often grouped with the Magic Wand) offers a fast and intuitive way to make an initial selection.
- Activate Quick Selection: Select the Quick Selection tool. You can adjust its size and hardness in the options bar.
- Paint Your Selection: Click and drag over the area whose color you wish to change (e.g., a dress, a car, or a specific part of a “Digital Art” piece). The tool intelligently detects edges and expands the selection as you paint.
- Refine as Needed: Use the
Alt(Windows) orOption(Mac) key with the Quick Selection tool to subtract from your selection, or use a smaller brush size for greater precision. - Isolate the Object (Layer via Copy): Once you have a decent selection, press
Ctrl + J(Windows) orCmd + J(Mac) to duplicate the selected area onto a new layer. This isolates your subject, allowing for non-destructive color changes.
This technique is excellent for “Creative Ideas” where you might want to swap out an object’s color entirely.
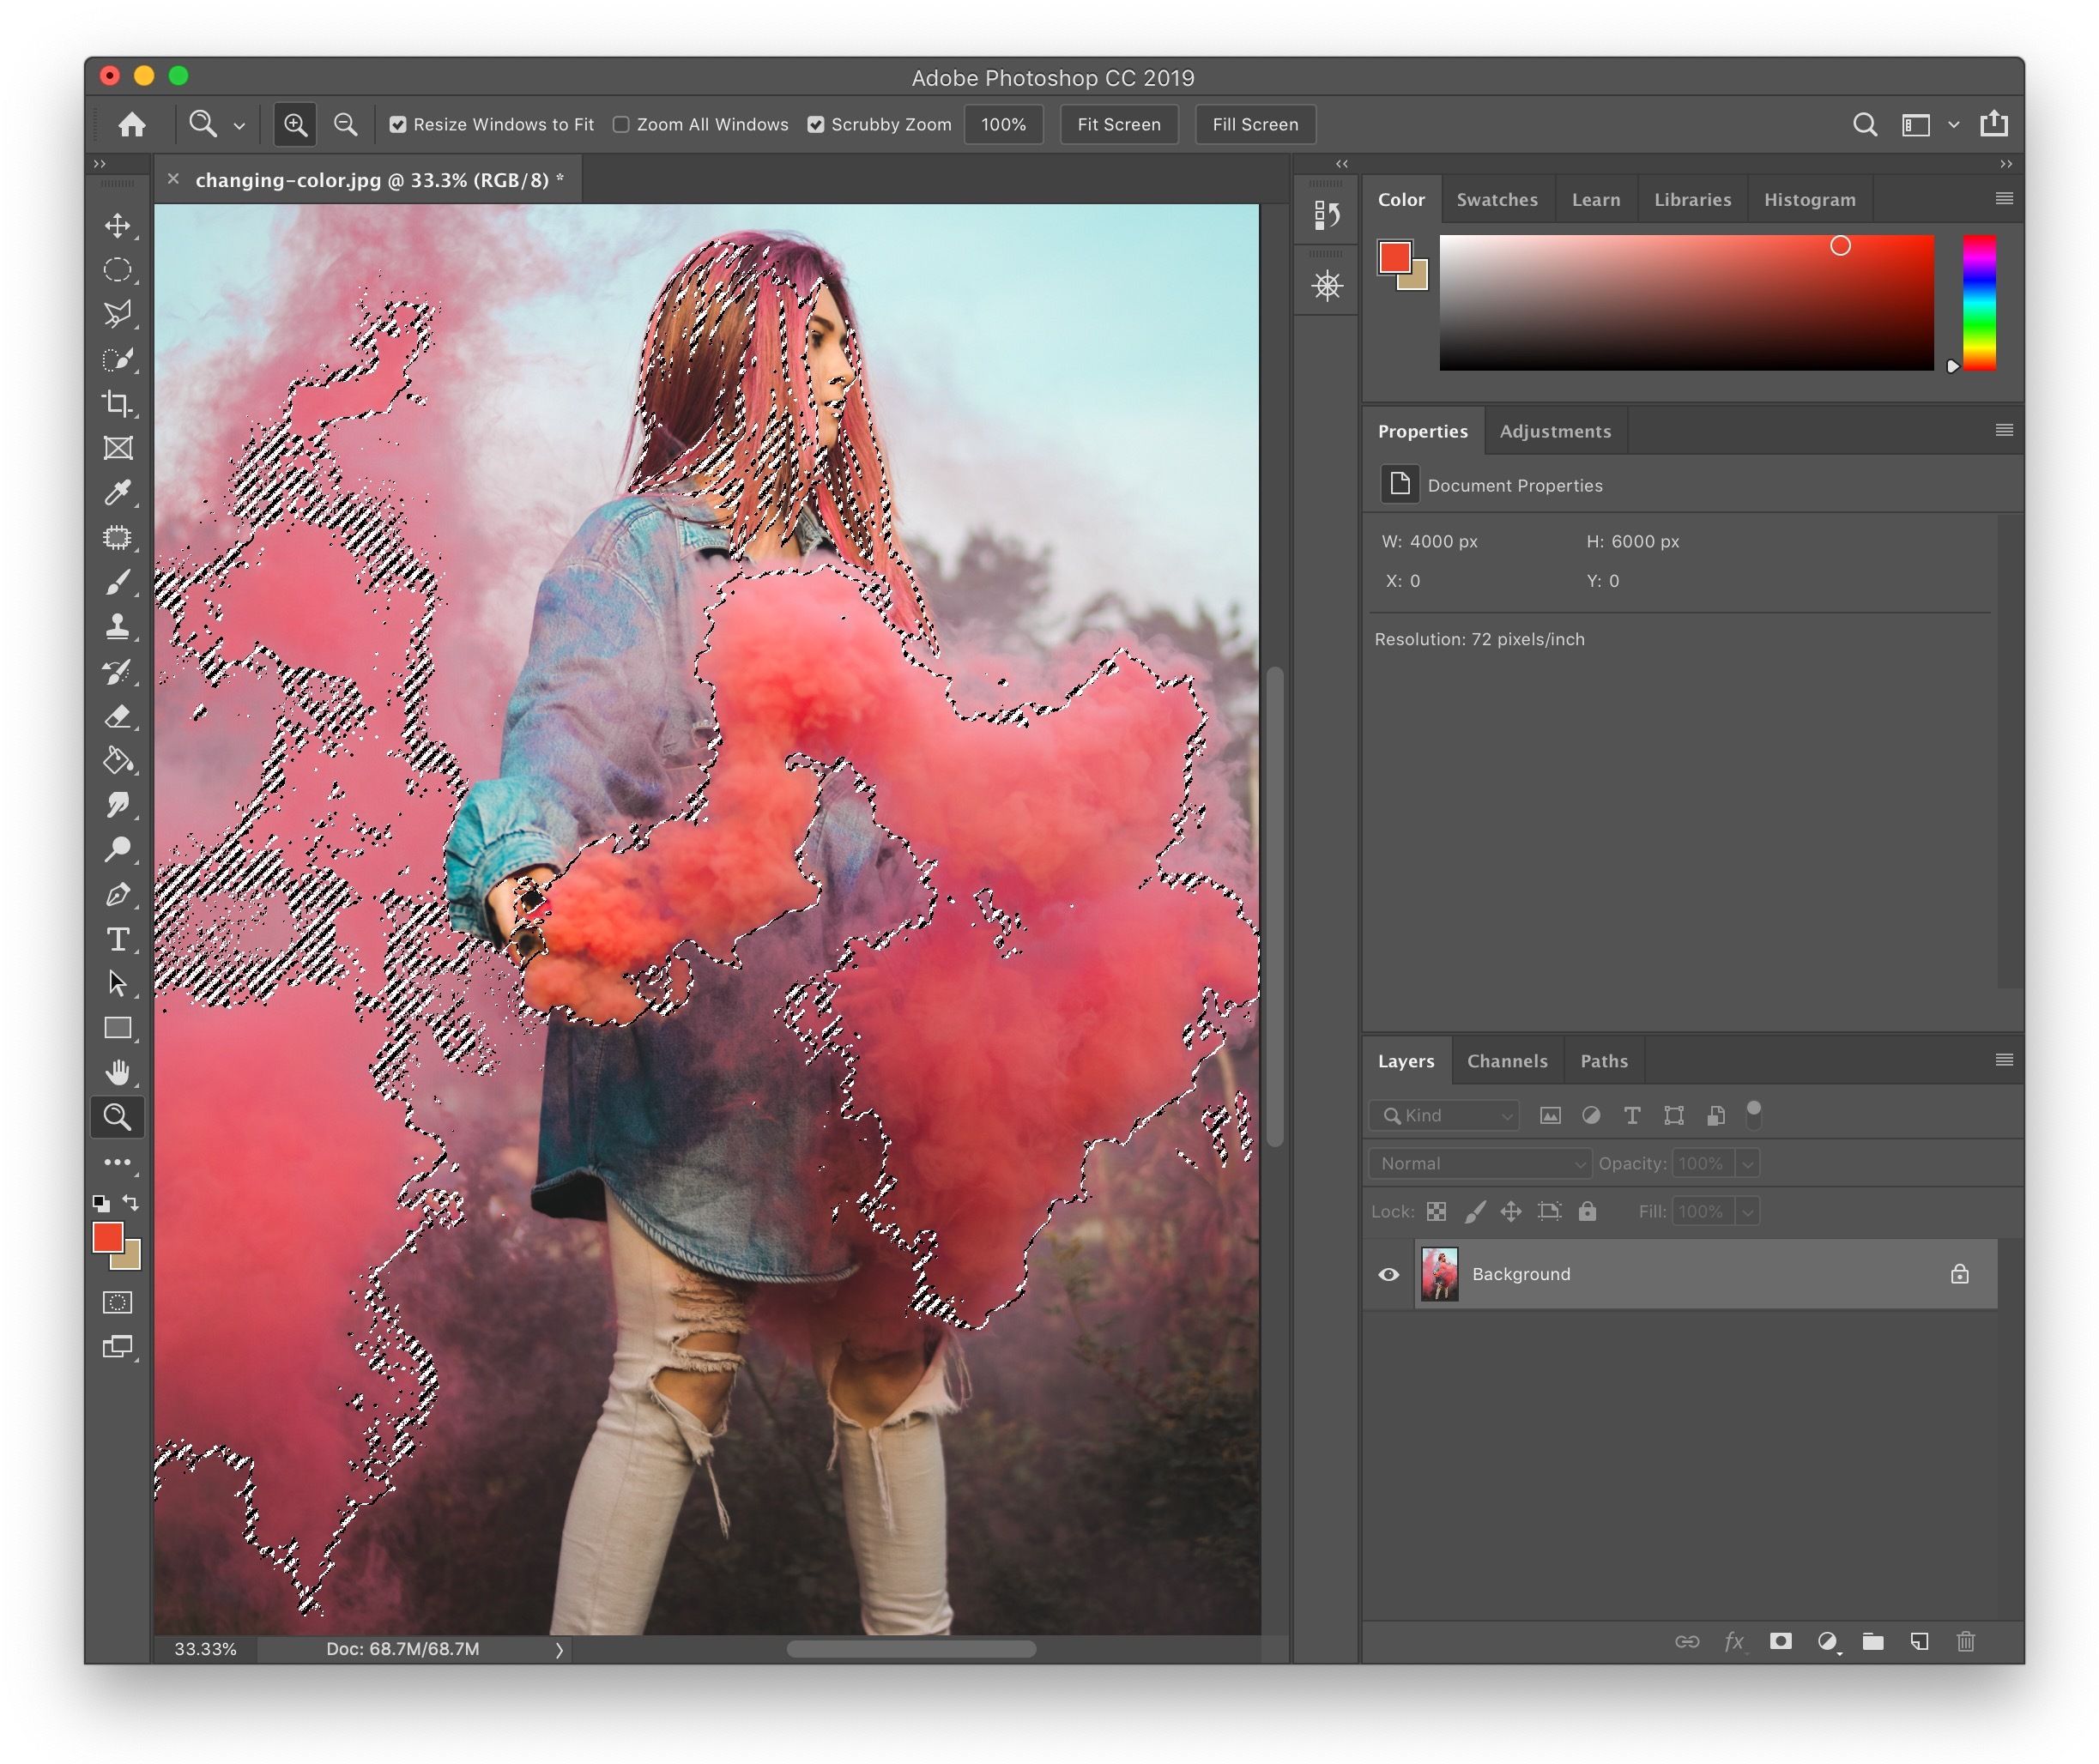
Background Color Changing with the Magic Wand and Refine Edge
For changing solid or semi-solid backgrounds, the Magic Wand Tool paired with Refine Edge is a powerful combination. This is particularly useful for crafting unique “Wallpapers” or altering “Backgrounds” to match a new theme.
- Initial Background Selection: Open your image and select the
Magic Wand Tool. Click on a dominant area of your background. If your background is multi-toned, holdShiftand click on other areas to add them to the selection. - Invert Selection: Once you have the majority of your background selected, right-click on your image and choose
Select Inverse. This switches the selection from the background to your main subject. - Refine Edge for Precision: Go to
Select > Refine Edge. This powerful dialog box allows you to fine-tune your selection edges, especially for tricky areas like hair or fur.- View Mode: Experiment with different “View Mode” options (e.g., “On Black,” “On White,” “Overlay”) to clearly see the edges of your selection. Choosing a contrasting background color in this mode (e.g., black for a light subject) can reveal imperfections.
- Radius and Smart Radius: Adjust the
Radiusto soften or harden the edge detection.Smart Radiuscan automatically adapt to varying edge sharpness. - Refine Edge Brush Tool: Use the
Refine Edge Brush Tool(the second brush icon from the left) to paint over problematic areas like hair. This tool intelligently detects and refines complex edges, separating subject from background with remarkable accuracy. - Global Refinements: Use sliders like
Smooth,Feather,Contrast, andShift Edgefor overall adjustments to the selection’s quality.
- Output to Layer Mask: In the “Output To” dropdown, select
Layer Mask. Click “OK.” This creates a layer mask on your active layer, effectively separating your subject from the background without permanently deleting any pixels.
Now that your subject is isolated with a clean layer mask, you can easily change the background color beneath it. This method provides the flexibility and precision needed for “Digital Photography” and intricate “Photo Manipulation.”
Dynamic Color Adjustment: Applying Changes with Versatile Adjustment Layers
With your selections made, the next step is to apply the actual color changes. Photoshop offers various adjustment layers and tools, each with its own advantages for specific scenarios.
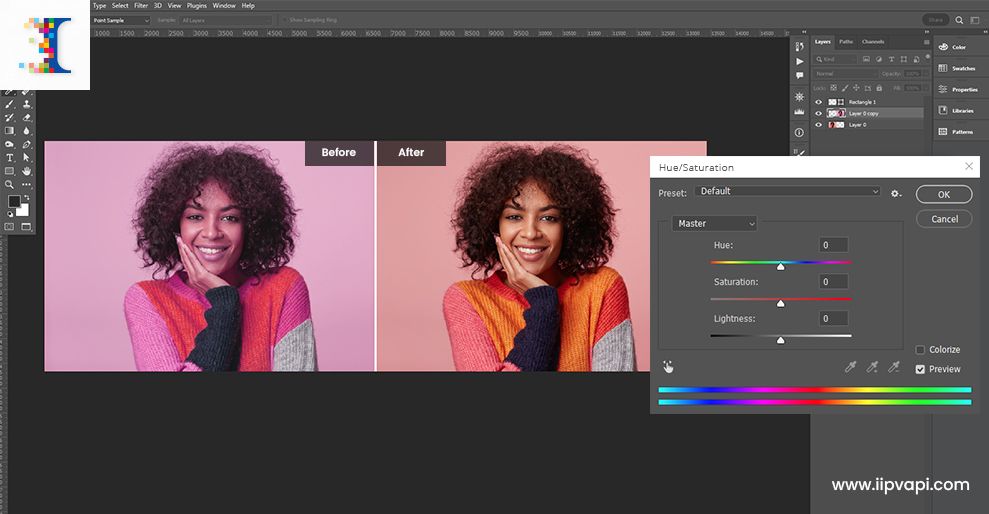
The Indispensable Hue/Saturation Adjustment Layer
The Hue/Saturation adjustment layer is the workhorse for most color changes. It allows you to modify the hue (the actual color), saturation (the intensity of the color), and lightness (brightness/darkness) of specific color ranges or the entire image.
- Add a Hue/Saturation Adjustment Layer: After making a selection (e.g., with Color Range or Quick Selection), go to
Layer > New Adjustment Layer > Hue/Saturation. If you had an active selection, Photoshop automatically creates a layer mask based on it, ensuring your adjustments only affect the selected area. If not, the adjustment will apply to the entire image, and you can add a layer mask later. - Adjusting Colors:
- “Finger” Tool (Targeted Adjustment Tool): In the Properties panel for the Hue/Saturation layer, click the “finger” icon (Targeted Adjustment Tool). Then, click directly on the color in your image you want to change and drag left or right. Photoshop automatically identifies that color range and adjusts its hue. This is incredibly intuitive for “Aesthetic” shifts.
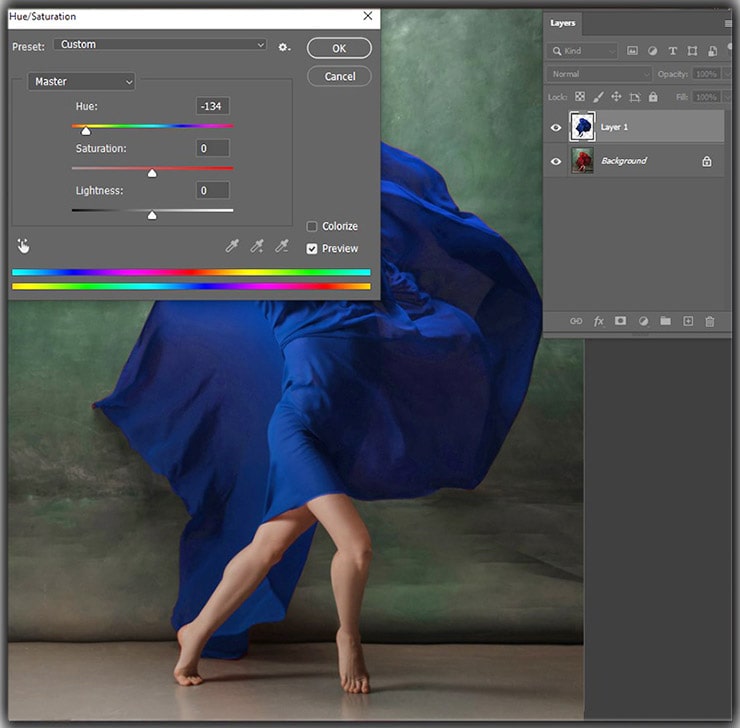
- Dropdown Menu: Alternatively, use the dropdown menu (initially set to “Master”) to select a specific color channel (e.g., Reds, Yellows, Cyans). Then, manipulate the
Hue,Saturation, andLightnesssliders to achieve your desired effect. The color bar below shows the original and new color ranges. - Slider Control: The
Hueslider shifts the color along the color wheel (e.g., red to blue).Saturationincreases or decreases color vividness.Lightnessmakes the color brighter or darker.
- Refining Layer Masks: If your adjustment layer was created without a perfect selection (or you need to fine-tune it), click on the layer mask thumbnail (the black and white square) in the Layers panel.
- Brush Tool: Select the
Brush Tooland set your foreground color to black to hide parts of the adjustment (reveal original color) or white to reveal parts of the adjustment (apply new color). - Quick Tip (Alt/Opt Click): Hold
Alt(Windows) orOption(Mac) and click on the layer mask thumbnail. This will display the mask itself in black and white. This allows for extremely precise painting with the brush tool to clean up any stray areas or blend transitions seamlessly. ClickAlt/Option + mask thumbnailagain to return to the normal image view.
- Brush Tool: Select the
The Hue/Saturation adjustment layer, combined with precise masking, is a powerful technique for “Photo Manipulation” and creating unique “Editing Styles” that stand out on Tophinhanhdep.com.
Exploring Other Adjustment Layers and Tools for Unique Effects
While Hue/Saturation is versatile, Photoshop offers additional methods for specific color change scenarios, each contributing to a rich “Visual Design” toolkit.
Gradient Maps and Color Overlays for Aesthetic Looks
To add a specific mood or “Aesthetic” to your images, or to create a “Thematic Collection,” Gradient Maps and Color Overlays are excellent choices.
- Gradient Maps:
- Add Layer: Go to
Layer > New Adjustment Layer > Gradient Map. This layer maps the luminosity of your image to a gradient, allowing you to recolor shadows, midtones, and highlights based on the gradient’s colors. - Choose Gradient: In the Properties panel, click on the gradient bar to open the Gradient Editor. Select a preset gradient or create your own. The left side of the gradient represents shadows, the middle represents midtones, and the right represents highlights.
- Blend Mode and Opacity: Experiment with different
Blend Modes(e.g., Color, Soft Light, Overlay) in the Layers panel and adjust theOpacityto control the intensity of the effect. A lower opacity often yields more realistic results. - Reverse Option: Click the
Reversecheckbox in the Properties panel to flip the gradient, mapping the highlight colors to shadows and vice-versa, offering a completely different “vibe.”
- Add Layer: Go to
- Color Overlays (Layer Style):
- Selection and Layer Style: Make a selection of the area you want to colorize. Then, go to
Layer > Layer Style > Color Overlay. - Choose Color and Blend Mode: In the Layer Style dialog, select a new color and choose a suitable
Blend Mode(e.g., Color, Overlay, Soft Light) andOpacity. This method is particularly quick for recoloring solid areas like logos or flat graphics, maintaining their texture and shading.
- Selection and Layer Style: Make a selection of the area you want to colorize. Then, go to
These techniques are perfect for creating stylized “Digital Art” and adding unique “Editing Styles” that define your visual signature.
The Color Replacement Tool for Realistic Swaps
For quick, brush-based color changes that retain the original image’s luminosity, shadows, and highlights, the Color Replacement Tool is invaluable. It’s found nestled under the Brush Tool in the toolbar (press B repeatedly or click and hold the Brush Tool icon to find it).
- Select the Tool: Choose the
Color Replacement Tool. - Pick Replacement Color: In the Tools panel, click on the Foreground Color swatch and select your desired new color from the Color Picker.
- Configure Options Bar:
- Mode: Set the
Modeto “Color” for the most natural result, as it preserves luminance. “Hue” and “Saturation” modes are also available but may produce less realistic results. - Sampling: Choose your
Samplingmethod: “Continuous” (samples color as you brush), “Once” (samples color once on the first click), or “Background Swatch” (replaces only the current background color). “Continuous” is often a good starting point. - Limits: Set
Limitsto “Continuous” (replaces adjacent pixels), “Discontinuous” (replaces all matching pixels within the brush area, regardless of adjacency), or “Find Edges” (helps maintain crisp edges). - Tolerance: Adjust
Toleranceto control how wide a range of the sampled color will be replaced. Lower values target very similar colors, while higher values include a broader spectrum.
- Mode: Set the
- Paint to Replace: Paint over the area you wish to recolor. The tool will intelligently replace the sampled color with your foreground color while preserving the underlying textures, shadows, and highlights.
- Dealing with Black and White: The Color Replacement Tool can sometimes struggle with pure black and white as they lack hue and saturation information. For these challenging scenarios, consider the
Selective ColororGradient Mapmethods discussed below, orLayer > Layer Style > Color Overlayas suggested by experts on Tophinhanhdep.com.
This tool is excellent for “Digital Photography” adjustments where realism is paramount, like changing a car’s paint color or an item of clothing.
Selective Color for Fine-Tuned Control (especially for black/white)
When the Color Replacement Tool or Hue/Saturation struggles with specific colors, particularly blacks, whites, or neutrals, the Selective Color adjustment layer can offer more granular control.
- Add Adjustment Layer: Go to
Layer > New Adjustment Layer > Selective Color. - Target Colors: In the Properties panel, use the
Colorsdropdown to select specific color ranges (e.g., Reds, Yellows, Cyans, but also Neutrals, Blacks, and Whites). - Adjust CMYK Sliders: For the chosen color range, you can precisely adjust the percentages of Cyan, Magenta, Yellow, and Black. For instance, to turn a black area into a color, you might need to reduce the Black percentage and increase Cyan, Magenta, or Yellow, often combined with a
Colorblend mode on the layer. - Gradient Map for B&W Colorization: As highlighted by long-time Photoshop users on Tophinhanhdep.com, for converting a black and white image into a single-tone color image (e.g., a sepia tone, or blue line art), the
Gradient Mapadjustment layer can be exceptionally effective. By creating a gradient from black to your desired color, it remaps the entire tonal range.
These advanced techniques empower you to tackle complex color challenges, resulting in sophisticated “Photo Manipulation” that truly captures your “Creative Ideas.”
Tophinhanhdep.com: Your Hub for Visual Excellence
Mastering color change in Photoshop is more than just learning technical steps; it’s about understanding how these techniques serve your overall creative vision. At Tophinhanhdep.com, we provide the inspiration, tools, and knowledge to help you achieve visual excellence in every project.
- For Images and Photography: Whether you’re enhancing “Wallpapers,” perfecting “Backgrounds,” crafting “Aesthetic” compositions, or fine-tuning “Beautiful Photography,” the skills learned here will enable you to curate stunning visuals. From “High Resolution” images to captivating “Stock Photos,” precise color control is a game-changer.
- For Visual Design and Creative Ideas: Graphic designers and digital artists will find these techniques essential for bringing their “Graphic Design” and “Digital Art” concepts to life. “Photo Manipulation” becomes an avenue for boundless “Creative Ideas” when you have full command over color.
- Complementing Image Tools: Your enhanced Photoshop skills integrate seamlessly with Tophinhanhdep.com’s “Image Tools” such as “Converters,” “Compressors,” and “Optimizers.” Create your perfect image with Photoshop, then use our tools to prepare it for any platform, ensuring optimal quality and performance. Our “AI Upscalers” can further refine your expertly color-corrected images to even higher resolutions.
- Image Inspiration & Collections: Use your newfound color manipulation prowess to contribute to or draw from “Photo Ideas,” “Mood Boards,” and “Thematic Collections” on Tophinhanhdep.com. Translate “Trending Styles” into your own unique creations, making your work an integral part of the vibrant visual community.
Conclusion
The ability to change the color of an image in Photoshop is a fundamental skill that unlocks a vast spectrum of creative possibilities. From meticulously selecting specific hues with Color Range to applying transformative adjustments with Hue/Saturation and experimenting with Gradient Maps for aesthetic depth, Photoshop provides the tools, and Tophinhanhdep.com provides the knowledge and inspiration.
Embrace non-destructive editing practices, experiment with different blend modes, and never shy away from refining your layer masks. Whether you’re altering a subtle shade in a “Nature” shot or redesigning the entire color scheme of a “Digital Art” piece, these techniques will empower you to bring your unique “Creative Ideas” to fruition.
Visit Tophinhanhdep.com today to explore our extensive collections of “Images,” dive deeper into “Photography” insights, leverage our powerful “Image Tools,” and fuel your “Visual Design” journey. With our resources and your developing skills, the perfect color is always within reach.