Mastering Image Color Transformation in Adobe Illustrator

Adobe Illustrator is renowned as the industry standard for vector graphics, a powerful playground for logos, illustrations, and intricate typographic designs. However, the world of visual design is rarely confined to pure vectors. Images—whether stunning high-resolution photography, atmospheric wallpapers, or detailed backgrounds—frequently find their way into Illustrator documents. This blend of raster and vector elements is where the real magic, and sometimes the challenge, begins. For graphic designers and digital artists, the ability to precisely control and change the color of an image within Illustrator is not just a convenience, but a critical skill for photo manipulation, achieving specific aesthetic moods, and ensuring visual harmony across a project.
While dedicated raster image editors like Adobe Photoshop excel at pixel-level manipulation, Illustrator offers several avenues for altering image colors, ranging from basic native adjustments to sophisticated non-destructive methods, particularly with the aid of powerful plugins. This comprehensive guide will delve into these techniques, empowering you to transform the visual impact of your images directly within your Illustrator workflow, tailoring them to fit any creative idea or thematic collection. Whether you’re aiming for a vibrant abstract look, a serene nature aesthetic, or a striking monochrome portrait, understanding these methods is key to unlocking new dimensions in your visual design projects.
The Nuances of Images in Illustrator: Embedded vs. Linked
Before diving into the specifics of color alteration, it’s crucial to grasp how images are incorporated and managed within Adobe Illustrator. Unlike Photoshop, which is inherently pixel-based, Illustrator handles raster images (like JPEGs, PNGs, TIFFs, PSDs) by either embedding them directly into the document or linking to external files. This distinction profoundly impacts how you can manipulate their colors and how your artwork behaves.
The primary goal of many visual designers is to maintain flexibility and quality, especially when working with high-resolution photography or stock photos that might undergo multiple iterations. Illustrator’s approach to image management is designed with this in mind, offering different workflows suited to various project needs.
Understanding Image Types: Raster vs. Vector
To effectively change image colors, it’s essential to differentiate between raster and vector images.
- Raster Images: These are composed of a grid of pixels, where each pixel holds specific color information. Common formats include JPEG, PNG, GIF, and TIFF. Digital photography, wallpapers, and backgrounds are typically raster images. When you zoom in on a raster image, you’ll eventually see individual pixels, which can lead to pixelation if scaled up too much. For our purposes, changing the color of a raster image usually means altering the color values of these pixels collectively.
- Vector Images: These are made up of mathematical paths defined by points, lines, and curves. Common formats include AI, SVG, and EPS. Logos, icons, and illustrations are often vector-based. Vector images are resolution-independent, meaning they can be scaled to any size without losing quality or becoming pixelated. Changing the color of a vector image is straightforward, as you’re simply altering the fill or stroke color of its constituent paths.
Many designers use Illustrator to incorporate existing beautiful photography or aesthetic images that are raster-based. The challenge often lies in harmonizing these raster elements with the vector artwork, requiring precise color adjustments to achieve a cohesive visual design.
Managing Your Image Assets: Embedded vs. Linked Files
When you place an image into an Illustrator document (File > Place), you have the option to either embed or link it.
-
Embedded Images: An embedded image becomes part of the Illustrator document itself. This makes the
.aifile self-contained and easily shareable, as all image data is included. However, it also increases the file size. For embedded images, Illustrator has a few native, albeit limited, color adjustment tools. If you later need to revert to the original image or perform more extensive edits, you might need to “unembed” it or re-import the original source file. In the Properties panel (Window > Properties) or Control bar (Window > Control), an embedded image will display “Image” in the top left when selected. You can “Unembed” it from here if needed. -
Linked Images: A linked image remains a separate external file. The Illustrator document only stores a preview and a reference (link) to its location. This keeps the
.aifile size smaller and allows for efficient updates. If the original linked image file is edited in an external application (like Photoshop) and saved, Illustrator will detect the change and prompt you to update the image within your document. While this offers non-destructive editing by preserving the original file, it means the image’s color manipulation isn’t happening directly within Illustrator’s interface, breaking the creative flow for in-situ adjustments. When selected, a linked image will display “Linked File” in the Properties panel or Control bar.
Understanding this distinction is vital, as certain color manipulation techniques are only applicable to one type of image or require specific workflows for the other. For instance, the “Edit Colors” menu options in Illustrator typically work only with embedded raster images, reflecting a legacy approach that often feels restrictive in modern visual design.
Native Illustrator Techniques for Basic Image Color Adjustments
Adobe Illustrator, being primarily a vector-focused application, has historically offered somewhat constrained native tools for raster image color manipulation. These tools are often “destructive” in nature, meaning they permanently alter the image pixels, making it difficult to revert to previous states without using multiple undo commands or keeping backup copies. However, for quick adjustments or achieving specific effects like converting to grayscale, they can still be useful.
For designers working with various types of images—from aesthetic backgrounds to abstract photos—these native methods provide a starting point, though their limitations quickly become apparent when precise control is needed.
Adjusting Color Balance for Raster Images (JPEG, PNG)
The most direct native method for color adjustment of embedded raster images is through the “Adjust Color Balance” dialogue. This tool allows for broad changes across the entire image’s color spectrum.
How to Use:
- Embed Your Image: First, ensure your JPEG or PNG image is embedded in your Illustrator document. If it’s linked, you’ll need to embed it via the Properties panel or Control bar.
- Select the Image: Click on the embedded image to select it.
- Navigate to Adjust Color Balance: Go to
Edit > Edit Colors > Adjust Color Balance.... - Make Adjustments: A dialogue box will appear with sliders for Red, Green, and Blue (if your document is in RGB mode) or Cyan, Magenta, Yellow, and Black (if in CMYK mode).
- Tick the
Previewbox to see your changes in real-time. - Drag the sliders to increase or decrease the intensity of each color channel. For example, moving the Red slider to the right adds more red, while moving it left reduces red (adding cyan).
- The
Convertoption is primarily for grayscale conversions, not for general color balance. - Ignore
FillandStrokeoptions, as they are for vector artwork.
- Tick the
Limitations: This method offers a “primitive” level of control compared to dedicated image editors. It applies changes globally and destructively. Once you click “OK,” the changes are baked into the image, and the only way to reverse them is by using Undo (Cmd/Ctrl+Z) or by re-embedding the original image. This lack of non-destructive editing can hinder experimentation and iterative design, particularly when refining visual design elements or exploring different photo ideas for mood boards.
Another limited option in this menu is Saturate, which allows a basic intensity adjustment. However, it’s often plagued by an unhelpful “no saturable color found” message, making it cumbersome to use effectively.
Converting to Grayscale and Applying Duotone Effects
Illustrator also offers basic options for converting images to grayscale and then applying a single color tint, mimicking a duotone effect. This can be effective for creating vintage aesthetics or focusing on tonal contrast in beautiful photography or abstract images.
How to Use:
- Embed and Select: As with color balance, ensure your raster image is embedded and selected.
- Convert to Grayscale: Go to
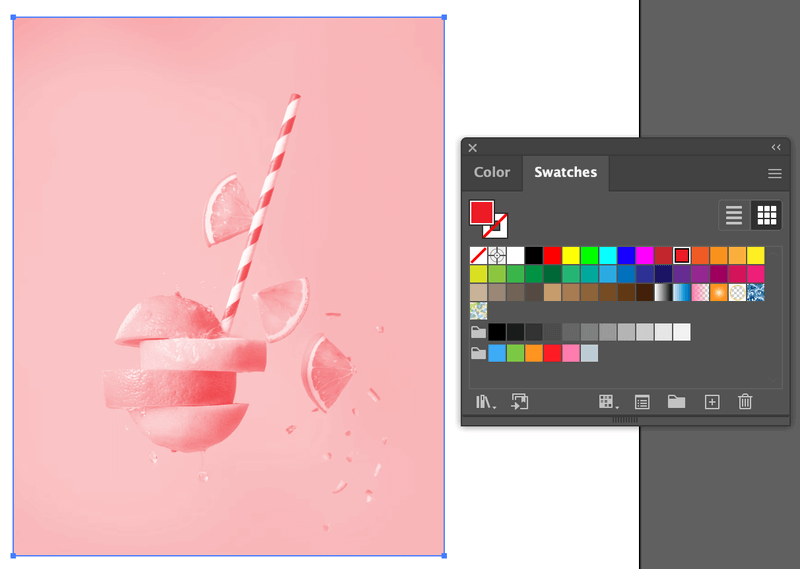
Edit > Edit Colors > Convert to Grayscale. This will strip all color information, leaving a black and white image. - Apply a Color Fill: With the grayscale image still selected, you can now apply a color tint. Choose a color from your Color panel or Swatches panel. This color will be applied as an overlay, effectively coloring the grayscale image with your chosen hue while retaining its luminosity values. This is similar to adding a “filter” in many image inspiration apps.
Creative Applications: This method is excellent for creating sad/emotional or artistic effects, transforming a vibrant image into a subdued, monochromatic piece. It’s also useful for thematic collections where a consistent single-color tone is desired across multiple images, like a sepia-toned vintage photo series. While simple, it offers a quick way to shift the mood and style of an image without complex external editing.
Leveraging External Editors for Linked Images
When Illustrator’s native tools fall short, the traditional workaround for more sophisticated image color manipulation is to utilize an external image editor like Adobe Photoshop. This method is inherently tied to linked images, emphasizing a workflow where Illustrator serves as the layout and vector integration hub, while Photoshop handles the pixel-level adjustments.
How to Use:
- Link Your Image: Place your image into Illustrator as a linked file.
- Edit in External Application:
- Select the linked image in Illustrator.
- Click the “Edit in Photoshop” button in the Control bar, Properties panel, or Contextual Task Bar (or go to
Edit > Edit in Photoshop). This will automatically open the linked image in Photoshop (or your default image editor).
- Perform Advanced Edits: In Photoshop, you have access to a full suite of non-destructive color adjustment layers like Curves, Levels, Hue/Saturation, Color Balance, Selective Color, and more. You can fine-tune colors, correct exposure, enhance contrast, or even apply complex editing styles to achieve specific visual design goals.
- Save and Update: After making your changes in Photoshop, save the file (ensuring you save over the original linked file). Return to Illustrator, and a dialogue box will appear, prompting you to update the linked image. Click “Yes” to refresh the image in your Illustrator document with the new color adjustments.
Advantages and Disadvantages: This method provides “all the Curves, Levels, Hue/Sat, etc. control you expect,” offering professional-grade editing. It’s also non-destructive to the original file, as changes are made in the external editor.
However, the major drawback is the disruption to your creative flow. You’re constantly toggling between two applications, making “color matching tricky” and real-time experimentation within the Illustrator context difficult. Illustrator doesn’t retain the undo/redo history for external edits, meaning each change cycle is a commitment. For designers seeking fluid photo manipulation directly within their primary vector environment, this back-and-forth can be a significant bottleneck.
Advanced Image Color Editing with Third-Party Plugins: Unlocking Photoshop-level Control
Recognizing the limitations of Illustrator’s native image color tools, especially for professional graphic design and digital art, third-party developers have stepped in to bridge the gap. Plugins, like Astute Graphics’ Phantasm, fundamentally transform Illustrator’s capabilities, bringing a level of control and non-destructive editing usually reserved for Photoshop, directly into your vector workspace. This empowers designers to achieve complex editing styles, create unique aesthetic images, and perform advanced photo manipulation without leaving Illustrator.
The advent of such tools is a game-changer for anyone working with a mix of images and vectors, from creating intricate digital art pieces to designing dynamic wallpapers and backgrounds.
Introducing Non-Destructive Color Adjustments
The core advantage of advanced plugins like Phantasm is their ability to apply “live effects” to images. This means that color adjustments are not permanently “baked in” (destructive) but are applied as editable layers, similar to adjustment layers in Photoshop.
Key Benefits of Non-Destructive Editing:
- Flexibility: You can easily hide, show, modify, or remove any color adjustment at any time without affecting the original image data. This is crucial for iterative design processes and exploring diverse creative ideas.
- Experimentation: Designers can freely experiment with different color palettes, moods, and editing styles, knowing they can always revert or fine-tune previous changes. This fosters a more fluid and less intimidating creative environment.
- Performance: While applying effects, the original high-resolution image data remains intact, preserving quality for print or high-fidelity digital photography.
These non-destructive methods are essential for maintaining the integrity of stock photos and digital photography, allowing for dynamic visual design without compromising source material.
Professional Color Tools: Curves, Levels, and Hue/Saturation
Phantasm delivers a suite of professional color control tools directly within Illustrator, mirroring the functionality found in dedicated image editors. These include:
- Curves: This powerful tool allows for precise control over the tonal range and individual color channels (RGB or CMYK) of an image. You can adjust brightness, contrast, and color balance by manipulating a curve on a graph. This is indispensable for achieving nuanced lighting and color grading, transforming an ordinary image into a captivating aesthetic piece.
- Levels: Levels provide more straightforward control over an image’s tonal range by adjusting black point, white point, and midtones. It’s excellent for improving contrast and correcting overall brightness quickly.
- Hue/Saturation: This allows you to adjust the hue (color tint), saturation (intensity of color), and lightness of an image. You can target specific color ranges or adjust the entire image, perfect for shifting the mood of a nature shot or creating vibrant abstract visuals.
- Brightness/Contrast, Exposure, Temperature/Tint, Shift to Color, Invert, Desaturate: These offer more specific and targeted adjustments, from simple contrast tweaks to dramatic inversions or color shifts. The
Desaturateoption in Phantasm, for example, offers more reliable control than Illustrator’s native counterpart, even allowing CMYK-specific grayscale conversion.
These tools are accessed via a dedicated panel (Window > Astute Graphics > Phantasm) and are applied as live effects that appear in Illustrator’s native Appearance panel. The ability to stack multiple effects and reorder their sequence offers unparalleled creative freedom, much like building a complex effect in Photoshop. This level of photo manipulation opens up new possibilities for visual design directly within Illustrator.
Crafting Custom “Filters” and Graphic Styles
Beyond individual adjustments, plugins like Phantasm empower designers to create and save their own “Instagram-style filters” or custom editing styles. Once you’ve painstakingly crafted a stack of Phantasm effects to achieve a desired look—perhaps a moody vintage effect for a sad/emotional image, or a vibrant pop-art style for abstract photography—you can save this entire stack as a Graphic Style in Illustrator.
How to Create a Custom Filter:
- Apply Effects: Apply one or more Phantasm effects (e.g., Desaturate, Curves, Hue/Saturation) to an image until you achieve your desired “filter” look.
- Save as Graphic Style: With the image (and its applied effects) selected, open the Graphic Styles panel (Window > Graphic Styles). Click the “New Graphic Style” button.
- Apply with a Click: Your custom filter is now saved. You can select any other image, group, or layer in your document and apply this Graphic Style with a single click, instantly transforming its appearance.
This feature is invaluable for maintaining consistency across image collections, rapidly prototyping different photo ideas, or creating thematic collections with a unified visual language. It streamlines the workflow for complex visual design projects, allowing for rapid application of sophisticated editing styles.
Transforming Raster PNGs into Editable Vector Artwork
While many color adjustment techniques focus on raster images, there’s a unique and powerful workflow in Illustrator that allows you to treat certain raster images, particularly clean PNGs, as if they were vectors. This involves “tracing” the image, converting its pixel data into editable paths. Once a PNG is vectorized, it can be recolored with the same ease and precision as any other vector object in Illustrator, including the ability to change specific parts of the image. This technique is especially useful for logos, simple illustrations, or aesthetic images with clear boundaries.
This process bridges the gap between raster images and the pure vector environment, offering designers unparalleled flexibility for graphic design, digital art, and photo manipulation when working with hybrid compositions.
The Power of Image Trace for PNGs
Adobe Illustrator’s Image Trace feature is designed to convert raster images into vector artwork. While it works best with high-contrast, simple images, it can be quite effective for converting PNGs that are already vector-like (e.g., icons, line art, graphics with solid colors) into fully editable vector objects.
How to Use Image Trace:
- Place the PNG: Place your PNG image into your Illustrator document. It can be linked or embedded.
- Select the Image: Click on the PNG image to select it.
- Open Image Trace Panel: Go to
Window > Image Traceto open the panel. - Configure Settings:
- Choose a
Mode: For colored PNGs, selectColor. For black and white,Black and WhiteorGrayscalemight be more appropriate. - Adjust
Palette: For color images,Limited ColororFull Colordepending on complexity. - Tick
Ignore Whiteif you want transparent areas around your traced artwork. - Adjust sliders like
Threshold,Paths,Corners,Noiseto refine the tracing result. The goal is to get the cleanest, most accurate vector conversion. - Click
Trace.
- Choose a
- Expand Appearance: Once traced, the image is still a live trace object. To convert it into editable vector paths, click the
Expandbutton in the Properties panel (under Quick Actions) or in the Control bar. This step is crucial, as it “expands” the traced paths into discrete vector shapes.
Benefits: After expanding, your PNG is no longer a raster image. It’s a collection of vector paths, just like any other artwork created natively in Illustrator. This transformation allows for complete scalability without pixelation and, critically, enables full vector-level color editing.
Granular Color Control with Recolor Artwork on Traced Images
Once your PNG has been successfully traced and expanded into vector paths, you unlock a powerful suite of color manipulation tools, particularly the “Recolor Artwork” feature. This tool, primarily designed for vectors, now becomes applicable to your former raster image, allowing for highly specific and creative color changes.
How to Use Recolor Artwork (on traced vectors):
- Select Traced Artwork: Select the entire group of vector paths that resulted from your Image Trace and Expand process.
- Access Recolor Artwork: Click the
Recolorbutton in the Properties panel (under Quick Actions) or go toEdit > Edit Colors > Recolor Artwork. - Edit Colors:
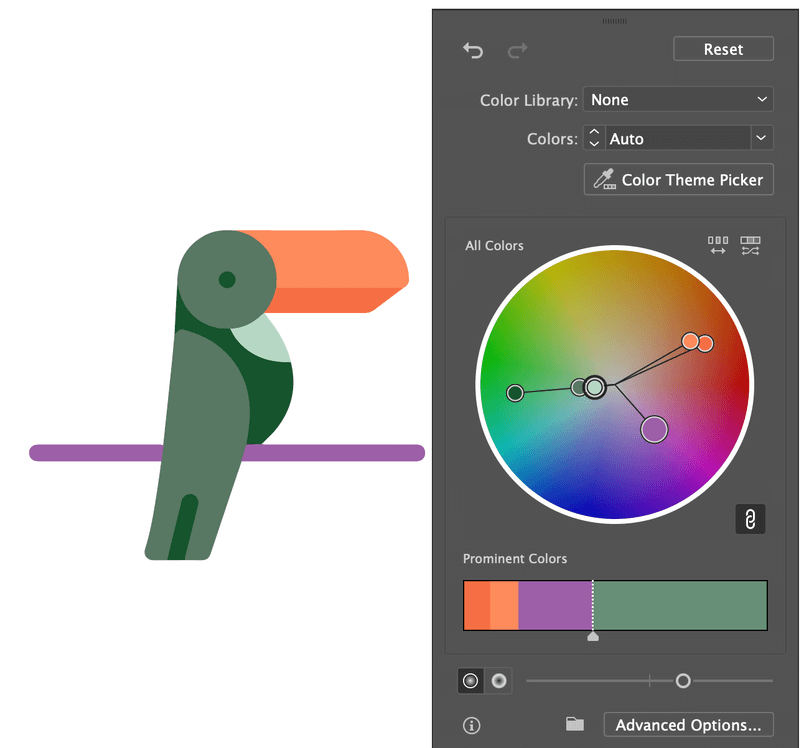
- The
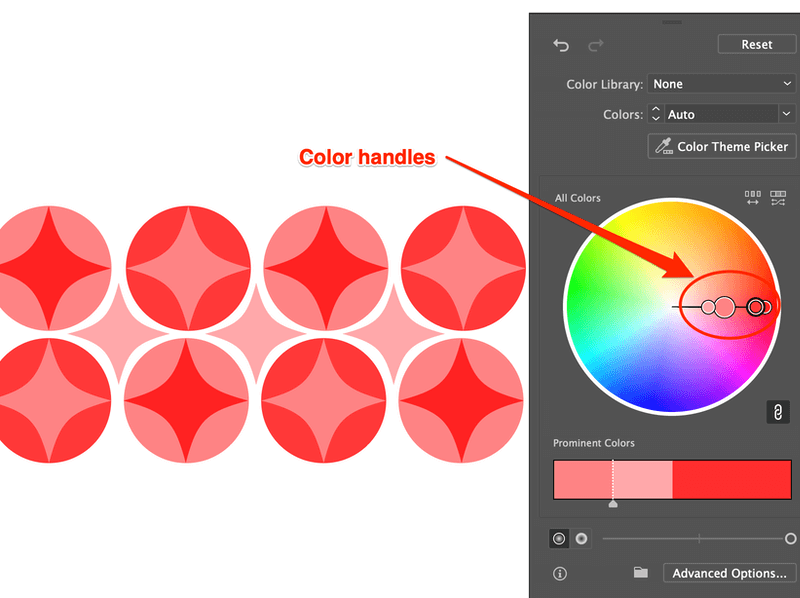
Recolor Artworkdialogue box presents a color wheel and a list of all colors currently present in your selected artwork. - Changing the whole color scheme: If the colors are “linked” (default), dragging one handle on the color wheel will shift all colors harmoniously. This is fantastic for experimenting with different mood boards or thematic collections quickly.
- Changing specific colors: Click the “Link/Unlink Harmony Colors” icon (looks like a chain link) to unlink the colors. Now, you can click on individual color handles on the wheel or select colors from the list and change them independently using the color picker. This allows you to precisely target and alter specific shades within your design.
- Advanced Options: Click the
Advancedbutton for more granular control, including the ability to map original colors to new ones, adjust brightness/saturation, and load/save color groups.
- The
Partial Image Color Change: A significant advantage here is the ability to change the color of parts of the image. After expanding the trace, if your image has distinct areas, you can Ungroup the artwork (Object > Ungroup) and then use the Direct Selection Tool (A) to select individual vector shapes. Once individual parts are selected, you can use the Recolor Artwork tool, the Color Picker (double-click Fill/Stroke in the Toolbar), or the Eyedropper Tool (I) to change just that specific area’s color. This is the solution for those instances where “you want to change the color of part of an image in Adobe Illustrator.”
This method is incredibly flexible for visual design, allowing you to transform a static PNG into a dynamic, customizable piece of digital art. It opens up opportunities for intricate photo manipulation, enabling you to refine details, create varied color effects, and ensure your imagery perfectly complements your overall graphic design.
Conclusion
The ability to change the color of an image in Adobe Illustrator is a multifaceted skill, ranging from straightforward native adjustments to advanced techniques involving plugins and vector conversion. While Illustrator’s inherent focus on vector graphics presents certain limitations for raster image manipulation, savvy designers have multiple pathways to achieve their desired visual outcomes.
For quick, global alterations of embedded raster images, native tools like Adjust Color Balance or Convert to Grayscale offer basic functionality, albeit with destructive consequences. When higher fidelity and non-destructive editing are paramount for beautiful photography or stock photos, the traditional approach of leveraging external editors like Photoshop for linked images remains viable, despite the workflow interruptions.
However, the true power for seamless and sophisticated image color transformation within Illustrator lies in third-party plugins like Phantasm. These tools provide Photoshop-level control with non-destructive live effects, offering precise adjustments via Curves, Levels, and Hue/Saturation, and empowering the creation of custom “filters” through Graphic Styles. This dramatically enhances flexibility for graphic design, digital art, and photo manipulation, allowing designers to experiment with aesthetic images, trending styles, and thematic collections without compromising creative flow.
Furthermore, for raster PNGs that have vector-like qualities, Illustrator’s Image Trace feature acts as a powerful image tool, converting pixels into editable vector paths. Once vectorized and expanded, these images can be entirely recolored or even partially adjusted using the robust Recolor Artwork feature, the Color Picker, or the Eyedropper Tool. This method turns static images into dynamic digital art, ready to be integrated into any visual design project, from vibrant wallpapers to abstract backgrounds.
Ultimately, mastering these diverse techniques ensures that your images—whether they’re high-resolution photography, emotional backgrounds, or elements for a creative mood board—can be perfectly integrated and harmonized within your Adobe Illustrator projects, elevating your overall visual design and bringing your creative ideas to life. Embrace these tools, and you’ll find that transforming image colors in Illustrator is not just possible, but an integral part of a fluid and powerful design workflow.