Mastering Image Dimensions: A Comprehensive Guide to Resizing Your Photos

In the vast and visually-driven world of digital media, controlling the dimensions of your images is not merely a technicality; it’s an art form and a fundamental skill. Whether you’re a professional photographer preparing high-resolution stock photos for a client, a graphic designer crafting digital art, an artist submitting work to a portfolio like CaFÉ, or simply an enthusiast sharing beautiful photography on social media, understanding “how to change dimensions of an image” is indispensable. From optimizing wallpapers and backgrounds for different screens to ensuring your thematic collections maintain a consistent aesthetic, precise control over image size influences everything from load times and print quality to visual appeal and professional presentation.
At Tophinhanhdep.com, we understand the critical role images play in communication and creativity. Our platform offers a wealth of resources covering everything from stunning images for every mood—be it nature, abstract, or sad/emotional—to advanced image tools like converters, compressors, optimizers, and AI upscalers. This guide will walk you through the essential concepts and practical steps for resizing images, ensuring your visual content always looks its best. We’ll explore various free and professional tools, both built-in to your operating system and available online, helping you to effortlessly adjust your images without compromising quality.

Why Image Dimensions Matter: The Fundamentals of Visual Harmony
The decision to resize an image often stems from a specific need, but the underlying principles remain constant. Incorrect dimensions can lead to pixelation, distortion, slow loading times, or an inability to meet platform requirements. Understanding the basics is the first step towards mastering image manipulation.
Understanding Pixels, Resolution, and Aspect Ratio
At the core of digital image dimensions are pixels. These tiny individual dots of color combine to form the complete image you see on your screen. When we talk about an image having dimensions of, say, 1920x1080 pixels, we mean it’s 1920 pixels wide and 1080 pixels high.
- Pixels vs. Physical Size: While pixels define the digital dimensions, resolution connects these pixels to a physical size, especially important for print. Resolution is typically measured in Pixels Per Inch (PPI) for digital displays or Dots Per Inch (DPI) for print.
- Web Resolution: For online use, a resolution of 72 PPI/DPI is standard. This is usually sufficient for quick loading and good display on screens, and is a common requirement for online portfolios.
- Print Resolution: For high-quality prints, a much higher resolution, typically 300 PPI/DPI, is recommended to ensure sharp details and prevent pixelation when viewed up close. Resizing photos for print means sometimes changing pixels to inches, and many tools can do the math for you.
- Aspect Ratio: This describes the proportional relationship between an image’s width and its height, often expressed as two numbers separated by a colon (e.g., 16:9, 4:3, 1:1). Maintaining the aspect ratio during resizing is crucial to avoid warping or stretching your image. Most resizing tools offer a “constrain proportions” or “maintain aspect ratio” option, which locks this relationship, automatically adjusting one dimension when you change the other. This ensures your aesthetic images retain their original look.
Common Scenarios for Resizing Images
Resizing isn’t just about making an image bigger or smaller; it’s about tailoring it for a specific purpose.
- Web Optimization: Large images can significantly slow down website loading times, impacting user experience and SEO. Resizing images for platforms like blogs, e-commerce sites (e.g., Shopify product photos), or social media (Facebook cover photos, YouTube thumbnails, Twitter headers) ensures they load quickly and fit perfectly within predefined layouts. Tophinhanhdep.com offers image tools like compressors and optimizers specifically for this purpose, alongside a range of beautiful photography and stock photos ready for web use.
- Print Preparation: When preparing images for physical prints—be it a family portrait, a poster for your room, or a design for a t-shirt—you need to match the image dimensions to the exact print size and ensure high resolution (e.g., 300 PPI).
- Portfolio Requirements: Artistic platforms, such as CaFÉ, often have strict image submission guidelines (e.g., JPEG only, no smaller than 1200 pixels on the longest side, 72 ppi, 5 MB maximum). Resizing tools become essential for artists to meet these specifications.
- Digital Art & Graphic Design: In visual design and photo manipulation, individual elements or entire compositions might need dimension adjustments to fit layouts, create creative ideas, or prepare final pieces for different outputs.
- Wallpapers & Backgrounds: To ensure a perfect fit without stretching or cropping, wallpapers and backgrounds often need to be resized to match the specific screen resolution of a device. Tophinhanhdep.com provides a vast collection of images suitable for various resolutions.
Built-in Solutions: Resizing on Your Operating System
You don’t always need complex software to change image dimensions. Most operating systems come with surprisingly capable pre-installed tools that make resizing quick and easy. These are perfect for quick adjustments of your images before uploading them as aesthetic backgrounds or for basic sharing.
macOS: Leveraging Preview for Quick Adjustments
If you’re a Mac user, you have a powerful yet simple image editor built right into your system: Preview.
- Open the Image: Right-click on your image file and select “Open,” or if Preview isn’t your default, choose “Open with” > “Preview.”
- Access Adjust Size: From the menu bar, navigate to “Tools” and then select “Adjust Size.”
- Enter Dimensions: A window will appear where you can enter your desired width and height. You might need to change the size type from inches to “pixels” for more precise digital control.
- Maintain Proportions: Crucially, ensure “Scale proportionally” and “Resample image” are checked. “Scale proportionally” will lock the aspect ratio, preventing distortion. “Resample image” allows Preview to add or remove pixels effectively.
- Confirm and Save: Click “OK” to apply the changes. Then go to “File” > “Save” to save the resized image, or “File” > “Save As” if you want to keep the original file untouched.

Windows: The Power of Photos and Paint
Windows users also have convenient options readily available on their PCs, catering to different levels of need.
Windows 11 Photos App
For modern Windows 11 PCs, the native Photos app is an excellent choice for resizing.
- Open with Photos: Right-click on your image and select “Open with” > “Photos.”
- Find Resize Option: In the top-right corner of the Photos app, click on the “Three dots” icon.
- Select Resize: From the drop-down menu, choose “Resize.”
- Custom Dimensions: A pop-up window will appear offering preset sizes. For specific control, select “Define custom dimensions.”
- Adjust and Maintain Aspect Ratio: Enter your desired width and height. To keep the image’s proportions intact, make sure the “Maintain aspect ratio” box is checked. This will automatically adjust one dimension when you change the other.
- Save Your Copy: Click the “Save resized copy” button. This is a great feature as it keeps your original image safe while saving a new, resized version.
Paint (Older Windows/Basic)
For those using older versions of Windows or needing a very basic approach, the classic Paint application can still do the trick.
- Open in Paint: Right-click your image, then select “Open with” > “Paint.”
- Access Resize: In the “Home” tab, click the “Resize” button.
- Set Pixels and Aspect Ratio: Choose “Pixels” and enter your desired width or height. To avoid distortion, check “Maintain aspect ratio.”
- Apply and Save: Click “OK” and then save your image.
For a more robust, yet still free, desktop alternative for Windows, consider downloading Paint.NET. It offers more advanced features than the basic Paint while remaining user-friendly.
ChromeOS: Simple Resizing with Gallery
Chromebook users aren’t left out when it comes to image resizing. The built-in Gallery app provides a straightforward way to adjust image dimensions.
- Open with Gallery: Right-click on your image and select “Open with Gallery.”
- Locate Rescale Button: In the Gallery app, look for the “Rescale” button at the top.
- Enter Dimensions: Input your desired width and height. If you need to break the aspect ratio, click the “Chain icon” to unlock it.
- Save Your Work: Click the blue “Save” button to overwrite the original, or click the “Down arrow” next to it to choose “Save as” and create a new copy, preserving your original.
Free Online & Desktop Tools for Advanced Resizing
While built-in tools are great for basic needs, many situations call for more powerful or specialized options. Fortunately, a wealth of free online and desktop applications can handle everything from simple resizes to batch processing and advanced editing. These tools are perfect for optimizing images for Tophinhanhdep.com’s visual design and thematic collections.
GIMP: The Open-Source Photoshop Alternative
GIMP (GNU Image Manipulation Program) stands out as a formidable, free, and open-source alternative to professional software like Adobe Photoshop. It’s available for both Mac and PC, offering professional-level editing and retouching tools without the cost. GIMP is fast, has a small installation footprint, is highly customizable, and surprisingly user-friendly once you get past the initial learning curve.
To resize an image in GIMP:
- Open Your Image: Launch GIMP and go to “File” > “Open” to load your image.
- Access Scale Image: Navigate to “Image” in the top menu, then select “Scale Image.”
- Adjust Dimensions and Resolution: In the “Scale Image” dialog, you can enter new values for “Width” and “Height.” Make sure the “chain” icon next to these fields is linked to maintain the aspect ratio. You can also adjust the “X resolution” and “Y resolution” (PPI) here, which is critical for print-ready files.
- Interpolation: GIMP offers different “Interpolation” methods (e.g., Cubic, Sinc) which determine how new pixels are calculated when resizing. For most cases, “Cubic” or “LoHalo” provides good quality.
- Scale and Export: Click “Scale” to apply the changes. Finally, go to “File” > “Export As” to save your resized image in your desired format (e.g., JPEG, PNG).
GIMP is an excellent choice for digital art enthusiasts and anyone needing robust photo manipulation capabilities without a subscription.
Web-Based Wonders: Simple Image Resizer, Pic Resize, Pixlr X, and BeFunky
For those who prefer not to download software or need quick, on-the-fly resizing, numerous web-based tools are incredibly efficient. These tools align perfectly with Tophinhanhdep.com’s focus on accessible image tools.
-
Simple Image Resizer: This tool lives up to its name, excelling at one task: resizing. It’s ideal when you’re in a hurry.
- Upload: Simply upload your image.
- Select Dimensions: Choose “dimensions” as your resizing method.
- Enter Values: Input your desired width or height (the other dimension will adjust proportionally).
- Resize and Download: Click “Resize,” and your proportionate, resized image is ready for download. It’s also available as a Google Chrome extension and is mobile-friendly.
-
Pic Resize: If you need to resize multiple images at once, especially for portfolio submissions like CaFÉ, Pic Resize offers a “Batch Resize” mode.
- Upload Multiple: Upload all your images simultaneously.
- Select Size: Choose your preferred size options.
- Submit Batch Job: Click “Submit Batch Job!” Note that batch mode doesn’t support cropping or special effects; these require individual processing in “Normal Mode.”
-
Pixlr X: A free web app for simple edits, including intelligent resizing. It’s a fantastic tool for creative ideas and editing styles.
- Open Image: Go to Pixlr X and select “Open image” to upload your file.
- Smart Resize: Find the “Layout and Template” button (looks like three rectangles) and select “Smart resize.”
- Customize: Here, you can enter width and height, use the “Lock proportions” toggle to maintain aspect ratio, or choose from various size presets.
- Apply and Save: Click “Apply,” then the blue “Save” button at the bottom. You can name the file, choose the format, and adjust quality. Be aware of a daily limit of three free saves.
-
BeFunky: An intuitive online photo editor with a powerful Resize tool. It helps you change dimensions by pixel, scale by percentages, and convert pixels to inches for print, all while maintaining aspect ratio and image quality. BeFunky supports JPEG/JPG, GIF, BMP, and PNG file formats, making it versatile for any type of images you might have in mind.
- Upload Photo: Upload your image to the BeFunky Photo Editor.
- Access Resize: Navigate to the “Edit” section and select “Resize.”
- Adjust Settings: Type in new width and height dimensions, select a percentage, or use preset print sizes. Lock the aspect ratio if needed.
- Apply and Save: Click the checkmark to apply changes, then “Save” your photo, customizing format and quality. BeFunky also offers an “Upscale” tool, which uses AI to enlarge images and enhance details, a great option when you need to improve the quality of low-resolution images – a service also available via Tophinhanhdep.com’s AI Upscalers.
Professional Powerhouse: Adobe Photoshop
For professionals and serious hobbyists in digital photography and graphic design, Adobe Photoshop remains the industry standard. It provides the most comprehensive control over image dimensions, resolution, and quality.
- Open Your Image: Launch Photoshop and go to “File” > “Open” to load your image.
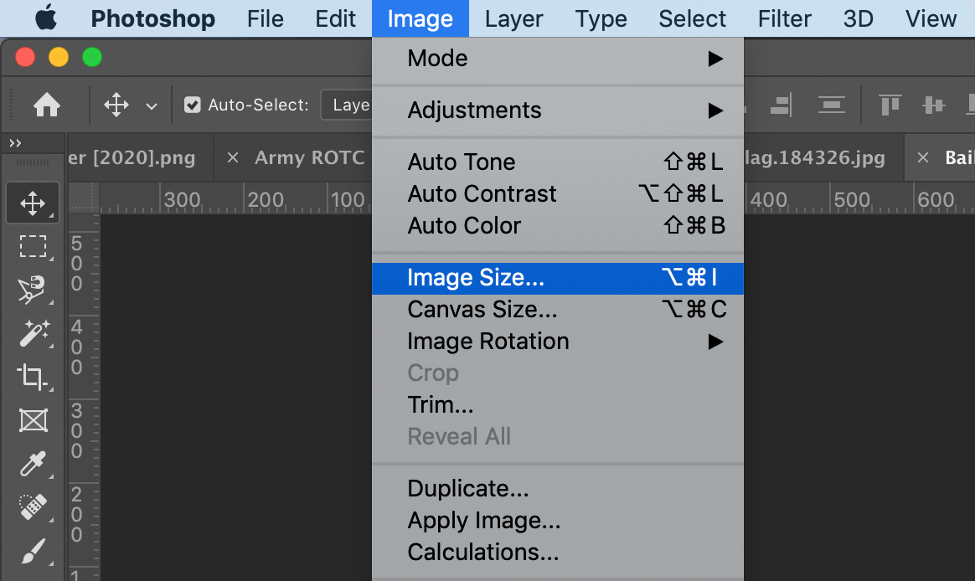
- Access Image Size: In the top menu, click “Image,” then select “Image Size.” You can also use the shortcut Ctrl+Alt+I (Windows) or Command+Option+I (Mac).
- Adjust Dimensions: A window will appear showing current dimensions. Enter your desired “Width” and “Height.” Crucially, ensure the “Constrain Proportions” (or “link” icon) is checked to maintain the aspect ratio.
- Set Resolution: In the “Resolution” field, input the desired PPI/DPI (e.g., 72 for web, 300 for print).
- Resampling: Under “Resample,” choose a method. “Automatic” or “Bicubic Sharper (reduction)” for making images smaller, and “Bicubic Smoother (enlargement)” for making them larger (though enlarging will still have quality limitations without AI upscaling).
- Apply and Save: Click “OK” to apply changes. Then go to “File” > “Save As” to save your newly resized image, choosing your preferred format and quality settings. Remember, increasing image dimensions significantly without advanced AI upscaling can lead to pixelation, as Photoshop cannot magically create new detail that wasn’t there in the original high-resolution image.
Best Practices for Resizing and Maintaining Image Quality
While tools make the process easy, adhering to best practices ensures your resized images always look professional and meet your intended purpose. These tips are crucial for anyone dealing with images, from stunning photography to abstract art.
- Always Work with a Copy: Never resize your original image file. Always duplicate the image before making any changes. This way, you preserve your high-resolution master and can always revert if needed.
- Start with High Resolution: It’s much easier to scale down a large, high-resolution image without losing quality than it is to enlarge a small, low-resolution one. When starting with beautiful photography, aim for the highest resolution possible. Tophinhanhdep.com provides an extensive collection of high-resolution images and stock photos perfect for any project.
- Maintain Aspect Ratio (Unless Cropping): As discussed, keeping the aspect ratio locked prevents unsightly stretching or squishing. Only unlock it if you intend to deliberately distort the image or if you are cropping a portion of the image to fit specific constraints. Resizing changes the entire image’s dimensions, while cropping removes parts of it.
- Understand Resampling: Resampling refers to how software adds or removes pixels when resizing.
- Downsampling: When making an image smaller, pixels are intelligently discarded. Good algorithms ensure a sharp result.
- Upsampling: When making an image larger, new pixels are interpolated (guessed) based on existing ones. This is where quality can suffer, leading to blurriness or pixelation.
- Choose the Right Resolution for the Output:
- Web/Screen: Aim for 72-96 PPI. This is sufficient for display and keeps file sizes small.
- Print: Aim for 300 PPI for high-quality results. If you’re printing something very large that will be viewed from a distance (like a billboard), you might get away with lower PPI.
- Select the Appropriate File Type and Compression:
- JPEG/JPG: Best for photographs with continuous tones. Allows for variable compression; higher compression means smaller file size but more quality loss. Find a balance.
- PNG: Ideal for images with transparent backgrounds, sharp lines, or text (like logos, graphic design elements) as it uses lossless compression, preserving quality better than JPEG but resulting in larger file sizes.
- GIF: Suitable for simple animations and images with limited colors. Tophinhanhdep.com offers converters to help you switch between these formats efficiently.
- Leverage AI Upscaling for Enlargement: If you absolutely need to enlarge a low-resolution image without significant quality loss, traditional methods will often fail. This is where AI Upscalers come in. These advanced tools, available on Tophinhanhdep.com, use artificial intelligence to intelligently add detail and enhance clarity when increasing image dimensions, making blurry images sharp again. It’s a game-changer for digital photography and image collections that need a boost.
Conclusion
Mastering image dimensions is a foundational skill in the digital age, impacting everything from your personal photo collections to professional portfolios and online presence. Whether you’re preparing images for print, optimizing them for web, or fine-tuning them for graphic design, the ability to resize accurately and efficiently is invaluable.
From the straightforward, built-in tools on your Mac or PC to the powerful online platforms and professional software like Photoshop, a solution exists for every need and skill level. By understanding the core concepts of pixels, resolution, and aspect ratio, and by applying the best practices outlined in this guide, you can ensure your images maintain their integrity and visual appeal across all applications.
At Tophinhanhdep.com, we are dedicated to providing you with the resources and tools to bring your visual ideas to life. Explore our vast collections of wallpapers, backgrounds, and aesthetic images, dive into high-resolution photography, and utilize our cutting-edge image tools, including compressors, optimizers, and AI upscalers. We aim to inspire your creative ideas and help you curate stunning thematic collections. Start experimenting with these resizing techniques today, and unlock the full potential of your images.