How to Change Image Background Color for Stunning Visuals

In the dynamic world of digital imagery, the background of a photograph is far more than just a setting; it’s a crucial element that shapes perception, mood, and focus. A perfectly chosen background can elevate a good image to a great one, ensuring your subject truly stands out, conveying the desired aesthetic, or even meeting specific professional requirements. Whether you’re a seasoned graphic designer, an aspiring digital artist, or simply someone looking to enhance your personal photos, the ability to change an image’s background color is an invaluable skill. At Tophinhanhdep.com, we understand the power of visual design and provide a wealth of resources, from high-resolution images and creative ideas to advanced image tools, to help you master this transformative technique. This comprehensive guide will walk you through various methods, from advanced Photoshop techniques to user-friendly online tools, empowering you to revolutionize your visual content.
The Transformative Power of Background Color
The background color of an image plays a pivotal role in its overall impact. It can set the emotional tone, direct the viewer’s eye, and even influence how the primary subject is perceived. Think about product photography: a clean, contrasting background can highlight intricate details and make a product appear more professional and appealing. For portraits, a vibrant background can exude excitement, while a cool-toned backdrop might evoke calmness or introspection. This isn’t just about aesthetics; it’s about effective visual communication.
Changing the background color is a powerful form of photo manipulation that allows you to:
- Enhance Focus: By eliminating distracting elements or using a color that contrasts with your subject, you can ensure the viewer’s attention remains squarely on what matters most.
- Establish Mood and Aesthetic: Colors carry psychological weight. A warm, energetic background can transform a plain image into a vibrant statement, while a minimalist, neutral tone can add sophistication. This directly ties into creating images with a specific aesthetic or conveying sad/emotional tones or pure beauty.
- Meet Professional Standards: For e-commerce, official documents like passport photos, or professional headshots, specific background colors (like pure white or specific shades of blue) are often mandatory. Our resources at Tophinhanhdep.com, including stock photos and guides on digital photography and editing styles, can help you achieve these standards.
- Unleash Creative Ideas: A new background opens up a world of possibilities for graphic design and digital art. You can create abstract compositions, thematic collections, or blend subjects into new environments, generating fresh creative ideas.
From simple solid color replacements to intricate gradient effects, understanding how to manipulate this fundamental aspect of an image unlocks immense creative potential. Tophinhanhdep.com is your go-to resource for image inspiration & collections, providing the perfect starting point for your next visual project.
Mastering Background Color Changes with Professional Tools
For unparalleled control and precision, professional photo editing software like Adobe Photoshop remains the gold standard. While it may seem daunting at first, breaking down the process into manageable steps makes it accessible for anyone willing to learn. The techniques covered here are fundamental to photo manipulation and will dramatically improve the high resolution quality of your final images.
Step-by-Step Guide: Isolate Your Subject with Precision
The first, and arguably most critical, step in changing a background is accurately separating your subject from its original surroundings. This requires meticulous selection, especially when dealing with complex details like hair, fur, or intricate edges.
-
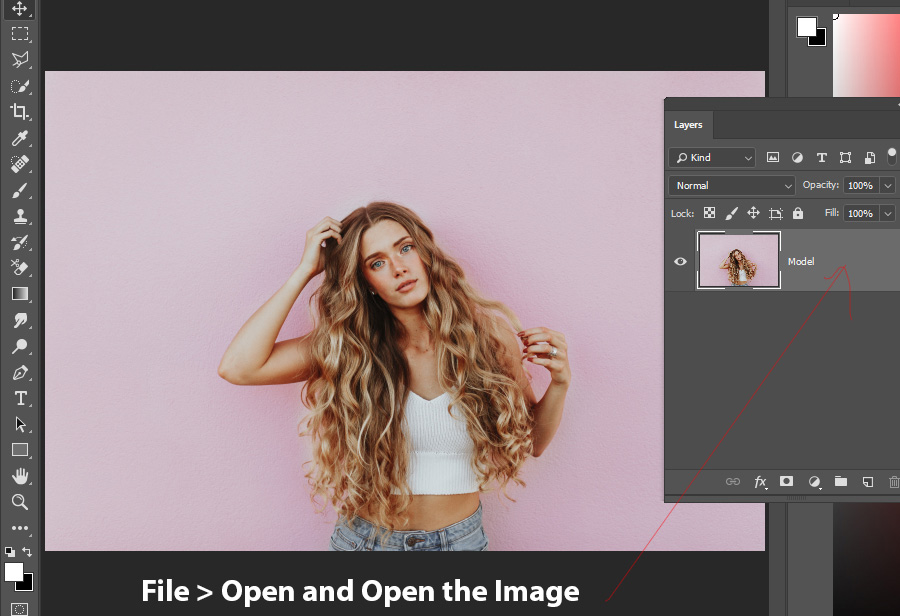
Opening Your Image: Begin by opening your desired image in Photoshop.
-
Initial Subject Selection: Photoshop offers several powerful tools for this:
- Magic Wand Tool: Ideal for backgrounds with large areas of solid or similar color. Select the Magic Wand tool (often found in the same group as the Quick Selection tool, accessible by pressing ‘W’). Click on the background areas. Hold down
Shiftand click to add more areas to your selection, orAlt(Option on Mac) to subtract areas. - Quick Selection Tool: More intelligent, this tool allows you to “paint” over your subject, and Photoshop attempts to identify and select its edges. Drag your cursor over the subject. To refine, use the
Altkey to deselect unwanted areas. - Select Subject (AI-Powered): For Creative Cloud users, this tool leverages Adobe Sensei’s Artificial Intelligence to automatically detect and select the main subject with remarkable accuracy. Simply click “Select Subject” in the Options bar. This is a game-changer for speeding up the initial selection process, making it easier to achieve high resolution results even on complex images.
- Magic Wand Tool: Ideal for backgrounds with large areas of solid or similar color. Select the Magic Wand tool (often found in the same group as the Quick Selection tool, accessible by pressing ‘W’). Click on the background areas. Hold down
-
Inverting the Selection: Once the background (or subject) is selected, you’ll need to ensure your selection isolates the subject. If you selected the background, right-click on the selection and choose “Select Inverse,” or go to
Select > Inverse. This switches the selection from the background to your main subject. -
Refining Edges for Flawless Results: Even with AI assistance, initial selections are rarely perfect, especially around challenging areas like hair. This is where the “Refine Edge” or “Select and Mask” workspace comes in.
- Go to
Select > Select and Mask(orSelect > Refine Edgein older Photoshop versions). - View Mode: Use the “View Mode” dropdown (e.g., “On Black,” “On White,” or “Overlay”) to clearly see the selection against a contrasting background. This helps you spot any lingering traces of the old background.
- Refine Edge Brush Tool: Use the “Refine Edge Brush Tool” (found in the Select and Mask workspace) to paint over areas like hair or fuzzy edges. Photoshop will intelligently detect the distinction between foreground and background, creating a much more natural and detailed selection. This step is crucial for digital photography and photo manipulation, ensuring your edits look seamless.
- Global Refinements: Adjust sliders like “Smooth,” “Feather,” “Contrast,” and “Shift Edge” to further fine-tune the selection, softening hard edges or tightening the mask as needed.
- Output Settings: In the “Output To” dropdown, select “Layer Mask” before clicking “OK.” This creates a non-destructive mask on your image layer, allowing for future adjustments without permanently altering your pixels.
- Go to
This meticulous selection process, while time-consuming, is the foundation for any professional photo manipulation. It ensures that your new background will integrate seamlessly, preserving the high resolution and integrity of your primary subject.
Implementing a New Solid Color Background
With your subject perfectly masked, adding a new background color is a straightforward process that offers immense creative flexibility. This technique is central to creating impactful visual design and exploring creative ideas.
- Adding a Solid Color Fill Layer:
- In the Layers panel, click the “New Adjustment Layer” icon (a half-filled circle) and select “Solid Color.”
- A “Color Picker” window will appear. Here, you can choose any color you desire. You can select a vibrant shade that enhances the aesthetic of your image, a neutral tone for professionalism, or even use the Dropper tool to pick a color directly from your subject (e.g., matching a blue jacket) for harmonious integration.
- Click “OK” once you’ve chosen your color. This will create a new layer filled with your chosen color, which will likely cover your subject.
- Positioning the Fill Layer:
- In the Layers panel, drag the newly created “Color Fill” layer below your main image layer. This makes your subject visible again, now against your chosen solid color background.
- Adjusting and Experimenting:
- The beauty of using a Solid Color Fill Layer is its non-destructive nature. You can double-click the color swatch thumbnail on the “Color Fill” layer at any time to reopen the Color Picker and experiment with different hues, saturations, and brightness levels. This is excellent for exploring various thematic collections or finding trending styles that suit your image.
- Consider the psychological impact of colors:
- White: Often used for product photography to create a clean, minimalist, and professional look, making products pop.
- Black: Adds drama, sophistication, and intense contrast, suitable for highlighting elegant subjects or creating abstract moods.
- Vibrant Hues (e.g., pink, blue, yellow): Can express personality, excitement, or a whimsical aesthetic, perfect for creative portraits or digital art compositions.
- Warm Tones (reds, oranges): Evoke energy, passion, or warmth.
- Cool Tones (blues, greens): Suggest calmness, tranquility, or professionalism.
This step effectively transforms your image, offering a blank canvas for further creative enhancements.
Adding Depth and Realism to Your New Background
A flat, solid background, while useful, often lacks the natural variation found in real-world lighting. To make your new background appear more organic and integrate seamlessly with your subject, you can introduce gradients of light and shadow. This advanced photo manipulation technique adds a layer of sophistication, moving beyond basic digital photography edits.
- Simulating a Gradient with Levels Adjustment:
- Central Highlight: Use the “Elliptical Marquee Tool” to draw an oval selection around the central area of your background, typically behind your subject’s face or body.
- Feather the Selection: Right-click inside the selection and choose “Feather.” A feather radius of
200 pixels(or more, depending on your image resolution) is a good starting point to create a soft, gradual transition. This prevents harsh lines and ensures a natural look, essential for beautiful photography. - Create a Levels Adjustment Layer: Go to
Layer > New Adjustment Layer > Levels. This automatically creates a mask from your elliptical selection. - Brighten Midtones: In the Properties panel for the Levels layer, slide the middle (gamma) slider to the left to brighten the midtones. This creates the illusion of a soft light source illuminating the center of your background, adding dimension.
- Darkening the Edges (Vignette Effect):
- Select Inverse for Edges: Create another elliptical marquee selection (feathered at
200 pixelsas before). Then, right-click and choose “Select Inverse.” This selects everything outside your central oval, i.e., the edges of your image. - Create Another Levels Adjustment Layer: Again, go to
Layer > New Adjustment Layer > Levels. - Darken Midtones: In this new Levels layer’s Properties panel, slide the middle (gamma) slider to the right to darken the midtones. This creates a subtle vignette effect, drawing even more attention to your subject and adding depth to the scene.
- Select Inverse for Edges: Create another elliptical marquee selection (feathered at
- Refining Blending and Opacity:
- Blending Mode for Realistic Shadows: For a white background, setting the Color Fill Layer’s blending mode to “Multiply” can make the solid color interact with any subtle shadows or textures from the original background, resulting in a more realistic effect. While this works best with white backgrounds, experimenting with different blending modes can yield unexpected and visually rich results for any color. Multiply darkens underlying colors while preserving hues, giving shadows more depth.
- Adjust Opacity: For both Levels adjustment layers, you can fine-tune their intensity by adjusting their opacity in the Layers panel. This allows you to control how strong the highlight and vignette effects are, ensuring a smooth transition and natural appearance.
- Color Fill Adjustments: Don’t forget that you can still double-click the Solid Color fill layer thumbnail to change the color and see how it interacts with your newly added depth. This iterative process is key to achieving the desired visual design.
By implementing these steps, you move beyond a flat background, creating a more professional and visually engaging image. These techniques are core to advanced editing styles and help achieve truly beautiful photography.
Streamlining the Process with Online & AI-Powered Tools
While professional software offers unmatched control, not everyone has access to or the time to master complex tools. Fortunately, the rise of online image tools has democratized background color changes, making it accessible with just a few clicks. Websites like Tophinhanhdep.com offer intuitive, AI-powered solutions that simplify this task, often for free.
Online background color changers typically follow a much simpler workflow:
- Upload Your Image: You simply upload the photo you wish to edit. Tophinhanhdep.com supports various image formats, ensuring compatibility with your high resolution digital photography.
- Automatic Background Removal: The core of these tools is often an AI Remover or AI Image Agent that automatically detects and separates the subject from the background. This “one-click” functionality saves significant time compared to manual selection in Photoshop. The AI Upscalers available at Tophinhanhdep.com can also ensure that your newly edited image maintains its quality, even if the original was lower resolution.
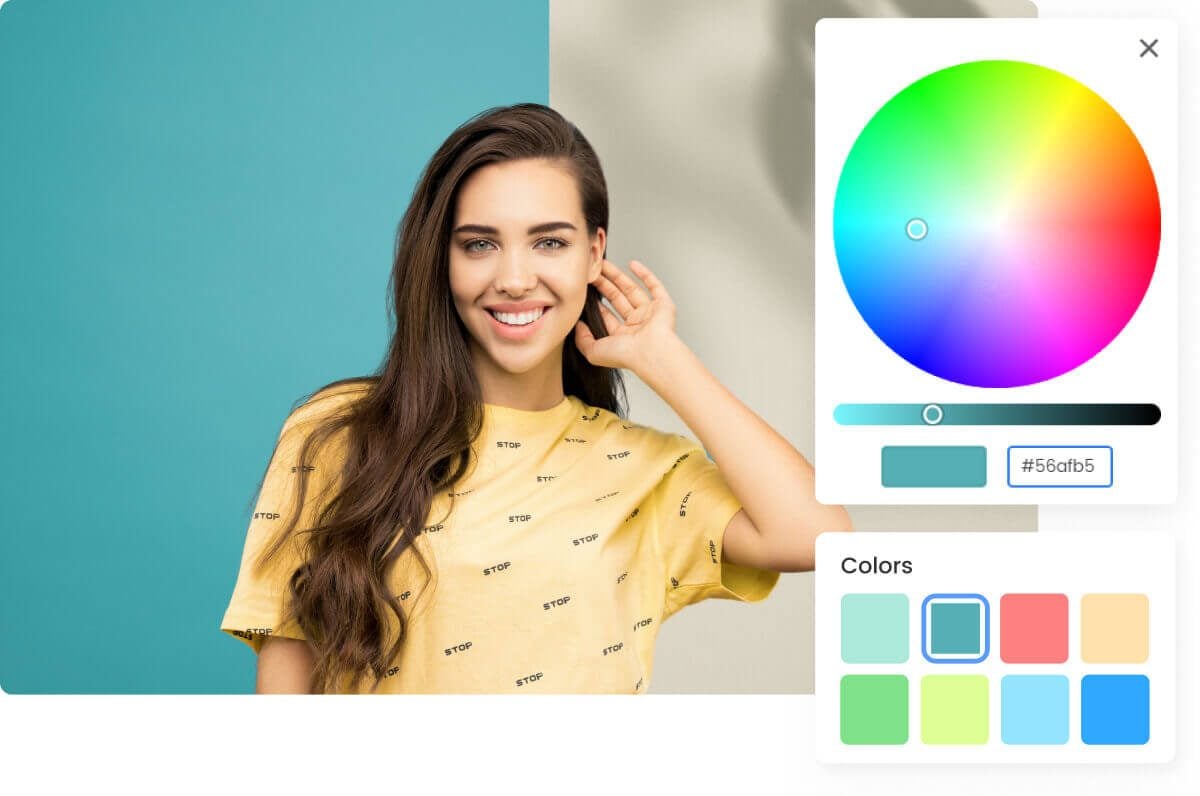
- Select a New Background Color: Once the background is removed, you are presented with a palette of color options. You can choose from standard colors like white, blue, red, or black, or explore gradient options for a more artistic touch. These options are perfect for quickly applying trending styles or creating specific thematic collections.
- Download Your Edited Image: After selecting your preferred color, you can download your image in various formats (e.g., PNG, JPG), ready for use as wallpapers, backgrounds, or for sharing.
Tophinhanhdep.com’s suite of image tools, including converters, compressors, and optimizers, can further prepare your image for any platform, ensuring efficient use without compromising quality. These tools are perfect for creators looking for creative ideas and quick execution in digital art and visual design.
Creative Applications and Inspiration from Tophinhanhdep.com
Changing an image’s background color isn’t just a technical task; it’s an artistic opportunity. With the techniques and tools at your disposal through Tophinhanhdep.com, you can unlock incredible creative ideas and significantly enhance your visual design projects.
Elevating Product Photography and Portraits
The strategic use of background color can dramatically impact the perceived value and professionalism of your photographs, especially in commercial and personal branding contexts.
- Product Photography: For e-commerce, a consistent and appealing background is vital.
- White Backgrounds: Often the default for marketplaces like Amazon, white backgrounds ensure clarity, focus solely on the product, and allow for easy integration into various web designs. Tophinhanhdep.com’s tools make achieving a perfect white backdrop effortless.
- Black Backgrounds: Convey luxury, sophistication, or drama. They can make metallic or colorful products truly gleam, adding a high-end feel that aligns with aesthetic and beautiful photography principles.
- Brand Colors: Incorporating specific brand colors as backgrounds can strengthen brand identity and create a cohesive visual language across your product catalog. This is a powerful graphic design strategy.
- Portraits: Background color for portraits allows for profound emotional and artistic expression.
- Vibrant and Expressive: Choose bold colors that reflect the subject’s personality or the desired mood. A sunny yellow might suggest joy, while a deep purple could hint at creativity or mystery. This contributes to capturing aesthetic or emotional aspects of the subject.
- Subtle Gradients: Instead of a single solid color, a subtle gradient can add depth and softness, preventing the image from looking too stark or artificial. This technique, achievable with Photoshop’s Levels adjustment, adds a professional touch to digital photography.
- Thematic Integration: If your portrait is part of a thematic collection, the background color can visually tie it into the broader narrative, enhancing cohesion and storytelling.
By thoughtfully selecting and implementing new background colors, you can transform ordinary product shots and portraits into compelling visual narratives. Explore Tophinhanhdep.com’s extensive image inspiration & collections for photo ideas tailored to your specific needs.
Exploring Thematic Collections and Trending Styles
Tophinhanhdep.com is a treasure trove of inspiration, offering a diverse range of images from nature and abstract to wallpapers and backgrounds. This platform is not just for finding new visuals but also for sparking your own creative ideas in visual design. When considering a new background color, draw inspiration from our collections:
- Mood Boards: Before committing to a color, create digital mood boards using images from Tophinhanhdep.com. Experiment with different color palettes that evoke your desired feelings or align with current trending styles. Do you want a calming, nature-inspired green, or a dramatic, abstract crimson?
- Thematic Collections: If you’re working on a series of images, changing background colors can help unify them into a cohesive thematic collection. For example, a series of portraits with pastel backgrounds might convey a soft, dreamy aesthetic, while geometric patterns with contrasting colors could create an abstract, dynamic collection.
- Creative Blending: Don’t limit yourself to solid colors. After removing a background, you could introduce a gradient inspired by a beautiful photography sunset, or an abstract texture found in our wallpapers section. This pushes the boundaries of simple background changes into more complex digital art and photo manipulation.
- AI-Powered Inspiration: Tophinhanhdep.com’s AI generators and AI effects can also provide unique background textures or color schemes you might not have considered. Use these tools to quickly prototype looks and iterate on your creative ideas.
The freedom to change background colors empowers you to continually refresh your visual content, adapt to new design challenges, and keep your images aligned with trending styles and personal expression. With Tophinhanhdep.com, you have the resources to turn every image into a masterpiece.
Conclusion
Changing an image’s background color is a fundamental skill that significantly enhances visual design and digital photography. Whether you opt for the granular control of professional software like Photoshop, meticulously isolating subjects with tools like the Magic Wand and Refine Edge, or embrace the efficiency of AI-powered online platforms from Tophinhanhdep.com, the ability to transform your backgrounds opens up a world of creative ideas.
From elevating product photography and giving portraits a distinct aesthetic to seamlessly integrating new elements through photo manipulation, the impact is undeniable. Tophinhanhdep.com is dedicated to providing you with the image tools, high resolution assets, and image inspiration & collections necessary to achieve your visual goals. We encourage you to explore our diverse library of wallpapers, backgrounds, and stock photos, and experiment with different editing styles. Embrace the power of color to redefine your images, convey powerful emotions, and create truly stunning visual narratives. Your next masterpiece is just a few clicks away!