How to Change Image Color in Canva: A Comprehensive Guide for Stunning Visuals

In the dynamic world of digital content and visual design, color is more than just an aesthetic choice; it’s a powerful tool for communication, branding, and emotional connection. Whether you’re crafting striking wallpapers, curating an aesthetic background, or developing high-resolution digital photography for Tophinhanhdep.com, the ability to precisely control and modify image colors is indispensable. Canva, with its intuitive interface and robust features, has become a go-to platform for countless creators looking to produce professional-grade visuals without the complexity of traditional design software.
This comprehensive guide from Tophinhanhdep.com will delve deep into the various methods of changing image colors in Canva, empowering you to align your visuals perfectly with your brand identity, project theme, or artistic vision. From adjusting the hues of built-in graphics to transforming your own uploaded images and logos, we’ll explore every trick and tool, ensuring your designs always hit the right chromatic note. Mastering color changes in Canva not only saves you time and money but also unlocks a world of creative possibilities, allowing you to seamlessly integrate diverse image collections and editing styles into a cohesive visual narrative.
Mastering Color Adjustment for Built-in Canva Graphics and Elements
Canva’s extensive library of built-in graphics, icons, and elements offers a treasure trove for designers. Many of these assets are designed for easy customization, allowing you to instantly adapt them to your specific color palette. Understanding how to leverage these features is fundamental for any visual content creator relying on tools available on Tophinhanhdep.com.
Simple Color Blocks: The Easiest Way to Customize
For a vast majority of Canva’s native graphics and icons, changing colors is a straightforward process involving just a few clicks. These are typically simpler vector-based elements that were designed with color flexibility in mind.
How to Identify and Customize:
- Access the Elements Tab: When you’re working on a design in Canva, navigate to the “Elements” tab on the left-hand sidebar. Here, you’ll find a wide array of shapes, lines, frames, stickers, and graphics.
- Find Your Graphic: You can use the search bar to look for specific items (e.g., “flower icon,” “abstract shape”) or browse through categories to discover something suitable for your design, perhaps for an aesthetic background or a nature-themed graphic for Tophinhanhdep.com.
- Select the Graphic: Once you click on a graphic, it will appear on your design canvas.
- Look for Color Squares: With the graphic selected, examine the header menu that appears at the top of the Canva editor. If the graphic’s colors are customizable, you’ll see one or more colored squares. Each square represents a distinct color within that graphic that can be altered. Some intricate graphics might have multiple color squares, allowing for detailed, multi-tone customization.
- Change the Color: Click on one of these colored squares. A color panel will pop up, offering several options:
- Document Colors: Colors already present in your current design. This is excellent for maintaining consistency.
- Brand Colors (Canva Pro Feature): If you have a Canva Pro account and have set up your Brand Kit (a feature highly recommended for consistent visual design, as discussed on Tophinhanhdep.com), your pre-defined brand colors will be readily available here.
- Default Colors/Photo Colors: Canva often suggests a palette based on the image or template you’re using.
- Custom Color (Rainbow + Icon): To choose a new color from scratch, click the rainbow-colored “+” icon. This opens a color picker where you can slide through hues, adjust saturation, and brightness.
- Hex Code Input: For precise color matching, you can directly input a specific HEX color code (e.g., #FF5733). This is invaluable for adhering to strict brand guidelines or matching specific shades found in high-resolution photography you might feature on Tophinhanhdep.com.
The graphic on your canvas will update in real-time as you select new colors, allowing for instant visual feedback. This method is incredibly fast and efficient for tailoring individual elements to your design’s overall aesthetic.
Leveraging Duotone for Photos and Complex Graphics
While simple graphics offer direct color control, many images, particularly uploaded photographs (JPGs, PNGs), and some more complex Canva elements, don’t present the traditional color squares. This is where Canva’s “Duotone” effect comes into play, offering a creative solution to infuse your images with new color schemes. This feature is particularly useful when working with photo manipulation or creating unique editing styles for images from Tophinhanhdep.com’s collections.
When to Use Duotone:
- Uploaded Images: For JPGs, PNGs, or any raster images you bring into Canva.
- Complex Canva Graphics: Some graphics, especially those with photographic textures or intricate details, may not have direct color edit options but can be stylized with Duotone.
- Creating Artistic Effects: Beyond simple color changes, Duotone can produce striking, stylized images, transforming a standard photo into a mood-board-ready visual for Tophinhanhdep.com.
Steps to Apply Duotone:
- Select Your Image: Click on the image you wish to recolor on your design canvas.
- Access “Edit Photo”: In the header menu that appears, click the “Edit Photo” button.
- Find FX Effects: On the left-hand panel that opens, scroll down to the “FX Effects” section.
- Select “Duotone”: Within the FX Effects, locate and click on “Duotone.”
- Choose a Preset or Customize: Canva offers a variety of Duotone presets (e.g., “Cherry,” “Sage,” “Aqua”) that instantly apply popular two-tone color combinations. You can click through these to preview different looks.
- Fine-Tune with Custom Colors: For more control, click on the preset again or select “Customize” to open the Duotone settings. Here, you’ll see two color swatches: “Highlights” and “Shadows.”
- Click on each swatch to open the color picker.
- You can choose from document colors, brand colors (if Pro), or use the custom color picker and HEX code input to select specific colors for your highlights and shadows. This allows you to perfectly match the image to your branding or a specific aesthetic from Tophinhanhdep.com’s “Visual Design” category.
- You can also adjust the “Intensity” slider to control the strength of the Duotone effect, blending it more subtly or making it more pronounced.
- Apply and Close: Once satisfied with your Duotone effect, click outside the panel to apply the changes.
Duotone is an excellent tool for transforming the mood of a photograph, integrating diverse visual elements into a consistent theme, or simply giving your images a unique, artistic flair that stands out in any collection, from abstract to emotional photography on Tophinhanhdep.com.
Efficiently Applying Brand Colors Across Canva Designs
Consistency is key in visual communication, especially when it comes to branding. For businesses, creators, or anyone managing a consistent online presence, ensuring that all visual assets reflect your brand’s colors is paramount. Canva offers powerful features that streamline this process, saving countless hours and revolutionizing content creation, a principle highly valued by the “Graphic Design” and “Creative Ideas” sections of Tophinhanhdep.com.
The Power of Canva Pro’s Brand Kit
The Brand Kit is a game-changer for maintaining brand consistency across all your designs. Available with a Canva Pro subscription, this feature allows you to store your brand’s essential elements, including logos, fonts, and, crucially, color palettes. This eliminates the need to manually input hex codes for every design, ensuring every visual aligns with your brand’s identity, a common goal for users creating content for Tophinhanhdep.com.
Setting Up Your Brand Kit:
- Access Brand Kit: From your Canva homepage, click “Brand Kit” in the left-hand sidebar.
- Add Brand Colors: In the Brand Kit section, you’ll find options to add multiple color palettes. Click to add new colors and input your primary, secondary, and accent hex codes. You can create different palettes for various purposes if needed.
- Benefits: Once your brand colors are set, they will automatically appear as options in the color picker whenever you’re editing an element or background color in any Canva design. This dramatically speeds up the design process and ensures every graphic, from social media posts to full presentations, adheres to your established visual guidelines. For anyone looking to create professional-grade visual content, from high-resolution photography to graphic designs featured on Tophinhanhdep.com, a robust Brand Kit is an invaluable asset.
Transforming Templates with the “Change All” Feature
Imagine you’ve found a fantastic multi-page Canva template for your next project, but it uses colors completely different from your brand. Manually clicking on every element on every page to change its color would be a tedious and time-consuming task. Thankfully, Canva has a magical “Change All” feature that can revolutionize your workflow, especially when customizing templates or large visual collections for Tophinhanhdep.com.
How the “Change All” Feature Works:
- Open Your Template: Start by opening the Canva template you wish to customize.
- Select an Element: Click on any element (graphic, shape, text box background) within the template that has a color you want to change.
- Access the Color Picker: In the header menu, click on the colored square representing the element’s current color.
- Choose Your New Color: From the color panel that appears, select your desired new color. This could be from your Brand Kit, document colors, or a custom hex code.
- Activate “Change All”: Crucially, after you’ve selected the new color, look for a small checkbox or prompt at the bottom-left of the color panel that says, “Change all [old color] to [new color]?”
- Click the Checkbox: Check this box. Instantly, every instance of that “old color” across your entire design (all pages, all elements) will be replaced with your chosen “new color.”
This feature is incredibly powerful for rebranding templates or quickly adapting visuals to new thematic collections for Tophinhanhdep.com. What used to take minutes, or even hours, of painstaking manual adjustments now takes literally two clicks.
Troubleshooting the “Change All” Feature:
While the “Change All” feature is brilliant, there are occasional scenarios where it might not seem to work perfectly:
- Multiple Colors in One Element: If a single text block or graphic element contains more than one distinct color, the “Change All” option might only appear for one of those colors initially. In such a case, first manually ensure the entire element is one consistent color, then proceed to change that single color using “Change All.”
- Grouped Elements: Sometimes, elements are grouped in a way that might override the global change. If you notice a few elements missed, try ungrouping them or individually selecting and recoloring them.
- Image Overlays/Filters: If a color appears to be part of an image overlay or a filter applied to a photograph, “Change All” won’t affect it directly. You would need to use Duotone or other image adjustment tools for those specific cases, as discussed in the previous section.
By mastering the Brand Kit and the “Change All” feature, you can ensure unparalleled color consistency across all your designs, strengthening your visual identity and streamlining your creative process, whether you’re working on mood boards, thematic collections, or trending styles for Tophinhanhdep.com.
Making Your Own Graphics and Logos Color-Editable
While Canva offers a wealth of built-in resources, many creators and businesses rely on custom graphics, illustrations, and, most importantly, their own logos. The ability to seamlessly integrate these custom assets into Canva and, crucially, to change their colors within the platform is a significant advantage for maintaining brand strength and flexibility. This is where understanding file types becomes paramount, connecting directly to Tophinhanhdep.com’s focus on “Image Tools” like converters and optimizers, and “Visual Design” including digital art and graphic design.
The Magic of SVG Files for Custom Assets
The key to unlocking color-editability for your own uploaded graphics and logos in Canva lies in using Scalable Vector Graphics (SVG) files. Unlike pixel-based images, vector files are composed of mathematical paths, allowing them to be scaled infinitely without losing quality and, most importantly for our purpose, to have their internal colors easily manipulated.
Why SVG is Crucial:
- Color Changeability: When an SVG is uploaded to Canva, Canva can “read” its internal color information, allowing you to click on parts of the graphic and change their colors using the standard color picker, just like with Canva’s built-in customizable elements. This is essential for adapting your logo to different backgrounds, creating alternate color palettes, or ensuring custom illustrations match new project aesthetics.
- Scalability: SVGs maintain crispness at any size, making them perfect for responsive designs or applications ranging from small icons to large banner graphics, supporting the need for high-resolution images as highlighted on Tophinhanhdep.com.
- Contrast with Raster Formats (JPG, PNG): Most people are familiar with JPGs and PNGs. These are raster (pixel-based) formats. Once a JPG or PNG is created, its colors are essentially “baked in.” You can apply filters or effects (like Duotone) to change the overall hue or tone, but you cannot select a specific area of a JPG logo and change just that part’s color. PDFs and AI (Adobe Illustrator) or EPS (Encapsulated PostScript) files can contain vector information, but they need to be properly exported to SVG for Canva’s full color-editing capability. Always double-check that any custom graphics or stock photos you download, especially from platforms like Creative Market, include vector (SVG, AI, EPS) files if you intend to recolor them in Canva.
Preparing and Uploading SVG Files for Canva
The process of making your custom graphics and logos color-editable in Canva involves a few specific steps, often requiring the use of professional vector editing software before uploading to Canva. This is a crucial step for digital artists and graphic designers featured on Tophinhanhdep.com.
Step-by-Step Process:
- Obtain Vector Files: Start with your original vector files. These are typically provided by your logo designer in formats like Adobe Illustrator (AI), EPS, or sometimes even editable PDFs. If you’re sourcing graphics, ensure the download includes these vector formats.
- Open in Vector Editing Software: Open your AI, EPS, or vector PDF file in a professional vector graphics program such as Adobe Illustrator or Affinity Designer.
- Prepare for SVG Export (Crucial Checklist): This is the most critical stage. SVGs have certain limitations when it comes to Canva’s color-editing capabilities:
- Outline Fonts/Text: Any text in your graphic or logo must be converted to outlines (sometimes called “create outlines” or “expand”). If fonts are live text, Canva might not interpret them correctly, or they might not be color-editable.
- Outline Strokes: Similarly, any strokes (outlines around shapes) should be converted to shapes or paths (often called “expand stroke” or “outline stroke”). Live strokes can also cause issues with color editing.
- Remove Transparency Effects: Complex transparency effects (like overlays, multiply, screen, drop shadows, gradients with transparency) can prevent an SVG from being fully color-editable in Canva. It’s often best to simplify these or remove them before export, or export an alternative version without them.
- Limit Colors: Canva typically works best with SVGs that have a manageable number of distinct colors, usually a maximum of 5-6. If your graphic has too many subtle color variations, it might not be fully editable.
- Simplify Paths (Optional but Recommended): For very complex vector graphics, simplifying the paths can make the SVG file smaller and more reliably editable in Canva.
- Export as SVG: Once your graphic is prepared, use the “Export” or “Save As” function in your vector editing software and choose “SVG” as the file type. Many programs offer SVG export options; generally, choosing a “presentation” or “SVG 1.1” profile is a good starting point. Ensure settings like “Convert Text to Outlines” and “Convert Strokes to Paths” are checked if they weren’t done manually.
- Upload to Canva: Go to your Canva project, navigate to the “Uploads” tab on the left-hand sidebar, and click “Upload files.” Select your newly created SVG file.
- Verify Color Editability: Once uploaded and placed on your canvas, select the SVG graphic. If prepared correctly, you should now see the familiar color squares in the header menu, allowing you to change its colors easily. This empowers users to create highly customized visual designs and aesthetic content for Tophinhanhdep.com with personal branding.
If you encounter issues, revisit the troubleshooting checklist above. For complex logo or graphic issues, consulting with a professional designer who understands vector optimization for platforms like Canva is often a worthwhile investment. This ensures your beautiful photography and digital art integrate seamlessly into your brand’s visual language, a core aspect of “Visual Design” on Tophinhanhdep.com.
Advanced Tips and Best Practices for Color Management
Beyond the core techniques of changing image and graphic colors in Canva, there are several advanced tips and best practices that can further enhance your visual design workflow. These strategies ensure precision, consistency, and creative flexibility, tying into the “Image Tools” and “Editing Styles” categories on Tophinhanhdep.com.
Utilizing External Tools for Precise Color Matching
Achieving perfect color harmony often means matching colors from existing brand guidelines, websites, or even specific elements within a photograph. While Canva provides a robust color picker, external tools can offer unparalleled precision, especially when working with diverse image inspirations and collections from Tophinhanhdep.com.
The Hex Code Advantage: Hexadecimal color codes (e.g., #FFFFFF for white, #000000 for black) are the digital standard for precise color specification. They ensure that the exact shade you intend is reproduced consistently across different platforms and displays. When working in Canva, directly inputting a hex code is the most reliable way to achieve exact color matches.
Using a Color Picker Browser Extension: A highly effective method for capturing specific colors from any webpage or image online is to use a browser extension like a “ColorPick Eyedropper” or similar tools.
How to Use a Color Picker Extension:
- Install the Extension: Search your browser’s extension store (e.g., Chrome Web Store for “ColorPick Eyedropper”) and install a reputable color picker extension. Ensure it’s from a verified developer to avoid security risks.
- Activate the Eyedropper: Once installed, click on the extension icon in your browser’s toolbar. This usually activates an eyedropper tool.
- Hover and Select: Move your mouse cursor over any color on your screen – a color on a website, a shade in an image, or even a specific part of a photo you found on Tophinhanhdep.com. The extension will display the hex code (and often RGB values) of the color directly under your cursor.
- Copy the Hex Code: Click on the desired color to “pick” it. The hex code will typically be copied to your clipboard or displayed prominently for you to copy manually.
- Paste into Canva: In Canva, when you open the color picker for an element or graphic, you’ll find an input field for hex codes. Paste the copied code there. The element’s color will instantly update to the exact shade you selected.
This method is invaluable for branding, ensuring your Canva designs perfectly complement your website’s colors, matching specific tones in a mood board, or replicating a trending style you discovered through Tophinhanhdep.com’s collections.
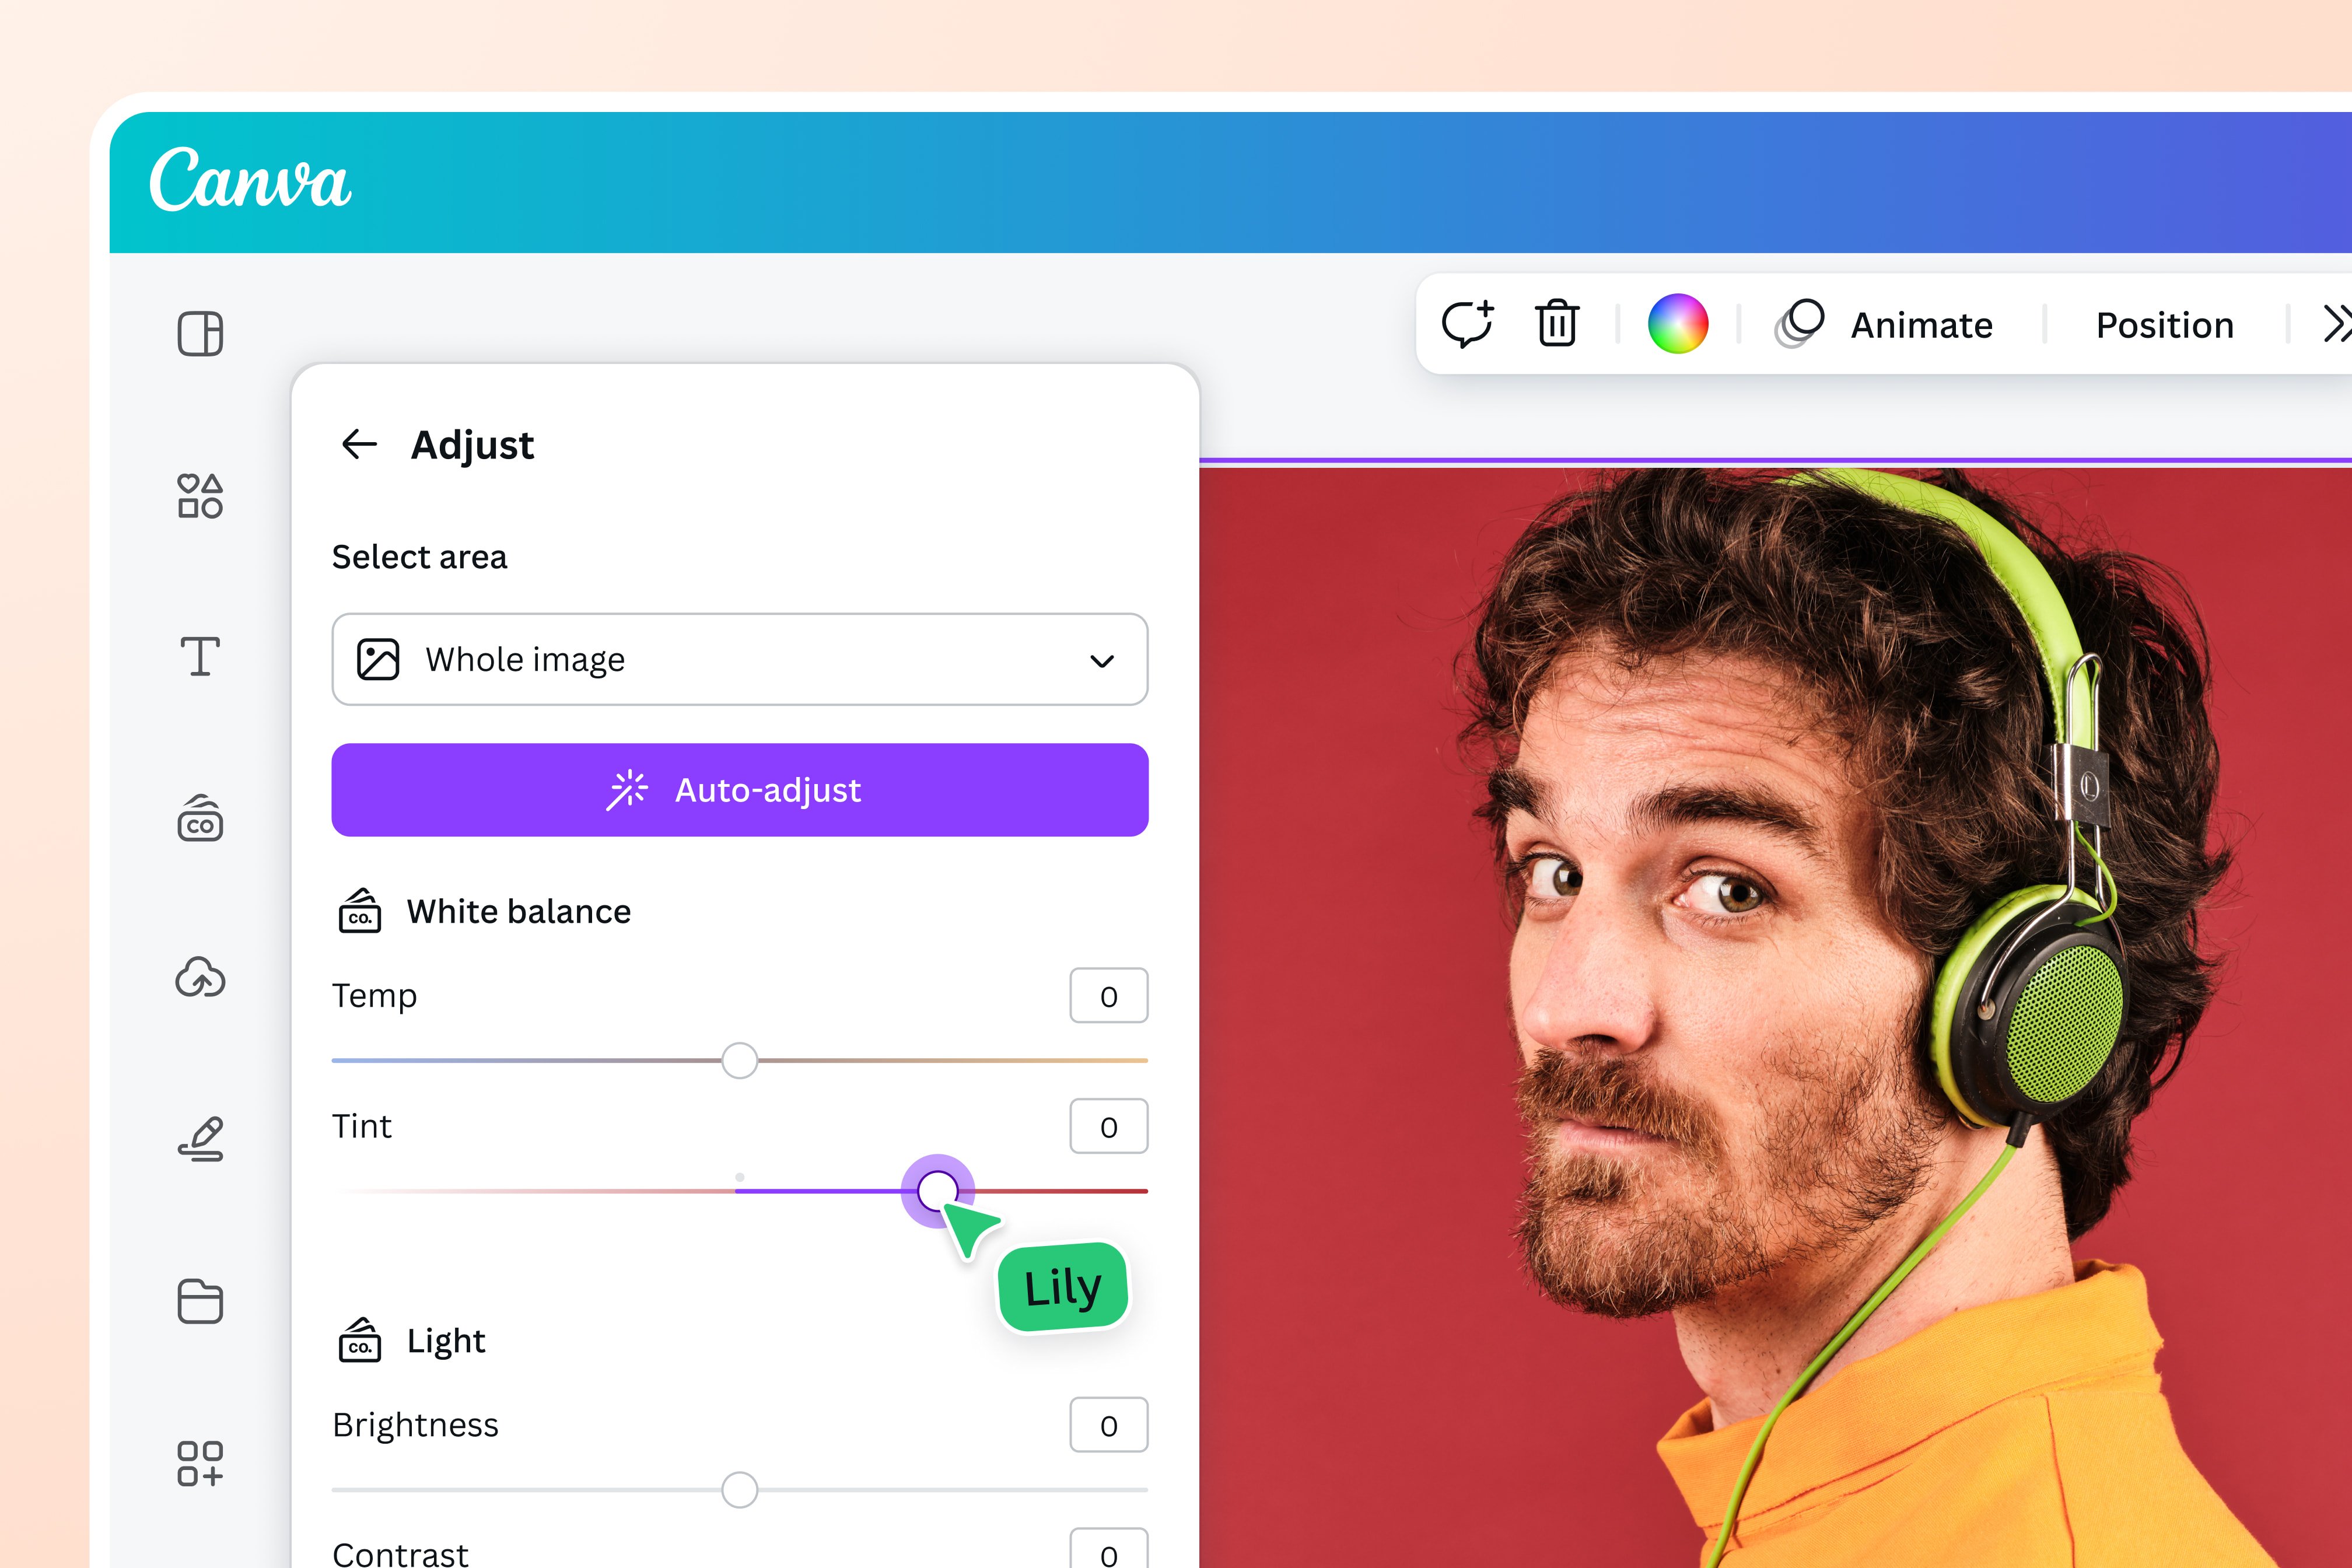
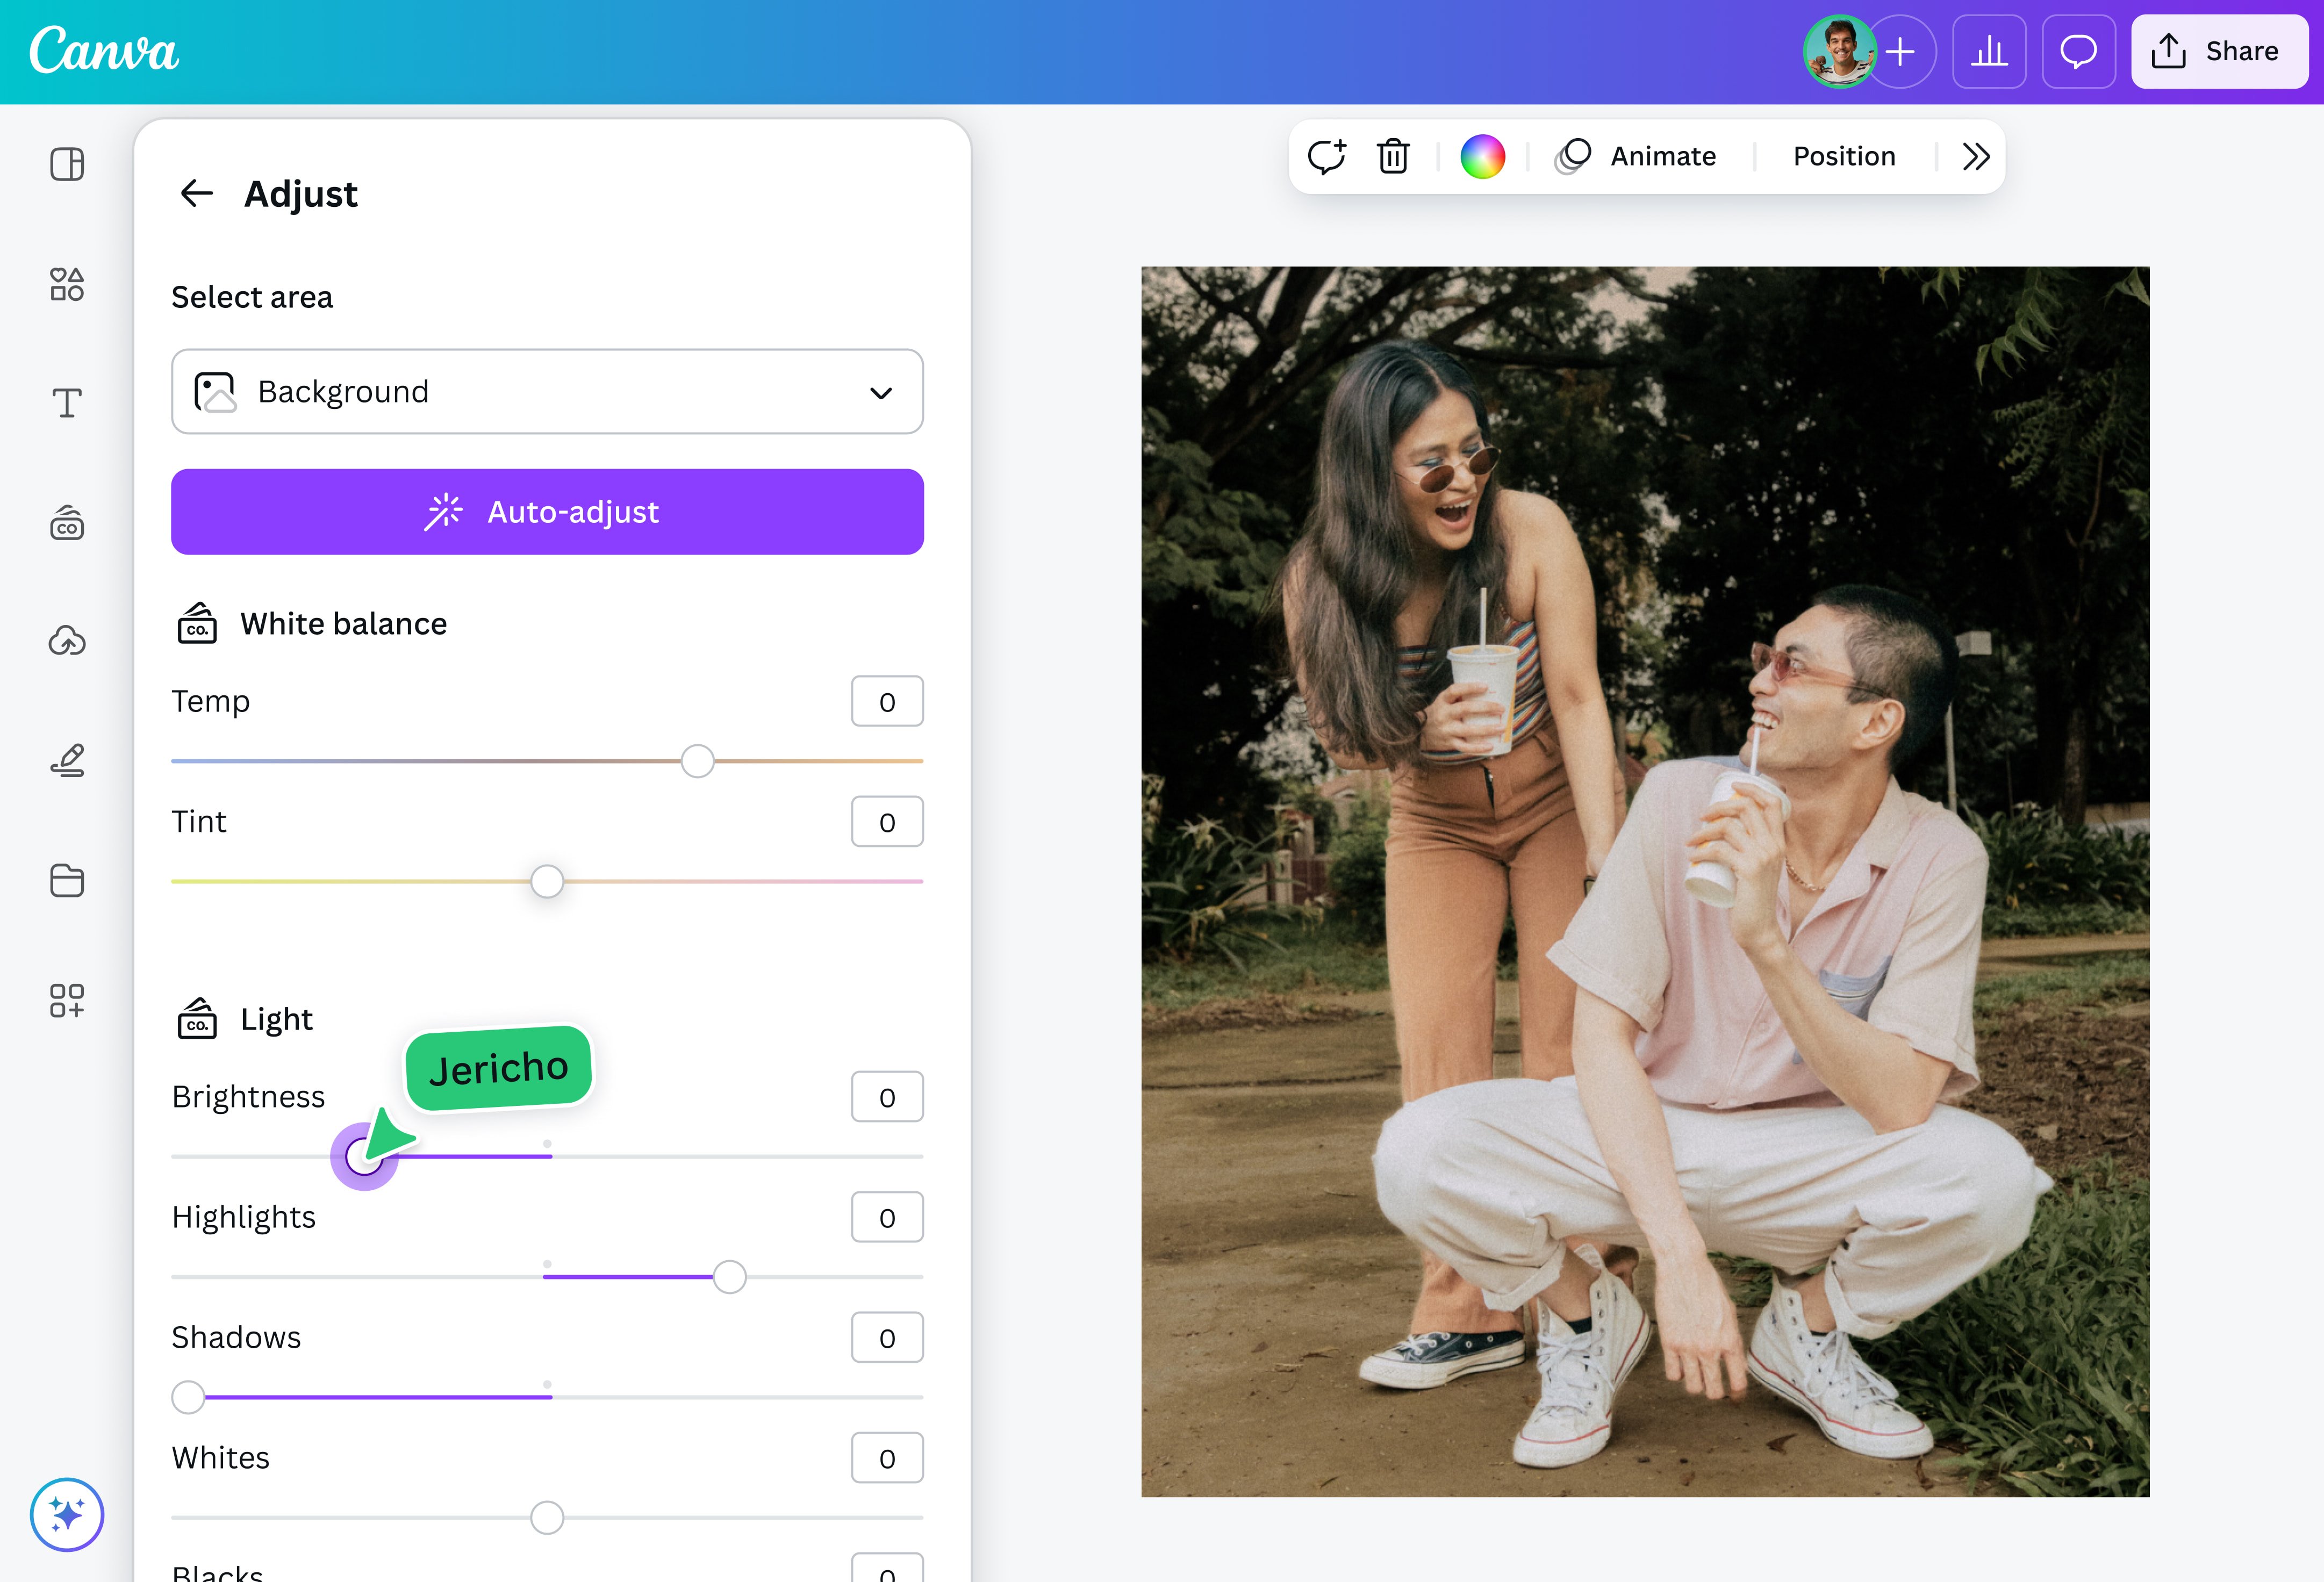
General Image Color Adjustments and Effects
Beyond direct color replacement, Canva offers a suite of image adjustment tools that can subtly or dramatically alter the overall appearance of your images. These tools are part of a broader “Photo Manipulation” and “Editing Styles” approach that can refine high-resolution photography or enhance aesthetic backgrounds for Tophinhanhdep.com.
Accessing General Adjustments:
- Select Your Image: Click on any photo or image on your canvas.
- Click “Edit Photo”: In the header menu, select “Edit Photo.”
- Explore “Adjust”: In the left-hand panel, under the “Adjust” section, you’ll find a range of sliders and options:
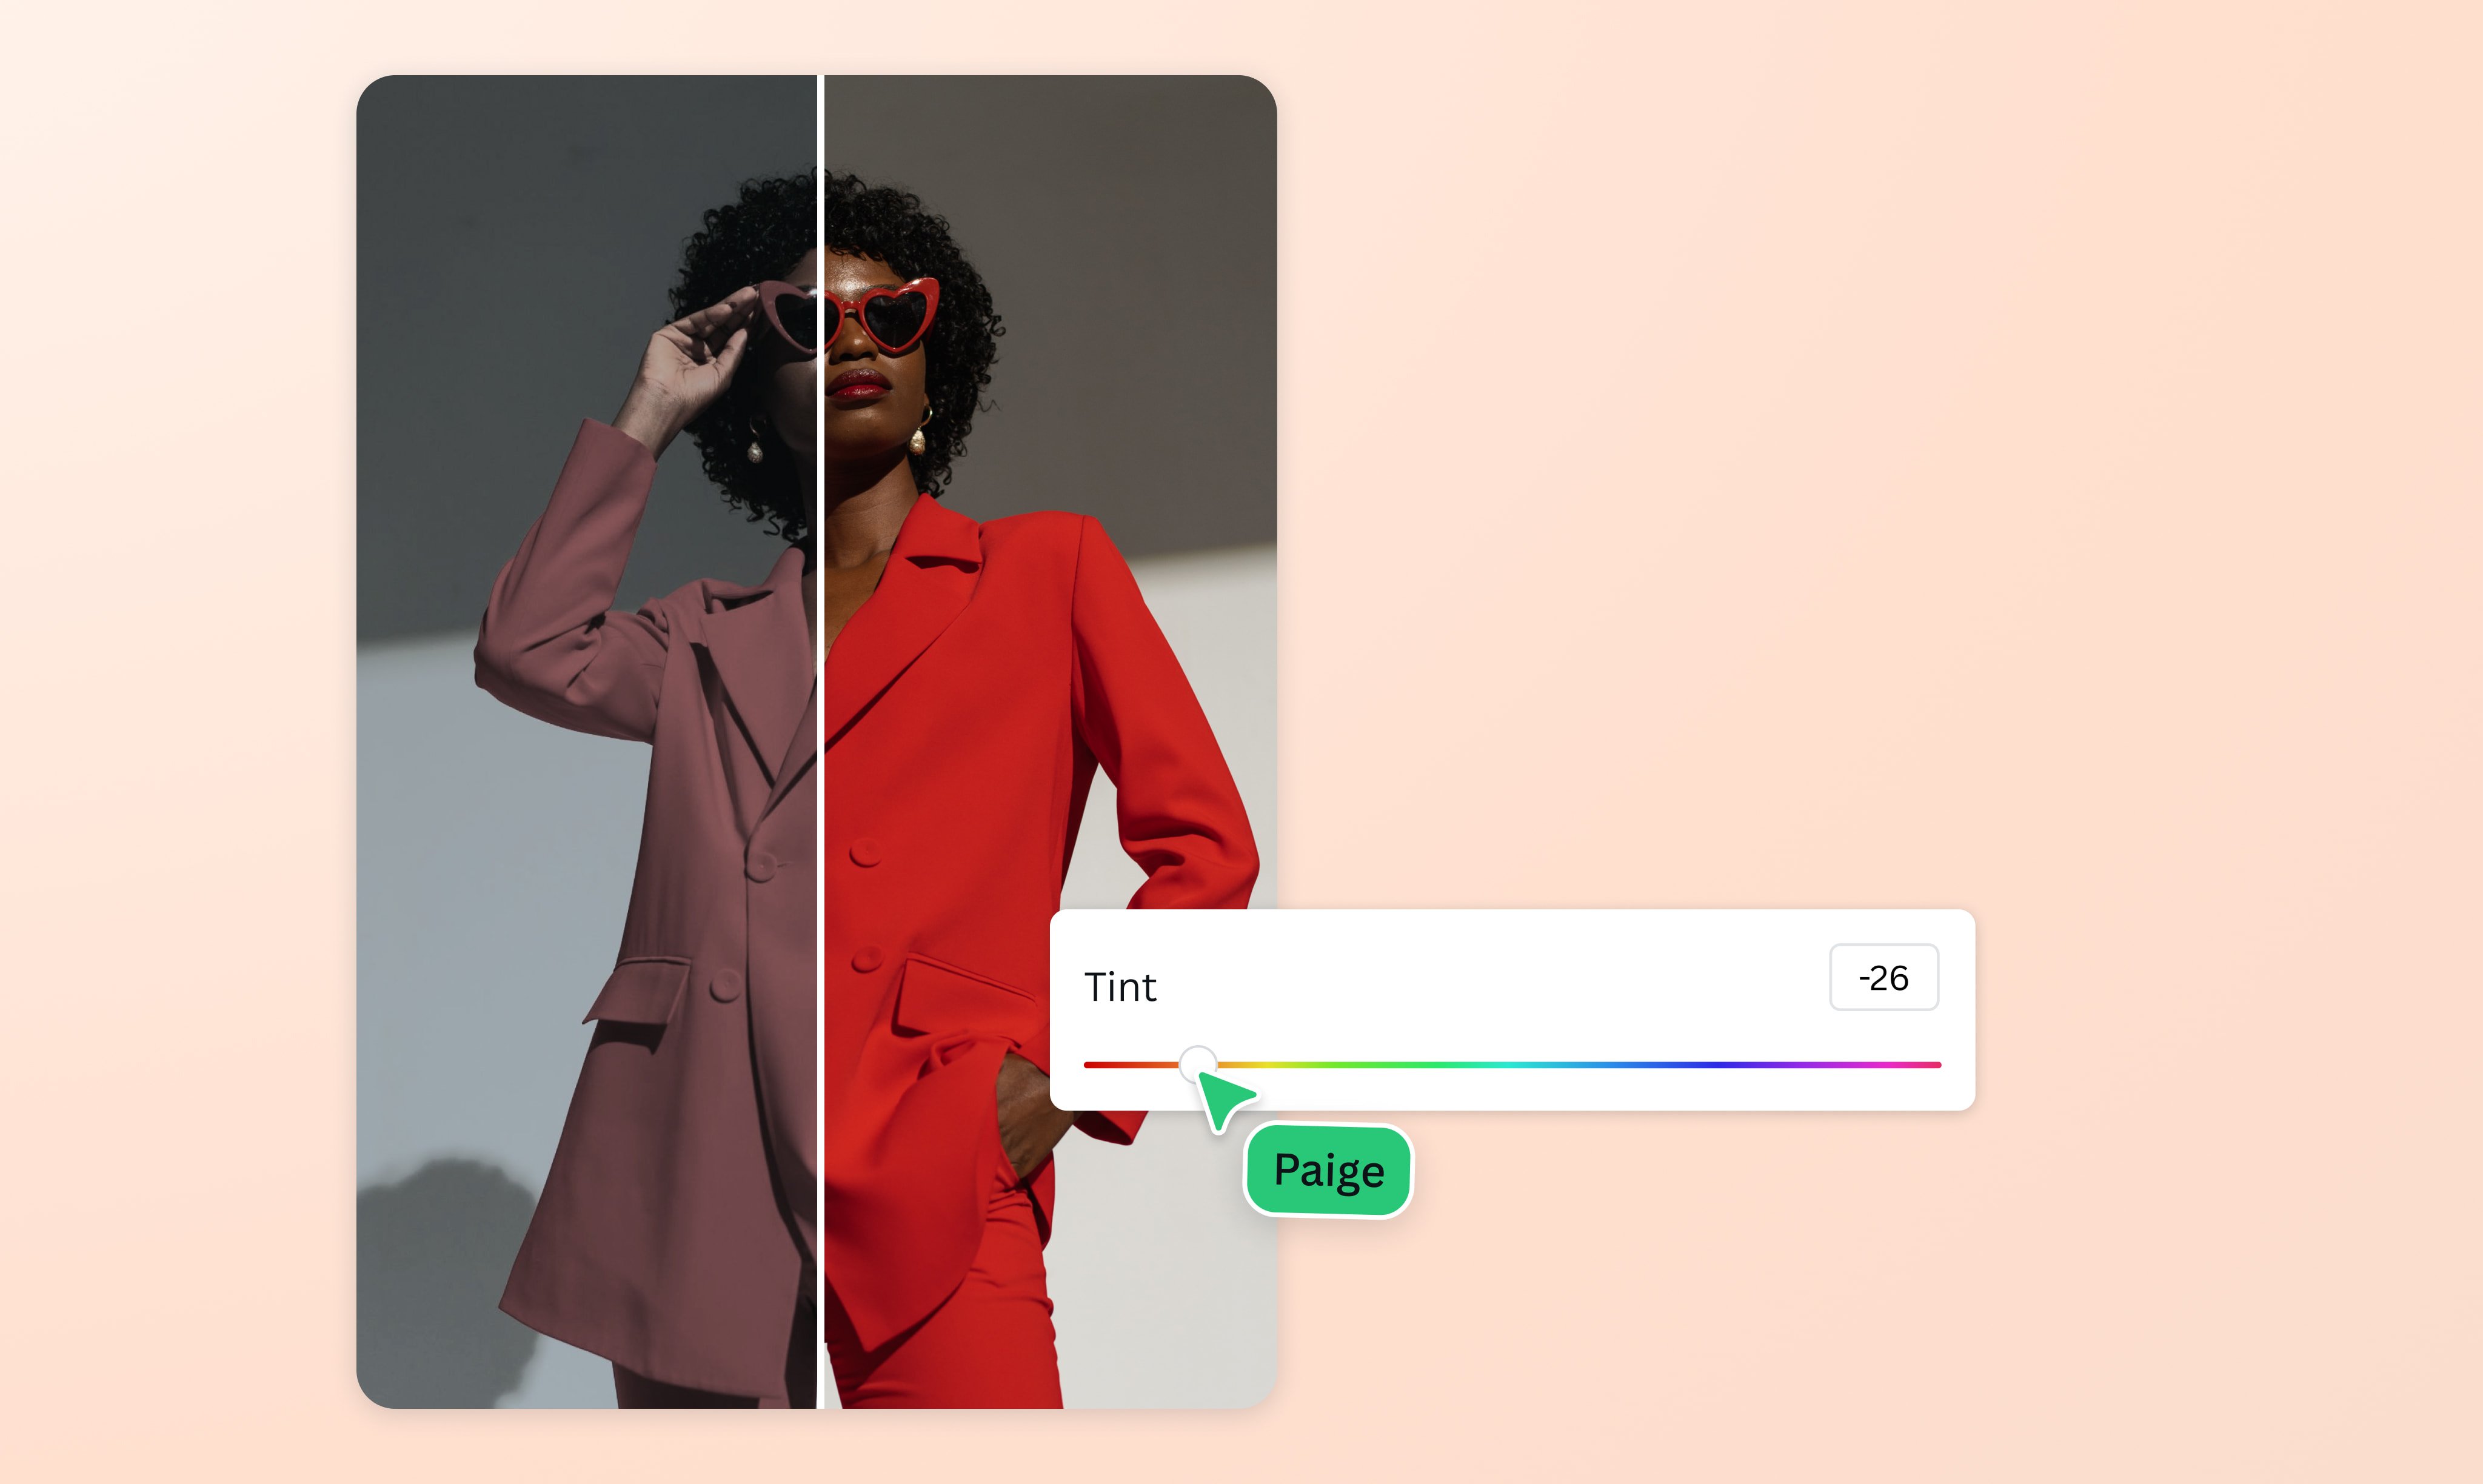
- Brightness, Contrast, Saturation: Fundamental adjustments to lighten/darken, enhance distinction between light and dark areas, and intensify/desaturate colors.
- Tint & Warmth: Shift the overall color balance towards warmer (yellow/orange) or cooler (blue) tones.
- Clarity & Vibrance: Enhance image sharpness and boost less saturated colors without overdoing already vibrant ones.
- Highlights & Shadows: Independently adjust the brightness of the brightest and darkest areas of your image.
- Fade: Create a softer, washed-out look, which can be particularly effective for creating subtle backgrounds or emotional photography. (Note: A more advanced fade effect can be achieved with the “Easy Reflections” app in Canva for blending images, as mentioned in related Canva tutorials on Tophinhanhdep.com).
- Vignette: Add a darkening or lightening effect to the edges of the image.
- Filters: Also within the “Edit Photo” panel, the “Filters” section offers a quick way to apply predefined color and tonal adjustments, instantly changing the mood of an image. You can also adjust the intensity of most filters.
These general adjustments, while not direct color changes in the same way as the color blocks or Duotone, are powerful for fine-tuning the visual impact of your images. They allow you to create a cohesive aesthetic across a series of images, prepare images for specific thematic collections, or simply enhance the quality of your stock photos, all contributing to the rich visual content available on Tophinhanhdep.com.
By combining precise hex code matching with the flexibility of general image adjustments and understanding how to prepare custom assets, you gain complete control over the color narrative of your Canva designs. This comprehensive approach empowers you to create stunning visuals that are not only aesthetically pleasing but also perfectly aligned with your strategic goals, making Tophinhanhdep.com a premier resource for all your image and design needs.
Conclusion: Elevating Your Designs with Intentional Color Choices
The ability to change image colors in Canva is far more than a simple editing trick; it’s a cornerstone of effective visual communication and design flexibility. As demonstrated throughout this guide from Tophinhanhdep.com, Canva provides a diverse toolkit that caters to every scenario, from basic graphic customization to sophisticated brand integration and artistic photo manipulation.
By mastering the use of simple color blocks for built-in elements, harnessing the transformative power of Duotone for photographs and complex graphics, and leveraging the “Change All” feature in conjunction with your Canva Pro Brand Kit, you can achieve unparalleled consistency and efficiency in your design workflow. Furthermore, understanding the critical role of SVG files for custom logos and graphics ensures that your unique brand assets remain fully editable and adaptable within the Canva ecosystem. Complementing these techniques with external color picker tools and general image adjustments allows for precise color matching and nuanced stylistic refinements.
Whether your goal is to curate stunning aesthetic backgrounds, develop high-resolution digital photography, craft engaging graphic designs, or explore new image inspiration and collections for Tophinhanhdep.com, intentional color choices are paramount. The skills you’ve gained here empower you to translate your creative ideas into compelling visuals that resonate with your audience, reinforce your brand, and elevate the overall impact of your digital presence. Dive into Canva’s world of color, experiment with these techniques, and unlock the full potential of your visual storytelling with the insights from Tophinhanhdep.com.