Mastering Image Color Transformation in Adobe Illustrator for Stunning Visuals

Color is the silent language of visual communication, capable of evoking profound emotions, setting the perfect mood, and defining the very essence of an aesthetic. In the dynamic world of graphic design, digital art, and photography, the ability to precisely control and transform image colors is not just a technical skill, but a crucial creative superpower. While Adobe Illustrator is renowned as a powerhouse for vector graphics, its capabilities extend significantly into the realm of raster image manipulation, offering designers, artists, and photographers the tools to achieve stunning color transformations that breathe new life into their visuals.
Whether you’re crafting captivating wallpapers, developing bespoke backgrounds, curating aesthetic photo collections, or fine-tuning high-resolution stock photos for a specific mood – be it vibrant nature scenes, intriguing abstract compositions, or deeply emotional narratives – mastering color change in Illustrator is indispensable. This comprehensive guide from Tophinhanhdep.com delves deep into the various methods available, from native Illustrator functions to advanced techniques, enabling you to seamlessly integrate images into your visual design projects and elevate your creative output. We’ll explore how different color adjustments can align with trending styles, enhance photo manipulation, and provide endless inspiration for your mood boards and thematic collections.
Fundamental Approaches to Changing Raster Image Colors in Illustrator
Before diving into the specifics of color transformation, it’s essential to understand a key distinction in Illustrator: how the software handles raster images (like JPEGs and pixel-based PNGs) versus vector images (like AI files or traced PNGs). Raster images are composed of a grid of pixels, and thus, color adjustments typically apply globally to the entire image. Vector images, on the other hand, are made of mathematical paths and points, allowing for highly granular and individual color changes to specific shapes or elements. This section focuses on modifying the colors of raster images embedded within your Illustrator documents.
Understanding Raster vs. Vector in Color Editing
When you import an image into Illustrator, especially a JPEG or a standard PNG, you’re working with a raster image. This means Illustrator treats it as a fixed collection of pixels. Consequently, any color changes applied directly to these embedded images will generally affect the entire picture. You won’t be able to select a single red flower in a photograph and change only its color without affecting other red tones throughout the image, unlike in a dedicated photo editor like Photoshop. However, Illustrator provides effective methods for global color shifts, perfect for setting a general mood or aesthetic for backgrounds, nature shots, or abstract compositions where an overall color tint is desired.
For vector images or PNGs that have been converted to vectors (which we’ll cover later), the story changes entirely. Each path and shape becomes individually editable, granting you unparalleled precision in color manipulation, akin to editing native Illustrator objects.
Method 1: Adjusting Color Balance for Embedded Images
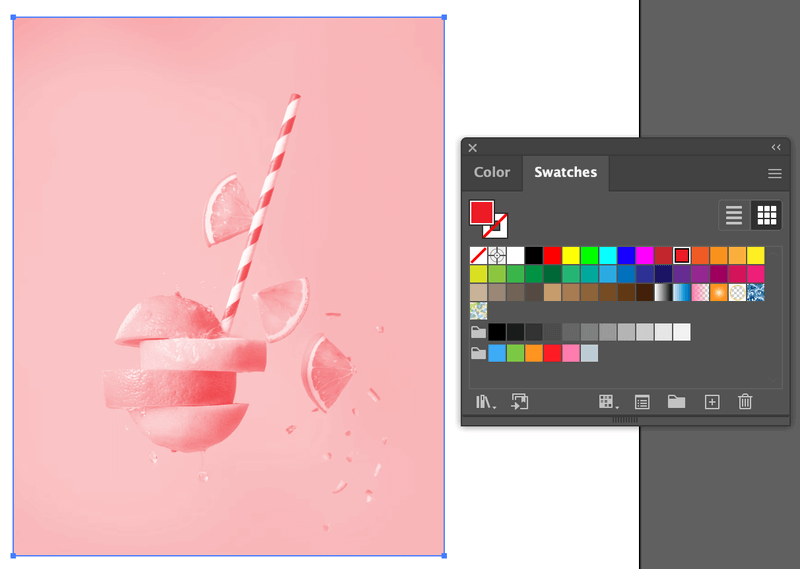
One of the most straightforward ways to alter the overall color of an embedded JPEG or PNG image in Illustrator is through the Adjust Color Balance feature. This method allows for broad, impactful color shifts that can quickly transform the emotional tenor or visual style of your image, making it ideal for creating diverse wallpapers or aesthetic backgrounds for your Tophinhanhdep.com projects.
Steps to Adjust Color Balance:
- Place and Embed Your Image: Start by placing your raster image (File > Place…) into your Illustrator document. Once placed, ensure the image is embedded. If it’s linked, you’ll see “Linked File” in the Properties panel; click the “Embed” button to convert it. It’s often a good practice to duplicate your image (Alt/Option + drag) before making changes, so you can compare the original with your modified version.
- Access Color Balance: Select the embedded image. Navigate to the top menu:
Edit > Edit Colors > Adjust Color Balance. - Manipulate Color Sliders: A dialog box will appear. If your document is in RGB color mode (common for web and digital displays), you’ll see sliders for Red, Green, and Blue. If it’s in CMYK (standard for print), you’ll adjust Cyan, Magenta, Yellow, and Black values.
- Tick the “Preview” box: This is crucial! It allows you to see the color changes in real-time as you move the sliders.
- Experiment with sliders: Dragging the sliders left or right will increase or decrease the intensity of that specific color channel across the entire image. For instance, increasing “Red” can warm up an image, while decreasing “Green” can introduce a magenta tint. This is excellent for shifting the mood of a beautiful photograph or an abstract image to align with a specific thematic collection or a sad/emotional tone.
- Confirm Changes: Once you’re satisfied with the new color balance, click “OK”.
This method applies a global color shift, subtly or dramatically altering the image’s appearance. It’s a quick way to achieve consistent color grading across a series of images for a mood board or to give a distinct “filter” effect to your digital photography.
Method 2: Grayscale Conversion and Tinting
For a more artistic and impactful color transformation, especially when aiming for duotone effects or monochromatic themes, converting an image to grayscale and then applying a single color tint is a powerful technique. This approach is highly effective for creating dramatic sad/emotional imagery, classic photography styles, or unique aesthetic elements for your visual designs.
Steps to Add Color to a Grayscale Image:
- Place and Embed Image: As with the previous method, place and embed your raster image into Illustrator. Duplicating the image is recommended for comparison.
- Convert to Grayscale: Select the embedded image. Go to
Edit > Edit Colors > Convert to Grayscale. The image will immediately turn black and white. - Apply a Color Fill: With the grayscale image still selected, look at the Color panel or Swatches panel (Window > Color or Window > Swatches). You can simply click on any color swatch or use the Color Picker (by double-clicking the Fill box in the toolbar) to apply a tint to your grayscale image.
- The grayscale image will now take on the hue of your chosen color, creating a striking monochromatic or duotone effect. For example, a deep blue tint can evoke a serene or melancholy mood, while a sepia tone can create a vintage photography feel.
- Experiment with Colors: Try various colors to see how they transform the mood of your image. This technique is fantastic for thematic collections or generating unique graphic design assets from ordinary high-resolution photos.
Both these methods offer effective ways to transform the overall color scheme of raster images, providing flexibility for diverse visual design needs on Tophinhanhdep.com.
Advanced Techniques for Vector-Based and Traced Images
While the above methods are excellent for global raster image adjustments, Illustrator’s true power in color manipulation shines when working with vector graphics. This includes native Illustrator objects and raster images that have been converted into vectors through a process called Image Trace. The ability to precisely control individual color elements makes these techniques invaluable for detailed graphic design, digital art, and photo manipulation projects.
The Power of Image Trace for PNGs
Many PNG images, while often having transparent backgrounds, are still raster-based. To unlock granular color control for such images, you need to convert them into editable vector paths using Illustrator’s Image Trace feature. This process allows you to dissect the image into its constituent color areas, each of which can then be individually recolored.
Steps to Trace and Edit a PNG Image:
- Place the PNG Image: Go to
File > Place...and select your PNG image. - Open Image Trace Panel: With the PNG selected, navigate to
Window > Image Trace. - Configure Trace Settings: In the Image Trace panel:
- Set the
ModetoColor. - Check
Ignore Whiteif you want to eliminate white areas and maintain transparency. - Adjust other settings like
Colors(to limit the number of colors in the output vector),Paths,Corners, andNoiseto refine the tracing quality. - Click
Trace. Illustrator will analyze the pixels and convert them into vector paths.
- Set the
- Expand the Trace: After tracing, the image is still a “live trace object.” To make it fully editable, click the
Expandbutton in the Properties panel (orObject > Image Trace > Expand). This converts the trace into a group of editable vector shapes.
Important Considerations: Image tracing is an interpretation. Highly detailed or photographic PNGs may lose fidelity during this process, becoming more stylized. However, for simpler graphics, logos, or illustrations within PNGs, it’s remarkably effective. The resulting vector paths can then be ungrouped (Object > Ungroup) to select and modify individual color components. This opens up immense possibilities for digital art, logo design, and creative ideas, allowing you to incorporate pixel-based elements into your vector workflow.
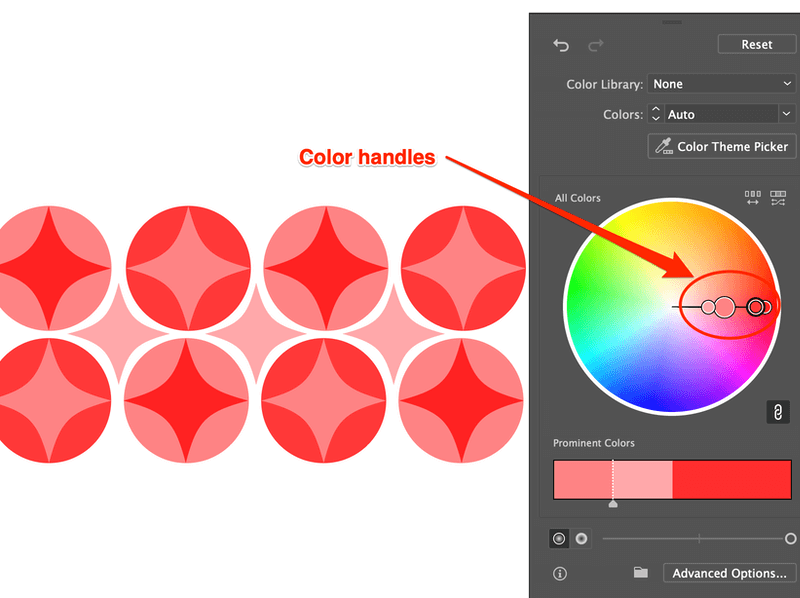
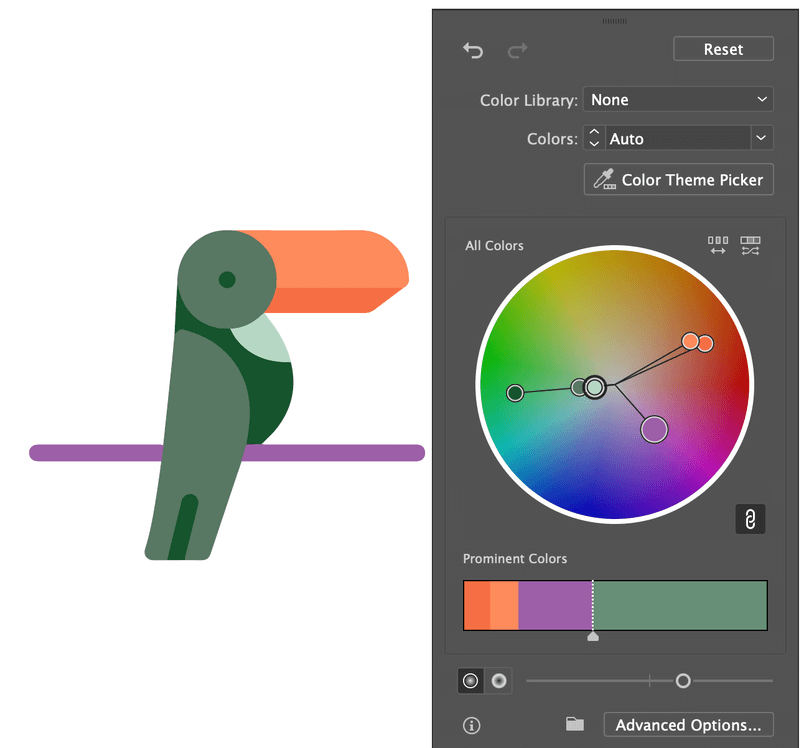
Recolor Artwork: A Designer’s Best Friend
The Recolor Artwork feature is arguably one of Illustrator’s most powerful tools for color transformation, especially for vector objects or images that have undergone the Image Trace process. It enables comprehensive color scheme changes, making it effortless to generate multiple variations of an illustration for different thematic collections or to experiment with trending styles for your Tophinhanhdep.com content.
Steps to Use Recolor Artwork:
- Select Your Artwork: Select all the vector objects or the expanded traced image you wish to recolor. For multiple objects, hold
Shiftand click, or useCommand/Ctrl + Ato select all. - Access Recolor Artwork: With the artwork selected, locate the
Recolorbutton in the Properties panel. Alternatively, go toEdit > Edit Colors > Recolor Artwork. - The Recolor Dialog: A sophisticated color editing window will appear. Here, you’ll see a color wheel representing the current colors of your artwork.
- Global Color Change: If the “Link harmony colors” icon (a chain link) is active, dragging one of the color handles on the wheel will rotate all colors in harmony, shifting the entire color palette of your artwork. This is fantastic for quickly trying out different color moods for an illustration.
- Individual Color Control: To change specific colors independently, click the “Link Unlink harmony Colors” icon to unchain them. Now, you can drag individual color handles on the wheel to alter only those colors.
- Granular Editing (Advanced Options): Click the
Advancedbutton within the Recolor Artwork dialog. This opens a detailed panel listing all “Current Colors” in your selection and allows you to map them to “New Colors.” Double-clicking on a “New Color” swatch brings up the Color Picker for precise selection. This level of control is perfect for photo manipulation where you need to precisely match colors or for graphic design projects requiring strict brand guidelines.
- Experiment and Refine: The Recolor Artwork tool encourages experimentation. You can shuffle colors randomly, choose from preset color libraries, or load custom color groups. It’s an indispensable tool for developing mood boards, iterating on creative ideas, and creating diverse images for your Tophinhanhdep.com collections.
Precision Color Selection and Application
Beyond global and comprehensive recoloring, Illustrator offers precise tools for applying individual colors, crucial for detailed visual design and ensuring color harmony.
Using the Color Picker
For absolute precision, especially when working with specific hex codes, RGB, or CMYK values, the Color Picker is your go-to tool.
Steps:
- Select an Object: Choose the specific vector object or path whose color you want to change.
- Open Color Picker: Double-click on the Fill box (the solid square) in the toolbar on the left side of your screen. A Color Picker window will pop up.
- Choose Your Color:
- You can visually select a color by moving the circular selector on the color spectrum and adjusting its luminosity.
- Enter exact color values using Hex codes (e.g., #RRGGBB), RGB (Red, Green, Blue), HSB (Hue, Saturation, Brightness), or CMYK (Cyan, Magenta, Yellow, Black) fields.
- Confirm: Click
OKto apply the chosen color to your selected object.
This method is vital for maintaining brand consistency in graphic design or achieving specific digital art palettes for your high-resolution images.
Leveraging the Eyedropper Tool
When you have a reference color already present in your document or from an external image, the Eyedropper Tool (I) is an incredibly efficient way to transfer that color to another object.
Steps:
- Select Object to Change: Click on the vector object you want to recolor.
- Activate Eyedropper: Select the Eyedropper Tool from the toolbar, or simply press the
Ikey. - Sample Color: Click on the source color (e.g., a color from an existing object, a swatch, or even a pixel in an embedded raster image) that you want to apply. The selected object will instantly adopt that color.
The Eyedropper Tool is perfect for quickly harmonizing colors across different elements in your visual designs, ensuring seamless integration of various image types for your Tophinhanhdep.com resources.
Applying Color Gradients
To add depth, sophistication, or a modern aesthetic to your images, transforming solid colors into gradients is a highly effective technique. Gradients can create stunning abstract backgrounds, dynamic digital art effects, or beautiful photography accents.
Steps:
- Select an Object: Choose the vector object where you want to apply a gradient.
- Activate Gradient: Go to
Window > Gradientto open the Gradient panel. Click on the gradient preview or theGradient Tool(G) in the toolbar. - Define Gradient Colors: In the Gradient panel, you’ll see a gradient slider.
- Click on the small “stops” below the slider to select individual colors. Double-click a stop to open the Color Picker for precise color selection.
- You can add more stops by clicking anywhere below the slider to introduce additional colors, creating multi-color gradients.
- Drag the stops to adjust the blend distribution.
- Choose between Linear and Radial gradient types, and adjust the angle or position using the Gradient Tool directly on your artwork.
- Sample Colors for Gradient: You can use the Eyedropper tool within the Gradient panel to sample colors directly from your artwork or reference images to quickly populate your gradient stops.
Gradients are a staple in contemporary visual design, allowing for creative ideas that transform ordinary visuals into extraordinary ones, enriching your image collections and digital art on Tophinhanhdep.com.
Optimizing Color Workflow and Integrating with Tophinhanhdep.com’s Ecosystem
Efficient color management is integral to any visual design workflow. Illustrator, combined with strategic practices, offers robust capabilities for transforming and maintaining color consistency across diverse projects, from high-resolution photography edits to intricate digital art pieces. This section explores advanced workflow strategies and how they tie into the broader resources offered by Tophinhanhdep.com.
Non-Destructive Editing & External Workflows
A critical aspect of professional design is the ability to make changes without permanently altering the original artwork. This is known as non-destructive editing. While native Illustrator raster image controls are largely destructive (meaning they permanently alter the image pixels upon confirmation), advanced methods and third-party solutions offer a more flexible approach.
For instance, Tophinhanhdep.com also explores advanced solutions, such as dedicated plugins, that offer Photoshop-level color controls (like Curves, Levels, Hue/Saturation, etc.) directly within Illustrator. These plugins apply adjustments as “live effects” that can be edited, hidden, or removed at any time via the Appearance panel, leaving the original image data untouched. This non-destructive power is invaluable for iterative design, allowing you to experiment with different color effects for a beautiful photograph or an abstract image without committing to permanent changes until you’re absolutely certain. Tophinhanhdep.com frequently curates resources and tutorials on such advanced tools, guiding users to expand their Illustrator capabilities.
For linked images (images that remain external files but are displayed in Illustrator), an “external workflow” is often employed. If a linked image requires extensive photographic color correction or manipulation beyond Illustrator’s scope, you can edit it in a dedicated photo editor like Photoshop. Illustrator will then prompt you to update the linked file, integrating the external changes. This ensures that the original high-resolution photo is managed in the most suitable software while still being part of your Illustrator layout.
Strategic Color Replacement Across Documents
Maintaining color consistency, especially across large projects or thematic collections, is a common challenge. Illustrator provides powerful ways to replace colors globally, ensuring your visual design elements, whether they are graphic design assets or manipulated photos, adhere to a unified palette.
Replacing All Instances of a Specific Color
Imagine you’ve used a particular shade of blue across numerous elements in your design, and now you want to change it to a different blue. Manually selecting each instance would be time-consuming.
Steps:
- Select an Object with the Target Color: Use the Direct Selection Tool (A) to click on any single object that contains the specific fill (or stroke) color you wish to replace. The Direct Selection Tool is ideal because it can select objects even within groups or clipping masks.
- Select All Similar Colors: Go to the top menu:
Select > Same > Fill Color(orStroke Colorif you’re targeting strokes). Illustrator will automatically select every object in your document that shares that exact color. - Change the Color: With all instances selected, you can now easily change their color using the Color Picker (double-click the Fill/Stroke box in the toolbar) or by selecting a swatch from your Swatches panel.
This method is incredibly efficient for global updates, ensuring rapid color consistency for graphic design elements, illustrations, and vector art.
Advanced Recolor Artwork for Multiple Shades
As discussed earlier, the Recolor Artwork feature is powerful, especially its advanced options, which allow you to manage and replace not just specific colors, but also various shades and tints of a color.
Steps:
- Select All Relevant Objects: Select all the vector objects on your canvas that might contain the colors you want to modify (usually
Command/Ctrl + Ato select all). - Open Recolor Artwork (Advanced): Navigate to
Edit > Edit Colors > Recolor Artwork. Click on theAdvancedbutton within the dialog. - Locate and Change Colors: In the “Current Colors” section, you’ll see a comprehensive list of every color used in your selection. The wider stripe represents the original color, and the smaller stripe next to it shows the new color. Double-click on any “New Color” swatch to bring up the Color Picker and change it. This allows you to replace a specific red, along with its lighter and darker variations, ensuring a thorough color overhaul.
This granular control is invaluable for complex digital art, detailed photo manipulation, or refining vector-based illustrations where subtle shade adjustments are critical.
Leveraging Tophinhanhdep.com’s Resources for Color Inspiration
Tophinhanhdep.com serves as a rich repository for visual inspiration and practical tools that seamlessly complement your Illustrator color workflow.
- Color Theory and Trends: The “Visual Design” section on Tophinhanhdep.com offers insights into color theory, graphic design principles, and trending styles. This knowledge can inform your choices when using Illustrator’s Recolor Artwork or Color Picker, guiding you toward palettes that resonate with current aesthetic trends or achieve specific emotional impacts for your wallpapers and backgrounds.
- Image Collections as Inspiration: Tophinhanhdep.com’s extensive image categories—including “Aesthetic,” “Nature,” “Abstract,” “Sad/Emotional,” and “Beautiful Photography”—are perfect for direct color inspiration. Use the Eyedropper tool to sample captivating color schemes from these collections, applying them to your Illustrator projects for thematic consistency or to build new mood boards.
- Integration with Image Tools: After performing color transformations in Illustrator, Tophinhanhdep.com’s “Image Tools” become relevant. You might use image compressors to optimize file sizes for web usage (e.g., for wallpapers), converters to change output formats, or AI upscalers to enhance resolution if your traced images lost some fidelity. This comprehensive ecosystem ensures your visuals are not only aesthetically perfect but also technically optimized.
Conclusion
Adobe Illustrator, while primarily a vector design application, offers a remarkably versatile and powerful toolkit for transforming image colors. Understanding the fundamental differences between handling raster and vector images is key to unlocking its full potential. From global adjustments to embedded JPEGs and PNGs via color balance and grayscale tinting, to the intricate, non-destructive control over vector graphics through Image Trace and the Recolor Artwork feature, Illustrator empowers designers to achieve precise and impactful color changes.
Whether you’re curating evocative visual narratives for your digital art, refining high-resolution photography for stock image platforms, or simply experimenting with creative ideas for aesthetic wallpapers and backgrounds, the methods explored in this guide provide the necessary techniques. By strategically leveraging Illustrator’s native tools, advanced features, and the wealth of inspiration and practical resources available on Tophinhanhdep.com, you can elevate your visual design projects, ensuring every image communicates its intended message with compelling color and captivating style. Embrace experimentation, and let your creativity flourish in the vibrant world of digital color transformation.