How to Change Image Colour in Photoshop: A Comprehensive Guide for Stunning Visuals

Photoshop, a cornerstone of digital photography and graphic design, offers an unparalleled suite of tools for image manipulation, with color editing standing out as one of its most transformative capabilities. Whether you’re a professional photographer looking to refine the hues in a high-resolution landscape, a graphic designer aiming to create captivating digital art, or simply someone curating an aesthetic collection for a mood board, mastering color alteration in Photoshop is essential. At Tophinhanhdep.com, we understand the power of color in conveying emotion, setting a mood, and perfecting visual narratives. This guide delves deep into various Photoshop techniques for changing image colors, ensuring your wallpapers, backgrounds, and beautiful photography always hit the right note, inspire creativity, and stand out in any thematic collection.
Color isn’t just a visual attribute; it’s a potent communication tool. It can evoke sadness or joy, highlight a subject, or transport viewers to an entirely different reality. Learning to precisely select and modify colors allows for everything from subtle enhancements to radical transformations. From adjusting a model’s clothing color to recoloring an entire background or applying complex color grading effects, Photoshop provides flexible, non-destructive workflows that empower creators. Let’s explore the core methods that will enable you to become a true color replacement master, unlocking new creative ideas and refining your digital photography skills.
The Fundamental Approach: Hue/Saturation with Color Range for Precise Control
One of the most versatile and professional ways to change specific colors in an image is by combining Photoshop’s “Color Range” selection with a “Hue/Saturation” adjustment layer. This method is praised for its precision and non-destructive nature, making it a go-to technique for photographers and digital artists alike. It allows you to target exact shades and then modify their hue, saturation, and lightness without permanently altering your original image pixels. This is particularly valuable when working on high-resolution stock photos or detailed photo manipulation projects, where retaining image quality is paramount.
Step-by-Step: Selecting Your Target Color with Precision
The journey to a perfect color change begins with accurate selection. The “Color Range” command excels at this, allowing you to isolate specific colors or tonal areas based on their visual properties.
- Duplicate Your Layer (Optional but Recommended): While adjustment layers are non-destructive, starting with a duplicated layer for safety or to create a new layer for the selection is a good practice. This preserves your original image data.
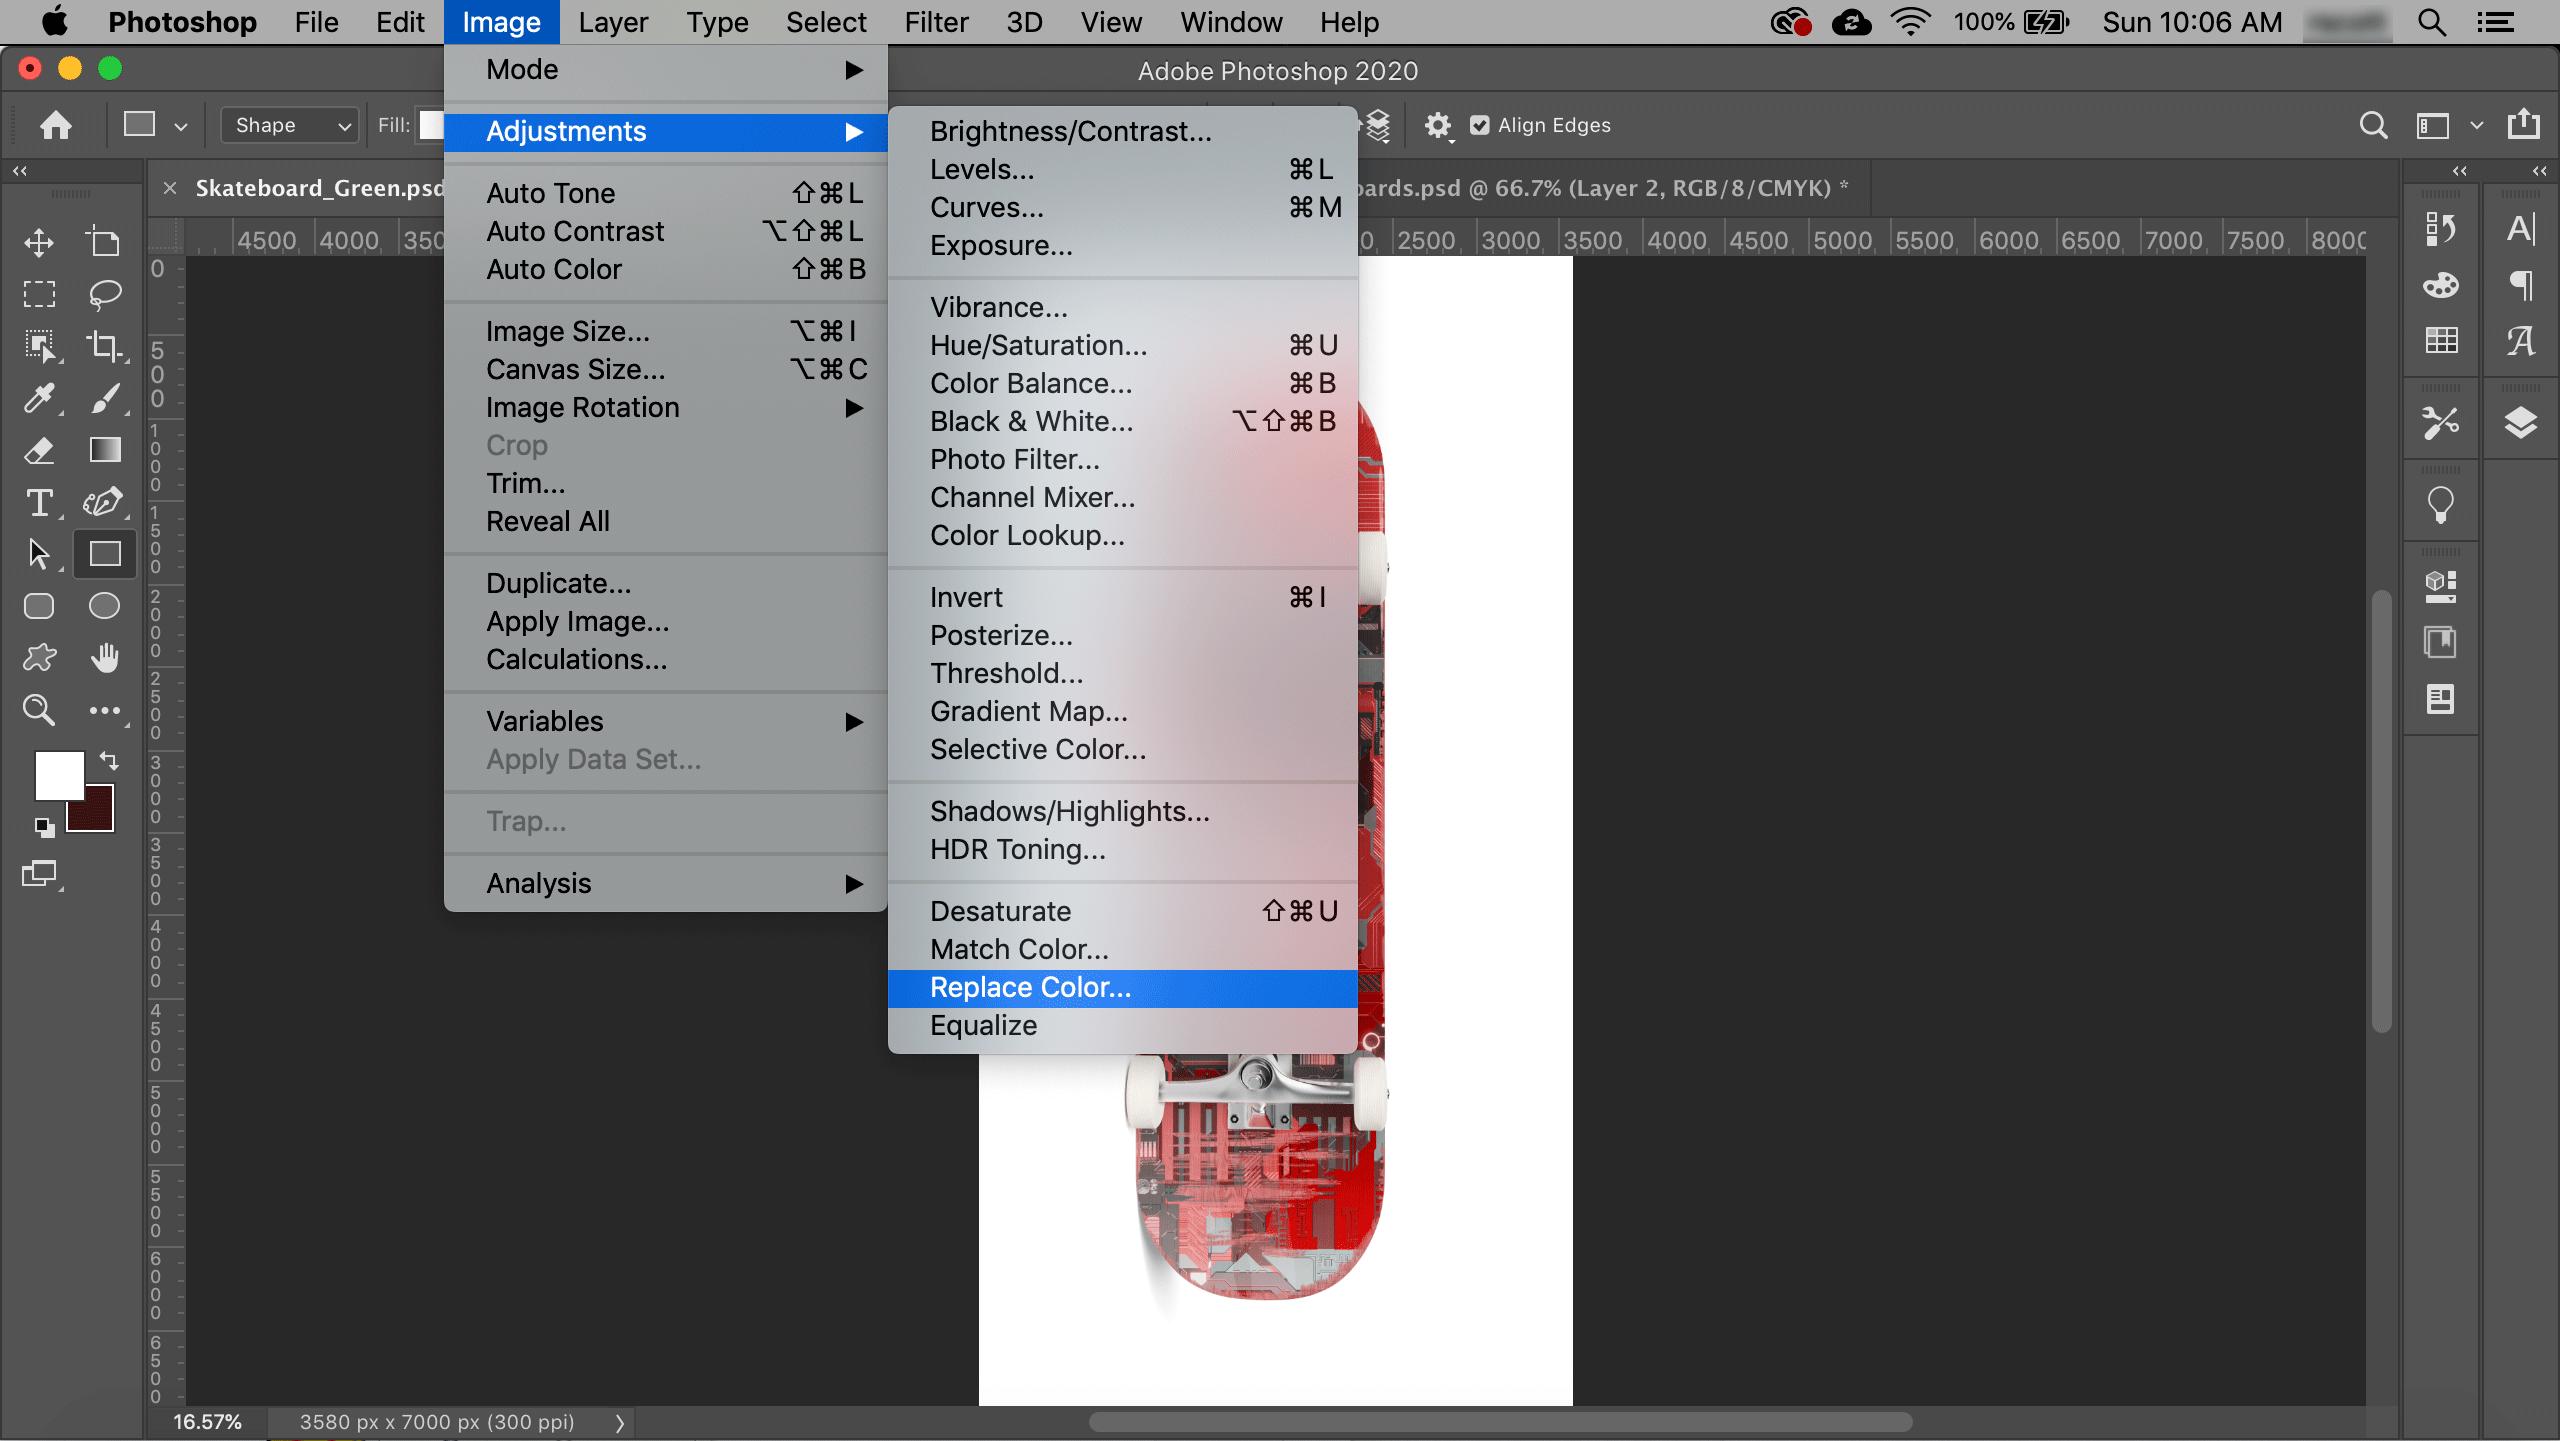
- Access Color Range: Navigate to
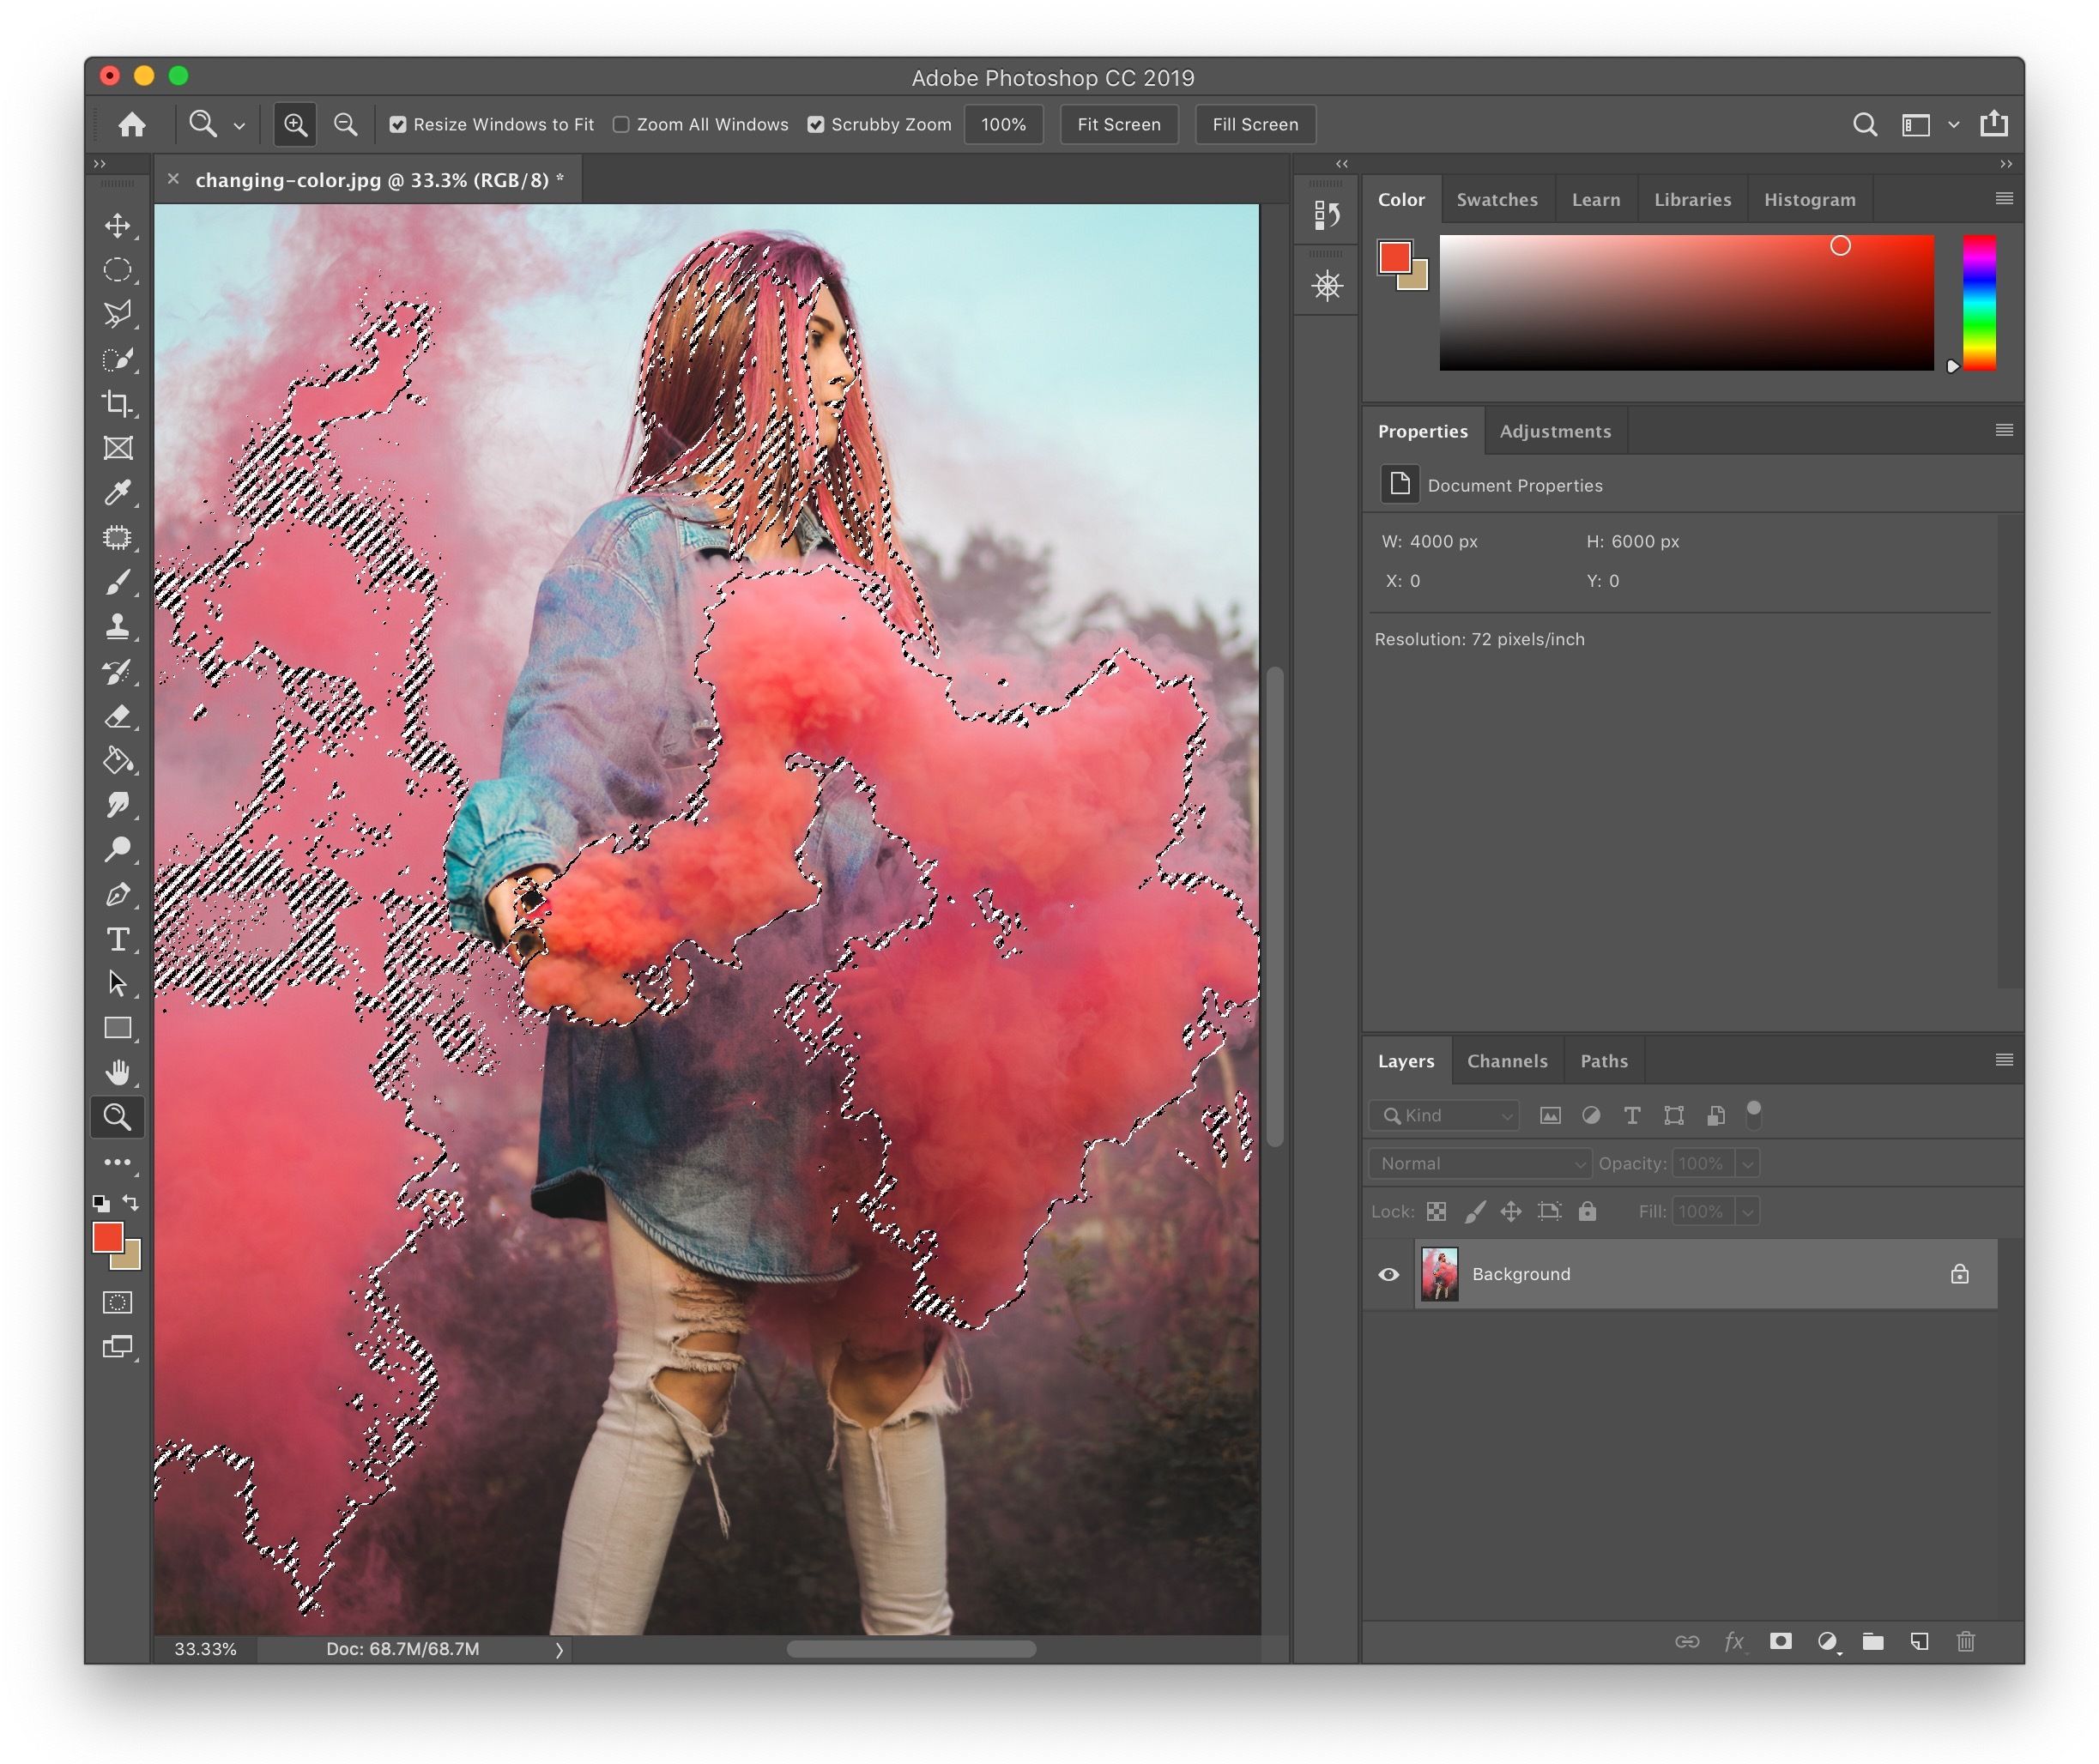
Select > Color Range. This will open a dialog box with a small preview window. - Sample Your Desired Color: With the default eyedropper tool active, click directly on the color you wish to change either in the preview window or, more accurately, on your main image canvas. As you click, you’ll see a white area appear in the preview, indicating the selected pixels.
- Refine Your Selection with Fuzziness: The “Fuzziness” slider is crucial here. Increasing fuzziness expands the range of similar colors included in your selection, while decreasing it narrows the selection to only the most precise matches. Adjust this slider carefully to capture as much of your target color as possible without spilling over into unintended areas.
- Add or Subtract Colors: Often, your initial click won’t capture every nuance of the desired color, or it might select unwanted nearby shades. The eyedroppers with plus (+) and minus (-) symbols are your allies. Use the “Add to Sample” eyedropper (+) to click on other areas of your target color that weren’t initially selected. Conversely, use the “Subtract from Sample” eyedropper (-) to remove unwanted color regions from your selection. You can even click and drag with these tools for broader adjustments.
- Preview Your Selection: The “Selection Preview” dropdown in the Color Range dialog box offers various ways to visualize your selection (e.g., “Grayscale,” “Black Matte,” “White Matte,” “Quick Mask”). Viewing your selection on a contrasting background (like “Black Matte” for light colors, or vice-versa) can help you spot tiny stray pixels or areas that need further refinement.
- Confirm Selection: Once satisfied, click “OK.” You’ll see the classic “marching ants” indicating your active selection on the image.
This meticulous selection process is fundamental, especially when striving for high-resolution photography edits where even minor imperfections can be noticeable. For graphic design and digital art, this level of control ensures your creative ideas are realized with precision.
Applying the Hue/Saturation Adjustment Layer for Dynamic Changes
With your precise color range selection active, the next step is to introduce a non-destructive adjustment layer. This is where the magic of changing colors truly happens, allowing you to experiment freely without altering the base image.
- Create a Hue/Saturation Adjustment Layer: Go to
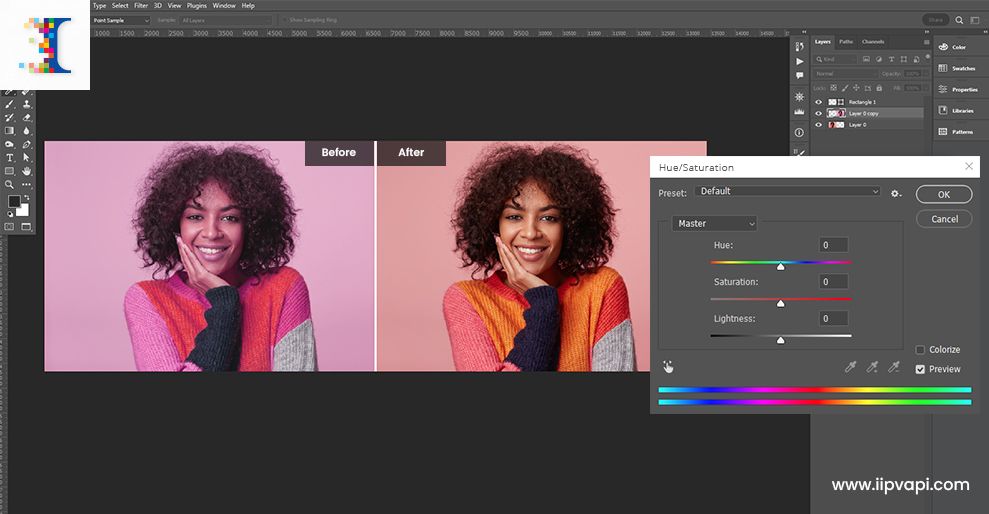
Layer > New Adjustment Layer > Hue/Saturation. Because you had an active selection, Photoshop will automatically apply this selection as a layer mask to the new Hue/Saturation layer. This ensures that your color adjustments will only affect the areas you selected, protecting the rest of your image. - Adjust the Hue Slider: In the Properties panel for the Hue/Saturation layer, you’ll find three main sliders: Hue, Saturation, and Lightness. The “Hue” slider is your primary tool for changing the actual color. Drag it left or right to cycle through the color spectrum. As you move it, you’ll see your selected area transform to a new color.
- Fine-tune Saturation and Lightness:
- Saturation: This slider controls the intensity or purity of the new color. Dragging it to the right increases vibrance, making the color more vivid, while dragging it to the left desaturates it, moving it towards gray.
- Lightness: This slider adjusts the brightness or darkness of the selected area. Moving it right brightens the color, and moving it left darkens it. Use this to ensure your new color blends naturally with the surrounding tones and retains the original image’s depth.
- Target Specific Color Channels (Advanced Tip): Above the Hue, Saturation, and Lightness sliders, there’s a dropdown menu that usually defaults to “Master.” Clicking this allows you to select specific color channels (e.g., Reds, Yellows, Greens, Cyans, Blues, Magentas). If you want to refine a specific color within your initial broader selection, choosing its corresponding channel here (e.g., “Reds” if you’re working on a red object) gives you even finer control over its hue, saturation, and lightness. This is an advanced technique for achieving pixel-perfect results in photo manipulation and digital photography.
The beauty of using an adjustment layer is its flexibility. You can return to this layer at any time to re-adjust the sliders, experiment with different colors, or even turn the layer off entirely to see the original. This non-destructive workflow is invaluable for creative exploration and allows for iterative refinements, especially for visual design projects where client feedback might necessitate multiple color variations.
Refining Selections with Layer Masks for Flawless Integration
Even with the meticulousness of the Color Range tool, minor imperfections can sometimes occur where the selection bleeds into unwanted areas or misses small details. The layer mask that automatically generates with your Hue/Saturation adjustment layer is your ultimate tool for correcting these issues and achieving seamless integration.
- Understand the Layer Mask: In the Layers panel, click on the white thumbnail next to your Hue/Saturation layer thumbnail. This white thumbnail is the layer mask. White areas on the mask indicate where the adjustment layer’s effects are visible, while black areas hide the effects. Shades of gray represent partial transparency.
- Use the Brush Tool for Refinement:
- To Hide (Reveal Original Color): Select the Brush Tool (B) from the toolbar. Ensure your foreground color is set to black. With the layer mask active, paint over any areas where the color change has bled into parts you want to remain the original color (e.g., skin, hair, reflections). Painting with black conceals the adjustment.
- To Reveal (Apply Color Change): If the adjustment missed some areas you wanted to change, switch your foreground color to white (press ‘X’ to toggle between foreground/background colors). Paint over these missed areas to apply the color change.
- Adjust Brush Properties: For precise work, adjust your brush’s size and hardness. A soft-edged brush (lower hardness) is excellent for blending, while a harder brush (higher hardness) is good for sharp edges.
- Quick Tip: Visualize with Alt/Opt-Click: For intricate refinements, hold down the
Alt(Windows) orOption(Mac) key and click on the layer mask thumbnail in the Layers panel. This will display the mask itself as a black and white image on your canvas. This monochrome view makes it incredibly easy to spot tiny stray pixels or areas that need cleaning up. ClickAlt/Option + mask thumbnailagain to return to your normal image view. - Refine Fuzziness (Again): If you find yourself painting extensively, it might be worth going back to the Hue/Saturation Properties panel. If your selection was made using the “Master” channel, the bottom of the Properties panel shows a color spectrum with a gray bar and four sliders. These sliders define the range of colors being affected. You can drag these sliders to expand or contract the color range, effectively acting as a “fuzziness” control directly on the adjustment layer. This can refine your mask without manual painting.
This iterative process of selecting, adjusting, and refining with layer masks is the hallmark of professional photo editing and digital art. It ensures that your color changes are not only impactful but also seamlessly integrated into the overall image, maintaining a natural or desired aesthetic. This approach is invaluable for creating stunning wallpapers, backgrounds, and aesthetic images that are ready for any digital photography collection or visual design project.
Beyond Hue/Saturation: Alternative Color Changing Techniques
While Hue/Saturation with Color Range is a powerhouse combination, Photoshop offers several other effective methods for altering colors, each with its own advantages depending on the desired outcome and the complexity of the image. These tools are particularly useful for specific graphic design tasks, quick photo manipulation, or achieving distinct artistic styles for your image collections.
The Quick & Easy: Color Replacement Tool
For straightforward color changes where you want to paint a new color over an existing one while retaining the original image’s texture and luminosity, the Color Replacement Tool is an efficient option. It’s often found nestled under the Brush Tool in the toolbar (press ‘B’ and then Shift+B to cycle through brush options).
- Select Your Replacement Color: Choose your desired new color from the foreground color swatch in the toolbar.
- Activate the Tool: Select the Color Replacement Tool.
- Adjust Tool Settings: In the Options Bar at the top, you can set various parameters:
- Mode: “Color” mode is usually best as it replaces only the hue and saturation while preserving the luminosity (lights and shadows) of the original pixels, ensuring a realistic blend. Other modes like Hue, Saturation, or Luminosity offer different effects.
- Sampling: “Continuous” samples colors as you drag; “Once” samples only the first color you click; “Background Swatch” replaces only areas matching the current background color. “Once” is often preferred for more control.
- Limits: “Discontiguous” paints over matching colors anywhere; “Contiguous” paints only over matching colors adjacent to where you click; “Find Edges” helps maintain sharp boundaries.
- Tolerance: This controls how wide a range of colors Photoshop considers “similar” to your sampled color. A higher tolerance will affect more shades, a lower tolerance will be more selective.
- Paint to Replace: Begin painting over the area whose color you wish to change. The tool will replace the sampled color with your chosen foreground color, automatically blending with the existing shadows and highlights.
Limitations: The Color Replacement Tool can sometimes struggle with very dark (black) or very light (white) areas, as these lack a strong hue component. It might produce muted or grayish results in these cases, as observed by many users. For these situations, other methods like “Selective Color” or “Gradient Map” might be more effective. Nonetheless, for quick, localized color shifts on mid-range tones, it’s a fantastic time-saver for digital photography and image editing.
Gradient Overlays and Mapping for Thematic Effects
When you want to infuse an entire image or a large section with a consistent color tone or create a dynamic blend of colors, Gradient Overlays and Gradient Maps offer powerful creative possibilities. These techniques are excellent for establishing specific aesthetic moods, crafting abstract backgrounds, or applying consistent editing styles across a collection of images.
-
Gradient Overlay (Layer Style):
- Select the layer you want to apply the gradient to (or a new empty layer if you want to create an abstract gradient background).
- Go to
Layer > Layer Style > Gradient Overlay. - In the dialog box, click on the gradient preview to open the Gradient Editor. Here, you can choose from presets or create your own multi-color gradients.
- Adjust
Blend Mode,Opacity,Style(Linear, Radial, Angle, Reflected, Diamond),Angle, andScaleto control how the gradient interacts with your image. Blend Modeoptions like “Soft Light,” “Overlay,” or “Color” can produce subtle or dramatic color washes. A lower opacity often yields more realistic results. This is perfect for generating thematic collections or adding subtle visual design elements.
-
Gradient Map (Adjustment Layer):
- Create a new Gradient Map adjustment layer:
Layer > New Adjustment Layer > Gradient Map. - A Gradient Map re-maps the luminance values of your image to the colors of a chosen gradient. Dark areas of the image will take on the left-most color of the gradient, mid-tones will take on the middle colors, and highlights will take on the right-most colors.
- In the Properties panel, click on the gradient bar to open the Gradient Editor. Experiment with different gradients to see how they dramatically alter the mood. For instance, a blue-to-yellow gradient can transform a drab scene into a dramatic sunset.
- Crucially, set the
Blend Modeof the Gradient Map layer (in the Layers panel) to “Color,” “Soft Light,” or “Overlay” and adjust itsOpacityto blend it naturally with your image. Without changing the blend mode, a gradient map will convert your image to grayscale and then colorize it. - You can also click the “Reverse” checkbox in the Properties panel to flip the gradient, changing which colors map to shadows and highlights.
- Create a new Gradient Map adjustment layer:
Gradient overlays and maps are fantastic for creating consistent visual aesthetics across multiple images, such as a series of sad/emotional photos, or for designing abstract backgrounds where color flows are key. They offer a powerful way to inject creative ideas and elevate your digital art.
Precise Adjustments with Selective Color
For highly targeted color modifications, especially when dealing with problematic colors like black or white that resist simple hue shifts, “Selective Color” is an advanced yet incredibly powerful adjustment tool. It allows you to modify the amount of Cyan, Magenta, Yellow, and Black in specific primary colors (Reds, Yellows, Greens, Cyans, Blues, Magentas, Whites, Neutrals, Blacks) within your image.
- Create a Selective Color Adjustment Layer: Go to
Layer > New Adjustment Layer > Selective Color. - Choose Your Target Color: In the Properties panel, use the “Colors” dropdown menu to select the specific color you want to adjust (e.g., “Blacks” to add color to black areas, or “Whites” for white areas, or any primary color like “Reds”).
- Adjust CMYK Sliders: For your chosen color, you’ll see sliders for Cyan, Magenta, Yellow, and Black.
- Drag a slider to the right to add more of that color.
- Drag a slider to the left to subtract that color (which effectively adds its complementary color).
- For example, to tint black areas with a blueish hue, select “Blacks” from the dropdown, then increase Cyan and decrease Yellow/Magenta.
- Experiment with Absolute/Relative: The “Method” option allows you to choose between “Relative” (adjusts existing CMYK percentages relative to their original value) and “Absolute” (adjusts existing CMYK percentages in absolute increments). “Relative” is often preferred for subtle changes, while “Absolute” can be more dramatic.
- Refine with Layer Mask: As with Hue/Saturation, the Selective Color adjustment layer comes with a layer mask. Use a black brush on the mask to hide the adjustment from areas where it’s not desired, or a white brush to reveal it.
Selective Color offers granular control, making it ideal for professional retouching, achieving specific editing styles in digital photography, and ensuring color accuracy for graphic design projects. It’s particularly effective for overcoming the challenges of coloring neutral tones like black, white, and gray.
Leveraging Layer Styles: Color Overlay
For situations where you simply want to replace an object’s color with a solid new color, especially for graphic elements like logos or defined shapes, the “Color Overlay” layer style is incredibly straightforward. This method is quick, clean, and ensures a uniform color change.
- Select Your Object: First, you need your object on its own layer, ideally with transparency around it, or make a precise selection of the object.
- Access Layer Styles: Right-click on the object’s layer in the Layers panel and choose
Blending Options..., or go toLayer > Layer Style > Color Overlay. - Choose Your New Color: In the Layer Style dialog box, select “Color Overlay” from the list on the left. Click on the color swatch next to the “Blend Mode” dropdown to open the Color Picker. Choose your desired new color.
- Adjust Blend Mode and Opacity (Optional): While “Normal” blend mode at 100% opacity will give you a solid color replacement, you can experiment with other blend modes (like “Multiply” or “Overlay”) and reduce opacity for more nuanced effects where the original texture or shading of the object might show through subtly.
- Confirm: Click “OK” to apply the layer style.
The Color Overlay is perfect for quick design changes, recoloring logos, or creating simple thematic variations of graphic elements. It’s a clean and efficient tool for visual design tasks.
Practical Applications and Creative Vision at Tophinhanhdep.com
Mastering these color-changing techniques in Photoshop opens up a world of creative possibilities, directly aligning with the diverse needs of Tophinhanhdep.com users, from curating stunning image collections to perfecting digital art and photography.
Photography Editing: Enhancing Reality and Crafting Moods
For digital photography, color manipulation is more than just correction; it’s about artistic expression.
- Nature & Landscapes: Imagine a nature photo where the sky is dull. Using Hue/Saturation and Color Range, you can effortlessly change the background color of the sky to a vibrant blue or a dramatic sunset hue, enhancing the image’s overall appeal for wallpapers or high-resolution stock photos. Similarly, autumn leaves can be made more vivid, or a serene lake can reflect a new palette.
- Stock Photos & Product Photography: For stock photos or e-commerce, being able to change the color of a product (e.g., clothing color changing) without reshooting is invaluable. The Color Replacement Tool or a precise Hue/Saturation adjustment can quickly alter a dress from red to magenta, offering multiple variations from a single shot, saving time and resources.
- Aesthetic & Emotional Photography: Color is intrinsically linked to emotion. To create a sad/emotional aesthetic, you might desaturate colors and introduce cool blue or desaturated green tints using Gradient Maps or Selective Color. Conversely, for beautiful photography, you might boost warm tones and vibrancy. These techniques allow photographers to craft a specific mood, transforming an ordinary shot into a compelling visual narrative.
Visual Design & Graphic Art: Unleashing Creative Ideas
In the realm of visual design, color changing tools are fundamental for innovation and flexibility.
- Abstract Art & Photo Manipulation: Artists can use Gradient Maps to generate entirely new abstract compositions from existing photos, transforming realistic scenes into surreal digital art. The ability to recolor specific elements in complex photo manipulations allows for seamless integration of disparate images, creating believable new realities or fantastical scenes.
- Branding & Creative Ideas: Designers frequently need to adapt images to fit specific brand palettes. Layer Styles like Color Overlay are perfect for recoloring graphic elements or text to match branding guidelines. For creative ideas, quick partial color changes can instantly test different visual concepts for posters, web banners, or other digital assets.
- Mood Boards & Thematic Collections: When assembling mood boards or thematic collections (e.g., “Trending Styles”), color consistency is key. Using uniform color grading techniques across a selection of images ensures a cohesive and professional presentation, guiding the viewer’s perception.
Image Tools & Optimization: The Bigger Picture
Beyond the creative aspects, these color editing techniques contribute to the overall quality and usability of images, linking back to Tophinhanhdep.com’s “Image Tools” section. High-resolution images benefit immensely from precise color adjustments as they allow for detail retention. Once your colors are perfected, you can then use image optimizers and compressors to ensure your visually stunning files are also web-ready and efficient. AI upscalers can further enhance images after color transformations, ensuring that even heavily modified digital art maintains its sharpness and resolution.
Advanced Tips and Troubleshooting for Mastering Color in Photoshop
To truly master color changes in Photoshop and make the most of its features for your Tophinhanhdep.com projects, consider these advanced tips and common troubleshooting scenarios.
Dealing with Black and White: Special Considerations
As many users have noted, directly changing black or white areas using Hue/Saturation can be challenging because these tones lack inherent hue information. Here are effective workarounds:
- Gradient Map (for artistic tints): As mentioned earlier, a Gradient Map is excellent for remapping the luminance of black and white areas to a chosen color gradient, providing an artistic tint while preserving tonal detail.
- Selective Color (for precise coloring of neutrals): For more precise control over black, white, and neutral gray areas, a Selective Color adjustment layer is ideal. You can select “Blacks,” “Whites,” or “Neutrals” from the dropdown and then introduce CMYK values to tint them with any color imaginable. For example, to make black appear deep blue, add cyan and magenta, and reduce yellow in the “Blacks” channel.
- Layer Style - Color Overlay (for solid color replacement): For solid black or white objects (like logos or line art), applying a “Color Overlay” layer style directly to that layer will replace the black/white with a chosen color uniformly.
- Image Mode (for grayscale images): If you’re working with a true grayscale image, ensure you convert it to RGB mode (
Image > Mode > RGB Color) before attempting to apply color, as many color adjustments only work in RGB.
The Power of Non-Destructive Editing
The consistent use of adjustment layers (Hue/Saturation, Selective Color, Gradient Map) and layer styles (Color Overlay) is a cornerstone of professional Photoshop workflows. This “non-destructive” approach means:
- Flexibility: You can go back and tweak any adjustment at any time without degrading the original image data.
- Experimentation: Feel free to try different colors and effects. If you don’t like a result, simply hide or delete the adjustment layer, or modify its settings.
- Refinement: Layer masks allow for pixel-perfect control over where the adjustments are applied, ensuring seamless integration.
This methodology is crucial when creating high-resolution images or engaging in complex photo manipulation, allowing for endless creative ideas without commitment.
Harnessing Photoshop Actions and Presets
For repetitive color changes or to apply a specific editing style consistently, Photoshop Actions and presets can be immense time-savers. Many photographers and designers create or purchase actions that automate complex color grading sequences.
- Photoshop Actions: These record a series of steps (like creating adjustment layers, making selections, applying filters) and allow you to replay them with a single click. They are perfect for applying a consistent aesthetic across an entire collection of images.
- Lightroom Presets & LUTs: While more geared towards Lightroom, Look-Up Tables (LUTs) can also be used in Photoshop (via Color Lookup adjustment layer) to apply cinematic color grades or specific aesthetic color profiles, which are popular for trending styles and mood boards.
At Tophinhanhdep.com, we encourage exploring these tools as part of your digital photography and visual design journey, enabling you to produce stunning wallpapers, captivating backgrounds, and beautiful photography with unparalleled efficiency.
General Troubleshooting and Best Practices
- Start with a Good Selection: The quality of your color change often hinges on the accuracy of your initial selection. Invest time in refining it.
- Check Image Mode: Ensure your image is in “RGB Color” mode (
Image > Mode > RGB Color) for most comprehensive color editing options. - Use Sample Images: Practice with sample images (like those often provided with tutorials) to understand how different tools behave before applying them to your critical projects.
- Zoom In: For precise mask refinements or small object selections, zoom in to a high magnification to catch every detail.
- Experiment with Blend Modes: Don’t just stick to “Normal” for adjustment layers. Experiment with “Color,” “Soft Light,” “Overlay,” and others to see how they interact with the underlying image tones, yielding a vast array of creative effects for your digital art.
Conclusion
Changing image colors in Photoshop is far from a single-click operation; it’s a diverse skill set that integrates selection mastery, adjustment layer proficiency, and an understanding of how color affects mood and perception. From the granular control offered by Hue/Saturation with Color Range to the artistic flair of Gradient Maps and the precision of Selective Color, Photoshop provides a robust toolkit for every creative challenge.
At Tophinhanhdep.com, we believe that empowering you with these techniques is key to unlocking your full potential in digital photography, visual design, and graphic art. Whether you’re curating aesthetic wallpapers, designing abstract backgrounds, or perfecting beautiful photography for your next thematic collection, these methods will ensure your images resonate with impact and intention. So, dive in, experiment with colors, and transform your creative visions into stunning realities. The journey to becoming a color replacement master begins now, and Tophinhanhdep.com is here to guide every step of the way.