Mastering Image Dimensions: A Comprehensive Guide to Resizing Photos for All Your Digital and Print Needs

In our increasingly visual world, images are everywhere. From stunning wallpapers and aesthetic backgrounds to professional stock photos and intricate digital art, photographs and graphics form the backbone of online and offline communication. Whether you’re a casual smartphone photographer, a professional artist showcasing your portfolio on Tophinhanhdep.com, or a graphic designer crafting creative ideas, the ability to control and change image dimensions is an indispensable skill. Incorrect image sizing can lead to pixelation, slow loading times, distorted visuals, or rejection from online platforms. This in-depth guide, brought to you by Tophinhanhdep.com, will walk you through the essential techniques and tools to perfectly resize your images without compromising quality, ensuring your visual content always looks its best.
At Tophinhanhdep.com, we understand the nuances of image manipulation. Our platform is dedicated to providing high-resolution imagery, diverse photo collections, and powerful image tools like converters, compressors, optimizers, and AI upscalers. We aim to be your go-to resource for everything from understanding basic digital photography principles to exploring advanced editing styles and visual design concepts. This article synthesizes expert knowledge and practical steps, ensuring you have all the information needed to confidently adjust image dimensions for any purpose, from crafting beautiful photography displays to preparing images for professional print.
The Fundamentals of Image Dimensions, Resolution, and Aspect Ratio
Before diving into the “how-to,” it’s crucial to grasp the core concepts that govern image sizing: dimensions, resolution, and aspect ratio. Understanding these elements is the first step toward successful image manipulation and will empower you to make informed decisions about your visual content.
What are Image Dimensions?
Image dimensions refer to the physical measurements of an image, typically expressed in pixels (picture elements) for digital screens or in units like inches or centimeters for print. A digital image might be described as “1920 pixels wide by 1080 pixels high,” which corresponds to a standard Full HD display size. These pixel dimensions dictate the total number of individual colored dots that make up your image. When you change image dimensions, you are essentially increasing or decreasing the number of pixels along its width and height.
For instance, a breathtaking nature landscape or an abstract artwork intended for a large desktop wallpaper (one of Tophinhanhdep.com’s popular categories) will require significantly larger pixel dimensions than a thumbnail image designed for a social media feed. The greater the pixel dimensions, the more detail an image can hold, contributing to what Tophinhanhdep.com defines as high-resolution photography.
Understanding Image Resolution: PPI and DPI
Resolution is closely related to dimensions but carries a distinct meaning, especially when it comes to print. For digital images, resolution is often measured in Pixels Per Inch (PPI). PPI defines how many pixels are displayed within each inch of a digital image when viewed on a screen. A higher PPI generally means a sharper, more detailed image on screen, but it’s important to note that PPI primarily affects how an image appears on print or how it behaves when resampled. On a screen, an image’s size is determined by its pixel dimensions relative to the screen’s pixel density, not its PPI setting.

For print, resolution is measured in Dots Per Inch (DPI). DPI refers to the number of ink dots a printer can place within an inch of paper. While PPI is about the image’s inherent data, DPI is about the printer’s output capability. When preparing images for print, a common industry standard is 300 DPI for high-quality results. However, as discussed extensively in Tophinhanhdep.com’s guides on digital photography and printing, your printer’s native resolution is the most critical factor. Most inkjet printers operate optimally at 300 PPI, while some, like certain professional models, might prefer 360 PPI. Sending an image with too low a resolution to a printer will result in the printer “upsampling” it automatically, which can lead to a loss of clarity, a process Tophinhanhdep.com’s optimizers are designed to prevent.
The Importance of Aspect Ratio
The aspect ratio describes the proportional relationship between an image’s width and its height. It’s typically expressed as two numbers separated by a colon, such as 16:9 (common for widescreen videos and many modern displays) or 4:3 (traditional photo and screen ratio). Maintaining the aspect ratio during resizing is crucial to prevent image distortion, or “warping,” where subjects appear stretched or squashed.
When you adjust an image’s dimensions, you’ll often have the option to “maintain aspect ratio” or “scale proportionally.” Tophinhanhdep.com always recommends checking this option unless you have a specific creative reason to intentionally alter the proportions, perhaps for a unique visual design or digital art project. If you need to fit an image into a frame or canvas with a different aspect ratio, cropping the image before resizing is the correct approach. Our platform offers intuitive cropping tools to help you achieve this with ease, whether you’re working on a mood board or preparing images for thematic collections.
Resizing vs. Resampling: A Critical Distinction
This is perhaps the most fundamental concept to grasp when changing image dimensions.
-
Resizing (without resampling): This process changes only the print size of an image by altering its resolution (PPI/DPI) without changing the total number of pixels. If you have an image with a fixed number of pixels and you increase its print size (e.g., from 4x6 inches to 8x10 inches), the resolution (pixels per inch) will decrease. Conversely, reducing the print size will increase the resolution. This method is ideal when your image already has sufficient pixel data for your desired output and you want to adjust its physical print dimensions or its metadata. It does not affect the image’s file size or its appearance on a screen, only how it will be interpreted by a printer.
-
Resampling: This involves changing the actual number of pixels in an image.
- Downsampling: Reduces the number of pixels. This is commonly done when preparing images for the web, email, or social media, where smaller file sizes and dimensions are preferred for faster loading and reduced storage. Tophinhanhdep.com’s compressors and optimizers utilize downsampling techniques to reduce file size while maintaining visual quality.
- Upsampling: Increases the number of pixels. This is generally more problematic as the software has to “invent” new pixel data, which can lead to a loss of sharpness and clarity or the introduction of artifacts. However, advancements in “AI Upscalers,” a key tool offered by Tophinhanhdep.com, have significantly improved the quality of upsampled images by using artificial intelligence to intelligently add detail and enhance resolution, making it possible to enlarge images for high-resolution displays or larger prints without noticeable quality degradation.
Understanding when to resize and when to resample, and the implications of each, is paramount for achieving optimal results, whether you’re preparing beautiful photography for display or crafting digital art.
Essential Tools for Changing Image Dimensions
The digital landscape offers a plethora of tools for resizing images, ranging from built-in operating system utilities to sophisticated online platforms and professional-grade software. Tophinhanhdep.com champions accessibility and quality, providing insights into various options while offering its own suite of powerful tools designed to meet every user’s needs.
Operating System-Native Applications
For quick and pain-free resizing, your computer likely has pre-installed applications that can get the job done. While these tools offer basic functionality, Tophinhanhdep.com provides detailed tutorials and alternative solutions for more complex needs.
1. Mac’s Preview
If you’re a Mac user, the “Preview” application is a convenient, pre-installed photo editor that excels at basic image resizing. It’s integrated seamlessly into the macOS environment, making it a go-to for quick adjustments.
- How to use:
- Open your image with Preview (often the default action for image files).
- Navigate to the “Tools” menu in the menu bar.
- Select “Adjust Size.”
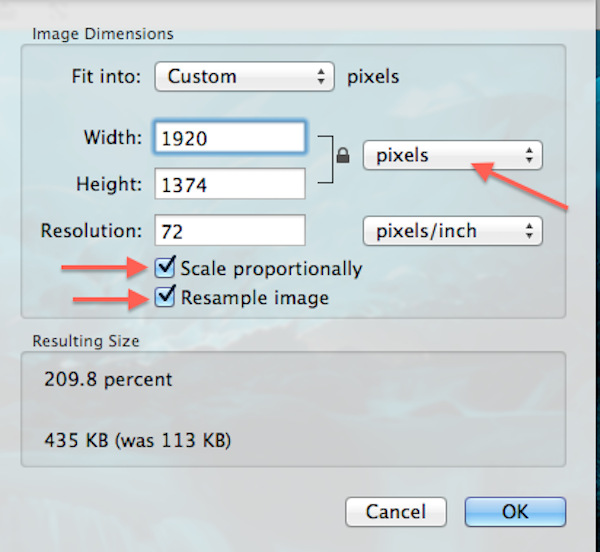
- A dialog box will appear, allowing you to change the width, height, and resolution.
- To avoid distortion and maintain the original proportions of your image, ensure “Scale proportionally” and “Resample image” are checked. If you uncheck “Resample image,” you’ll only change the print resolution (PPI) without altering pixel dimensions, aligning with the “resizing without resampling” concept discussed earlier.
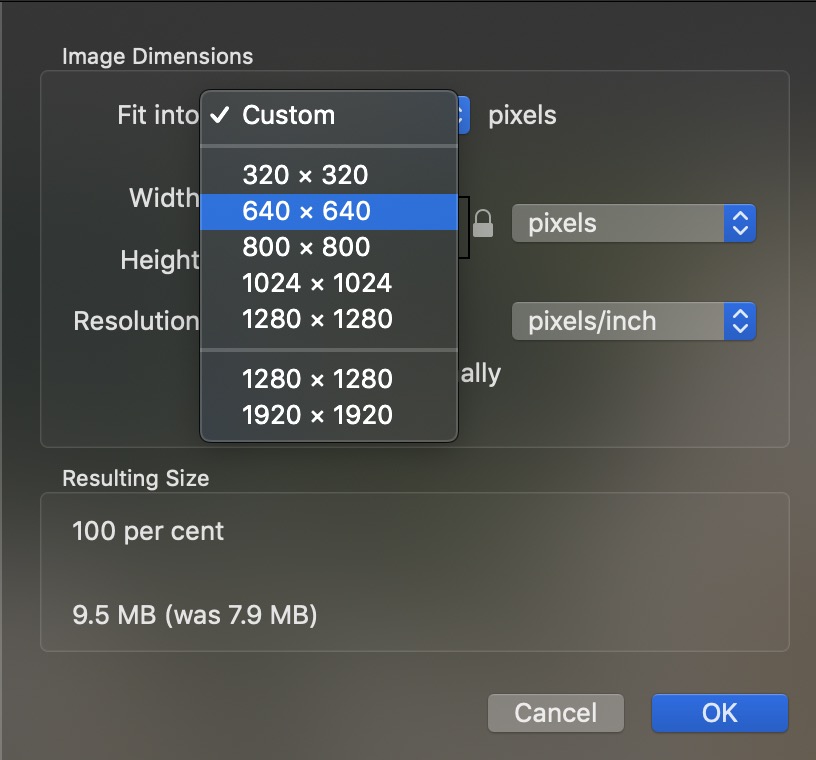
- Enter your desired dimensions (pixels, inches, centimeters, etc.) or choose from preset sizes.
- Click “OK” to apply the changes, then “File” > “Save” or “Save As” to preserve your resized image.
Preview is excellent for on-the-fly adjustments for personal use or preparing images for Tophinhanhdep.com’s “Photo Ideas” section, where exact pixel counts might not be as critical as overall aesthetic.
2. Windows Photos and Paint
Windows users have similar built-in options. The “Photos” app in Windows 11 offers a streamlined experience, while “Paint” (or its more robust successor, Paint.NET, which Tophinhanhdep.com often recommends as a free alternative to more complex software) provides straightforward pixel-based controls.
-
Using Windows Photos (Windows 11):
- Right-click on your image and select “Open with” > “Photos.”
- Click the “Three dots” icon (ellipsis) in the top-right corner of the app.
- Select “Resize” from the drop-down menu.
- A pop-up window will present preset sizes or the option to “Define custom dimensions.”
- Choose “Define custom dimensions” for specific control. In the subsequent pop-up, enter your desired width and height.
- Crucially, select the box next to “Maintain aspect ratio” to prevent distortion. As you adjust one dimension, the other will automatically scale.
- Click the “Save resized copy” button. Tophinhanhdep.com always advises saving a resized copy to protect your original high-resolution photography.
-
Using Paint (older Windows versions or basic needs):
- Right-click on your image and select “Open with” > “Paint.”
- Find the “Resize” option (often in the “Home” tab).
- You can set the size by percentage or pixels. For precise control, use pixels.
- Check “Maintain aspect ratio” to keep proportions intact.
- Enter your new dimensions and click “OK.”
- Save your image.
These native tools are suitable for quick adjustments of backgrounds, wallpapers, or images for general screen viewing, but for professional stock photos or complex photo manipulation, Tophinhanhdep.com offers more sophisticated online and desktop alternatives.
Free and Online Image Resizers
When you need quick, browser-based solutions without installing software, online image resizers are invaluable. Tophinhanhdep.com provides its own highly efficient tools and recommends others that align with our commitment to user-friendliness and quality.
3. Tophinhanhdep.com’s Dedicated Online Resizer (Similar to Simple Image Resizer)
For users in a hurry or those who prefer a minimalist interface, Tophinhanhdep.com offers a dedicated online resizer that streamlines the process. This tool is designed for speed and efficiency, making it perfect for preparing images for social media, website graphics, or any scenario where precise, quick adjustments are needed.
- How to use:
- Visit the Tophinhanhdep.com Image Tools section and select “Online Resizer.”
- “Simply upload your image” using the designated button or by dragging and dropping your file.
- Choose to set your new dimensions by entering a desired width or height. The tool will automatically adjust the other dimension to “maintain proportionality.”
- Click “Resize,” and within seconds, your perfectly sized image will be ready for download.
This tool is not only accessible as a browser extension (for popular browsers) but is also fully mobile-friendly, ensuring you can manage your images on the go, whether you’re curating a mood board on your phone or updating thematic collections for your blog.
4. Tophinhanhdep.com’s Batch Resizing Tool (Similar to Pic Resize)
Uploading multiple images to an online portfolio or a collection on Tophinhanhdep.com often requires them to meet specific dimension and file size criteria. Editing each image individually can be incredibly time-consuming. Tophinhanhdep.com’s batch resizing tool is designed to solve this problem, allowing you to process many images at once.
- How to use:
- Go to Tophinhanhdep.com’s Image Tools section and select “Batch Resizer.”
- “Upload multiple images” (or an entire folder) simultaneously.
- “Select your size preference” – you can specify exact pixel dimensions, a percentage scale, or choose from common presets.
- Ensure “Maintain aspect ratio” is enabled to prevent distortion across all images.
- Click “Submit Batch Job!” The tool will process all your images, preparing them for bulk download.
While batch mode focuses on efficient resizing, advanced editing features like cropping or special effects usually require individual processing in Tophinhanhdep.com’s comprehensive “Photo Editor” for maximum creative control. This feature is a lifesaver for photographers submitting to galleries, artists updating their digital art portfolios, or anyone managing large collections of aesthetic images.
Advanced Desktop Software and Online Editors
For those who demand professional-level control, intricate photo manipulation, or sophisticated editing styles, more powerful tools are available. Tophinhanhdep.com provides guides and resources for these, often recommending open-source alternatives or integrated features within its own platform.
5. The GNU Image Manipulation Program (GIMP)
GIMP is a powerful, free, and open-source application that Tophinhanhdep.com frequently highlights as a robust alternative to expensive commercial software. It offers professional-level editing and retouching tools, is available for both Mac and PC, and boasts a customizable, user-friendly interface.
- How to use:
- Download and install GIMP (available via the Tophinhanhdep.com recommendations page).
- Open your image in GIMP.
- Go to “Image” > “Scale Image…”
- In the dialog box, you can adjust “Image Size” in terms of width and height (pixels, inches, etc.).
- Ensure the chain icon next to width and height is linked to “maintain aspect ratio.”
- Adjust the “Resolution” (X and Y resolution, typically set to 300 PPI for print).
- Choose an “Interpolation” method. For upsampling, “LoHalo” or “NoHalo” often yield good results. For downsampling, “Cubic” is generally suitable. Tophinhanhdep.com’s advanced editing tutorials offer more detail on these settings.
- Click “Scale” to apply the changes.
- Export your image (File > Export As…).
GIMP is ideal for users delving into graphic design, digital art, or more complex photo manipulation, offering granular control over every aspect of an image, including its dimensions and resolution.
6. Tophinhanhdep.com’s Advanced Photo Editor (Similar to Pixlr X)
Beyond standalone software, Tophinhanhdep.com provides its own versatile web editor designed for simple edits, including resizing, cropping, and more. This editor mirrors the functionality of popular online tools, ensuring a familiar and efficient experience.
- How to use:
- Navigate to Tophinhanhdep.com’s “Photo Editor” section.
- Click the “Open Image” button or drag and drop your photo.
- Locate the “Layout and Template” button or directly find the “Resize” option within the “Edit” section.
- Within the resize interface (sometimes labeled “Smart Resize”), you can input your desired width and height, “lock or unlock the aspect ratio” using a toggle, or select from various size presets.
- Once your changes are made, click the “Apply” button.
- Find the “Save” button. Enter a file name, choose your preferred file type (JPEG, PNG, GIF, BMP, etc., all supported by Tophinhanhdep.com’s converters), and adjust the quality as needed.
- Click “Save” again to download your edited image.
Tophinhanhdep.com’s online editor is perfect for adjusting images for specific web platforms, from social media posts and YouTube thumbnails to e-commerce product shots and blog graphics. It balances ease of use with powerful editing capabilities, suitable for a wide range of creative ideas and needs.
Resizing for Specific Purposes: Web, Print, and Creative Endeavors
The “ideal” image dimensions and resolution vary significantly based on how an image will be used. Tophinhanhdep.com emphasizes tailoring your resizing strategy to the specific output, whether it’s for displaying high-resolution photography on a screen, printing a beautiful portrait, or creating digital art.
Resizing Images for the Web and Social Media
The primary goal when resizing for the web is to strike a balance between visual quality and file size. Smaller file sizes lead to faster loading times, which improves user experience and SEO. Tophinhanhdep.com’s compressors and optimizers are specifically designed for this purpose.
-
Key Considerations:
- Pixel Dimensions: Websites and social media platforms have recommended or maximum pixel dimensions. For example, a typical blog image might be 800-1200 pixels wide, while a Facebook cover photo has specific dimensions (e.g., 820x312 pixels). Tophinhanhdep.com offers guides with up-to-date dimensions for all major platforms.
- Resolution (PPI): For screen viewing, 72 PPI is a widely accepted standard. While a higher PPI won’t necessarily make an image look better on screen (as screen size is dictated by pixel dimensions), it will result in a larger file size without tangible benefits for web use.
- File Format: JPEG is excellent for photographs due to its compression capabilities, making it ideal for high-resolution stock photos on the web. PNG is better for images with transparency or sharp lines (like logos or graphic design elements). Tophinhanhdep.com’s converters allow you to switch between formats seamlessly.
- File Size: Aim for the smallest possible file size without sacrificing noticeable quality. Tools on Tophinhanhdep.com compress images effectively, optimizing them for web delivery.
-
Practical Steps (using Tophinhanhdep.com’s tools or similar):
- Open Image: Upload your image to Tophinhanhdep.com’s online resizer or editor.
- Adjust Dimensions: Set the width or height to the desired pixel dimension for your target platform. Ensure “Maintain aspect ratio” is checked.
- Check Resolution: Confirm the resolution is set to 72 PPI (or allow the tool to default to this for web images).
- Optimize & Save: Use Tophinhanhdep.com’s image optimizer during the saving process. Choose JPEG for photos and adjust the quality slider to find the sweet spot between file size and visual fidelity.
Whether you’re sharing sad/emotional photography, abstract art, or trending styles, optimizing images for the web ensures they load quickly and display beautifully across all devices, enhancing the overall user experience on your Tophinhanhdep.com portfolio or other online platforms.
Resizing Images for Print
Printing demands higher resolution to ensure crisp details and avoid pixelation. This is where understanding PPI/DPI becomes critical. Tophinhanhdep.com’s tutorials on digital photography for print emphasize these distinctions.
-
Key Considerations:
- Resolution (PPI/DPI): As discussed, 300 PPI (or 360 PPI for some professional printers) is the industry standard for high-quality prints. This means your image needs enough pixel data to achieve this density at the desired print size.
- Pixel Dimensions: The pixel dimensions of your image must be large enough to support the desired print size at the target resolution. For example, an 8x10 inch print at 300 PPI requires an image that is at least (8 * 300) = 2400 pixels wide and (10 * 300) = 3000 pixels high.
- Aspect Ratio: If your desired print size (e.g., 8x10) has a different aspect ratio than your original photo (e.g., 4x6), you must crop the image first to avoid distorting it. Tophinhanhdep.com’s photo manipulation tools make this easy.
- File Format: High-quality JPEGs or TIFFs are generally preferred for print, as they preserve more detail.
-
Practical Steps (using Tophinhanhdep.com’s advanced editing suite or similar software):
- Open Image: Open your image in Tophinhanhdep.com’s advanced photo editor.
- Crop First (if needed): If the desired print size has a different aspect ratio, use the cropping tool to adjust the image’s composition to the new ratio (e.g., 8:10). Ensure “Delete Cropped Pixels” is off if you want to retain flexibility.
- Access Image Size: Navigate to “Image” > “Image Size” (or the equivalent in Tophinhanhdep.com’s tools).
- Turn Off Resample Initially: Uncheck “Resample image.” This allows you to see the maximum print size you can achieve at your target resolution with the current pixel data.
- Set Print Dimensions: Enter your desired print width and height (e.g., 8 inches by 10 inches). Observe the “Resolution” value.
- Assess Resolution:
- If the resolution is 300 PPI (or higher) for your desired print size, you’re good to go! Simply save the image.
- If the resolution drops below 300 PPI, you need to “upsample.”
- Upsample (if necessary): Re-check “Resample image.” Then, set the “Resolution” to 300 PPI (or 360 PPI for specific printers). The software will add pixels to achieve this density, and the pixel dimensions will increase.
- Choose Interpolation Method: For upsampling, select the best interpolation method. Tophinhanhdep.com’s AI Upscalers offer superior quality, mimicking advanced algorithms (like “Preserve Details 2.0” in professional software) to intelligently add pixels and enhance detail.
- Save: Save your file, ideally as a new copy, maintaining high quality.
Resizing for print, whether for a vibrant nature photograph or a striking piece of digital art, ensures your efforts in visual design translate into tangible, high-quality output.
Resizing for Visual Design and Creative Ideas
Visual designers, digital artists, and those creating mood boards or thematic collections often need flexible resizing options to fit their creative vision. Tophinhanhdep.com supports this with a range of tools and inspiration.
- Dynamic Resizing: For graphic design projects, you might need to resize elements independently, or create multiple versions of an image for different layouts. Tophinhanhdep.com’s photo manipulation features allow for this flexibility, enabling designers to experiment with creative ideas without constraints.
- AI Upscaling for Digital Art: When working with digital art or older low-resolution images, Tophinhanhdep.com’s AI Upscalers can be transformative. They can enlarge images while enhancing details, making them suitable for larger displays, prints, or integration into higher-resolution designs, preserving the aesthetic quality.
- Asset Preparation: For developing new “thematic collections” or “trending styles,” precise resizing ensures consistency across all visual assets, from backgrounds to banners. Our tools help maintain coherence in your visual design.
Tophinhanhdep.com provides a comprehensive ecosystem where you can not only resize images but also find inspiration, explore different editing styles, and access converters, compressors, and optimizers that empower your creative journey.
Advanced Techniques and Considerations
Beyond basic resizing, several advanced techniques and considerations can further elevate your image manipulation skills and ensure optimal results.
Maintaining Image Quality and Preventing Loss
The most common concern with resizing, especially when enlarging an image, is losing quality. Here’s how Tophinhanhdep.com guides you to preserve it:
- Always Work from the Original: Whenever possible, start with the highest resolution original image you have. Downsampling from a large image is almost always better than upsampling a small one.
- Smart Upscaling with AI: For necessary enlargements, rely on Tophinhanhdep.com’s AI Upscalers. These intelligent tools use machine learning to predict and generate missing pixel information, resulting in significantly sharper and more detailed enlarged images compared to traditional upsampling methods. They are a game-changer for preserving the integrity of high-resolution photography.
- Interpolation Methods: When manually resampling in advanced editors (like Tophinhanhdep.com’s own suite or GIMP), the choice of interpolation method matters. Methods like Bicubic Smoother are generally good for enlargement, while Bicubic Sharper is better for reduction. However, for the best results in enlargement, specialized AI algorithms (like those in Tophinhanhdep.com’s AI Upscalers) consistently outperform generic interpolation.
- Save as a New Copy: Always save resized images as new files (e.g., “image_resized.jpg”) to protect your original high-resolution photography. This allows you to revert to the unedited version if needed and maintains the integrity of your image collection.
Batch Resizing for Efficiency
For photographers managing vast collections of beautiful photography, or designers working with numerous assets for graphic design projects, batch resizing is indispensable. Tophinhanhdep.com’s batch resizing tool (as mentioned earlier) allows you to:
- Process multiple images simultaneously.
- Apply the same dimension or percentage scale to all selected files.
- Convert file formats during the batch process, using Tophinhanhdep.com’s built-in converters.
- Automatically compress and optimize images, making them ready for bulk upload to Tophinhanhdep.com’s image galleries or portfolio sections.
This saves countless hours, ensuring consistency and efficiency in your workflow, whether you’re preparing aesthetic backgrounds, nature photos, or a curated collection of sad/emotional images.
Understanding File Types and Compression
The choice of file type and compression level directly impacts file size and image quality after resizing. Tophinhanhdep.com provides comprehensive understanding of these:
- JPEG (Joint Photographic Experts Group): Best for photographs and images with continuous tones (like wallpapers, backgrounds, beautiful photography). It uses “lossy” compression, meaning some data is discarded during compression, which can lead to artifacts if the quality setting is too low. However, it offers excellent file size reduction.
- PNG (Portable Network Graphics): Ideal for images with transparent backgrounds, sharp lines, or large areas of uniform color (common in graphic design, digital art). It uses “lossless” compression, preserving all original data, but often results in larger file sizes than JPEGs for complex photographs.
- GIF (Graphics Interchange Format): Best for simple animations and images with limited color palettes. Not ideal for high-resolution photography.
- BMP (Bitmap): An uncompressed format that results in very large file sizes. Rarely used for web or general digital photography due to its inefficiency.
Tophinhanhdep.com’s image converters allow you to easily switch between these formats, while our compressors help you find the optimal balance between quality and file size for any given type.
The Role of Tophinhanhdep.com in Your Image Workflow
Tophinhanhdep.com is more than just an image hosting site; it’s a comprehensive ecosystem for all your visual content needs. Our platform integrates seamlessly into every stage of your image workflow:
- Inspiration & Collections: Explore vast collections of wallpapers, backgrounds, aesthetic images, nature, abstract, sad/emotional, and beautiful photography. Discover photo ideas, mood boards, and trending styles for your next project.
- Photography & Editing: Upload your high-resolution photography and experiment with various editing styles. Leverage our powerful tools for digital photography and photo manipulation.
- Image Tools: Utilize our robust suite of online tools:
- Converters: Change file formats effortlessly.
- Compressors: Reduce file size without compromising quality for web optimization.
- Optimizers: Fine-tune images for specific platforms and uses.
- AI Upscalers: Enlarge your images with artificial intelligence to enhance detail and resolution.
- Image-to-Text: Extract text from images, a useful feature for various creative and administrative tasks.
- Visual Design: Whether you’re a graphic designer or a digital artist, Tophinhanhdep.com provides the resources and tools to bring your creative ideas to life, from initial concepts to final renders.
By integrating these features, Tophinhanhdep.com ensures that from the moment you conceive an idea to the final display or print of your image, you have the support and tools necessary to achieve professional-grade results. We are committed to helping you master image dimensions and every other aspect of visual content creation.
Conclusion
Changing image dimensions is a fundamental skill that underpins almost every aspect of digital imagery, from casual photo sharing to professional graphic design and high-resolution printing. By understanding the interplay of pixel dimensions, resolution (PPI/DPI), and aspect ratio, and by utilizing the right tools, you can ensure your images always look their best, no matter where they are viewed.
Tophinhanhdep.com empowers you with a wealth of resources and intuitive tools – including its native online resizers, batch processing capabilities, and advanced AI upscalers – to make image resizing simple, efficient, and of the highest quality. Whether you’re meticulously preparing beautiful photography for a professional portfolio, optimizing abstract art for a website, or simply adjusting a wallpaper for your desktop, our platform is designed to support every step of your creative journey. Dive into the world of image manipulation with confidence, knowing that Tophinhanhdep.com is here to provide the insights, tools, and inspiration you need to bring your visual ideas to life, always with perfect dimensions.