How to Change Image DPI: A Comprehensive Guide for Tophinhanhdep.com Users

In the dynamic world of digital imagery, where every pixel contributes to the overall visual experience, understanding fundamental concepts like DPI (Dots Per Inch) is crucial. Whether you’re curating stunning wallpapers, preparing high-resolution stock photos, crafting intricate digital art, or simply optimizing images for web display, the DPI setting plays a significant, though often misunderstood, role. At Tophinhanhdep.com, your ultimate resource for everything from aesthetic backgrounds to advanced image tools and visual design inspiration, we believe in empowering our community with the knowledge to master their digital assets.
This comprehensive guide will demystify DPI, clarify its relationship with image quality and resolution, and walk you through various methods to change it using popular software and innovative AI tools. We’ll explore why changing DPI is essential for various applications, from ensuring crisp prints of your beautiful photography to meeting the precise requirements of graphic design projects.
Understanding DPI: The Foundation for Tophinhanhdep.com’s Visuals
Before diving into the “how-to,” it’s vital to grasp what DPI truly represents and why it’s a cornerstone for managing your digital images effectively. For users passionate about high-resolution photography, creating impactful visual designs, or curating thematic image collections, a clear understanding of DPI is indispensable.
DPI vs. PPI: Clarifying the Terminology

Often, the terms DPI (Dots Per Inch) and PPI (Pixels Per Inch) are used interchangeably, leading to confusion. While Tophinhanhdep.com and many image editing tools might use “DPI” as a catch-all, it’s helpful to understand the technical distinction:
- PPI (Pixels Per Inch): This refers to the pixel density of a digital image displayed on a screen or within the digital file itself. It dictates how many pixels are packed into one linear inch of your image. A higher PPI generally means a higher-resolution digital image.
- DPI (Dots Per Inch): This term specifically refers to the number of ink dots a printer places within one linear inch of physical paper. Printers use a combination of tiny ink dots to reproduce the colors and details of your digital image.
In the context of digital images, when people refer to “DPI,” they almost always mean “PPI.” The “DPI” setting you see in image editing software is essentially the metadata tag that tells printing devices or other software how many pixels per inch to interpret the image at, to achieve a certain print size. It doesn’t inherently add or subtract pixels from your image; it’s a directive. This distinction is crucial for Tophinhanhdep.com users, especially those involved in high-resolution photography and graphic design for print.
Why DPI Matters for Your Images
The DPI (or rather, PPI setting) of your images influences several critical aspects, impacting everything from your aesthetic backgrounds to professional stock photos:
- Print Quality: This is where DPI’s role is most pronounced. A higher DPI (typically 300 DPI for professional prints) ensures that your printed images, whether they’re beautiful photography for a gallery or elements for a visual design project, appear sharp and detailed. If the DPI is too low for the intended print size, the image will look pixelated or “blocky.”
- Default Print Dimensions: When you open an image in a word processor or desktop publishing program, its inherent DPI setting often determines its default physical size on the page. For instance, a 1500-pixel wide photo with a DPI set to 300 will initially appear as a 5-inch wide print (1500 pixels / 300 PPI = 5 inches).
- File Size (Indirectly): While changing the metadata DPI doesn’t alter file size, increasing the actual pixel dimensions (which is often done to achieve a higher effective DPI for larger prints) will significantly increase file size. This is a key consideration for Tophinhanhdep.com users dealing with storage, web optimization, or sharing large collections of nature or abstract images.
- Compatibility and Requirements: Many online platforms for stock photos, print services, or graphic design submissions have specific DPI requirements (e.g., 300 DPI). Knowing how to adjust this setting without compromising your image’s true quality is vital for fulfilling these specifications.
- Visual Design and Digital Art: Graphic designers and digital artists often work within strict resolution and DPI parameters to ensure their creations translate perfectly from screen to print, whether for posters, brochures, or client projects.
Checking DPI: Knowing Your Image’s Starting Point
Before making any changes, it’s helpful to know the current DPI setting of your image. This is a straightforward process across different operating systems:
- On Windows:
- Open File Explorer and navigate to your image.
- Right-click on the image file.
- Select “Properties,” then go to the “Details” tab.
- Under the “Image” section, you’ll find “Resolution” listed (often as DPI).
- On Mac:
- Open Finder and locate your image.
- Right-click (or Control-click) on the image.
- Select “Open With” and choose “Preview.”
- In Preview, go to “Tools” in the menu bar, then select “Show Inspector” (or press Cmd+I).
- In the Inspector window, look for the “DPI” or “Resolution” information.
This initial check provides a baseline for your image manipulation efforts, ensuring you understand the raw data you’re working with before applying any of Tophinhanhdep.com’s recommended image tools.
Mastering DPI Changes: Tools and Techniques for Tophinhanhdep.com Users
The primary goal when simply “changing DPI” is often to alter the internal metadata setting without resampling (i.e., changing the actual pixel dimensions) of your image. This ensures your image’s inherent resolution and quality, whether it’s a beautiful photograph or a unique digital art piece, remain untouched while satisfying specific DPI requirements. Tophinhanhdep.com users can achieve this through various image tools.
The Core Principle: Changing DPI Without Resampling
The golden rule for preserving image quality when adjusting DPI is to deselect or uncheck the “Resample Image” option in your image editing software. Resampling involves adding or removing pixels to change the image’s actual dimensions. If you resample when trying to change DPI, your software will either stretch a smaller image to fit a larger print dimension (making it blurry) or shrink a larger image (losing detail), potentially damaging the quality of your high-resolution photography or carefully crafted visual designs.
By not resampling, you are simply changing the metadata that defines how many pixels per inch the image should be printed at, without affecting the total number of pixels it contains. This is the “trick” that allows you to satisfy print shops or graphic designers who insist on a “300 DPI image” even if your image’s pixel dimensions are already perfectly adequate.
Adobe Photoshop: The Industry Standard for Digital Photography and Graphic Design
For professionals and enthusiasts utilizing Tophinhanhdep.com’s resources for high-resolution photography, digital art, or intricate photo manipulation, Adobe Photoshop is an indispensable tool. Changing DPI without resampling is straightforward:
- Load your image into Adobe Photoshop or Photoshop Elements.
- Go to the “Image” menu at the top.
- Select “Image Size” (or “Image > Resize > Image Size” in some Photoshop Elements versions).
- In the “Image Size” dialog window, crucially deselect the “Resample Image” checkbox. Ensure there is no checkmark in this box.
- In the “Resolution” box, type in your desired DPI value (e.g., 300).
- Click “OK”.
- Save your photo with a new name (e.g.,
image-300dpi.jpg) to preserve the original. When saving as JPEG, choose a high quality setting (e.g., 10 or higher).
This method alters only the internal DPI tag, leaving the pixel dimensions of your aesthetic, nature, or abstract images unchanged, ensuring their inherent quality for Tophinhanhdep.com’s diverse collections.
Free Alternatives: GIMP, XnView, and Irfanview for Accessible Image Manipulation
Tophinhanhdep.com understands that not everyone has access to premium software. Fortunately, several free image tools offer similar functionality for managing your images:
-
GIMP (GNU Image Manipulation Program): A powerful open-source editor for Windows, Mac, and Linux, great for digital art and photo manipulation.
- Open your image in GIMP.
- Go to “Image” > “Print Size.”
- Set your desired DPI value in the “X resolution” field. The “Y resolution” will automatically adjust if the chain icon is intact.
- Go to “File” > “Save” (to apply changes to the current file) or “Save As” (to create a new file).
-
XnView (for Windows, Linux & Mac): A versatile image viewer and converter recommended by Tophinhanhdep.com for its batch processing capabilities and ease of use.
- Open your image in XnView.
- Select the “Image” > “Resize” menu option (not “Set DPI”).
- In the image size dialog window, deselect the “Resample Image” checkbox.
- In the “Resolution” box, type in your desired DPI (e.g., 300).
- Click “OK”.
- Save the photo with a new name, ensuring high JPEG quality (e.g., 95%).
-
Irfanview (for Windows): A lightweight and fast image viewer/editor, perfect for quick adjustments.
- Load your image into Irfanview.
- Select the “Image” > “Resize/Resample” option.
- In the dialog window, locate the specific DPI data box.
- Enter your desired DPI value without adjusting anything else.
- Click “OK”.
- Use “Save As” to save the image with a new name, ensuring high JPEG quality.
Microsoft Office Picture Manager: Simple Adjustments for Everyday Use
While an older tool, for those who still have it or require basic adjustments within a familiar environment, Microsoft Office Picture Manager can also modify DPI. It’s often used for everyday images rather than high-resolution photography.
- Open Microsoft Office Picture Manager.
- Open the image you wish to edit.
- Go to the “Picture” tab or the “File” tab and select “Properties”.
- Under the “Image” section, locate the “Resolution” option.
- Adjust the DPI value as desired.
- Click “OK” to save the changes.
- Use “Save” or “Save As” to preserve your edited image. Note that its compression options for saving might be less granular than dedicated photo editors.
Windows Built-in Tools (Photos App & Paint): Basic DPI Management
For basic needs, Windows’ native applications offer limited DPI adjustment capabilities, usually tied to print settings. These are generally not suitable for professional-grade high-resolution photography or graphic design.
-
Photos App (Windows 10/11): While not directly changing the metadata DPI, you can influence the output DPI when printing.
- Open the image in the Photos app.
- Select the “Print” option.
- In the print window, navigate to “Page Setup” or “Printer Properties”.
- Look for options to adjust print quality or resolution, which indirectly relates to DPI.
-
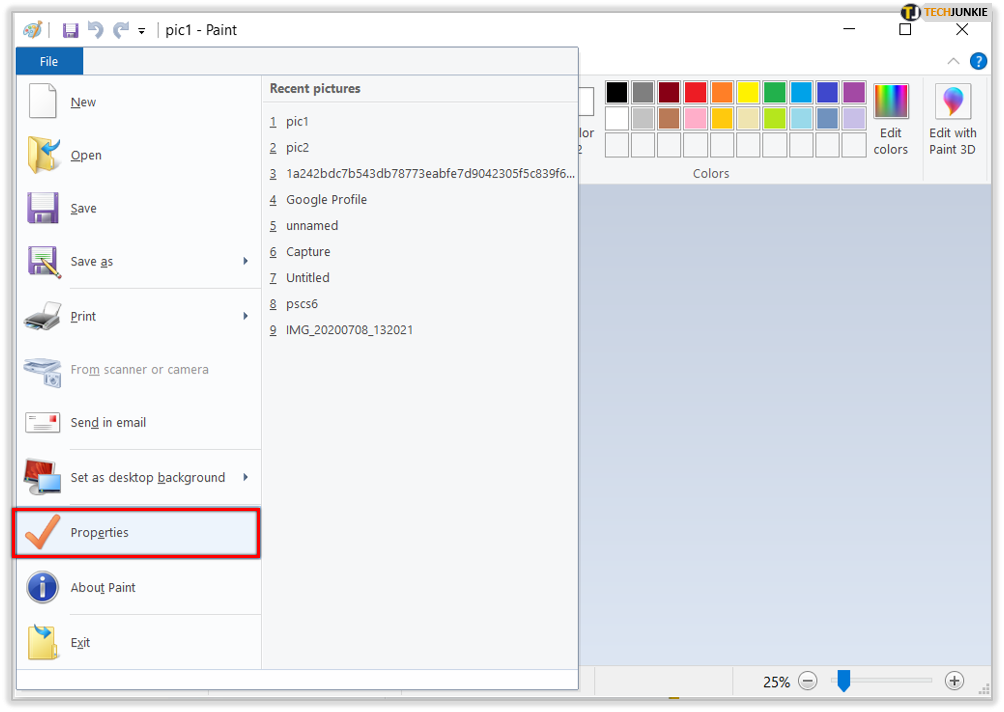
Paint (Microsoft Paint): Microsoft Paint itself doesn’t offer a direct option to change the DPI metadata without affecting image size. You can see the image properties (including DPI if present) under “File” > “Properties,” but direct manipulation of DPI without resampling isn’t its strong suit.
Online DPI Converters: Quick Metadata Edits for Web Optimization
For Tophinhanhdep.com users who need to quickly override DPI metadata without improving image quality (e.g., for specific website upload requirements), free online tools are a convenient option.
- Go to a reputable online DPI converter (e.g.,
convert.town/image-dpi). - Choose your desired DPI value.
- Upload your image.
- The website will process and download the image with the updated DPI metadata.
Remember, these tools simply change the metadata tag; they do not add or remove pixels, meaning the actual image resolution and quality remain the same. This is useful for web optimization or fulfilling specific platform requirements, but not for genuinely improving print quality for your beautiful photography.
Beyond Metadata: Increasing True Image Resolution for High-Quality Prints on Tophinhanhdep.com
While simply changing the DPI metadata without resampling is useful for compatibility, it won’t actually make a low-resolution image sharper or suitable for a much larger print. For Tophinhanhdep.com users aiming for genuinely high-resolution photography, stunning aesthetic prints, or scalable digital art, the goal is to increase the actual pixel density – meaning, adding more pixels to the image.
Traditionally, increasing image resolution (upscaling) with standard photo editors often led to blurry or pixelated results. However, with advancements in AI Upscalers, this limitation has been largely overcome.
AI Upscalers (e.g., LetsEnhance): Truly Increasing Resolution and DPI for High-Resolution Photography
AI upscaling tools, a category Tophinhanhdep.com champions under “Image Tools,” leverage artificial intelligence to intelligently add new pixels to your image, inferring detail and texture. This process genuinely increases the total number of pixels, allowing for:
- Higher effective DPI: By adding more pixels, the image can now be printed at a larger physical size while maintaining a high DPI (e.g., 300 DPI or more), resulting in sharper, more detailed prints.
- Enhanced print quality: Ideal for converting smaller images into print-ready files for large posters, canvases, or high-quality photo books.
- Improved detail: AI algorithms can restore lost details and reduce artifacts, making your aesthetic images, nature shots, or abstract compositions truly shine.
How AI Upscalers Work (e.g., similar to LetsEnhance):
- Upload your image to the AI upscaling service.
- Select an upscaling factor (e.g., 2x, 4x, 8x, or specify desired output dimensions/DPI). Many services default to 300 DPI for print.
- Choose an upscaling model (some AI tools offer different models optimized for photos, digital art, text, etc.). This relates directly to Tophinhanhdep.com’s focus on “digital art” and “photography.”
- Process the image. The AI analyzes your image and generates new pixels.
- Download the enhanced image. The output will have significantly more pixels and can achieve a higher true DPI for print.
This method is a game-changer for Tophinhanhdep.com users who want to transform lower-resolution photos into stunning high-resolution assets suitable for large-format prints, stock photo submissions, or expansive digital displays.
The Arithmetic of Resolution, Print Size, and DPI
Understanding the relationship between these three elements is crucial for anyone involved in visual design or high-resolution photography:
- Pixel Dimensions / DPI = Print Size (in inches)
- Pixel Dimensions / Print Size (in inches) = DPI
For example, a 3000 x 2400 pixel image:
- Printed at 10 x 8 inches will yield 300 DPI (3000/10 = 300; 2400/8 = 300).
- If you tried to print the same image at 30 x 24 inches, it would only be 100 DPI (3000/30 = 100), likely resulting in a pixelated print.
This highlights that to achieve a high DPI for a larger print size, you must start with an image that has sufficient pixel dimensions, or use an AI upscaler to create them.
Essential Considerations: Optimizing Images for Tophinhanhdep.com’s Diverse Applications
Choosing the right DPI for your images isn’t a one-size-fits-all decision. It depends heavily on the final application, whether it’s a wallpaper, a piece of digital art, or an entry into a thematic collection. Tophinhanhdep.com recommends considering these factors:
- Viewing Distance:
- Close viewing (less than 2 feet): For photo books, flyers, brochures, or beautiful photography meant for intimate viewing, 300-400 DPI is recommended for maximum crispness.
- Medium viewing (2-6 feet): For posters or smaller prints viewed from a slight distance, 100-200 DPI might suffice.
- Distant viewing (billboards, large signs): For images viewed from a significant distance, much lower DPIs (e.g., 35 DPI or even less) are acceptable, as the human eye won’t perceive individual dots.
- Subject Matter: Images with intricate details (e.g., detailed nature photography, elaborate abstract art) will benefit more from higher DPI than images with simpler compositions, where lower DPI might be less noticeable.
- Printing Material: High-quality, glossy paper can hold more ink and reproduce finer details, making high DPI settings (300+ DPI) worthwhile. Uncoated papers may not show the benefit of extremely high DPIs beyond 200-250 DPI.
- Web Display: For images intended solely for websites (like aesthetic backgrounds or image collections on Tophinhanhdep.com), the pixel dimensions are far more important than the DPI value. A common web standard for resolution is 72 PPI, but simply changing the DPI tag without resizing pixels will have no visual impact on screen. Optimize pixel dimensions for fast loading without sacrificing on-screen clarity.
Saving Formats and Quality Settings
When you’ve adjusted your image’s DPI or resolution, proper saving is critical, especially for formats like JPEG, which use compression. For your high-resolution photography and digital art, Tophinhanhdep.com advises:
- JPEG: Always save JPEGs with a high-quality setting (e.g., 90-95% or higher, or Adobe Quality 10+). This minimizes compression artifacts and preserves visual detail.
- PNG: A good choice for images with sharp edges, text, or transparency (common in graphic design and digital art), as it uses lossless compression.
- TIFF: Often used for professional printing and archival purposes due to its uncompressed or losslessly compressed nature, ensuring maximum quality for critical visual design projects.
Always save a copy of your modified image with a new name, retaining your original file as a backup. Check the file size of your new image against the original; a significant, unexpected discrepancy might indicate an issue with your saving settings or an unintentional resampling.
Your DPI Questions Answered: FAQs for the Tophinhanhdep.com Community
Is 72 DPI a high resolution?
No. 72 DPI (or 96 DPI) are legacy numbers that became associated with web images in the past. These values refer to the pixel density on older monitors, not the inherent quality of an image. For web images, the total pixel dimensions (e.g., 1920x1080 pixels) are what truly matter for clarity on screen. For print, 72 DPI is generally considered low resolution.
Does DPI matter for images on websites?
Not directly. For web display, the pixel dimensions (width x height) are paramount. A 1000x800 pixel image will look the same on a screen whether its metadata DPI is set to 72, 300, or 1. DPI only becomes relevant for web if a platform specifically requires a certain DPI tag in the metadata, even if it doesn’t affect the visual display.
What is the recommended DPI for printing images?
For most high-quality prints, like beautiful photography, brochures, or graphic design elements, 300 DPI is the widely accepted standard. For larger prints viewed from a distance, a lower DPI might be acceptable. Always check with your printing service for their specific requirements.
Can I convert a 72 DPI image to 300 DPI?
You can change the metadata tag from 72 DPI to 300 DPI using any of the methods described (e.g., Photoshop without resampling). However, this won’t add any detail or quality to the image. To genuinely make a low-resolution (e.g., 72 DPI-at-print-size) image suitable for high-quality 300 DPI printing at a larger size, you would need to increase its actual pixel dimensions using an AI upscaler or reconstruct it.
How does increasing DPI affect file size?
If you only change the DPI metadata without resampling, the file size will remain virtually unchanged. However, if you increase the actual pixel resolution of an image (which is what you do when truly “increasing DPI” for larger prints, especially with AI upscalers), the file size will significantly increase because you are adding more data (pixels) to the image.
Conclusion: Mastering Your Visuals with Tophinhanhdep.com
Understanding how to change image DPI is a fundamental skill for anyone working with digital visuals, from casual photographers to professional graphic designers. Whether you need to simply adjust a metadata tag for specific submission requirements or genuinely enhance the pixel density of your images for stunning large-format prints, Tophinhanhdep.com provides the insights and guidance you need.
By distinguishing between DPI as a metadata tag and DPI as a measure of true pixel density, and by utilizing the right image tools—from industry-standard software like Photoshop to accessible free alternatives and cutting-edge AI upscalers—you can ensure your images always look their best. From curating aesthetic wallpapers to preparing high-resolution stock photos, and from crafting intricate digital art to optimizing images for various platforms, mastering DPI empowers you to take full control of your visual assets.
Explore Tophinhanhdep.com for more resources on image inspiration, collections, editing styles, and advanced image tools, and unlock the full potential of your photography and visual design endeavors.