Mastering Image Resolution in Photoshop: A Comprehensive Guide for Tophinhanhdep.com Users

In the vibrant world of digital imagery, where every pixel contributes to the narrative, understanding and controlling image resolution is paramount. Whether you’re a seasoned photographer refining a high-resolution masterpiece, a graphic designer crafting compelling visuals, or an enthusiast curating aesthetic wallpapers for a mood board, the clarity and detail of your images hinge on their resolution. For users of Tophinhanhdep.com, a hub for everything from beautiful photography and trending styles to advanced image tools and digital art, knowing how to manipulate resolution in Adobe Photoshop is a foundational skill that unlocks a world of creative possibilities. This guide will delve into the intricacies of image resolution, its impact on various visual applications, and provide a detailed, step-by-step walkthrough of how to precisely adjust it within Photoshop, ensuring your images always look their best.
Understanding Image Resolution and Its Importance for Tophinhanhdep.com
Image resolution refers to the level of detail an image holds. It dictates everything from the sharpness of a digital photograph to the quality of a printed banner. For anyone serious about visual content, from professional digital photography to creating stunning abstract backgrounds, grasping the concept of resolution is the first step towards achieving superior results.
What is Image Resolution?
At its core, image resolution is the number of pixels (picture elements) packed into a given area, typically measured in dimensions of height and width. Your digital camera, for instance, captures images with a specific pixel density, depending on its sensor size and megapixel count. For example, an image described as 8256 x 6192 pixels contains over 51 million individual pixels, translating to approximately 51 megapixels. More pixels within an image signify higher resolution, meaning denser pixel information, richer detail, and superior image quality.
This density is often quantified as PPI (pixels per inch) for digital displays or DPI (dots per inch) for printed materials. The higher the PPI/DPI, the more pixels or dots are compressed into each inch, resulting in a sharper, more detailed image with smoother tonal and color transitions. This is crucial for high-resolution photography where capturing intricate details is key. Conversely, when you crop an image, you are essentially removing pixels, which lowers its overall resolution and, consequently, its potential for detail and enlargement. Understanding these fundamentals helps Tophinhanhdep.com users make informed decisions when preparing images for various purposes, from optimizing web images to ensuring professional-grade prints.
Why Resolution Matters for Digital Photography and Visual Design
The significance of image resolution extends across the entire spectrum of digital imagery and visual design. For digital photographers, high resolution directly correlates with the ability to produce large, detailed prints, offering clients the flexibility to display their beautiful photography in grand formats. It ensures that every nuance, from the subtle textures of nature photography to the intricate expressions in an emotional portrait, is preserved.
In the realm of visual design and graphic design, resolution is fundamental to the integrity and impact of creative ideas. A low-resolution image, when scaled up, quickly becomes “pixelated”—where individual pixels become visibly chunky, degrading the overall aesthetic. This is particularly problematic for elements intended for photo manipulation, where seamless integration requires consistent quality. Whether you’re designing a dynamic abstract wallpaper, a serene nature background, or a compelling aesthetic visual for a mood board, starting with adequate resolution prevents quality compromises later on. It guarantees that your digital art retains its crispness and that your creative output aligns with trending styles and professional standards. For Tophinhanhdep.com, providing resources for high-resolution stock photos and editing styles underscores the critical role resolution plays in all aspects of visual content creation and consumption.
Preparing Your Images: Selecting the Appropriate Size for Various Platforms
The ideal resolution for an image isn’t a one-size-fits-all answer; it depends entirely on the image’s intended use. A resolution perfectly suited for a web background might be wholly inadequate for a large-format print. Tophinhanhdep.com users often work with diverse visual projects, necessitating a strategic approach to image preparation.
Optimizing Images for Web and Social Media
When images are destined for online platforms—be it a website, blog, or social media—the priority shifts from ultra-high detail to efficient loading and display. Large file sizes, typical of high-resolution images, can drastically slow down website performance, leading to a poor user experience. Moreover, social media platforms often have specific recommendations or even automated compression that can degrade overly large files.
A common rule of thumb for web images is to aim for a resolution around 72 PPI. Most computer and mobile screens display images effectively at this resolution, rendering higher PPI values largely unnecessary for on-screen viewing. For dimensions, images posted online are often no larger than 2000 pixels on their longest side, keeping file sizes typically under 1MB. This balance ensures your images load quickly while still looking sharp on most displays.
Furthermore, reducing the resolution and overall file size of images before uploading them online serves a dual purpose: it aids in faster loading and offers a degree of protection against unauthorized use. By not providing your full-resolution original, you retain more control over your digital assets. Tophinhanhdep.com’s resources on image compressors and optimizers can be invaluable here, helping you strike the perfect balance between quality and web-friendliness for your aesthetic images and thematic collections.
Ensuring High Resolution for Print and Professional Projects
In contrast to web applications, printing demands significantly higher resolutions to produce sharp, detailed physical copies. The difference between an image looking good on a screen versus a glossy magazine page or a large art print is primarily a matter of resolution. For professional prints, such as high-resolution photography meant for galleries or commercial campaigns, a standard of 300 DPI (dots per inch) is widely accepted. This density ensures that the individual dots of ink are imperceptible to the naked eye, resulting in continuous tones and smooth color transitions.
When preparing images for print, it’s crucial to consult with your printing studio regarding their minimum resolution requirements. What might be acceptable for a small photo album could be entirely insufficient for a large banner. Attempting to enlarge a low-resolution image too much for print will inevitably lead to pixelation, where the individual color dots become visible, ruining the visual design. This limitation underscores the importance of capturing images at high resolution from the outset, especially for stock photos or beautiful photography that might one day grace a physical medium. Tophinhanhdep.com champions the creation of high-quality images, emphasizing that a strong foundation in resolution is non-negotiable for any print-bound project.
Step-by-Step: Changing Image Resolution in Adobe Photoshop
Adobe Photoshop remains the industry standard for image editing, offering precise control over every aspect of an image, including its resolution. For Tophinhanhdep.com users, mastering Photoshop’s resolution adjustment tools is key to achieving desired outcomes for digital art, photo manipulation, and high-resolution photography.
Navigating the Image Size Dialog Box
The journey to adjusting image resolution in Photoshop begins with the “Image Size” dialog box, your central control panel for dimension and resolution modifications.
- Open Your Image: Start by launching Adobe Photoshop and opening the image you wish to modify. Go to
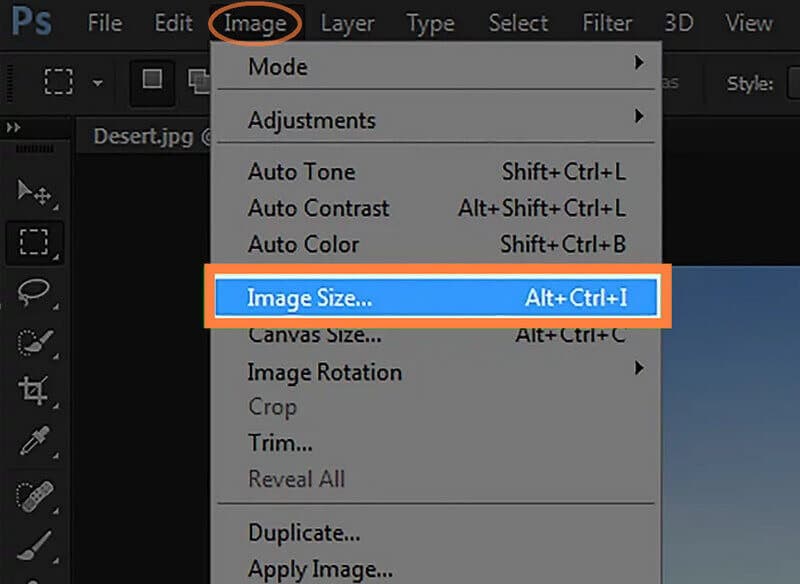
File > Open...and select your image, or simply drag and drop the file into Photoshop. - Access Image Size: Once your image is open, navigate to
Image > Image Size...in the top menu bar. Alternatively, use the keyboard shortcutOption + Command + Ion Mac orAlt + Ion Windows.
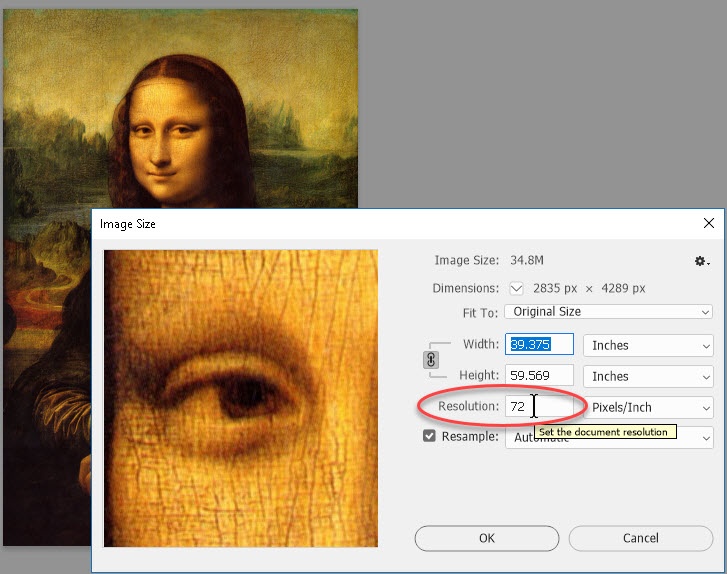
This action opens the Image Size dialog box, a window rich with information and controls. Here, you’ll see your image’s current width and height in pixel dimensions, along with its document size (file size in MB) at the top. Photoshop defaults to showing measurements in pixels, but you can easily switch to inches, centimeters, or even a percentage using the dropdown menus next to the dimension fields. This dialog box is where all resolution and dimension changes will be made, providing a clear overview of your image’s current state.
Adjusting Pixel Dimensions and Resolution Settings
Within the Image Size dialog box, you have the power to redefine your image’s physical dimensions and its pixel density.
- Change Pixel Dimensions: You can directly input new values into the
WidthorHeightfields underPixel Dimensions. By default, Photoshop keeps theConstrain Aspect Ratio(represented by a chain icon between Width and Height) active. This means if you change the width, the height will automatically adjust proportionally, and vice-versa, preventing distortion. If you need to change these dimensions independently, click the chain icon to unlink them, though this is generally discouraged unless you specifically intend to stretch or squash the image. - Set Resolution (PPI/DPI): The
Resolutionfield (usually measured in pixels/inch) is where you define the image’s pixel density. As discussed, 72 PPI is typical for web images, while 300 PPI is standard for high-quality printing. Changing this value will affect the overall size of your image (its document size) if theResample Imageoption is unchecked. If you only change the resolution from, say, 300 PPI to 150 PPI without resampling, your image’s physical print size will double, but its pixel count will remain the same, effectively spreading the existing pixels over a larger area. This setting is crucial for ensuring your image meets the specific demands of print media or digital display, aligning with Tophinhanhdep.com’s commitment to versatile image utility.
The Art of Resampling: When and How to Use It
Resampling is perhaps the most critical—and often misunderstood—aspect of changing image resolution. It dictates how Photoshop adds or removes pixels when you change an image’s dimensions or resolution.
- Understanding Resampling: When the
Resample Imagecheckbox is ticked, Photoshop actively adds new pixels (upsampling) or discards existing ones (downsampling) to meet your new dimension or resolution requirements. When it’s unticked, Photoshop only changes the relationship between existing pixels and physical size (e.g., how many pixels fit into an inch for printing), without altering the total pixel count. - When to Resample:
- Downsampling (reducing size/resolution): This is generally safe and often necessary for web optimization or fitting large images into smaller spaces. Photoshop discards redundant pixels, often with minimal perceivable quality loss.
- Upsampling (increasing size/resolution): This is where caution is key. Photoshop has to invent new pixel information, which can lead to a loss of sharpness and detail, resulting in a softer or even pixelated image if pushed too far. The quality of your starting image is paramount; a 100x100 pixel image at 72 PPI cannot magically become a high-quality 3000x3000 pixel image at 300 PPI.
- Selecting a Resampling Mode: Photoshop offers various algorithms for resampling, each suited for different tasks:
- Preserve Details (enlargement): Often the best choice for significantly enlarging images, as it attempts to maintain sharp edges and details. It also includes a
Reduce Noiseslider to mitigate artifacts. - Bicubic Smoother (enlargement): Excellent for general enlargements, producing smoother tonal gradations.
- Bicubic Sharper (reduction): Ideal for reducing image size, as it maintains sharpness by sharpening edges in the downsampled image.
- Bicubic (smoother gradients): A good general-purpose option for both enlargement and reduction.
- Nearest Neighbor (hard edges): Fast but produces jagged edges; suitable only for illustrations with hard edges or when pixel art is desired.
- Bilinear (medium quality): A step up from Nearest Neighbor, offering smoother transitions.
- Preserve Details (enlargement): Often the best choice for significantly enlarging images, as it attempts to maintain sharp edges and details. It also includes a
Experimenting with Preserve Details and Bicubic Smoother is recommended for most upsampling tasks, as they tend to yield the best results for various types of images found on Tophinhanhdep.com, from nature scenes to aesthetic photography.
Post-Adjustment Sharpening for Optimal Clarity
After you’ve adjusted an image’s resolution, especially if you’ve enlarged it, a slight loss of perceived sharpness can occur. To counteract this and bring back critical detail, a final sharpening step is often beneficial, particularly for images intended for online viewing or detailed prints.
- Access the Unsharp Mask Filter: Go to
Filter > Sharpen > Unsharp Mask.... Don’t let the name confuse you; “Unsharp Mask” is a powerful tool designed to enhance edge contrast, making an image appear sharper. - Apply Sharpening Settings: In the Unsharp Mask dialog box, you’ll find three main sliders:
- Amount: Controls the intensity of the sharpening effect. A good starting point for enlarged images is often around 100%.
- Radius: Determines the thickness of the sharpened edges. A setting of 1.0 pixels is a versatile starting point for many images.
- Threshold: Prevents sharpening of areas that don’t need it, protecting smooth tones (like skin or skies) from becoming grainy. Start with a low value like 0 or 1, and increase if artifacts appear.
Adjust these sliders while observing the preview to achieve the desired clarity without introducing unwanted artifacts or halos around edges. This final touch ensures that your high-resolution images, whether they are inspiring mood boards or professional stock photos, are presented with maximum impact and precision, fully leveraging the capabilities of Photoshop and the resources available at Tophinhanhdep.com.
Beyond Photoshop: Exploring AI Upscalers and Other Image Tools on Tophinhanhdep.com
While Photoshop provides powerful manual control over image resolution, the landscape of image editing is continuously evolving. Tophinhanhdep.com understands the need for diverse tools and offers solutions that extend beyond traditional software, particularly in the burgeoning field of artificial intelligence.
Leveraging AI for Resolution Enhancement
For images that start with inherently low resolution—perhaps an old photograph, a quickly captured background, or a historical image that needs to be part of a thematic collection—upscaling them significantly in Photoshop can be a challenging task, often leading to undesirable pixelation or a “painted” look. This is where AI upscalers shine.
Tophinhanhdep.com’s suite of AI Upscalers utilizes advanced algorithms that can intelligently “guess” and reconstruct missing detail when an image is enlarged. Unlike Photoshop’s conventional resampling methods, AI tools are trained on vast datasets of images, enabling them to generate plausible new pixel information that often results in remarkably sharp and detailed high-resolution outputs from a low-resolution source. Whether you’re trying to make a vintage family photo suitable for a modern digital art piece or upscale a found aesthetic image for a wallpaper, AI upscalers offer a powerful, often effortless, solution to significantly improve image quality without the intensive manual labor or limitations of traditional methods. They are particularly effective for photography (high resolution) projects where clarity from limited sources is crucial, opening new creative ideas for photo manipulation.
Complementary Tools: Compressors, Converters, and Optimizers
Beyond resolution adjustment and AI enhancement, managing your image assets effectively involves a broader set of tools, many of which are readily available through Tophinhanhdep.com.
- Image Compressors: After achieving your desired resolution, especially for web or social media, file size can still be a concern. Image compressors efficiently reduce file size without a significant loss in visual quality, ensuring faster load times for your wallpapers, backgrounds, and aesthetic image collections.
- Image Converters: Different platforms and uses require various file formats (e.g., JPEG for photos, PNG for transparency, GIF for animations). Image converters allow you to seamlessly switch between formats, optimizing your images for their specific context.
- Image Optimizers: These tools often combine compression and format conversion with other optimizations (like metadata stripping) to deliver the smallest possible file size while maintaining acceptable quality. This is vital for digital photography and graphic design projects where efficiency is key.
- Image-to-Text Tools: While not directly related to resolution, Tophinhanhdep.com also caters to broader image needs with tools like Image-to-Text, enabling users to extract information from visuals, further expanding the utility of their digital assets for various creative ideas and functional requirements.
These tools, alongside Photoshop’s robust features and Tophinhanhdep.com’s comprehensive resources, equip users with everything they need to master image quality, from initial capture to final delivery, ensuring stunning visuals across all mediums and purposes.
Conclusion
Mastering image resolution in Adobe Photoshop is an indispensable skill for anyone navigating the vast and visual digital landscape. From understanding the core principles of pixels per inch to expertly utilizing Photoshop’s Image Size dialog box, the ability to precisely control resolution empowers you to elevate the quality of your digital photography, graphic design, and all forms of visual content. Whether you’re aiming for crystal-clear prints, fast-loading web images, or dynamic digital art, the correct resolution sets the foundation for visual excellence.
Tophinhanhdep.com is your ultimate resource for unlocking this potential, offering not only detailed guides on traditional techniques but also pioneering advanced solutions like AI Upscalers to overcome the inherent limitations of low-resolution source material. Coupled with essential Image Tools like compressors, converters, and optimizers, Tophinhanhdep.com ensures that every image you create, edit, or share—from captivating wallpapers and aesthetic backgrounds to professional stock photos and inspiring mood boards—meets the highest standards of clarity and impact. Embrace these techniques and tools to transform your creative ideas into stunning realities, ensuring your visual narratives always resonate with impeccable quality.