How to Change Image Size and Resolution in Photoshop

In the vast and visually driven digital world, the ability to expertly manipulate images is an indispensable skill. Whether you’re a seasoned professional photographer, a graphic designer crafting stunning digital art, or an enthusiast curating aesthetic wallpapers for your devices on Tophinhanhdep.com, understanding how to control image size and resolution in Adobe Photoshop is fundamental. This comprehensive guide will demystify these crucial concepts, providing you with the knowledge and step-by-step instructions needed to achieve optimal results for both print and web applications.
Many users begin their journey with digital images by merely adjusting dimensions, unaware of the underlying principles that govern image quality and file efficiency. This often leads to pixelated prints, sluggish website load times, or images that simply don’t look their best. By delving into the essence of pixels, image size, and resolution, you’ll gain the confidence to resize images effectively, ensuring your creations consistently meet the highest standards of visual appeal and performance, perfectly complementing the high-resolution, beautiful photography and diverse collections available on Tophinhanhdep.com.
Understanding the Building Blocks of Digital Images
Before diving into the mechanics of Photoshop, it’s essential to grasp the core components that define every digital image. These fundamental concepts—pixels, image size, and resolution—are interconnected and dictate how your images appear, whether on a screen or in print.
Pixels: The Fundamental Elements
At its most basic level, a digital image is a meticulously arranged mosaic of tiny squares called pixels, a term short for “picture elements.” Think of them as the individual brush strokes that compose a painting; each pixel holds a single color value. When viewed from a normal distance, these minuscule squares blend seamlessly to create the illusion of a continuous, detailed image, rich with light, shadows, and textures – much like the breathtaking nature and abstract images you might explore on Tophinhanhdep.com.
However, this continuity is merely an optical trick. If you zoom in close enough on any digital image in Photoshop, you’ll eventually break this illusion, revealing the distinct, solid-colored squares that form the entire picture. Photoshop even provides a “Pixel Grid” (accessible via View > Show > Pixel Grid) to make these individual components easier to discern once you’ve magnified the image beyond 500%. This understanding of pixels is crucial for anyone engaging in digital photography or image editing, as they are the ultimate arbiters of detail and quality. For those downloading backgrounds or wallpapers from Tophinhanhdep.com, the density and clarity of these pixels directly translate to the visual fidelity on their screens.

Image Size: Pixel Dimensions
Moving beyond the individual pixel, image size refers to the total number of pixels that make up an image, specifically expressed as its width and height in pixels. For instance, an image described as 4509 pixels wide by 3000 pixels high contains precisely those many pixels horizontally and vertically. This dimension is often referred to as the image’s “pixel dimensions.”
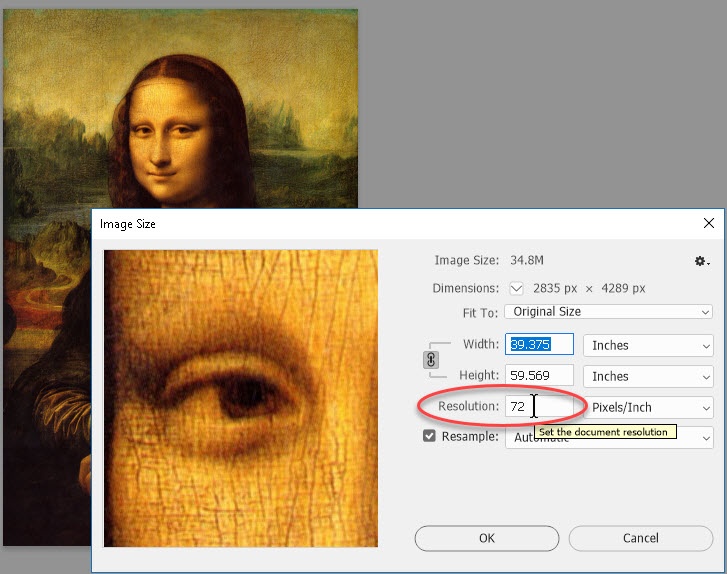
To easily ascertain an image’s pixel dimensions in Photoshop, navigate to Image > Image Size. In the “Image Size” dialog box, you’ll find the “Dimensions” section, which clearly displays the width and height in pixels (or another chosen unit if adjusted). The total number of pixels in an image can be calculated by multiplying these two values (e.g., 4509 * 3000 = 13,527,000 pixels, or approximately 13.5 megapixels).
For users of Tophinhanhdep.com, understanding image size is vital. If you’re selecting an image for a specific screen resolution, knowing its pixel dimensions helps you predict how well it will fit or if it will require cropping or scaling. For “High Resolution” stock photos, larger pixel dimensions indicate more data, offering greater flexibility for various visual design projects or larger prints.

Image Resolution: Print vs. Screen
Perhaps the most frequently misunderstood concept is image resolution. In the context of digital images, resolution is primarily measured in pixels per inch (ppi), sometimes interchangeably (though less accurately for digital) with dots per inch (dpi). Contrary to popular belief, image resolution does not affect how an image looks on a screen. A 300 ppi image displayed on a monitor will appear identical to a 72 ppi version of the exact same pixel dimensions. This is a critical distinction that can save you a lot of confusion.
Instead, image resolution exclusively controls the size at which an image will print. It dictates how many of an image’s available pixels will be “crammed” into every physical inch of paper. A higher ppi value means more pixels per inch, resulting in a smaller, sharper print. Conversely, a lower ppi means fewer pixels per inch, leading to a larger, but potentially less sharp, print.
In the “Image Size” dialog box, below the pixel dimensions, you’ll find the “Resolution” field, typically measured in “pixels/inch.” When the “Resample” option (which we’ll discuss next) is unchecked, changing the resolution value will only alter the image’s physical print dimensions (width and height in inches/cm), while the total number of pixels in the image remains unchanged. This is crucial for photographers looking to achieve high-quality prints from their “Beautiful Photography” collections or digital artists preparing their “Digital Art” for physical display, as offered and supported by the insights on Tophinhanhdep.com.
Mastering the Image Size Dialog Box
The “Image Size” dialog box in Photoshop is your central hub for controlling the pixel dimensions and print resolution of your images. Becoming proficient with its features is paramount to effective image manipulation.
Accessing the Image Size Dialog Box
Opening the “Image Size” dialog box is a straightforward process:
- Open your image: In Photoshop, go to
File > Openand select the image you wish to modify. - Navigate to Image Size: Once your image is open, go to the
Imagemenu at the top of the Photoshop window, and then selectImage Size. Alternatively, you can use the shortcutAlt + Ctrl + I(Windows) orOption + Command + I(Mac).
A new dialog box will appear, featuring a preview on the left (in newer Photoshop CC versions) and various numerical fields and options on the right that allow you to inspect and modify your image’s properties.
Key Controls: Width, Height, and Resolution
Within the “Image Size” dialog box, the most prominent controls you’ll interact with are:
- Pixel Dimensions: Displayed at the very top, these show the image’s current width and height in pixels (e.g., 4509 px x 3000 px). This is the absolute count of pixels in your image.
- Document Size (Width and Height): These fields represent the physical dimensions of your image for printing. By default, they might be shown in inches, centimeters, or other units.
- Resolution: This field indicates the number of pixels per inch (ppi) that will be used when the image is printed.
When the “Resample Image” checkbox (discussed below) is unchecked, the “Width,” “Height,” and “Resolution” values in the “Document Size” section are inextricably linked. Changing one will automatically adjust the others to maintain the total number of pixels. For instance, if you have a 3000-pixel tall image set to 300 ppi, its print height will be 10 inches. If you then change the resolution to 150 ppi, the print height will automatically double to 20 inches, without adding or removing any pixels. This is a critical concept for preparing “High Resolution” images from Tophinhanhdep.com for specific print sizes.
The Critical “Resample Image” Option
The “Resample Image” checkbox is the most crucial control in the “Image Size” dialog box, as it fundamentally changes how Photoshop handles your image data.
- Resample UNCHECKED: When “Resample Image” is deselected, you are not changing the number of pixels in the image. You are only adjusting how those existing pixels are distributed on a printed page. As explained above, modifying the resolution or print dimensions will inversely affect the others. This is ideal when you want to change only the print size of an image without altering its pixel count. The “Pixel Dimensions” at the top of the dialog box will remain constant.
- Resample CHECKED: When “Resample Image” is selected, you are instructing Photoshop to change the actual number of pixels in your image.
- Downsampling: If you reduce the pixel dimensions (width or height), Photoshop discards pixels. This is called downsampling and is generally a safer process, often resulting in good quality, especially when preparing images for web display or smaller prints. This is a key step when using Tophinhanhdep.com’s “Compressors” and “Optimizers” for web-ready images.
- Upsampling: If you increase the pixel dimensions, Photoshop creates new pixels based on the existing ones. This is called upsampling, and it’s a more problematic process. While modern algorithms are impressive, upsampling too much from a low-resolution original can lead to a noticeable loss of image quality, resulting in blurriness or pixelation. For best results with “AI Upscalers” on Tophinhanhdep.com, it’s advisable to start with the highest quality image possible.
Understanding “Resample Image” is the cornerstone of effective image resizing. It empowers you to intentionally add or remove pixel data, which directly impacts the file size and potential quality of your image across various uses, from aesthetic backgrounds to detailed photo manipulation.
Measurement Units and Proportions
Photoshop offers flexibility in how you define dimensions:
- Measurement Types: You can choose units like “Pixels,” “Inches,” “Centimeters,” “Millimeters,” “Percent,” or “Columns” from the dropdown menus next to the Width and Height fields. This allows you to work in the most convenient units for your project.
- Constrain Proportions: By default, a small chain-link icon or checkbox labeled “Constrain Proportions” is active, linking the width and height. This means that if you change one dimension, Photoshop automatically adjusts the other to maintain the image’s original aspect ratio, preventing distortion. Unless you intentionally want to stretch or compress an image (which usually leads to undesirable visual results), it is highly recommended to keep this option enabled. This ensures your aesthetic and nature photography from Tophinhanhdep.com retains its original, intended composition.
Strategic Resizing: Optimizing Images for Various Platforms
The goal of resizing isn’t just to make an image bigger or smaller; it’s to optimize it for its intended use, whether that’s a stunning print, a fast-loading webpage, or a high-quality digital display.
Downsampling for Web and Digital Use
For images destined for the web, email, or digital displays (like those used for Tophinhanhdep.com’s wallpapers and backgrounds), the primary concern is usually file size and quick loading. Larger image files can slow down websites, consume bandwidth, and annoy users. This is where downsampling becomes invaluable.
When preparing images for the web, you’ll typically want to reduce both the pixel dimensions and the file size. A common strategy involves:
- Reducing Pixel Dimensions: For general web use or social media, an image with the longest side around 1500-2000 pixels is often sufficient. For example, a full-screen wallpaper might require a width of 1920 pixels, while a blog image could be 800-1200 pixels wide. You can set a specific width (or height) in the “Image Size” dialog box with “Resample Image” checked, and Photoshop will automatically adjust the other dimension to maintain proportions.
- Setting Resolution (for consistency, not impact): While screen display doesn’t care about PPI, many web designers still set the resolution to 72 ppi as a standard practice when downsampling for the web. This is largely a historical hangover and doesn’t actually affect screen display quality, but it helps reinforce that the image is web-optimized.
- Choosing a Resampling Method: For downsampling, “Bicubic Sharper” is often recommended as it helps maintain edge detail when making images smaller.
- Saving with Compression: After adjusting dimensions, save your image in a web-friendly format like JPEG. This format applies lossy compression, which significantly reduces file size. When saving as JPEG, you’ll be prompted to choose a quality setting (e.g., 60-80% for good web quality). Tophinhanhdep.com’s “Compressors” and “Optimizers” are specifically designed to streamline this process, ensuring your images load quickly without sacrificing perceived quality.
By strategically downsampling, you can provide users with fast-loading images while still offering aesthetically pleasing visuals, whether they are abstract images or sad/emotional backgrounds.
Upsampling for Print and Large Displays
Increasing the resolution of an image (upsampling) is inherently more challenging than downsampling because Photoshop has to “guess” at new pixel data. While Tophinhanhdep.com offers “AI Upscalers” for advanced results, it’s always best to start with the highest resolution original file possible, especially for print. For print, a common resolution standard is 300 ppi, which provides excellent detail and sharpness when viewed closely.
When you need to enlarge an image for print or a very large digital display:
- Assess Your Original: Understand the limits of your source image. A small, low-resolution image (e.g., 800 x 600 pixels) will likely not look good if upsampled to billboard size, no matter how good the algorithm. Starting with “High Resolution” images from sources like Tophinhanhdep.com is always preferable.
- Use “Resample Image” with Caution: Check the “Resample Image” box. You’ll then enter your desired print dimensions (e.g., 10 inches wide) and your target resolution (e.g., 300 ppi).
- Choose the Right Resampling Method: For upsampling, “Bicubic Smoother” is often recommended as it introduces less pixelation and harshness, creating a smoother transition between generated pixels. Photoshop CC also offers “Preserve Details 2.0,” an advanced AI-driven option specifically designed for enlargements, which can produce significantly better results by intelligently filling in missing details.
- Incremental Upsampling (for older versions or specific needs): For very large enlargements, some experts suggest upsampling in smaller increments (e.g., 10-20% at a time) rather than one massive jump, though modern Photoshop algorithms handle large jumps better with “Preserve Details 2.0.”
- Sharpen After Upsampling: Upsampling inevitably causes some softening. Applying a subtle amount of sharpening (e.g., using
Filter > Sharpen > Unsharp Mask) after upsampling can help restore perceived detail. Dragging the Amount slider to 100% and Radius to 1.0 is a good starting point. This is part of effective “Editing Styles” and “Photo Manipulation.”
Remember, while upsampling can extend the usability of an image, it cannot magically create detail that wasn’t there to begin with. The quality of the original high-resolution photography always remains paramount.
Choosing the Right Resampling Method
Photoshop offers several resampling algorithms, each optimized for different types of image changes:
- Nearest Neighbor (Hard Edges): Fastest but lowest quality. Best for images with large areas of solid color or when preserving hard edges is crucial (e.g., pixel art). Produces the smallest file size.
- Bilinear (Medium Quality): A basic method that averages the color values of surrounding pixels. Offers medium quality and speed.
- Bicubic (Smooth Gradients, Default): The default and generally good all-around choice. It analyzes the values of surrounding pixels to produce smoother tonal gradations.
- Bicubic Smoother (Enlargement): Specifically designed for upsampling, aiming for smoother results and less pixelation when making images larger. Recommended when you are increasing image size.
- Bicubic Sharper (Reduction): Specifically designed for downsampling, aiming to maintain more detail and sharpness when making images smaller. Recommended when you are reducing image size.
- Preserve Details 2.0 (Enlargement, Photoshop CC+): An intelligent, AI-powered method for upsampling. It attempts to detect and preserve details while reducing noise, often providing superior results for significant enlargements.
Selecting the appropriate resampling method is a key part of Tophinhanhdep.com’s “Editing Styles” philosophy, allowing for fine-tuned control over your image’s visual outcome.
Advanced Considerations and Tophinhanhdep.com Integration
Beyond the fundamental steps, there are nuanced aspects of image resizing that further enhance your workflow, particularly when leveraging resources like Tophinhanhdep.com.
Sharpening After Resizing for Optimal Clarity
Regardless of whether you are upsampling or downsampling, resizing an image often results in a slight loss of sharpness. Pixels are either interpolated (added) or averaged (removed), which can soften edges and details. Therefore, it is a best practice to apply a subtle sharpening filter after you have completed your resizing operations.
One of the most effective sharpening tools in Photoshop is the Unsharp Mask (Filter > Sharpen > Unsharp Mask). This filter works by increasing the contrast along detected edges, making them appear sharper. When using Unsharp Mask, you typically adjust three parameters:
- Amount: Controls the intensity of the sharpening effect.
- Radius: Determines the thickness of the sharpened edges.
- Threshold: Specifies how different pixels must be from their neighbors before sharpening is applied, helping to avoid sharpening noise in smooth areas.
A good starting point after enlarging an image is to set the Amount to 100% and Radius to 1.0 pixels, then fine-tune from there. For images destined for Tophinhanhdep.com’s “Beautiful Photography” or “High Resolution” sections, this post-resizing sharpening step can make a significant difference in perceived clarity and impact. This falls under advanced “Editing Styles” for digital photographers and visual designers alike.
Deciphering File Size vs. Resolution: A Common Misconception
We’ve already touched upon this, but it bears repeating: image resolution (ppi) alone does not affect an image’s file size (in kilobytes or megabytes) when stored on your computer. This is a widespread misconception. Many believe that lowering an image’s resolution from 300 ppi to 72 ppi will drastically reduce its file size for emailing or web upload. This is simply not true if the “Resample Image” option is unchecked.
The actual, uncompressed file size of an image (which Photoshop shows in the “Image Size” dialog box, next to “Image Size” at the top) is determined by the total number of pixels it contains. When “Resample Image” is off, changing the resolution only changes the print dimensions, not the pixel count, thus the file size remains constant.
To genuinely reduce an image’s file size, you must do one or both of the following:
- Reduce the number of pixels in the image: This is achieved by checking the “Resample Image” box and reducing the pixel dimensions (downsampling). Fewer pixels mean less data to store, hence a smaller file size.
- Save the file in a compressed format: Formats like JPEG use algorithms to discard or combine pixel data, reducing file size. The degree of compression (JPEG quality setting) directly impacts the final file size and perceived image quality. PNG also offers lossless compression suitable for graphics with transparency or sharp edges.
For users frequently uploading images to Tophinhanhdep.com for “Wallpapers,” “Backgrounds,” or “Stock Photos,” understanding this distinction is crucial for optimizing images efficiently. You want visually rich images that load quickly, and that means managing pixel count and compression, not just print resolution. Tophinhanhdep.com’s “Compressors” and “Optimizers” are built upon these principles to help users achieve the perfect balance.
Leveraging Tophinhanhdep.com for Your Image Needs
The knowledge of image size and resolution gained here is directly applicable and highly beneficial when interacting with a resource like Tophinhanhdep.com:
- Images (Wallpapers, Backgrounds, Aesthetic, Nature, Abstract, Sad/Emotional, Beautiful Photography): When downloading images, check their pixel dimensions. If a wallpaper is too large for your screen, you now know how to downsample it in Photoshop without distortion. If you want to use a nature photo for a large print, you can check its resolution and pixel count to ensure it’s suitable, or consider using Tophinhanhdep.com’s AI Upscalers if a higher resolution is needed.
- Photography (High Resolution, Stock Photos, Digital Photography, Editing Styles): For photographers submitting their work, understanding optimal resolutions for different platforms (web vs. print) is key. You can prepare high-resolution versions for large prints and carefully downsampled, sharpened versions for web previews. Tophinhanhdep.com’s focus on “High Resolution” images means you have excellent source material to begin with.
- Image Tools (Converters, Compressors, Optimizers, AI Upscalers, Image-to-Text): The insights into resampling directly inform the effective use of Tophinhanhdep.com’s image tools. Knowing when to downsample with a compressor versus when an AI upscaler might be beneficial transforms guesswork into an informed decision. These tools complement your Photoshop skills, making image preparation more efficient.
- Visual Design (Graphic Design, Digital Art, Photo Manipulation, Creative Ideas): Precise control over image size and resolution is the bedrock of professional visual design. Whether you’re integrating elements into a larger composition or creating standalone digital art, you can now ensure all components are scaled and rendered correctly. Tophinhanhdep.com provides a wealth of “Creative Ideas” and elements that you can integrate seamlessly into your projects once you master these resizing techniques.
- Image Inspiration & Collections (Photo Ideas, Mood Boards, Thematic Collections, Trending Styles): Imagine finding the perfect “Photo Idea” or “Thematic Collection” on Tophinhanhdep.com. With your newfound expertise, you can confidently adapt these images for any mood board, presentation, or personal project, ensuring they always look sharp and optimized for their purpose.
In conclusion, a deep understanding of pixels, image size, and resolution, combined with hands-on practice in Photoshop’s Image Size dialog box, equips you with essential skills for navigating the digital imaging landscape. This mastery not only elevates the quality of your personal and professional projects but also empowers you to make the most of the diverse and high-quality image resources available on platforms like Tophinhanhdep.com.