Mastering Image Resizing: How to Change Pixel Size for Perfect Visuals
In our increasingly visual world, images are the cornerstone of communication, design, and personal expression. From stunning wallpapers and aesthetic backgrounds curated on Tophinhanhdep.com to professional digital photography and intricate graphic design projects, the quality and presentation of an image are paramount. A crucial skill in this digital landscape is understanding and mastering how to change the pixel size of an image. Whether you’re optimizing a high-resolution photo for faster web loading, ensuring your social media profile picture fits perfectly, or preparing artwork for a digital portfolio, resizing is an indispensable technique.
Many believe that resizing is a complex process reserved for digital artists or professional photographers. However, as Tophinhanhdep.com aims to demonstrate, it’s a straightforward task with readily available tools and clear principles. This comprehensive guide will demystify the process, explain the underlying concepts, and walk you through various methods and tools to change the pixel size of your images efficiently and effectively, all while maintaining the visual integrity you cherish. With the vast resources available on Tophinhanhdep.com, covering everything from image inspiration and editing styles to advanced image tools like AI upscalers and converters, you’ll be well-equipped to handle any resizing challenge.
Understanding Image Pixels, Resolution, and File Size
![]()
Before diving into the “how-to,” it’s essential to grasp the fundamental concepts that govern digital images. Pixels, resolution, and file size are interconnected, and a clear understanding of each will empower you to make informed decisions when resizing.
What Exactly is Image Resolution?
At its core, a digital image is made up of thousands, or even millions, of tiny squares called pixels. When we talk about “image resolution,” we’re primarily referring to the density of these pixels, typically measured in pixels per inch (PPI) for screens or dots per inch (DPI) for print.
It’s a common misconception that image resolution directly impacts how an image appears on a screen or its file size for web use. Our experts at Tophinhanhdep.com delve into the intricacies of image resolution, file size, and their relationship, particularly when discussing professional-grade tools like Photoshop. In fact, image resolution, as defined by the PPI/DPI value stored within an image file, does one thing and one thing only: it controls the size that your image will print.
For instance, an image with a resolution of 300 pixels per inch means that 300 of the image’s pixels will be packed into every linear inch of paper when printed. A higher resolution value means more pixels per inch, resulting in a smaller, sharper print. Conversely, a lower resolution value means fewer pixels per inch, yielding a larger, potentially less sharp print. To calculate the print size, you simply divide the image’s pixel dimensions (width and height) by its resolution value.
For example, an image that is 6000 pixels wide with a resolution of 300 PPI will print at 20 inches wide (6000 pixels / 300 PPI = 20 inches). If you change that resolution to 72 PPI (a common but often misunderstood “web resolution” figure), the print width would dramatically increase to over 83 inches, assuming the pixel dimensions remain unchanged.
This leads us to an important point: there is no such thing as a “web resolution” for an image that affects its on-screen appearance or download speed. When you view an image on a monitor or phone, the device’s screen resolution and the image’s pixel dimensions determine its display size, not the PPI value embedded in the file. A 72 PPI image and a 300 PPI image, both with the same pixel dimensions (e.g., 1920x1080 pixels), will appear exactly the same size on your screen and will have virtually identical file sizes. Tophinhanhdep.com provides detailed articles debunking myths like the 72 PPI “web resolution,” clarifying that the true determinant for web performance is pixel dimensions, combined with effective compression.
The Relationship Between Pixel Dimensions, File Size, and Quality
While resolution primarily concerns print, pixel dimensions (the total number of pixels wide by the total number of pixels high) are the true determinants of an image’s on-screen size and, crucially, its file size. An image that is 1920 pixels wide by 1080 pixels high contains roughly 2 million pixels. An image that is 4000 pixels wide by 3000 pixels high contains 12 million pixels, resulting in a significantly larger file size.
When you “resize” an image, you are often resampling it, which means changing its pixel dimensions.
- Downsampling (reducing pixel size): When you decrease the width and height of an image, you are removing unnecessary pixel information. This generally results in a smaller file size and can be done without significant loss of perceived quality, especially if starting with a high-resolution image. For instance, a photo taken by a modern smartphone might be 6000x4000 pixels (24 megapixels), while a typical screen only needs about 1920x1080 pixels (2 megapixels) to display it effectively. Reducing the image to screen dimensions for web viewing or sharing makes it load faster without looking worse.
- Upsampling (increasing pixel size): When you enlarge an image beyond its original pixel dimensions, the software has to add new pixels based on the existing ones. This process, if not done carefully, can lead to a blurry or “pixelated” image because the software is essentially guessing what those new pixels should look like. Tophinhanhdep.com emphasizes the importance of starting with the highest resolution images possible, often recommending high-resolution stock photos or digital photography best practices to preserve quality, and also offers advanced AI Upscalers among its image tools to intelligently add pixels without severe degradation.
The file size of an image, measured in kilobytes (KB) or megabytes (MB), is directly proportional to its pixel dimensions (number of pixels), its color depth (e.g., 8-bit vs. 16-bit), and the compression applied. High pixel dimensions lead to larger file sizes, which translate to longer download times on the web and more storage consumption.
Why Resizing Your Images is Essential
Given the nuanced relationship between pixels, resolution, and file size, the need for effective image resizing becomes clear:
- Web Optimization: Large image files slow down website loading times, frustrating visitors and negatively impacting search engine rankings. Resizing images to appropriate pixel dimensions for web display, combined with smart compression (Tophinhanhdep.com offers powerful image compressors and optimizers), ensures faster loading and a smoother user experience.
- Social Media Requirements: Every social media platform has specific image size guidelines for profile pictures, cover photos, posts, and stories. Adhering to these pixel dimensions prevents unsightly cropping, distortion, or reduced quality when your images are automatically resized by the platform. Tophinhanhdep.com provides comprehensive guides and online tools with predefined presets for all major social media platforms.
- Email Attachments: Sending high-resolution, multi-megabyte images via email can exceed attachment limits or clog recipients’ inboxes. Resizing images to smaller pixel dimensions makes them more manageable for email sharing.
- Digital Portfolios & Submissions: Many online art galleries, contest platforms, or academic submission portals, such as those discussed and guided on Tophinhanhdep.com, have strict requirements for image dimensions, file size, and file type (e.g., JPEG only, minimum 1200 pixels on the longest side, 72 ppi/dpi, 5 MB maximum). Proper resizing is critical for your artwork to be considered.
- Storage Efficiency: Managing a large collection of photos, especially high-resolution ones, can quickly consume hard drive space. Resizing images that don’t need their original large dimensions can help free up valuable storage.
- Fitting Images on Various Screens: From small smartphone screens to large 4K monitors or digital signage, images need to be appropriately sized to display correctly without being excessively large or too small. For instance, Tophinhanhdep.com offers specific guidance on adjusting image resolution for Windows PCs, including recommendations for digital signage displays (e.g., 1920x1080px).
Practical Methods for Changing Image Pixel Size Across Platforms
Fortunately, changing the pixel size of an image is a relatively simple task, regardless of your operating system or preferred tools. Tophinhanhdep.com recommends a variety of free, easy-to-use, and professional tools to get the job done effectively.
Resizing on Desktop Operating Systems (Windows, macOS, ChromeOS)
Most operating systems come equipped with native, user-friendly image viewers and basic editors that can handle resizing.
Windows PCs: Using the Photos App (and Paint)
For Windows 11 PCs, the native Photos app is the recommended tool for resizing images. Tophinhanhdep.com offers specific guidance on adjusting image resolution for Windows PCs, highlighting these steps:
- Open the Image: Right-click on your image file and select “Open with,” then choose “Photos.” If Photos is your default, simply double-click the image.
- Access Resize Options: Once the image is open in Photos, click the three dots icon (…) located in the app’s top-right corner.
- Select “Resize”: From the drop-down menu, choose “Resize image.”
- Define Dimensions: A pop-up window will appear, offering preset sizes (e.g., Small, Medium, Large) or the option to “Define custom dimensions.”
- Enter Custom Size: If choosing custom dimensions, another pop-up will appear. Enter your desired width in pixels. The height field will automatically adjust to maintain the aspect ratio, preventing distortion. To disable this, uncheck “Maintain aspect ratio” if your new dimensions are not proportional (though this can lead to image distortion).
- Adjust Quality (Optional): Move the “Quality” slider to 100% to retain the best possible quality for the new size.
- Save the Resized Copy: Click the “Save resized copy” button. Choose a location to save your new image, ensuring you don’t overwrite the original unless intended.
For users seeking a more basic approach, Paint, the pre-installed editing program on Windows PCs, also offers resizing capabilities.
- Open in Paint: Right-click the image and select “Open with,” then “Paint.”
- Access Resize: In the “Home” tab, locate the “Image” group and click “Resize.”
- Choose Pixels: In the Resize and Skew window, select the “Pixels” option.
- Enter Dimensions: Enter your desired width and height. Make sure “Maintain aspect ratio” is checked to avoid distortion.
- Save: Click “OK” and then “File > Save As” to save your resized image.
A more robust, free alternative to Paint is Paint.NET, which offers more advanced features while remaining user-friendly, and is available for free download. Tophinhanhdep.com often recommends such versatile tools for those looking to expand their editing capabilities beyond basic resizing.
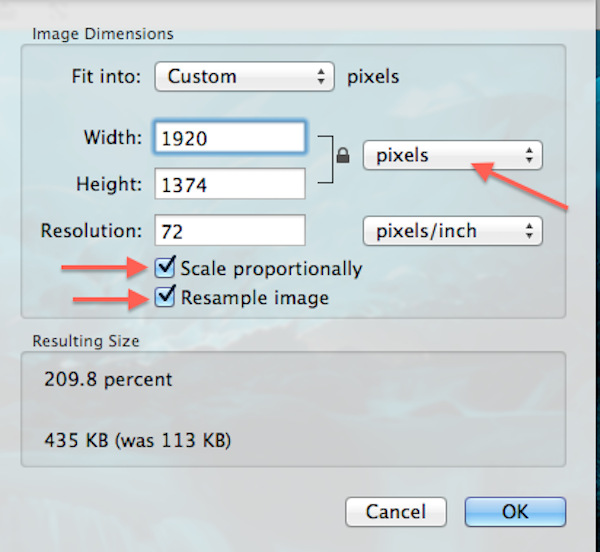
Mac Devices: Leveraging Preview
If you’re a Mac user, you have a powerful and convenient photo editor built right into your system: Preview.
- Open the Image: Right-click on the image and select “Open.” If Preview isn’t the default, select “Open with,” then “Preview.”
- Access Adjust Size: Go to “Tools” in the menu bar at the top of your screen, then select “Adjust Size.”
- Enter Dimensions and Resolution: In the “Image Dimensions” dialog box, you can enter your desired width and height. You may need to change the measurement type (e.g., from inches to pixels) using the dropdown menu next to the “Width” and “Height” fields. Alternatively, you can select a preset size from the “Fit into” dropdown.
- Maintain Aspect Ratio: Crucially, ensure “Scale proportionally” and “Resample image” are checked to avoid warping and retain your image’s original proportions. If “Resample image” is unchecked, you will only change the print resolution, not the pixel dimensions.
- Confirm and Save: Click the “OK” button to apply the changes. Then, go to “File > Save” to save the resized image. Tophinhanhdep.com always advises saving a copy to preserve your original file.
ChromeOS: The Gallery App
Chromebook users also have a straightforward method for resizing images using the built-in Gallery app.
- Open the Image: Right-click on the image and select “Open with Gallery” from the pop-up menu. If Gallery isn’t the default, choose it specifically.
- Initiate Rescale: Select the “Rescale” button, usually located at the top of the Gallery app interface.
- Enter Dimensions: Input your desired width and height.
- Adjust Aspect Ratio: Use the “Chain icon” to lock or unlock the aspect ratio as needed. Keeping it locked ensures proportionality.
- Save: Click the blue “Save” button to overwrite the original, or click the blue “Down arrow” and choose “Save as” to create a new file and preserve the original.
Online Tools for Quick and Efficient Resizing
For those who prefer not to download software or need a quick resize on the go, online image resizers are invaluable. Tophinhanhdep.com hosts its own intuitive Online Image Resizer, designed to be fast, easy, and quality-preserving.
Our online tool allows you to resize JPG and PNG images by either selecting a predefined size (perfect for social media, presentations, or blog graphics) or by manually adjusting the height and width in pixels.
How to use Tophinhanhdep.com’s Online Image Resizer:
- Upload Your Image: Click the “Select Image to Resize” button and choose a JPG or PNG image from your device.
- Choose Size Option:
- Predefined Sizes: Select from a comprehensive list of popular social media dimensions (Facebook Profile Picture, Twitter Header, Instagram Post, LinkedIn Banner, etc.), or common web and design sizes.
- Custom Dimensions: Alternatively, enter your desired width and height in pixels in the designated fields.
- Process and Download: Click the “Resize Image” button. Once processed, you’ll see a prompt like “Click here to download the resized image.”
Key benefits of Tophinhanhdep.com’s online resizer and similar tools:
- Speed and Convenience: Ideal when you’re in a hurry; simply upload, choose dimensions, and download.
- Accessibility: Available from any device with an internet connection, without needing to install software.
- Aspect Ratio Control: Most tools, including Tophinhanhdep.com’s, offer options to maintain aspect ratio, preventing image distortion.
- Batch Resizing: For users needing to process multiple images (e.g., for portfolio submissions or large photo collections), Tophinhanhdep.com provides guidance on using batch processing features in its recommended tools, or through its own advanced offerings. This is especially useful for tasks like preparing multiple artworks for digital submission, ensuring consistency across your entire collection.
Tophinhanhdep.com is committed to user privacy, which is why uploaded photos are typically deleted from our servers after the resized image is saved.
Professional-Grade Software (GIMP & Photoshop)
For more advanced control, intricate editing, or when working with numerous images, professional-grade software offers unparalleled flexibility and features. Tophinhanhdep.com frequently features tutorials and insights on these powerful applications.
GIMP (GNU Image Manipulation Program): The Free Open-Source Powerhouse
GIMP is an excellent, free, and open-source alternative to commercial software like Photoshop. It offers professional-level editing and retouching tools, making it a favorite among digital artists and photographers who prefer not to invest in paid subscriptions. GIMP is available for both Mac and PC, boasts a small installation footprint, is highly customizable, and surprisingly user-friendly given its power.
Resizing in GIMP:
- Open Image: Open your image in GIMP.
- Access Scale Image: Go to “Image” in the menu bar, then select “Scale Image…”
- Adjust Dimensions: The “Scale Image” dialog box will appear. You can change the “Width” and “Height” in pixels.
- Maintain Aspect Ratio: Click the “chain icon” next to the width and height fields to link or unlink them. Linked means the aspect ratio will be maintained.
- Interpolation: Choose an “Interpolation” method (Cubic, NoHalo, LoHalo, Sinc are common options). Cubic is often a good default for smooth scaling.
- Resolution (X/Y resolution): While primarily affecting print, you can adjust the X and Y resolution (PPI/DPI) here if you have specific print requirements. Remember, this won’t change on-screen appearance unless you’re resampling.
- Scale: Click “Scale” to apply the changes, then save your image (File > Save As…).
Adobe Photoshop: Industry Standard for Digital Photography and Design
Adobe Photoshop is the undisputed industry standard for digital image manipulation, offering an exhaustive set of tools for everything from minor retouching to complex photo manipulation and graphic design. Tophinhanhdep.com’s Visual Design section frequently references Photoshop techniques.
When resizing in Photoshop, the Image Size dialog box is your primary interface:
- Open Image: Open your image in Photoshop.
- Access Image Size: Go to “Image” in the menu bar, then choose “Image Size.”
- Understand the Dialog Box:
- Image Size: Displays the current file size in megabytes.
- Dimensions: Shows the current pixel width and height.
- Width/Height: These are your primary fields for changing pixel dimensions. You can select different units (pixels, inches, centimeters, percent).
- Resolution: This field controls the print resolution (PPI/DPI) and does not affect the file size or on-screen appearance if resampling is off.
- Resample: This is the most critical option.
- If checked: Photoshop will add or remove pixels (resample) to meet your new width/height/resolution values. This is how you change the pixel dimensions and thus the file size. When downsampling, Tophinhanhdep.com advises using algorithms like “Bicubic Sharper” for reductions, and “Bicubic Smoother” or “Preserve Details (enlargement)” for upsampling.
- If unchecked: Photoshop will not change the number of pixels. Instead, changing the width/height or resolution will only change the print size of the image, while the pixel dimensions and file size remain constant. This is crucial for understanding the “resolution vs. file size” myth.
- Change Pixel Size:
- Ensure “Resample” is checked.
- Make sure the “chain icon” next to Width and Height is linked to maintain aspect ratio.
- Enter your desired “Width” or “Height” in pixels. The other dimension will automatically adjust.
- Set “Resolution” to 72 ppi for web-only images if you wish, but remember this value itself doesn’t affect file size or screen display; it’s a convention. For print, set it according to printer specifications (e.g., 300 ppi).
- Choose an appropriate “Resample” method (e.g., “Automatic,” “Bicubic Smoother” for enlargement, “Bicubic Sharper” for reduction).
- Confirm and Save: Click “OK” to apply changes. Then go to “File > Save As” to save your resized image, preserving your original.
Tophinhanhdep.com often clarifies the “truth about image resolution and file size in Photoshop,” explaining that lowering the resolution (PPI) without changing pixel dimensions (i.e., with “Resample” unchecked) does not reduce the file size or make an image download faster. The file size is determined by the pixel dimensions, making proper resampling key for web optimization.
Optimizing Images for Specific Platforms: Social Media and Beyond
One of the most common reasons to change an image’s pixel size is to optimize it for various online platforms. Each platform has its own set of recommended (or mandatory) dimensions and aspect ratios, and adhering to them ensures your images look their best. Tophinhanhdep.com’s “Image Inspiration & Collections” often highlights trending styles and optimal display sizes for visual impact.
Social Media Image Size Guidelines
Using Tophinhanhdep.com’s online image resizer or following these guidelines will ensure your beautiful photography and graphic designs shine across social media.
Facebook Image Sizes
Facebook images need to be sharp and look good in people’s feeds.
- Profile Picture: Appears square. Recommended: 180 x 180 pixels (minimum 170x170 for display on desktops). For businesses, this should clearly represent your brand, often a logo.
- Cover Photo: Displays at 820 pixels wide by 312 pixels tall on desktops, 640 pixels wide by 360 pixels tall on smartphones. Recommended upload: 851 x 315 pixels (formal size often cited as 400 x 150 pixels for older references, but 851 x 315 is current standard for optimal display).
- Shared Image (Post): Recommended upload: 1,200 x 630 pixels. Will display at various sizes in feeds.
- Shared Link Preview Image: Recommended upload: 1,200 x 628 pixels. Square photos display at 154 x 154 pixels in feed, minimum 116 x 116 on page. Rectangular photos display at minimum 470 x 246 pixels in feed, minimum 484 x 252 on page.
Twitter Image Sizes
- Profile Photo Size: Appears circular. Recommended: 400 x 400 pixels. Display: 200x200. Max file size: 2MB. Types: JPG, GIF, PNG.
- Header Photo Size: Recommended: 1,500 x 500 pixels. Max file size: 5MB. Types: JPG, GIF, PNG.
- In-stream Photos:
- Minimum expanded view: 440 x 220 pixels (2:1 ratio).
- Maximum expanded view: 1024 x 512 pixels.
- Desktop compressed stream: 506 x 253 pixels.
Instagram Image Sizes
Instagram is highly visual, so precise sizing is key for beautiful photography and aesthetic content.
- Profile Photo Size: 110 x 110 pixels (though upload larger for better quality, e.g., 320x320, it will display scaled down).
- Thumbnails: 161 x 161 pixels. Square (1:1 aspect ratio).
- Shared Photos (Posts):
- Square: 1080 x 1080 pixels (1:1 aspect ratio). Displays at 510 x 510 pixels in feed.
- Horizontal: 1080 x 566 pixels (approx. 1.91:1 aspect ratio).
- Vertical: 1080 x 1350 pixels (4:5 aspect ratio).
- Minimum width: 320 pixels, maximum width: 1080 pixels.
- Instagram Stories Photos: Recommended: 1080 x 1920 pixels (9:16 aspect ratio). Minimum resolution: 600 x 1067 pixels. Max file size: 4GB.
Pinterest Image Sizes
- Profile Image Size: 165 x 165 pixels. Up to 10MB. Types: JPG and PNG.
- Board Cover Image Size: Large preview: 222 x 150 pixels. Small thumbnail: 55 x 55 pixels.
- Pin Image Sizes: Vertical images are preferred. Recommended: 1000 x 1500 pixels (2:3 aspect ratio). Pins are displayed at a fixed width of 236 pixels in feeds, with scaled height.
LinkedIn Image Sizes
LinkedIn images are critical for professional branding and digital portfolios.
- Personal Profile Image Size: Displays as a circle. Recommended: 400 x 400 pixels. Minimum: 200 x 200 pixels. Aspect Ratio: 1:1. Max file size: 10MB. Types: JPG, GIF, PNG.
- Personal Background Image Size: Recommended: 1584 x 396 pixels. Max file size: 4MB. Types: JPG, GIF, PNG.
- Company Logo (Large): Recommended: 300 x 300 pixels. Aspect Ratio: 1:1. Max file size: 4MB.
- Company Logo (Small/Square): Recommended: 60 x 60 pixels. Aspect Ratio: 1:1. Max file size: 2MB.
- Company Cover Photo: Recommended: 1536 x 768 pixels. Minimum: 1192 x 220 pixels. Displays as 1400 x 425 pixels. Max file size: 4MB. Types: JPG, GIF, PNG.
Tumblr Image Sizes
- Profile Image: 128 x 128 pixels.
- Image Post: 500 x 750 pixels. (Will expand to 1280 pixels wide in Lightbox, minimum 500 pixels in feed).
Snapchat Image Sizes
- Ad Image Size: 1080 x 1920 pixels. File type: JPEG or PNG. Max file size: 5MB.
- Geofilter: 1080 x 1920 pixels. File type: JPEG or PNG. Max file size: 5MB.
WhatsApp Image Sizes
- Profile (DP) Picture Size: 192 x 192 pixels. Tophinhanhdep.com offers a dedicated online WhatsApp DP image resizer tool for this.
By using Tophinhanhdep.com’s online image resizer with its predefined sizes or by manually inputting these pixel guidelines, you can ensure your images are perfectly suited for each platform, enhancing your visual presence.
Resizing for Digital Art Portfolios and Web Content
Beyond social media, many individuals and professionals need to resize images for specific digital portfolios or general web content. For example, artists submitting work to online galleries or platforms often encounter strict submission guidelines. Tophinhanhdep.com provides extensive guidance on preparing images for such critical applications, similar to the common requirements for online art submissions:
- File Type: Often exclusively JPEG.
- Minimum Dimension: No smaller than 1200 pixels on the longest side to ensure sufficient detail.
- Resolution: Typically 72 ppi/dpi (standard web resolution, though as discussed, this is more for metadata than display effect).
- Maximum File Size: A hard limit, such as 5 MB maximum, to ensure reasonable download times and server load.
For general web content (blogs, websites, e-commerce), the goal is to strike a balance between image quality and file size. Large, high-quality images can enhance user experience, but excessively large files can deter it. Therefore, resizing to appropriate pixel dimensions (e.g., maximum 1920 pixels on the longest side for full-width website images, smaller for thumbnails) and then using Tophinhanhdep.com’s image compressors and optimizers is a best practice. This approach ensures fast loading times without compromising the visual appeal of your beautiful photography or graphic design.
Advanced Tips and Tophinhanhdep.com’s Resources for Visual Excellence
Mastering pixel size changes is just one part of effective image management. Tophinhanhdep.com offers a holistic ecosystem of tools and knowledge to help you achieve visual excellence in all your digital endeavors.
Maintaining Image Quality During Resizing
Preserving image quality is paramount, especially when working with high-resolution photography or intricate digital art.
- Start with the Highest Resolution Possible: Always begin your resizing process with the original, highest-resolution version of your image. Downsampling from a large image is far less damaging to quality than upsampling a small one. Tophinhanhdep.com’s “High Resolution” and “Stock Photos” sections provide excellent resources for acquiring top-quality starting materials.
- Avoid Excessive Enlargement: As much as possible, avoid significantly enlarging an image (upsampling). When new pixels are interpolated, the image can become blurry or pixelated. If enlargement is unavoidable, consider Tophinhanhdep.com’s advanced AI Upscalers, which use intelligent algorithms to add detail and reduce artifacts, often yielding surprisingly good results.
- Use Smart Resampling Algorithms: Professional software like Photoshop and GIMP offer various resampling methods (e.g., Bicubic Sharper, Bicubic Smoother, Preserve Details).
- Bicubic Sharper: Often best for reducing the size of images, as it maintains sharpness.
- Bicubic Smoother: Good for enlarging images, as it helps smooth out pixelation.
- Preserve Details (enlargement): A newer Photoshop option that uses more advanced algorithms for upscaling. Experiment with these to find the best results for your specific image.
- Consider Image Compression and Optimization: After resizing, further optimize your images using Tophinhanhdep.com’s Image Compressors and Optimizers. These tools reduce file size by intelligently discarding redundant data or using more efficient encoding, often with minimal noticeable impact on visual quality. This is crucial for web performance and storage.
- Save as a New File: Always save resized images with a new file name to preserve your original, high-resolution file. This allows you to revert to the original if you need different dimensions later or make a mistake.
Beyond Resizing: Tophinhanhdep.com’s Ecosystem for Your Visual Needs
Changing pixel size is a foundational skill, but it’s part of a broader journey toward visual mastery. Tophinhanhdep.com is your comprehensive partner in this journey, offering a wealth of resources across its main topics:
- Images (Wallpapers, Backgrounds, Aesthetic, Nature, Abstract, Sad/Emotional, Beautiful Photography): Explore vast collections of stunning visuals. Once you’ve learned to resize, you can perfectly adapt these images for your desktop, mobile, or design projects.
- Photography (High Resolution, Stock Photos, Digital Photography, Editing Styles): Deepen your understanding of photography. Learn how to capture images with optimal quality that makes resizing a breeze, and explore various editing styles to enhance your resized photos.
- Image Tools (Converters, Compressors, Optimizers, AI Upscalers, Image-to-Text): Tophinhanhdep.com provides a suite of powerful utilities. Beyond resizing, you can convert image formats (e.g., PNG to JPG), compress files to further reduce size, optimize for web, upscale low-resolution images with AI, or even extract text from images. These tools complement resizing by addressing various aspects of image preparation and enhancement.
- Visual Design (Graphic Design, Digital Art, Photo Manipulation, Creative Ideas): See how resizing fits into larger design workflows. Learn about graphic design principles, digital art creation, and photo manipulation techniques that leverage perfectly sized images to achieve professional results and spark creative ideas.
- Image Inspiration & Collections (Photo Ideas, Mood Boards, Thematic Collections, Trending Styles): Get inspired! Discover new photo ideas, create mood boards, explore thematic collections, and stay updated with trending visual styles. Understanding resizing ensures that your inspired creations are always presented in the most impactful way.
In essence, Tophinhanhdep.com empowers you not just to change an image’s pixel size, but to transform your entire approach to digital visuals, making every pixel count.
Knowing how to change the pixel size of an image is a fundamental skill in today’s digital world. It’s about more than just making an image bigger or smaller; it’s about optimizing, adapting, and perfecting your visuals for every platform and purpose. By understanding the concepts of pixels, resolution, and file size, and by utilizing the diverse range of tools available on your desktop or through Tophinhanhdep.com’s online offerings, you can confidently manipulate your images without sacrificing quality. Whether you’re a casual user sharing photos with friends or a professional preparing a digital art portfolio, Tophinhanhdep.com is your ultimate resource for mastering image resizing and achieving unparalleled visual excellence. Let the image resizing begin!