Mastering Image Resolution: Your Comprehensive Guide to Changing Image Sizes with Tophinhanhdep.com

In today’s visually-driven world, images are everywhere – from the stunning wallpapers adorning our screens to the high-resolution photography gracing professional portfolios. Whether you’re a digital artist, a casual photographer, or someone simply looking to upload a picture to a website, understanding and knowing how to change the resolution of an image is a fundamental skill. Image resolution directly impacts an image’s quality, clarity, and suitability for various platforms, be it a printed mug, a social media banner, or a digital background.
At Tophinhanhdep.com, we understand the nuances of image manipulation and strive to provide you with the best tools and insights. Our platform is dedicated to all things visual, offering everything from beautiful photography and aesthetic backgrounds to powerful image tools like converters, compressors, optimizers, and AI upscalers. This guide will walk you through the essential techniques for adjusting image resolution, ensuring your visuals always look their best, regardless of the application.

Understanding Image Resolution and Why It Matters
Before diving into the “how-to,” it’s crucial to grasp what image resolution means and why its proper management is so vital.
What is Image Resolution?
Image resolution refers to the detail an image holds. It’s typically measured in pixels per inch (PPI) for screens or dots per inch (DPI) for print. For digital images, resolution is often expressed by its dimensions – the number of pixels wide by the number of pixels high (e.g., 1920x1080 pixels). A higher resolution image contains more pixels, resulting in greater detail and sharper appearance, especially when viewed at larger sizes. Conversely, a lower resolution image has fewer pixels, which can lead to pixelation or blurriness if stretched beyond its original size.
Think of it this way: a high-resolution image is like a finely woven tapestry with many threads, allowing for intricate details. A low-resolution image is more like a coarsely woven rug, where individual threads (pixels) become visible when you look closely.
Common Scenarios for Changing Resolution
You might encounter situations requiring a resolution change almost daily. Here are some typical scenarios:
- Website Uploads: Many websites, like online photo printing services or e-commerce platforms, have strict requirements for image resolution. If an image’s resolution is too low, it might be rejected or appear blurry on their product, as experienced by users trying to upload photos for custom mugs. If it’s too high, it might slow down page loading, impacting user experience. This relates directly to our website’s focus on high-resolution photography and optimizing images.
- Social Media: Different social media platforms (Facebook, Instagram, X.com, LinkedIn) have optimal image dimensions for profiles, banners, and posts. Adjusting resolution ensures your aesthetic backgrounds or thematic collections look crisp and are not awkwardly cropped or compressed by the platform.
- Printing: For physical prints, DPI is key. A photo meant for a large poster requires a much higher resolution than one for a small business card. Incorrect resolution can result in grainy or pixelated prints.
- Emailing and Sharing: High-resolution images can have large file sizes, making them slow to send via email or challenging to share quickly. Reducing the resolution (and thus file size) can streamline this process. Our compressors and optimizers tools at Tophinhanhdep.com are specifically designed for this.
- Storage: Large image files consume significant storage space. Downsizing images can help manage your digital archives more efficiently, especially for your extensive image collections.
Practical Methods for Changing Image Resolution on Desktop
Several tools, both built-in and professional, allow you to modify image resolution directly from your computer.
Using Built-in Windows Tools (Paint & Photos App)
For Windows users, there are accessible, no-cost options to adjust image resolution. While these tools are straightforward, it’s important to note that increasing resolution with them usually doesn’t add detail, but rather stretches existing pixels, which can lead to quality degradation.
How to Check the Resolution of an Image on a Windows PC:
Before making any changes, it’s wise to know the current resolution.
- Navigate to the image file using Windows Explorer.
- Right-click on the image file.
- Select Properties.
- Go to the Details tab.
- Look for the Dimensions field to see the image’s pixel resolution (e.g., 1920x1080px).
Resizing with Microsoft Paint:
Microsoft Paint is a simple, pre-installed image editor on Windows, suitable for basic resolution adjustments.
- Open the image in Microsoft Paint. You can usually do this by right-clicking the image, selecting “Open with,” and choosing “Paint.”
- In the ribbon at the top, find the “Image” group and click the “Resize” button.
- In the Resize and Skew dialog box, select the “Pixels” option.
- You can then enter your desired width or height in pixels. By default, “Maintain aspect ratio” is checked, which means the other dimension will automatically adjust to prevent distortion. If you uncheck this, you can set both dimensions independently, but this can lead to image stretching or squishing.
- Click “OK” to apply the changes.
- Save your modified image (File > Save As) to keep a copy of both resolutions. Remember, saving over the original will overwrite it.
Resizing with the Windows Photos App:
The Photos app is another built-in Windows utility that offers a slightly more streamlined resizing experience.
- Double-click the image file to open it with the Photos app (this is usually the default image viewer). If it doesn’t open with Photos, right-click the image, hover over “Open with,” and select “Photos.”
- Once the image is open, look for the "…" (three-dot) icon in the top right corner of the window. Click it.
- From the dropdown menu, select “Resize image.”
- A sidebar or new window will appear, offering various resizing presets or a custom option. Choose “Define custom dimensions” or similar.
- Ensure the “Pixels” option is selected.
- Enter the required width of the image. The height field will update automatically to maintain the aspect ratio.
- You might also see a “Quality” slider. For best results, especially when reducing size, keep it at 100%.
- Click “Save” or “Save resized copy,” choose a location, and save your new image. This is particularly useful for preparing digital photography for specific display sizes.
Professional Editing with Adobe Photoshop
For more precise control, advanced features, and minimal quality loss, professional software like Adobe Photoshop is the go-to choice, often used by those creating graphic design and digital art.
- Open the image you wish to modify in Photoshop. You can do this by clicking File > Open or by pressing Ctrl+O (Windows) or ⌘ Cmd+O (Mac) and then double-clicking the image file.
- Once the image is open, navigate to the Image menu at the top of the screen.
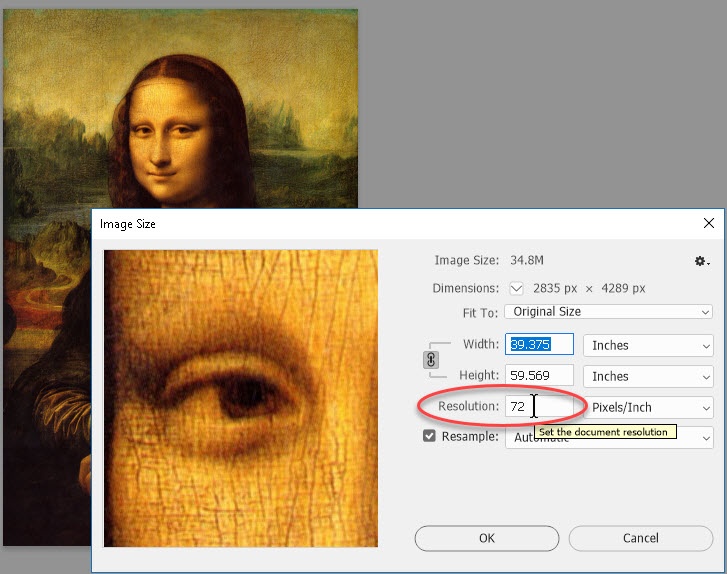
- Select “Image Size.” This will open the Image Size dialog box, which provides comprehensive options.
- In the “Image Size” dialog, you’ll see two main sections: “Pixel Dimensions” and “Document Size.”
- Pixel Dimensions: This section shows the width and height of your image in pixels. This is where you’ll make changes for digital use.
- Document Size: This section displays the physical dimensions (e.g., inches, cm) and resolution (PPI) for printing.
- Enter a new width or height amount under “Pixel Dimensions.”
- By default, the “Constrain Proportions” (chain icon) checkbox is selected, meaning that if you change one dimension, the other will automatically adjust to maintain the aspect ratio, preventing distortion. If you need to change dimensions independently (which can distort the image), deselect this box.
- You can also use the dropdown menu next to each size field to change dimension measurements (e.g., from pixels to inches or centimeters).
- Choose a Resampler Setting: Resampling is a crucial step that determines how Photoshop adds or removes pixels when you change the image size.
- “Bicubic Sharper” is generally recommended when making images smaller as it preserves detail.
- “Bicubic Smoother” is often better for making images larger by smoothing transitions between pixels, though significant enlargement will still result in some loss of quality.
- Deselecting the “Resample Image” checkbox means you are only changing the “Document Size” (print size and resolution/PPI) without altering the “Pixel Dimensions.” This is ideal if you’re adjusting for print output and want to maintain the current pixel count while changing how densely those pixels are printed. Making images larger with resampling enabled can lead to loss of image quality and introduction of blur if not done carefully.
- Click “OK” to apply the sizing changes.
- If you want to save these changes, go to File > Save or File > Save As to create a new file, preserving your original. Photoshop offers powerful tools for photo manipulation and creating stunning image inspiration.
Leveraging Online Image Resolution Changers with Tophinhanhdep.com
For quick, efficient, and versatile resolution changes without needing specialized software, online tools are invaluable. Tophinhanhdep.com offers a robust solution for all your image resizing needs.
The Convenience of Tophinhanhdep.com’s Image Resolution Changer
Our image resolution changer is designed with user-friendliness and quality preservation in mind. It’s perfect for anyone needing to adjust image dimensions on the fly, whether for wallpapers, backgrounds, stock photos, or personal use.
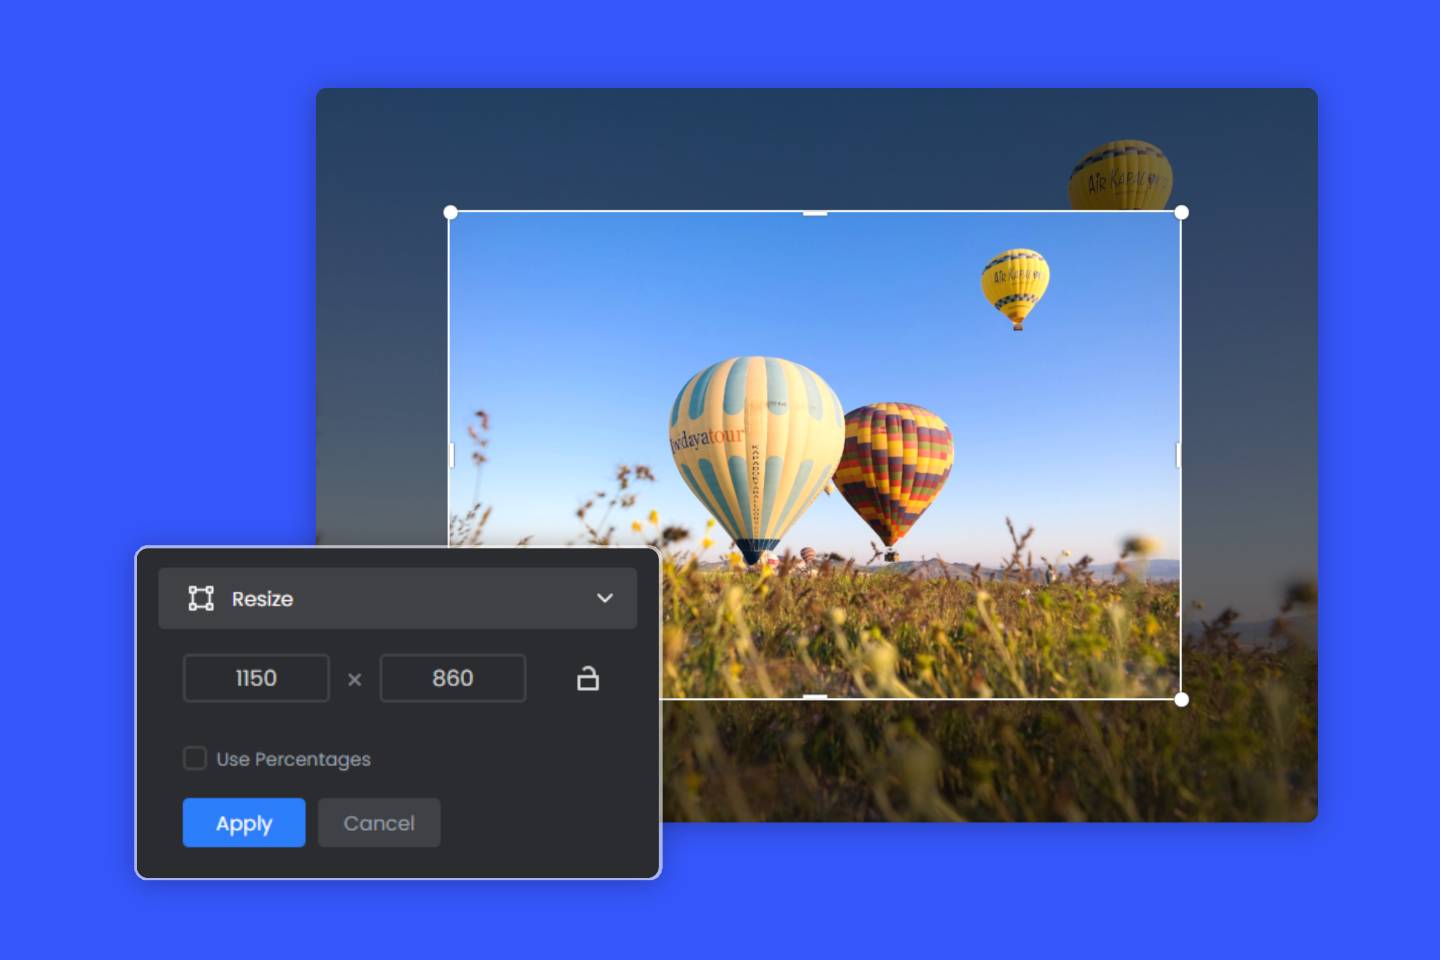
- Upload Image: Begin by visiting the Tophinhanhdep.com Image Resolution Changer page. Click “Start for Free” and easily upload the image you want to resize. Our platform supports various formats, including common ones like JPEG and PNG.
- Change Image Resolution: Once uploaded, you’ll find an intuitive interface to adjust the image size.
- Enter desired dimensions in the “Width” and “Height” fields. The tool will automatically maintain the aspect ratio by default, preventing distortion.
- Alternatively, you can resize by adjusting a percentage, which is useful for uniformly scaling down a batch of images.
- Preview and Download: After adjusting, you can instantly preview the changes to ensure satisfaction. Once ready, download your resized image. You can continue to resize more images, making it a powerful tool for managing your image collections.
Key Features of Tophinhanhdep.com’s Resolution Changer:
- Maintaining High Resolution: Our tool focuses on resizing images while preserving their quality. When reducing resolution, it smartly condenses pixels, and when upscaling, our advanced algorithms, including AI Upscalers, work to enhance detail and clarity without the typical blurriness associated with simple enlargement.
- Batch Resize Images: For users dealing with multiple photos, Tophinhanhdep.com streamlines the process by allowing you to edit numerous images simultaneously, a boon for photographers and content creators.
- Change PNG and JPG Resolution: Effortlessly resize both PNG and JPEG images online for free, instantly, and without compromising the quality that makes your beautiful photography stand out.
Tailoring Images for Diverse Needs with Tophinhanhdep.com
Tophinhanhdep.com’s resolution changer is a versatile image tool that allows you to effortlessly resize images for a multitude of purposes, ensuring your visual design remains impeccable across all platforms. Escape the hassle of awkward zoom-ins and regain control over how your visuals appear, aligning perfectly with trending styles and specific aesthetic requirements.
For Social Media Use:
Unlock the power of our resolution changer to tailor your images flawlessly for any social media platform. Say goodbye to awkward cutouts and unsightly black bars. Whether it’s a dynamic Facebook cover, a captivating Instagram story (perfect for your aesthetic backgrounds), or an attention-grabbing YouTube thumbnail (essential for creative ideas), effortlessly adapt a single image for any content type. With the added convenience of batch resizing, streamline your social media presence without compromising image quality. Our fast and free tool guarantees your photos are fine-tuned to perfection, precisely tailored to the dimensions and file size you require.
Custom Resolution:
Empower yourself with our tool to customize resolutions as you desire. Once prepared, effortlessly proceed to adjust your resolution by specifying either precise pixel dimensions or percentages. Here are some popular image sizes you might need for your photo ideas and mood boards:
- Create square photo: 1080 x 1080 pixels
- Create landscape photo: 600 x 400 pixels
- Create header photo: 1500 x 500 pixels
- Create portrait photo: 1080 x 1350 pixels
- Create profile photo: 400 x 600 pixels
For Different Screens and Web Applications:
When you’re tweaking photos for various online platforms, it can feel like navigating a maze. Our free Image resolution changer is your trusty guide. Easily resize images to meet your needs, whether you’re sprucing up an e-commerce store like Shopify, fine-tuning your website’s backgrounds, or optimizing for mobile web. From enhancing your online store visuals to perfecting blog graphics, our tool does it all seamlessly. This ensures your digital photography translates well across all devices.
Adjust Size for Print:
Discover the perfect solution for resizing your images for print with Tophinhanhdep.com’s resolution changer tool. Streamline the process of adjusting photo dimensions for printing needs, effortlessly accommodating business cards, family portraits, letters, posters, greeting cards, and more. Ensure precise sizing for various print purposes with ease, while optimizing layouts to reduce paper waste. This makes photo manipulation for print a breeze.
Important Considerations When Adjusting Image Resolution
While changing image resolution is straightforward with the right tools, it’s essential to be aware of a few key considerations to maintain optimal quality.
Maintaining Image Quality and Aspect Ratio
The most critical aspect of resolution changing is quality. When you downscale (reduce resolution), pixels are discarded, which usually maintains visual quality well. However, when you upscale (increase resolution), new pixels must be created, and if this isn’t done intelligently, it can lead to blurriness, pixelation, or a “soft” appearance. This is where Tophinhanhdep.com’s AI Upscalers shine, using artificial intelligence to analyze and intelligently add detail, making the image sharper and clearer, often achieving near-4K quality. Always strive to maintain the aspect ratio unless you intentionally want to stretch or compress the image, which can lead to unnatural distortion.
Resolution vs. File Size
It’s important to distinguish between resolution and file size, though they are often related. A higher resolution generally means a larger file size because there are more pixels to store. However, file size is also heavily influenced by compression. A highly compressed low-resolution JPEG might be smaller than an uncompressed, similarly sized PNG. Tophinhanhdep.com offers dedicated compressors and optimizers that allow you to reduce file size without drastically impacting visual quality, a common need for web images and sharing.
Upscaling vs. Downscaling: The Quality Dilemma
- Downscaling: Reducing an image’s resolution is generally safe and often improves image load times and storage efficiency. Modern algorithms do an excellent job of intelligently removing pixels without noticeable quality loss.
- Upscaling: Increasing an image’s resolution from a lower-resolution source is where challenges arise. Simple upscaling methods merely duplicate pixels, leading to a blurry or pixelated result. This is why AI Upscalers from Tophinhanhdep.com are so revolutionary. They use sophisticated machine learning models to infer and generate new details, effectively “guessing” what the missing information should look like, providing superior results compared to traditional methods. This allows you to transform standard digital photography into high-resolution assets.
Conclusion
Controlling the resolution of your images is a fundamental skill that empowers you to present your wallpapers, backgrounds, beautiful photography, and digital art exactly as intended across various platforms. From quickly resizing a photo in Microsoft Paint for an email to professionally preparing a high-resolution image for print in Photoshop, or leveraging the intuitive and powerful image tools available at Tophinhanhdep.com for web optimization and AI upscaling, you now have a comprehensive understanding of the options available.
Tophinhanhdep.com is your go-to resource for all aspects of image tools, visual design, and image inspiration. Whether you need to convert formats, compress files, optimize for speed, or transform low-res images into stunning high-resolution masterpieces, our suite of tools is designed to make your creative workflow seamless and efficient. Explore our vast collections of aesthetic, nature, abstract, and thematic backgrounds, find photo ideas for your next project, or simply make your favorite stock photos perfectly sized for any purpose. Never stress about whether your photos are the right size again—start using Tophinhanhdep.com’s powerful image resolution changer and other tools today to bring your visual ideas to life with unparalleled clarity and precision!