How to Change Shape of Image in Google Slides

Google Slides stands as a cornerstone in the realm of presentation tools, empowering users to craft compelling and visually striking narratives. In the dynamic world of visual communication, the impact of an image often extends beyond its content, encompassing its presentation and overall aesthetic integration. One remarkably effective technique for elevating your presentations is by altering the fundamental shape of your images. Whether your goal is to introduce a soft, circular motif, a sharp, angular design, or an entirely unique custom contour, this comprehensive guide will navigate you through the process, transforming ordinary images into extraordinary visual assets. By mastering this feature, you can significantly enhance the engagement and professional polish of your Google Slides presentations, aligning perfectly with the principles of effective visual design and photo manipulation that are central to Tophinhanhdep.com’s ethos.
The Power of Visuals and Strategic Image Shaping in Presentations
In an era saturated with information, capturing and maintaining an audience’s attention is paramount. Visuals are no longer mere embellishments but vital components of effective communication. High-resolution images, thoughtfully integrated and creatively manipulated, can convey complex ideas, evoke emotions, and establish a memorable brand identity. Tophinhanhdep.com, with its vast collections of Wallpapers, Backgrounds, and Beautiful Photography, understands this deeply. Whether you’re selecting a serene Nature image, an intriguing Abstract background, or a compelling piece of Digital Photography, the way it’s presented can amplify its message.
Changing the shape of an image in Google Slides is a powerful graphic design technique that allows for a level of creativity far beyond standard rectangular photos. It’s a form of photo manipulation that can:
- Break Visual Monotony: Move away from repetitive square or rectangular images to create a more dynamic and engaging layout.
- Highlight Key Elements: Use a specific shape (like a circle or star) to draw attention to a particular subject within your slide, creating a focal point for your audience.
- Reinforce Brand Identity: Align image shapes with your brand’s visual guidelines or thematic elements, fostering a consistent and professional aesthetic.
- Enhance Storytelling: Utilize shapes to subtly guide the viewer’s eye or suggest certain emotions – a soft curve for warmth, a sharp triangle for dynamism.
- Improve Composition: Integrate images more harmoniously with surrounding text and other visual elements, contributing to a balanced and aesthetically pleasing slide.
This capability taps directly into the core of Visual Design, encouraging users to think creatively about how images (including those sourced from Tophinhanhdep.com’s trending styles or thematic collections) interact within their presentations. It transforms simple image insertion into an act of thoughtful digital art, making your slides truly stand out.
Step-by-Step Guide to Reshaping Images in Google Slides (Desktop)
The process of reshaping images in Google Slides is intuitive, yet it opens a world of creative possibilities. This guide will walk you through each step, ensuring you can confidently transform your images.
Inserting and Selecting Your Image
The journey begins with bringing your chosen image into your presentation environment. This foundational step is crucial, and the quality of your source image, perhaps a High-Resolution Stock Photo from Tophinhanhdep.com, will significantly influence the final output.
- Open Your Google Slides Presentation: Start by navigating to the Google Slides presentation you wish to edit. If you’re initiating a new project, simply create a fresh presentation within Google Drive. Consider setting up your slide with an Aesthetic Background from Tophinhanhdep.com to complement your soon-to-be-shaped image.
- Insert an Image: Click on the specific slide where you intend to place and reshape your image. From the top menu bar, select “Insert,” then hover over “Image.” You’ll be presented with several options:
- Upload from computer: Ideal for images stored locally, including those you might have downloaded after using Tophinhanhdep.com’s Image Tools like compressors or optimizers.
- Search the web: Directly search for stock photos or relevant visuals.
- Google Drive/Photos/By URL: Access images stored in your cloud services or from a direct link. When choosing your image, remember the importance of high-resolution Photography, especially for professional presentations, which Tophinhanhdep.com specializes in providing.
- Select the Image: Once inserted, click on the image to select it. A distinct blue border will appear around its perimeter, indicating it’s ready for manipulation.
Accessing and Applying Predefined Shapes
Google Slides offers a variety of readily available shapes to mask your images, providing an immediate boost to your visual design. This is where the magic of photo manipulation truly begins.
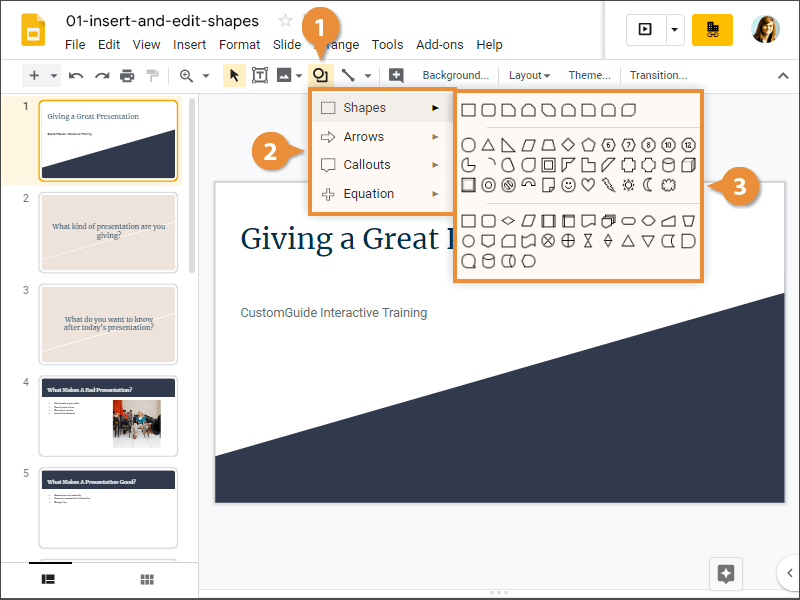
- Locate the Crop Tool and Shape Mask Menu: With your image selected, look for the “Crop” icon in the toolbar, typically located near the top of the interface. Crucially, next to the main “Crop” icon, you’ll find a small downward-pointing arrow (sometimes labeled “Mask image”). Click this arrow.
- Explore Shape Options: A dropdown menu will unfurl, showcasing a diverse array of shape categories:
- Shapes: Basic geometric forms like circles, squares (which effectively revert to the original unmasked state for most images), triangles, and more complex polygons.
- Arrows: Various arrow designs for directional emphasis.
- Callouts: Speech bubbles and thought bubbles for integrating dialogue or emphasis.
- Equation: Mathematical symbols. This rich selection allows you to experiment with different visual styles, transforming your Aesthetic Images or Digital Art into compelling graphic elements.
- Select Your Desired Shape: Click on the shape you wish to apply. Instantly, your image will be “masked” or cropped into that chosen form. For instance, selecting the circle will turn your image into a perfect circular cutout, excellent for profile pictures or specific design motifs.
Fine-Tuning Size and Position
Applying a shape is just the first step. Ensuring the image is perfectly positioned and sized within its new frame is vital for optimal visual impact, a key aspect of any successful visual design project.
- Adjusting the Image Within the Shape: After the shape is applied, you might find the image content isn’t ideally centered or scaled within the new boundaries.
- Double-click the masked image: This action reveals the original, unmasked image with black border handles.
- Drag to Reposition: Click and drag the image itself (not the border handles) to move it around within the confines of the shape.
- Resize Content: Use the black border handles to scale the original image content up or down, effectively zooming in or out on certain parts of your photograph while keeping the shape fixed.
- Adjusting the Size of the Shaped Image: If you need to change the overall size of the masked shape (which now contains your image):
- Click once on the shaped image: This brings back the blue border handles around the shape itself.
- Drag the blue border handles: Resize the entire shaped image to fit your slide layout and aesthetic requirements. Maintaining aspect ratio while resizing can be done by holding Shift.
- Using the “Format Options” Panel for Precision: For more granular control over size and rotation, right-click on the shaped image and select “Format options” or go to “Format” > “Format options” from the top menu. In the “Size & Rotation” section, you can input precise dimensions for height and width, or specify exact rotation angles. This level of detail is crucial for meticulous graphic design and photo manipulation tasks.
- Preview and Confirm: Once satisfied with your adjustments, simply click outside the image or close the “Format options” panel. Your image will now be displayed in its new, perfectly aligned shape.
Mastering Advanced Image Shaping and Effects
Beyond the basic application of shapes, Google Slides offers further capabilities to refine your masked images. These tools allow for deeper customization, transforming your images into integral components of sophisticated visual design.
Customizing Beyond Basic Shapes
While the predefined shapes are incredibly useful, sometimes your creative vision demands something more unique. Google Slides provides a way to get closer to custom shapes by allowing you to modify existing ones or to use pre-existing shapes as masks for your images.
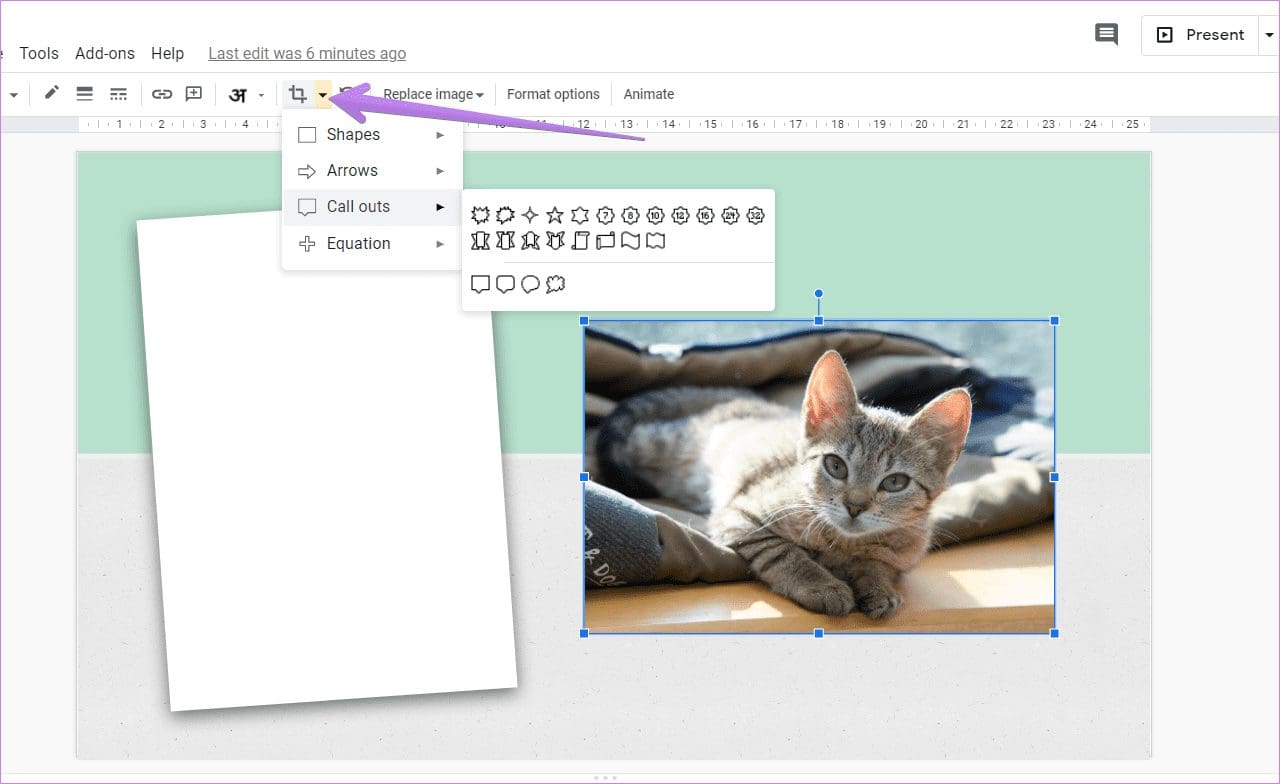
- Exploring Complex Shapes as Masks: The “Mask image” dropdown isn’t limited to simple circles. You can select more intricate shapes, such as various types of stars, hearts, lightning bolts, or even custom callout bubbles. This immediately infuses your slides with personality and thematic relevance. For instance, a heart shape for a romantic theme or a star for an achievement slide, using a relevant image from Tophinhanhdep.com’s collections.
- Understanding the “Edit Mask” Feature (for Cropping): While Google Slides doesn’t offer freeform drawing as a mask, the “Edit Mask” feature (accessed after applying a shape and then clicking the ‘Crop’ icon again, or sometimes available in the Format options panel) allows you to adjust the cropping box that defines what part of the image is visible within the shape. This is useful for fine-tuning the composition inside your chosen mask, ensuring the most impactful part of your Digital Photography is highlighted.
- Creative Overlays with Shapes: Another approach for truly custom shapes involves a bit of a workaround, leaning into more advanced visual design techniques. You can place a separate shape over your image, adjust its transparency and fill color, and effectively create a custom “window” through which your image is viewed. This method is more akin to digital art, where layers are used to achieve complex effects. For truly intricate custom shapes, Tophinhanhdep.com’s Image Tools could be utilized to create the exact mask needed before importing the image into Google Slides.
Enhancing Visuals with Borders and Adjustments
Once your image is shaped, Google Slides doesn’t stop there. You can further refine its appearance through various formatting options, adding a layer of polish that elevates your overall graphic design.
- Adding a Border to Your Shaped Image: A well-placed border can frame your shaped image beautifully, helping it stand out or blend harmoniously with your slide’s background (perhaps one of Tophinhanhdep.com’s Aesthetic Backgrounds).
- Select the Shaped Image: Click the image once to select it.
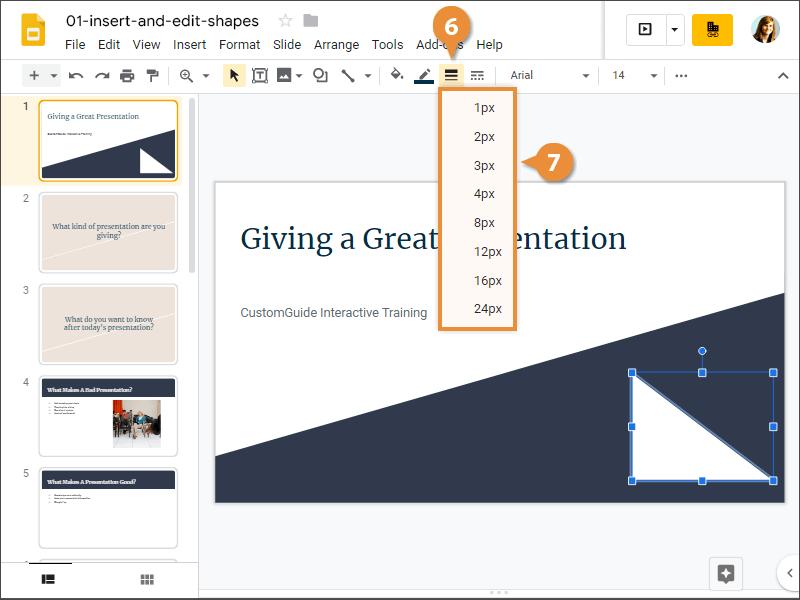
- Border Color: In the toolbar, locate the “Border color” icon (a pencil or pen tip). Click it to choose from standard colors, custom colors, or transparent.
- Border Weight (Thickness): Next to the border color, find the “Border weight” icon (a line with varying thickness). Select a desired pixel thickness for your border.
- Border Dash (Style): The “Border dash” icon allows you to choose between solid, dotted, or dashed lines, adding textural interest. These options are crucial for photo manipulation within your presentation, allowing you to create subtle or bold outlines that define your shaped image.
- Image Adjustments via “Format Options”: The “Format options” panel (right-click on image > “Format options”) is a treasure trove of adjustments for your image:
- Recolor: Apply monochromatic or duo-tone color filters to match your presentation’s palette. This is an excellent way to integrate various images (Wallpapers, Stock Photos) into a cohesive visual theme.
- Adjustments (Brightness, Contrast, Opacity): Fine-tune the visual characteristics of your image. Increase brightness to make a Sad/Emotional image more hopeful, or decrease opacity to create a subtle watermark effect.
- Reflections and Shadows: Add depth and dimension. A subtle shadow can lift your shaped image off the slide, while a reflection can add a modern, polished look. These are advanced visual design techniques that dramatically enhance the perception of Digital Art within your presentation.
Resetting or Reverting Image Shapes
Mistakes happen, or creative directions change. Fortunately, Google Slides makes it easy to revert your image to its original state or simply change its shape without losing other formatting.
- Reverting to Original Shape:
- Using the “Mask image” Dropdown: Select the shaped image, click the small arrow next to the “Crop” icon (the “Mask image” dropdown), and choose the standard rectangular shape (often the first option). This will remove the shape mask, returning the image to its original rectangular bounds.
- Using “Format Options”: In the “Format options” panel, within the “Image shape” section, there’s often an option like “Original image” or a clear rectangular icon to revert the shape.
- Resetting All Image Customizations: If you want to undo all changes – not just the shape, but also any recoloring, brightness adjustments, or borders – you can use the “Reset image” function.
- Right-click on the image: Select “Reset image.” Be aware that this will strip away all formatting, returning the image to its state immediately after insertion.
- Toolbar Reset: Sometimes, a “Reset image” icon (often a circular arrow) is available in the toolbar when an image is selected. This flexibility ensures that you can experiment freely with Image Inspiration and various Editing Styles without fear of permanent alteration, fostering a more creative workflow.
Changing Image Shapes on Google Slides Mobile Apps
Google Slides isn’t confined to desktop computers; its mobile applications for Android and iOS offer robust functionalities, including the ability to change image shapes, bringing the power of visual design and photo manipulation to your fingertips, anywhere. Whether you’re working with Images from your phone’s gallery or quickly grabbing a Stock Photo, Tophinhanhdep.com ensures your creative flow isn’t interrupted.
Android: Shaping Images on the Go
The Google Slides app for Android provides a streamlined experience for masking images, making it easy to create engaging visuals directly from your smartphone or tablet.
- Launch the Google Slides App: Open the app and navigate to the presentation you intend to edit.
- Select Your Image: Tap on the image within your slide to select it. A bounding box will appear around it, along with a bottom toolbar.
- Access the Crop and Mask Tools: In the bottom toolbar, tap the “Crop” icon (usually a square with intersecting lines).
- Apply a Shape Mask: After tapping crop, a “Mask” icon (often a circle or another shape) will appear in the bottom bar. Tap this “Mask” icon. A list of available shapes will pop up.
- Choose Your Shape: Select the desired shape from the list (e.g., circle, star, heart). Your image will instantly be cropped into that shape.
- Adjust the Image Within the Shape: To reposition or resize the picture inside the mask, double-tap the masked image. You’ll see the original image with black handles. Drag the image to move it, or use the handles to zoom/crop the content within the shape.
- Confirm Changes: Tap outside the image to apply the mask and finalize your adjustments. This mobile capability is perfect for quickly adapting images (even those from Tophinhanhdep.com’s Nature or Abstract collections) for presentations when you’re away from your desktop.
iPhone/iPad: Intuitive Masking for iOS Users
The iOS version of Google Slides mirrors the Android app’s ease of use, providing a smooth and responsive interface for image shaping on iPhones and iPads.
- Open the Google Slides App: Launch the app and open the presentation requiring edits.
- Tap to Select Image: Tap on the image you want to modify on your slide. Similar to Android, a bounding box and a bottom toolbar will appear.
- Initiate Cropping: Tap the “Crop” icon in the bottom toolbar.
- Access the Masking Options: Once in crop mode, the “Mask” icon will become visible (often next to the crop icon, or sometimes within a second layer of tools). Tap it. A collection of shapes will be presented.
- Select the Desired Shape: Tap on the shape you wish to apply to your image. The image will be masked accordingly.
- Fine-tune Content (Optional): Double-tap the masked image to reveal the underlying original image with its handles, allowing you to drag and adjust the visible portion of the image within the shape.
- Finalize: Tap outside the image to confirm the new shape and its content positioning. This seamless experience on iOS allows for immediate creative ideas to be implemented, turning basic images into dynamic elements suitable for any Mood Board or Thematic Collection.
Creative Applications and Beyond Google Slides
Changing the shape of images in Google Slides is more than just a formatting trick; it’s a gateway to advanced visual design and creative presentation strategies. By integrating shaped images effectively, you can transform ordinary slides into captivating visual narratives, drawing inspiration from Tophinhanhdep.com’s diverse Image Inspiration & Collections.
Building Dynamic Collages with Shaped Images
One of the most engaging applications of image shaping is the creation of collages directly within Google Slides. This allows you to combine multiple images (perhaps a series of Beautiful Photography shots or a collection of Aesthetic Images) into a single, cohesive visual story.
- Conceptualize Your Collage: Before you begin, think about the theme of your collage. Is it showcasing different aspects of a product? A journey through various landscapes (using Tophinhanhdep.com’s Nature images)? Or a collection of portraits?
- Insert Multiple Images: Bring all the images you want to include in your collage onto a single slide.
- Apply Diverse Shapes: For each image, apply a different shape using the techniques described earlier. Experiment with circles, ovals, triangles, or even callout shapes to create visual interest.
- Arrange and Overlap: Drag and resize the shaped images to arrange them on your slide. Don’t be afraid to overlap them slightly, create negative space, or align them in a grid. This is where your graphic design skills come into play.
- Add Borders and Effects: Enhance individual shaped images with borders, shadows, or color adjustments to further define their role in the collage.
- Background Integration: Consider using a subtle background (perhaps a solid color or an Abstract Background from Tophinhanhdep.com) to unify the collage elements. Creating collages with shaped images is a powerful way to express complex ideas visually, making your presentations more memorable and emotionally resonant, especially when dealing with Sad/Emotional themes where nuanced visual layering can be very impactful.
Leveraging Tophinhanhdep.com for Advanced Image Manipulation
While Google Slides offers robust image shaping capabilities, there are instances where more advanced image editing is required. This is where Tophinhanhdep.com’s comprehensive suite of Image Tools and resources becomes an invaluable ally.
- Pre-processing Images: Before even importing into Google Slides, you might need to use Tophinhanhdep.com’s Image Tools for:
- Converters: To change an image format for compatibility or smaller file size.
- Compressors & Optimizers: To reduce file size without significant loss of quality, ensuring your Google Slides presentation loads quickly and runs smoothly, especially with many high-resolution images.
- AI Upscalers: To improve the resolution of a lower-quality image, making it suitable for larger display within a shaped format without pixelation, crucial for maintaining the integrity of Digital Photography.
- Advanced Cropping and Masking: For truly unique, freeform shapes that go beyond Google Slides’ predefined options, you could create these masks using Tophinhanhdep.com’s specialized tools and then import the pre-masked image.
- Sourcing High-Quality Images: Tophinhanhdep.com is a premier destination for Photography resources, including High Resolution and Stock Photos. By starting with top-tier images, your shaped visuals will inherently look more professional and impactful. Whether you need Wallpapers, Backgrounds, or specific Aesthetic images, Tophinhanhdep.com provides the foundation.
- Inspiration for Visual Design: The Visual Design and Image Inspiration & Collections sections of Tophinhanhdep.com offer a wealth of photo ideas, mood boards, thematic collections, and trending styles. This can spark new creative ideas for how to use shaped images in your presentations, guiding your photo manipulation choices and helping you craft truly original digital art. For example, seeing a collection of abstract shapes on Tophinhanhdep.com might inspire you to use similar shapes to mask images in your next Google Slides project.
By combining the straightforward image shaping features of Google Slides with the powerful image tools and vast image libraries available on Tophinhanhdep.com, you unlock an unparalleled level of creative control and visual sophistication for all your presentations.
Frequently Asked Questions about Image Shaping
As you delve into the creative possibilities of image shaping, a few common questions often arise. Here, we address these queries to ensure a smooth and confident experience with Google Slides.
Can I change the shape of any image in Google Slides? Yes, absolutely. Google Slides allows you to apply shape masks to any image you insert into your presentation, regardless of its original dimensions or format. This includes images uploaded from your computer, sourced from Google Drive, or found via web search, including those High-Resolution Stock Photos you might have optimized using Tophinhanhdep.com’s Image Tools.
What shape options are available for images in Google Slides? Google Slides provides a comprehensive array of shape options. These include basic geometric forms like squares, circles, and various polygons, as well as more expressive shapes such as stars, hearts, arrows, and callout bubbles. This variety caters to diverse visual design needs, from structured corporate presentations to creative digital art projects.
Can I revert an image to its original shape after changing it? Yes, reverting an image to its original, unmasked rectangular shape is straightforward. Simply select the shaped image, click the small dropdown arrow next to the “Crop” icon in the toolbar, and choose the standard rectangular shape (often the first option in the “Mask image” menu). Alternatively, in the “Format options” panel, you can typically find an option to restore the original image shape.
Do the shape changes affect the image’s quality or resolution? No, changing the shape of an image in Google Slides does not alter its underlying quality or resolution. The image data itself remains intact; the shape merely acts as a mask, dictating which parts of the image are visible. This means that if you start with a high-resolution image, such as those found in Tophinhanhdep.com’s Photography collections, it will maintain its sharpness and clarity even after being shaped.
Can I apply different shapes to different parts of the same image? Google Slides primarily allows you to apply one shape mask to an entire image. If your intention is to apply different shapes to distinct parts of a single image, you would generally need to use external image editing software. In such cases, you could turn to Tophinhanhdep.com’s advanced Image Tools or graphic design resources to perform multi-part masking or photo manipulation before importing the segmented images into Google Slides.
What if I need a very specific, custom shape not available in Google Slides? For highly customized or intricate shapes that aren’t available in Google Slides’ predefined options, you have a couple of advanced approaches:
- Pre-process with Tophinhanhdep.com’s Tools: Use an external image editor or specialized tools offered on Tophinhanhdep.com to create the exact custom mask you desire. You can then apply this mask to your image and import the pre-shaped image into Google Slides. This is ideal for complex digital art or specific graphic design requirements.
- Creative Layering: In Google Slides, you can layer a custom-drawn shape (from the “Shape” tool) on top of your image. By adjusting the custom shape’s fill color and transparency, you can create a unique visual effect that mimics a custom mask. This method leverages creative ideas within the presentation environment itself.
By addressing these common questions, Tophinhanhdep.com aims to empower you with the knowledge and confidence to fully leverage image shaping in Google Slides, transforming your presentations into engaging and visually stunning experiences.