How to Change Size of an Image: Your Ultimate Guide with Tophinhanhdep.com

In our increasingly visual world, mastering the art of image resizing is no longer just a technical skill—it’s a fundamental necessity. From optimizing breathtaking wallpapers and backgrounds for your devices to preparing high-resolution photography for print, or simply sharing aesthetic images on social media, understanding how to adjust image dimensions is paramount. At Tophinhanhdep.com, we recognize the diverse needs of creators, photographers, and casual users alike. Our comprehensive platform is dedicated to providing you with the knowledge and tools to manage your digital imagery effectively, ensuring your beautiful photography and digital art always look their best.
Resizing an image is a task we all encounter at some point in our digital lives. Whether you’re working on a Windows PC, a macOS system, or a Chromebook, or leveraging powerful online image tools, the ability to scale images up or down is essential. This guide, brought to you by Tophinhanhdep.com, will walk you through the relatively simple yet crucial methods for resizing images, delving into the core concepts, practical applications, and advanced techniques. We’ll explore how proper resizing impacts everything from a captivating nature abstract to a perfectly optimized stock photo, and how Tophinhanhdep.com’s suite of image tools, including compressors, optimizers, and AI upscalers, can streamline your workflow and elevate your visual design projects.
Understanding the Fundamentals of Image Resizing
Before diving into the practical steps, it’s vital to grasp the core concepts that govern image dimensions and quality. Resizing isn’t just about making an image bigger or smaller; it involves a delicate balance of pixels, resolution, and aspect ratio, all of which directly influence the visual integrity of your image. Tophinhanhdep.com emphasizes these foundational elements to help you achieve optimal results for any image, whether it’s a vibrant aesthetic background or a critical piece of digital art.
Resizing vs. Resampling: A Crucial Distinction
One of the most important concepts to understand is the difference between resizing and resampling an image. Many people use these terms interchangeably, but they refer to distinct processes with different impacts on your image quality.
-
Image Resizing: When you “resize” an image without resampling, you are changing the dimensions at which the image will print or be displayed, without altering the total number of pixels in the image. Instead, you are changing the image’s resolution (pixels per inch or PPI). If you increase the physical print size, the pixels become more spread out, reducing the PPI. Conversely, making the print size smaller packs more pixels into each inch, increasing the PPI. This method is ideal when you need to adjust an image for print without changing its inherent pixel data, ensuring a high-quality output for your beautiful photography. The file size (in megabytes) remains the same.
-
Image Resampling: Resampling, on the other hand, changes the total number of pixels in an image.
- Upsampling (Enlarging): This involves adding new pixels to the image. When you upsample, the software attempts to create new pixels based on the information from surrounding pixels. This process, if not done carefully, can lead to a loss of clarity and sharpness, resulting in a “pixelated” or “blurry” image. This is where advanced tools like Tophinhanhdep.com’s AI Upscalers become invaluable, as they use artificial intelligence to intelligently add pixels and enhance details, minimizing quality degradation.
- Downsampling (Reducing): This involves removing pixels from the image. When you downsample, the software discards unnecessary pixel information. This typically results in a smaller file size and is often done when preparing high-resolution images for web display or email, where large file sizes are impractical. Done correctly, downsampling can maintain excellent visual quality while significantly reducing file size, a service Tophinhanhdep.com’s compressors and optimizers are designed to provide.
Understanding this distinction is key to preserving the quality of your images. For instance, downsampling a high-resolution stock photo for a website is generally safe, but upsampling a small image for a large print requires more advanced techniques to avoid noticeable quality loss.
The Importance of Aspect Ratio and Resolution (PPI/DPI)
Two other critical elements in image resizing are aspect ratio and resolution.
-
Aspect Ratio: This defines the proportional relationship between an image’s width and its height, often expressed as two numbers separated by a colon (e.g., 16:9, 4:3, 1:1). Maintaining the aspect ratio during resizing is crucial to prevent distortion, which can make your stunning nature photography look stretched or squashed. Most resizing tools, including those available on Tophinhanhdep.com, offer an option to “lock” or “maintain aspect ratio” to preserve the image’s original proportions automatically. If you need to change the aspect ratio, you typically need to crop the image first, a technique we’ll discuss later.
-
Resolution (PPI/DPI): Resolution is typically measured in pixels per inch (PPI) for digital screens and sometimes dots per inch (DPI) for printed output. It describes the density of pixels or ink dots within a given area.
- For digital displays: While the “72 ppi for web” rule is largely a myth (digital screens care about total pixel dimensions, not PPI), a higher PPI generally indicates a more detailed image.
- For print: Resolution is critical. A higher PPI/DPI means more image detail is packed into each inch of paper, resulting in a sharper, crisper print. The industry standard for high-quality prints is often 300 PPI, though some professional printers may prefer 360 PPI. Tophinhanhdep.com’s tools are designed to help you prepare your images with the correct resolution for any printing need, from beautiful photography books to large-format digital art prints.
By carefully managing aspect ratio and resolution, you ensure that your images, whether they are emotional and sad pictures or vibrant abstract designs, are presented with the clarity and precision they deserve.
Practical Methods for Resizing Images Across Platforms
No matter your operating system, there are readily available tools to help you resize images. Tophinhanhdep.com aims to demystify these processes, offering guidance on native applications and recommending efficient online alternatives.
Resizing Images on Windows PCs
Windows users have several built-in options to resize images, with the Photos app being the most straightforward for quick adjustments. For more robust needs, Tophinhanhdep.com recommends exploring other native tools or online solutions.
Using the Photos App: The Photos app in Windows 11 (and similar versions) offers an intuitive way to resize.
- Open the Image: Right-click on your image file and select “Open with” > “Photos.”
- Access Resize Options: Click the three dots (
...) icon in the top-right corner of the Photos app window, then select “Resize image” (or “Resize” from a dropdown menu). - Choose Dimensions: A pop-up will appear. You can select from preset sizes (e.g., “Small,” “Medium,” “Large,” ideal for emailing or sharing) or choose “Define custom dimensions” for specific width and height inputs.
- Maintain Aspect Ratio: Crucially, ensure the “Maintain aspect ratio” box is checked to prevent distortion. When you enter a number into one dimension (width or height), the other will automatically adjust proportionally. Uncheck this only if you intentionally want to stretch or squish the image.
- Adjust Quality: Often, there’s a quality slider. For most purposes, leave it at 100% unless you specifically need a smaller file size at the cost of some quality, which Tophinhanhdep.com’s image compressors can manage more effectively.
- Save Your Copy: Click “Save resized copy” or “Save,” then choose a location and a new file name to avoid overwriting your original image.
Checking Image Resolution in Windows: To check an image’s current resolution:
- Locate File: Browse to the image in Windows Explorer.
- Open Properties: Right-click the file and select “Properties.”
- View Details: Go to the “Details” tab. Under “Image,” you’ll find “Dimensions” (pixel width and height) and sometimes “Resolution” (DPI). This helps determine if your image is suitable for a specific wallpaper or print project before resizing.
Using Paint (or Paint.NET): For basic resizing, the classic Paint application is also an option. For more advanced features without the complexity of professional software, Tophinhanhdep.com recommends free, more robust alternatives like Paint.NET, which can be easily found and downloaded through our platform. In Paint:
- Open Image: Open your image in Paint.
- Select Resize: Click “Resize” in the Home tab.
- Choose Pixels or Percentage: You can resize by percentage or by specific pixels.
- Maintain Aspect Ratio: Check “Maintain aspect ratio” to keep proportions intact.
- Apply and Save: Enter your desired values, click “OK,” and then save the resized image.
Resizing Images on macOS
Mac users benefit from the powerful and convenient Preview app, which comes pre-installed and serves as an excellent image viewer and basic editor for your high-resolution photography.
Using Preview:
- Open the Image: Double-click your image file, or right-click and select “Open with” > “Preview.”
- Access Adjust Size: From the menu bar, select “Tools” > “Adjust Size.”
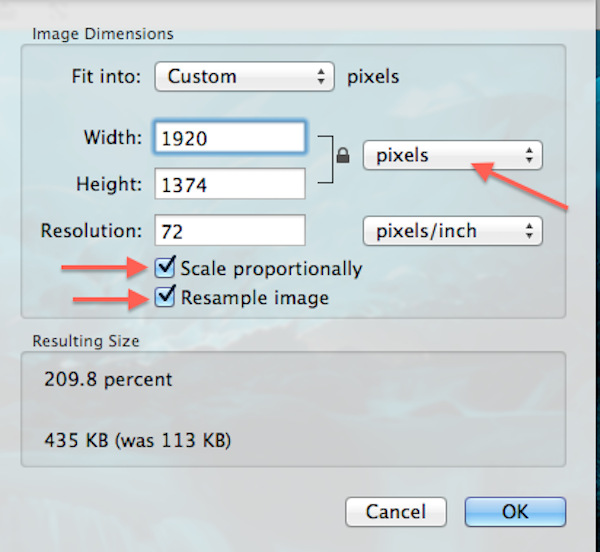
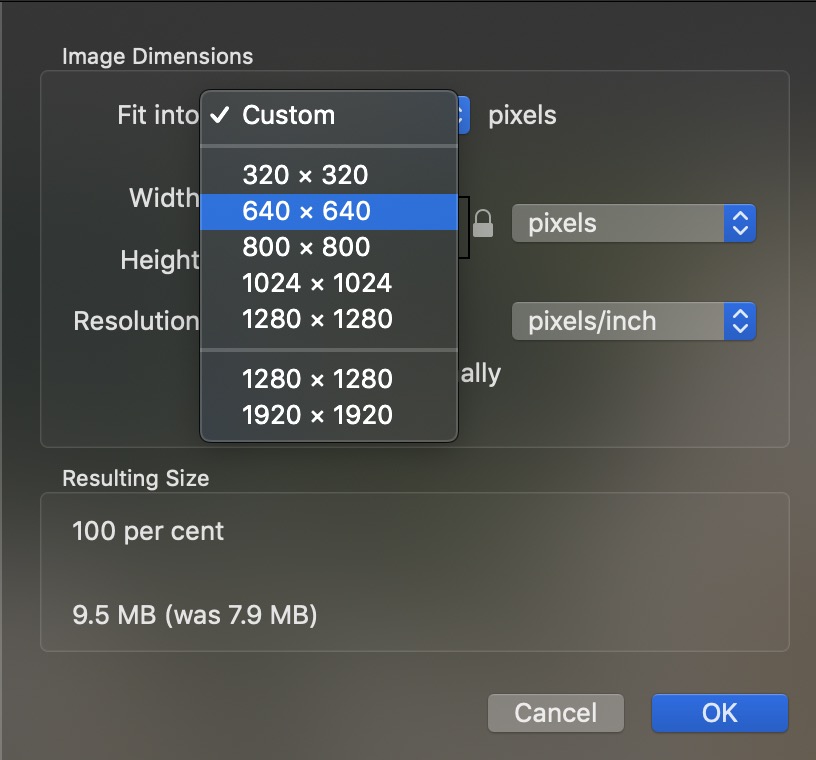
- Enter Dimensions: A window will appear where you can enter the desired width and height. You can change the unit (pixels, inches, centimeters) using the dropdown menus.
- Maintain Aspect Ratio: Ensure the “Scale proportionally” (or “Lock aspect ratio” depending on macOS version) box is checked to prevent distortion. As you adjust one dimension, the other will automatically update.
- Resample Image: Make sure “Resample image” is checked. This ensures that Preview processes the pixels to fit the new size, similar to resampling.
- Apply and Save: Click “OK” to apply the changes. Then, go to “File” > “Save” or “File” > “Export” to save your resized image. If you save, it will overwrite the original; if you export, you can create a new file. Tophinhanhdep.com always recommends saving as a new file to preserve your original beautiful photography.
Resizing Images on ChromeOS
Chromebook users can rely on the native Gallery app for straightforward image resizing.
Using the Gallery App:
- Open the Image: Right-click the image file and select “Open with Gallery.”
- Select Rescale: Look for the “Rescale” button, typically found at the top of the Gallery app interface.
- Enter Width and Height: Input your desired width and height.
- Manage Aspect Ratio: Click the “Chain” icon to lock or unlock the aspect ratio as needed. Keeping it locked is recommended for most aesthetic and wallpaper adjustments.
- Save Your Image: Click the blue “Save” button to overwrite the original, or select the blue “Down arrow” and choose “Save as” to create a new copy, which is always the safer option.
Harnessing Online Tools for Quick and Easy Resizing
For cross-platform compatibility, quick edits, or when you need specialized features like batch processing, online image resizers are invaluable. Tophinhanhdep.com proudly offers a suite of such tools, designed to be user-friendly and highly efficient.
Tophinhanhdep.com’s Online Image Resizer: Our platform provides a free, fast, and intuitive online image resizer that simplifies the process for all types of projects, from optimizing images for mood boards to preparing stock photos for publishing.
- Upload Your Photo: Visit Tophinhanhdep.com’s Image Resizer page. You can click the “Upload Your Photo” button or simply drag and drop your image file onto the designated area.
- Adjust Image Size: Once uploaded, you’ll find clear options to adjust dimensions.
- Pixel Dimensions: Enter specific width and height values in pixels.
- Percentage Scaling: Scale your image up or down by a percentage of its original size.
- Preset Sizes: Choose from a variety of common preset sizes tailored for social media, websites, or print.
- Lock Aspect Ratio: Our tool features an easy-to-use “Lock Proportions” toggle (often represented by a chain icon) to maintain the aspect ratio, preventing any unwanted distortion of your nature or abstract images.
- Batch Resize (Advanced Feature): Tophinhanhdep.com also offers batch resizing capabilities. This is particularly useful when you need to upload multiple images for thematic collections or portfolios, saving significant time by allowing you to process many files at once.
- Apply Changes and Save: After making your adjustments, click “Apply” and then “Save.” You can typically choose your preferred file type (JPEG, PNG, GIF) and adjust the quality, ensuring your resized image meets your specific needs without sacrificing high resolution. The edited image will then be downloaded to your device.
These online tools are perfect for quick adjustments, offering flexibility and accessibility without needing to download any software, making Tophinhanhdep.com your ideal partner for visual design and digital photography tasks.
Optimizing Images for Specific Use Cases
The “correct” way to resize an image often depends on its final destination. An image destined for print has different requirements than one intended for a website or social media. Tophinhanhdep.com provides insights into optimizing your images for various platforms, ensuring they always look their best.
Printing Your Images? Resize Photos for Print.
Resizing images for print is a specialized skill, crucial for anyone looking to create physical copies of their beautiful photography or digital art. It involves not just dimensions but also understanding resolution and the printer’s capabilities.
- Pixels to Inches Conversion: When preparing for print, you’ll often need to think in terms of inches rather than just pixels. Tophinhanhdep.com’s tools help you seamlessly convert pixel dimensions to print sizes. For example, a common photo print size like 8x10 inches requires specific pixel dimensions at a certain resolution (e.g., 300 PPI). Our platform often provides charts or calculators to guide you through these conversions, simplifying your journey from a high-resolution photo to a perfectly sized print.
- Printer’s Native Resolution: A critical factor is your printer’s native resolution. Most inkjet printers perform best when receiving images at 300 pixels/inch. Some, like certain professional Epson models, prefer 360 pixels/inch. If you send an image with a lower resolution, the printer will automatically “upsample” it (add pixels) to match its native resolution, which often leads to a softer, less detailed print than if you handled the upsampling yourself in image editing software. Tophinhanhdep.com emphasizes performing any necessary upsampling within a capable image editor (like Photoshop or advanced online tools with AI features) to maintain maximum quality.
- Checking Resolution Before Print: Always check your image’s resolution (PPI) before sending it to print. If it’s below the printer’s native resolution, consider upsampling it. Remember, while a lower resolution might look acceptable on screen, it will likely appear pixelated or soft in print, especially for larger sizes.
By carefully adjusting pixel dimensions and resolution, you can ensure your family portraits, t-shirt designs, or large-format posters created from your digital art retain their sharpness and detail.
Adjusting Images for Web and Digital Platforms
The internet demands images that load quickly and display correctly across various devices and screen sizes. Resizing for the web involves a different set of considerations, primarily focusing on file size and display dimensions.
- Social Media Optimization: Each social media platform (Facebook, Instagram, YouTube, Twitter, etc.) has its own recommended image dimensions for profile pictures, cover photos, banners, and post images. Using Tophinhanhdep.com’s image resizer, you can easily adjust your aesthetic images or high-resolution stock photos to fit these exact pixel ratios, ensuring they look professional and don’t get awkwardly cropped or compressed by the platform. For example, a YouTube thumbnail needs specific dimensions to be effective.
- Website and Blog Graphics: For websites and blogs, large image files can significantly slow down page loading times, negatively impacting user experience and SEO. Here, downsampling your high-resolution photography to appropriate web dimensions (e.g., 1920px wide for a hero image, 800px for blog post images) and then using Tophinhanhdep.com’s image compressors and optimizers to reduce file size without visible quality loss is crucial. This ensures your visual design elements, like mood boards or thematic collections, are displayed efficiently.
- Email and Digital Sharing: When emailing images or sharing them through messaging apps, smaller file sizes are always preferred. Resizing images to a modest resolution (e.g., 1280px on the longest side) before sending can prevent slow uploads, bounce-backs due to file limits, and excessive data usage for recipients.
Tophinhanhdep.com’s tools are designed to simplify these adjustments, allowing you to prepare your images for any online platform with ease, keeping your content vibrant and accessible.
To Resize or Upscale? Leveraging AI for Quality Enlargement
When you need to make an image larger, the choice between simple resizing and AI upscaling is critical for maintaining quality.
- Simple Resizing (Upsampling): As discussed, traditional upsampling (making an image larger using standard resizing tools) involves the software guessing new pixel information. While it works, it often leads to a noticeable loss of quality, detail, and clarity, especially with significant enlargements. The image can appear soft, blurry, or “blocky.” This method is generally best for minor enlargements or when some quality loss is acceptable.
- AI Upscaling: This is where Tophinhanhdep.com’s advanced AI Upscalers shine. Unlike traditional methods, AI upscaling uses artificial intelligence and machine learning algorithms to analyze the image, detect patterns, and intelligently generate new pixel data. This process allows for significant enlargement of images while enhancing details, sharpening edges, and minimizing artifacts often associated with traditional upsampling. If you have a beautiful photograph that’s too small for a large print or a wallpaper, or you want to enhance a lower-resolution image from your aesthetic collections, Tophinhanhdep.com’s AI upscaler is the superior choice, preserving and even improving visual fidelity.
Both tools have their place, but for truly enlarging an image without sacrificing its quality, Tophinhanhdep.com recommends leveraging the power of AI upscaling, a feature readily available through our platform.
Mastering Advanced Resizing Techniques with Professional Tools
For those delving deeper into digital photography, visual design, and photo manipulation, professional software like Adobe Photoshop offers unparalleled control over image resizing. Even if you’re not using Photoshop, the principles discussed here apply to other advanced image editing programs and Tophinhanhdep.com’s own comprehensive tools.
Cropping to a Different Aspect Ratio
As mentioned earlier, if you need to print an image to a frame size that doesn’t match its original aspect ratio (e.g., fitting a 4x6 image into an 8x10 frame), you must first crop the image. This ensures that the main subject is properly framed and that you don’t end up with awkward white borders or unwanted stretching.
General Steps for Cropping:
- Select Crop Tool: Open your image in a professional editor (or an advanced online tool from Tophinhanhdep.com) and select the Crop tool.
- Set Aspect Ratio: In the tool’s options bar (or settings panel), you can usually specify a new aspect ratio (e.g., 8:10 or 10:8 for portrait or landscape). Many tools offer presets for common print sizes.
- Adjust Crop Border: A cropping border will appear over your image. You can drag its corners or edges to select the desired area of your photo. Position your subject within this new ratio, sacrificing some parts of the original image if necessary.
- Apply Crop: Confirm the crop. It’s often advisable to use an option that doesn’t permanently delete the cropped pixels, allowing for future adjustments.
Once cropped, your image will have the correct aspect ratio, and you can then proceed to resize it to your target print dimensions using the methods discussed in the “Resizing for Print” section, making sure to adjust the resolution as needed. This meticulous approach is vital for professional-grade photo manipulation and graphic design projects.
Advanced Resolution Control and Interpolation Methods
In professional software, you gain fine-grained control over resolution and how pixels are added or removed during resampling.
- Image Size Dialog Box: In programs like Photoshop, the “Image Size” dialog box is your command center. Here, you can toggle the “Resample” option on or off, allowing you to either change only the print dimensions/resolution (Resample off) or change the actual pixel dimensions (Resample on).
- Interpolation Methods: When resampling (adding or removing pixels), the software uses an “interpolation method” to calculate the new pixel values. Different methods yield different results in terms of sharpness and smoothness:
- Automatic: The software chooses what it thinks is best.
- Bicubic Smoother (for enlargement): Good for upsampling, aiming for smoother transitions.
- Bicubic Sharper (for reduction): Good for downsampling, helping to maintain crispness.
- Preserve Details / Preserve Details 2.0 (AI-enhanced): Newer, AI-powered methods (found in modern professional software and Tophinhanhdep.com’s advanced tools) are specifically designed for superior upsampling, intelligently adding detail and reducing artifacts. When enlarging an image, especially high-resolution photography or digital art, selecting an advanced interpolation method like “Preserve Details 2.0” can make a significant difference in the final quality.
Understanding and selecting the right interpolation method is a nuance that can dramatically impact the quality of your resized images, particularly when you’re striving for high-resolution output or intricate visual design.
Tophinhanhdep.com: Your Go-To Hub for Image Resizing and Beyond
At Tophinhanhdep.com, we are more than just an image resizing tool; we are a comprehensive platform designed to empower your digital creativity. Our core mission aligns perfectly with the diverse needs of today’s visual creators, from casual enthusiasts curating mood boards to professional photographers managing stock photos.
Seamless Integration with Our Image Tools
Image resizing is just one facet of a broader ecosystem of image management. Tophinhanhdep.com integrates seamlessly with our other powerful image tools to provide an all-in-one solution:
- Image Converters: Easily change file formats after resizing (e.g., from TIFF to JPEG).
- Image Compressors: Reduce file size after resizing for faster loading times on web platforms.
- Optimizers: Fine-tune images for specific web or print uses.
- AI Upscalers: Crucial for enlarging images without quality loss, transforming smaller files into high-resolution backgrounds or wallpapers.
- Image-to-Text Converters: For those needing to extract textual information from images, even after visual adjustments.
By offering these tools, Tophinhanhdep.com supports every stage of your image workflow, ensuring your beautiful photography and creative ideas are always presented optimally.
Elevating Your Visual Design and Photography
Our website categories – Images (Wallpapers, Backgrounds, Aesthetic, Nature, Abstract, Sad/Emotional, Beautiful Photography), Photography (High Resolution, Stock Photos, Digital Photography, Editing Styles), Image Tools, Visual Design (Graphic Design, Digital Art, Photo Manipulation, Creative Ideas), and Image Inspiration & Collections – all underscore the critical role of proper image sizing.
Whether you’re curating aesthetic mood boards, preparing high-resolution stock photos, or manipulating digital art for a graphic design project, Tophinhanhdep.com offers the resources, inspiration, and tools you need. We provide thematic collections, showcase trending styles, and offer photo ideas to spark your creativity. With our user-friendly interface and robust features, you can confidently resize, optimize, and enhance your images, bringing your creative visions to life with unparalleled clarity and impact. Explore Tophinhanhdep.com today and transform the way you interact with your digital imagery.