How to Change the Size of an Image: Your Essential Guide to Perfect Visuals on Tophinhanhdep.com

In our visually-driven world, images are everywhere – from the breathtaking wallpapers adorning our screens to the captivating backgrounds on our digital devices, the aesthetic shots filling our social feeds, and the beautiful photography we cherish. Whether you’re a professional photographer, a digital artist, a graphic designer, or simply someone who loves collecting and sharing stunning visuals, the ability to control and change the size of your images is a fundamental skill. At Tophinhanhdep.com, we understand the power of a perfectly sized image, whether it’s a high-resolution stock photo, a piece of intricate digital art, or a simple yet profound sad/emotional image destined for a mood board.
Resizing an image isn’t just about making it bigger or smaller; it’s about optimizing it for its intended purpose, maintaining its quality, and ensuring it delivers the desired visual impact. Imagine trying to set a beautiful nature photograph as your desktop background, only to find it stretched or pixelated. Or perhaps you’re uploading an abstract art piece to an online portfolio, and the platform demands specific dimensions. These scenarios highlight the critical role of image resizing in our digital lives.
This comprehensive guide from Tophinhanhdep.com will walk you through everything you need to know about changing image sizes. We’ll explore the core concepts of image resolution and aspect ratio, delve into practical, step-by-step instructions for popular operating systems like Windows, macOS, and ChromeOS, and introduce you to powerful online and desktop tools that can handle everything from quick adjustments to professional-grade manipulations. Our goal is to empower you to master image sizing, ensuring that every image you encounter or create, whether it’s part of our curated collections or your own unique digital photography, looks its absolute best, ready for any application—be it a vibrant wallpaper, a critical component of visual design, or a piece of inspiring art.

The Core Concepts: Resizing, Resampling, and Resolution
Before diving into the “how-to,” it’s crucial to grasp the underlying principles that govern image sizing. A clear understanding of concepts like pixels, resolution, and aspect ratio will not only make the resizing process easier but also help you achieve superior results. For creators and enthusiasts of high-resolution photography and digital art featured on Tophinhanhdep.com, this foundational knowledge is indispensable for preserving the integrity and beauty of your visuals.
Resizing vs. Resampling: Understanding the Difference
Often, the terms “resizing” and “resampling” are used interchangeably, but they refer to two distinct processes with significant implications for image quality. Understanding the difference is paramount for anyone working with digital images, especially when aiming for high-quality outcomes, whether for stunning wallpapers or detailed stock photos.
Image Resizing (without resampling): When you resize an image without resampling, you are essentially changing its print dimensions or display dimensions without altering the total number of pixels it contains. Think of it like changing the size of the frame around a picture – the picture itself (the pixel data) remains the same, but how large it appears when printed or displayed on a screen changes. This is achieved by adjusting the image’s resolution (measured in pixels per inch, or PPI/DPI), which dictates how densely those existing pixels are packed. This method is primarily used when preparing images for print, where you want to tell the printer how many existing pixels to squeeze into each inch of paper.
Image Resampling: Resampling, on the other hand, involves changing the actual number of pixels in an image.
- Downsampling: This means reducing the number of pixels. When you downsample, the software discards pixel information, making the image smaller in file size and often in dimensions. It’s akin to taking a high-resolution digital photography shot and reducing it for a web background or an email attachment to ensure faster loading times and reduced bandwidth usage. While downsampling generally results in a loss of detail (as pixels are thrown away), if done correctly, the visual impact can be minimal, especially for smaller display sizes.
- Upsampling: This involves increasing the number of pixels. When you upsample, the software has to create new pixels based on the surrounding pixel information. This process is inherently more challenging because the software is guessing what those new pixels should look like. Upsampling typically leads to a loss of sharpness and clarity, often introducing pixelation or a “soft” appearance. This is where advanced AI Upscalers, often integrated into sophisticated image tools or available as standalone services (like those Tophinhanhdep.com might feature), can make a significant difference, intelligently adding pixels to enhance details rather than just blurring them.
Resampling is necessary when you need to change the actual pixel dimensions of an image. Downsampling is vital for web optimization, reducing file sizes for faster loading of aesthetic images or stock photos on Tophinhanhdep.com, and for sharing via email. Upsampling might be used cautiously when a larger print or display size is needed than the original pixel dimensions can support, often leveraging AI-powered tools to minimize quality loss for digital art or detailed photography.
The Critical Role of Resolution (PPI/DPI) for Print and Web
Image resolution is a critical factor determining the quality and clarity of your visuals, whether they are displayed on a screen or printed on paper. It’s especially relevant for high-resolution photography and ensuring your abstract or beautiful photography images look sharp across all mediums.
Pixels Per Inch (PPI) and Dots Per Inch (DPI):
- PPI (Pixels Per Inch): This refers to the density of pixels in a digital image file. A higher PPI means more pixels are packed into each inch of the image, resulting in finer detail.
- DPI (Dots Per Inch): This term is specific to printing and refers to the density of ink dots a printer places on a physical inch of paper. A higher DPI in a printer results in a more detailed and smoother print.
Resolution for Web and Screen Display: For images displayed on screens (websites, social media, digital backgrounds, wallpapers), what truly matters are the pixel dimensions (e.g., 1920x1080 pixels). A screen displays an image based on its pixel dimensions, not its PPI. A 1000x1000 pixel image will take up the same amount of screen space whether its PPI is set to 72 or 300, assuming the zoom level is 100%. The main impact of a higher PPI on web images (without changing pixel dimensions) is often just a larger file size, leading to slower loading times. When preparing your aesthetic or nature images for online platforms, focus on the required pixel dimensions and then optimize the file size through compression, rather than obsessing over PPI.
Resolution for Print: For printing, resolution is paramount. The industry standard for high-quality prints, particularly for images that will be viewed up close, is often 300 PPI. This density ensures that the individual pixels are small enough to blend together, creating a continuous, sharp image. Most inkjet printers have a “native” resolution, often 300 PPI or even 360 PPI (for brands like Epson). If you send an image with a lower resolution, the printer’s software will automatically upsample it to its native resolution. However, a dedicated image editing tool can often do a superior job of upsampling, producing better results than letting the printer handle it. For the beautiful photography you want to hang on your wall, aiming for the printer’s native resolution is always best.
Aspect Ratio and Cropping: Maintaining Visual Integrity
The aspect ratio describes the proportional relationship between an image’s width and its height (e.g., 16:9, 4:3, 1:1). Understanding and managing the aspect ratio is crucial for visual design, especially when fitting images into specific layouts, creating mood boards, or preparing images for different platforms like social media banners or website headers on Tophinhanhdep.com.
- Why Aspect Ratio Matters: When you resize an image, if you maintain the aspect ratio, the image will scale proportionally, avoiding distortion (stretching or squishing). If you change the width or height independently without locking the aspect ratio, your image will become distorted, ruining the composition of your beautiful photography or digital art.
- Cropping to Change Aspect Ratio: If you need to fit an image into a space with a different aspect ratio than its original, you will need to crop it. Cropping involves cutting away parts of the image from its edges to achieve the desired new aspect ratio. For example, to fit a 3:2 landscape photograph into a 1:1 square for a Tophinhanhdep.com social media post, you would use a cropping tool to select a square portion of the image. When cropping, be mindful of the composition; ensure important elements of your nature scene or abstract artwork are not inadvertently cut out.
Everyday Image Resizing with Native Operating System Tools
You don’t always need specialized software to resize images. Most operating systems come equipped with built-in tools that can handle basic image resizing tasks quickly and efficiently. These native applications are perfect for everyday adjustments, whether you’re preparing a background image or a quick share of your aesthetic findings from Tophinhanhdep.com.
Simple Resizing on Windows 11 (Tophinhanhdep.com’s Recommended Method)
For Windows 11 PCs, the native Photos app provides a straightforward way to resize your images. This method is ideal for quick adjustments of wallpapers, backgrounds, or any digital photography you need to tailor for specific uses.
Step-by-Step Guide for Windows 11 Photos App:
- Open the Image: Locate your image. Right-click on it and select “Open with,” then choose “Photos.”
- Access Resize Option: In the Photos app, click the “Three dots icon” (ellipsis) in the top-right corner.
- Select Resize: From the drop-down menu, select “Resize.”
- Choose Dimensions: A pop-up appears. Select a preset size or “Define custom dimensions” for a specific size.
- Maintain Aspect Ratio: Check “Maintain aspect ratio” to prevent distortion. Enter one dimension, and the other will adjust automatically. Uncheck it if you need independent control.
- Save Your Resized Copy: Click the “Save resized copy” button. A new version of your image will be saved, leaving your original untouched.
Adjusting Image Sizes on macOS with Preview
Mac users have Preview, a versatile built-in application perfect for quick and easy image resizing. This is ideal for managing your digital photography and aesthetic collections.
Step-by-Step Guide for macOS Preview:
- Open the Image: Right-click on the image and select “Open” (or “Open with” > “Preview”).
- Access Adjust Size: Go to the “Tools” menu in the menu bar.
- Select Adjust Size: Choose “Adjust size” from the drop-down menu.
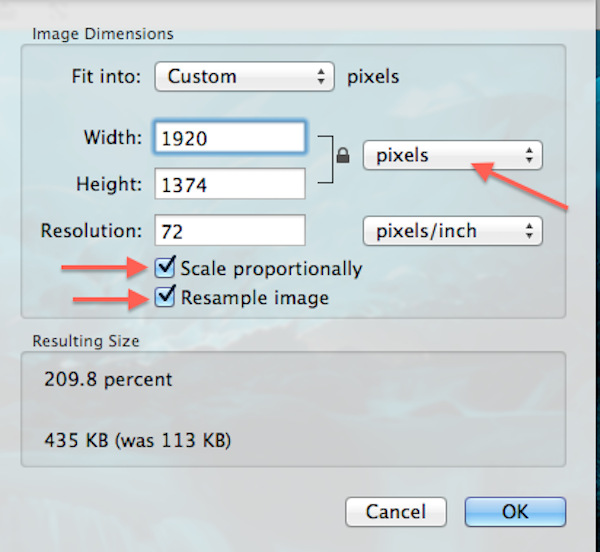
- Enter Dimensions: In the dialog box, enter the desired width and height. Change units (e.g., to pixels) if needed. You can also select a preset size. Ensure “Scale proportionally” is checked.
- Confirm New Size: Click “OK” to apply.
- Save the Resized Image: Go to “File > Save” to update, or “File > Export” to save as a new file.
Scaling Images on ChromeOS using Gallery
Chromebook users have a convenient built-in option for image resizing through the Gallery app. This is perfect for on-the-go adjustments of wallpapers, backgrounds, or photos from your Tophinhanhdep.com collection.
Step-by-Step Guide for ChromeOS Gallery App:
- Open the Image: Right-click on the image and select “Open with Gallery.”
- Locate Rescale Button: Click the “Rescale” button at the top of the Gallery app interface.
- Enter Dimensions: Input the desired width and height. Click the “Chain icon” to lock/unlock the aspect ratio as needed (locked is recommended to prevent distortion).
- Save Your Changes: Click “Save.” To keep the original, click the “blue Down arrow” next to Save and choose “Save as.”
Advanced & Online Tools for Enhanced Image Control
While native tools are excellent for basic tasks, specific projects, such as preparing high-resolution photography for print, intricate digital art for a portfolio, or optimizing a large batch of stock photos for Tophinhanhdep.com, demand more powerful solutions. This section explores a range of online and desktop image tools, each offering unique advantages for more complex resizing needs. These tools often come with additional features like converters, compressors, and optimizers, enhancing your overall visual design workflow.
Web-Based Solutions: Pixlr X, Simple Image Resizer, and Pic Resize
Online image editors offer convenience and accessibility, requiring no software installation. They are perfect for quick edits on any device and often come with intuitive interfaces, making them ideal for casual users and graphic designers alike. Tophinhanhdep.com often recommends such tools for their ease of use in preparing images for web and social media.
-
Pixlr X (for comprehensive online editing): Pixlr X is a free, feature-rich web app for simple photo editing, including robust resizing capabilities. It’s a great choice for aesthetic images and creative ideas from Tophinhanhdep.com that need a bit more than just a size change.
How to resize with Pixlr X:
- Go to Pixlr X: Visit their website.
- Open Image: Click “Open image” and select your file.
- Find Layout/Template: Locate and click the “Layout and Template button” (three rectangles icon).
- Select Smart Resize: In the Layout menu, choose “Smart resize.”
- Adjust Dimensions: Enter desired width/height, use the “Lock proportions toggle” for aspect ratio, or select a preset.
- Apply Changes: Click the “blue Apply button.”
- Save Your Work: Click the “blue Save button” at the bottom.
- Final Save Options: Enter a file name, select type, and adjust quality. Click “Save” again to download.
-
Simple Image Resizer (for speed and simplicity): This tool focuses on doing one thing well: resizing images quickly. It’s excellent for when you’re in a hurry to adjust a single image.
How to resize with Simple Image Resizer:
- Visit Website: Go to their website.
- Upload Image: Upload your image.
- Choose Dimensions/Percentage: Select “dimensions” or “percentage,” then enter your desired width/height or reduction percentage.
- Resize and Download: Click “Resize” and then download your image. Available as a Chrome extension and is mobile-friendly.
-
Pic Resize (for batch processing): Pic Resize is fantastic if you need to resize multiple images at once, common for creating thematic collections or preparing numerous stock photos for upload to Tophinhanhdep.com.
How to batch resize with Pic Resize:
- Go to Pic Resize: Visit their website.
- Upload Multiple Images: Select the option to “Upload multiple images.”
- Select Size Preference: Specify your desired size preference (e.g., percentage reduction, specific dimensions).
- Submit Batch Job: Click “Submit Batch Job!”
- Download: Download your resized images. Note: Batch mode usually doesn’t support cropping or effects.
Professional Desktop Editing: GIMP and Photoshop for Precision
For those who demand ultimate control and precision in their visual design and digital photography workflow, dedicated desktop software like GIMP and Photoshop are indispensable. These tools offer advanced features for resampling, fine-tuning resolution, and complex photo manipulation, allowing you to achieve the highest quality for your Tophinhanhdep.com contributions.
-
GIMP (GNU Image Manipulation Program): GIMP is a powerful, free, and open-source alternative to Photoshop, available for Mac and PC. It offers professional-level editing and retouching tools, making it user-friendly and highly customizable for digital artists.
How to change image size (Scale) in GIMP:
- Open Image: Launch GIMP and open your image (File > Open).
- Access Scale Image: Go to “Image > Scale Image…” from the menu.
- Adjust Dimensions and Resolution: In the dialog, enter your desired width or height. Ensure the “chain icon” is linked to maintain aspect ratio. Adjust X and Y resolution (PPI), aiming for 300-360 PPI for print.
- Quality (Interpolation): Under “Quality,” choose “Cubic” for smooth results.
- Scale: Click the “Scale” button.
- Save: Go to “File > Save” or “File > Export As…” to save your changes.
-
Adobe Photoshop (The Industry Standard): Photoshop is the gold standard for digital photography, graphic design, and photo manipulation. Its Image Size dialog box provides unparalleled control for resizing, resampling, and preparing images for print or web, essential for achieving the exacting standards often seen in Tophinhanhdep.com’s high-resolution photography.
How to resize images for print with Photoshop (Key Concepts):
- Open Image Size Dialog: Open your image. Go to “Image > Image Size.”
- Understand Resample Option:
- For Print (Changing Resolution without changing pixels): Turn “Resample” OFF. Adjust “Resolution” (e.g., to 300 PPI). The print width/height will change.
- For Resampling (Changing pixel dimensions): Turn “Resample” ON. Enter desired pixel width and height (link icon for aspect ratio). Set desired resolution (e.g., 300 PPI for print).
- Interpolation Method: If “Resample” is ON, choose an interpolation method. “Preserve Details 2.0” (CC 2018+) is best for upsampling; “Bicubic Sharper” for downsampling. “Automatic” is a safe default.
- Check Image Size: Note changes in pixel dimensions and file size.
- Cropping for Aspect Ratio: If your target print size (e.g., 8x10) doesn’t match your image’s original aspect ratio, first use the Crop Tool (C) to crop to the new ratio (e.g., enter 8x10 in Options Bar). Then use Image Size.
- Click OK: Apply changes.
- Save: Save your image (File > Save As…) to a new file.
Optimizing Tophinhanhdep.com Images for Every Purpose
The purpose of an image dictates its optimal size and resolution. At Tophinhanhdep.com, we feature everything from high-resolution digital photography to charming aesthetic images, and each requires a thoughtful approach to resizing. Understanding these specific needs ensures your visual design efforts yield perfect results, whether for print, web, or unique creative ideas.
Sizing for Wallpapers, Backgrounds, and Social Media
Wallpapers and backgrounds are often the first visual elements we interact with on our devices. Aesthetic collections, whether for personal mood boards or public display on Tophinhanhdep.com, also require thoughtful resizing to fit various screen sizes and visual layouts.
- Desktop Wallpapers: To ensure a nature photograph or abstract art piece looks crisp, resize it to match or slightly exceed your monitor’s native resolution (e.g., 1920x1080, 2560x1440, 3840x2160), maintaining its aspect ratio (typically 16:9). This prevents stretching or pixelation.
- Mobile Backgrounds: For mobile devices, aim for a resolution around 1080x1920 pixels (portrait) or higher. Most phones will automatically scale images, but starting with a well-sized image improves quality.
- Aesthetic & Thematic Collections: When building mood boards or thematic collections on Tophinhanhdep.com, consistency in image size and aspect ratio can greatly enhance visual appeal. Consider standardizing to a few common aspect ratios (e.g., 1:1 squares, 16:9 rectangles) and resizing images accordingly. This might involve strategic cropping to fit the desired aesthetic, ensuring your sad/emotional images evoke the right feeling without awkward framing.
- Social Media Platforms: Each platform has specific recommendations for image dimensions (e.g., Instagram posts, Facebook cover photos, YouTube thumbnails, Twitter headers). Always check the latest requirements and resize accordingly, prioritizing pixel dimensions and file size for fast loading.
Preparing High-Resolution Photography and Digital Art for Print
Printing requires a different mindset than web display. The goal is to ensure enough pixel density to produce a sharp physical image. This is particularly important for printing beautiful photography or digital art sourced from Tophinhanhdep.com.
- Understanding Print Dimensions: For print, you’re thinking in physical units (inches) and how many pixels will fill them. To calculate required pixel dimensions for print:
(desired print width in inches * PPI) x (desired print height in inches * PPI). For an 8x10 inch print at 300 PPI, you’d need an image of at least 2400x3000 pixels. - Common Print Sizes and Corresponding Pixel Dimensions (at 300 PPI):
- 4x6 inches: 1200 x 1800 pixels
- 5x7 inches: 1500 x 2100 pixels
- 8x10 inches: 2400 x 3000 pixels
- 11x14 inches: 3300 x 4200 pixels
- 16x20 inches: 4800 x 6000 pixels
- Cropping First: If your original image’s aspect ratio doesn’t match the target print size, always crop the image to the correct aspect ratio first before setting the final print dimensions and resolution.
- Upscaling for Larger Prints: If your image’s original pixel dimensions are too small for your desired print size at 300 PPI, you will need to upsample it. Use advanced tools like Photoshop with “Preserve Details 2.0” or dedicated AI Upscalers to minimize quality loss. While upsampling always involves some compromise, these tools can achieve impressive results.
- File Size and Quality: For print, you generally want the highest quality possible. Save images for print in formats like TIFF, high-quality JPEG, or PNG to preserve detail. Be mindful of file size requirements from print services, but prioritize quality over extreme compression.
Conclusion: Mastering Your Visuals with Tophinhanhdep.com
The ability to change the size of an image is far more than a technical trick; it’s a fundamental skill that empowers you to fully express your creative vision and ensures your visual content looks its best across every platform and medium. From the vibrant wallpapers that personalize your screen to the high-resolution photography you painstakingly prepare for print, from the aesthetic backgrounds that set a mood to the precise digital art you share with the world—every image benefits from thoughtful resizing.
Tophinhanhdep.com is dedicated to being your ultimate resource for all things visual. We aim to inspire you with diverse image inspiration and collections, from captivating nature scenes to thought-provoking abstract compositions, and to equip you with the knowledge and tools you need to excel in digital photography and visual design. Whether you’re leveraging our curated thematic collections, exploring trending styles for your next project, or contributing your own beautiful photography, mastering image sizing is a cornerstone of success.
By understanding the difference between resizing and resampling, appreciating the nuances of resolution for different outputs, and expertly managing aspect ratios, you unlock the full potential of your images. The native tools on your operating system, combined with powerful online and desktop software, provide a spectrum of options for every skill level and need. And when you need to take your images further, exploring advanced image tools like AI Upscalers (as might be featured on Tophinhanhdep.com) can transform even challenging upscaling tasks into remarkable results.
So, whether you’re a seasoned graphic designer or just beginning your journey into digital art, remember that the perfect image is often one that’s perfectly sized. Continue to explore, create, and share your stunning visuals, knowing that with Tophinhanhdep.com by your side, you have the expertise to make every pixel count. Embrace the art of image resizing, and let your images truly shine.