How to Change the Aspect Ratio of an Image: A Comprehensive Guide to Mastering Visual Proportions

In the dynamic world of digital imagery, where visuals dominate everything from personal desktops to professional portfolios, understanding and manipulating aspect ratios is an indispensable skill. Whether you’re a casual user setting up a new wallpaper, a photographer preparing high-resolution stock photos, a graphic designer crafting digital art, or simply someone who wants their screen to look just right, getting the aspect ratio perfect is key. Incorrect aspect ratios can lead to unsightly black bars, stretched images, or cropped compositions that diminish the impact of your visuals. This comprehensive guide will delve into the essence of aspect ratio, explore various methods for adjusting it across different platforms and tools, and offer insights to ensure your images always look their best.
At Tophinhanhdep.com, we understand the critical role aspect ratio plays in creating stunning visual experiences. From breathtaking nature photography to abstract art, ensuring your images are perfectly framed, whether for a background or a mood board, is paramount. This guide is designed to empower you with the knowledge and tools to achieve flawless image proportions every time.
Understanding Aspect Ratio: Why It Matters for Your Visuals
Before diving into the “how-to,” it’s crucial to grasp what aspect ratio is and why it holds such significance in the realm of images and visual design.
What is Aspect Ratio?
The aspect ratio of an image or display is the proportional relationship between its width and its height. It is commonly expressed as two numbers separated by a colon (e.g., 16:9, 4:3, 1:1), where the first number represents the width and the second represents the height. This ratio dictates the shape and dimensions of your content, ensuring it fits properly within a designated space, whether it’s a screen, a print, or a digital canvas.
For instance, a 16:9 aspect ratio signifies that for every 16 units of width, there are 9 units of height. This is the standard widescreen format for most modern displays, televisions, and video content. A 4:3 ratio, on the other hand, is squarer, reminiscent of older televisions and traditional photography. A 1:1 ratio, a perfect square, is popular for profile pictures and certain social media platforms.
The Importance of Correct Aspect Ratios for Images, Photography, and Visual Design
The correct aspect ratio is more than just a technical specification; it’s a fundamental element of visual communication and aesthetic appeal.
-
For Images (Wallpapers, Backgrounds, Aesthetic, Nature, Abstract, Sad/Emotional, Beautiful Photography): When setting a stunning nature landscape as your wallpaper or an aesthetic abstract piece as your background, an incorrect aspect ratio can lead to frustrating distortion or awkward black bars. A beautiful photograph, meticulously composed, can lose its visual integrity if forced into the wrong proportions. Ensuring the correct ratio preserves the artist’s original intent and provides a seamless viewing experience. For thematic collections or mood boards, consistent aspect ratios create a more harmonious and professional presentation.
-
For Photography (High Resolution, Stock Photos, Digital Photography, Editing Styles): Professional photographers, digital artists, and those managing stock photos constantly deal with aspect ratio adjustments. High-resolution images, especially, offer the flexibility to be cropped to various ratios without significant loss of detail. When preparing images for print, a specific frame size dictates the required aspect ratio. For online platforms, different social media sites or stock photo agencies have unique aspect ratio requirements, which, if ignored, can lead to automatic cropping or resizing that compromises the photo’s composition. Editing styles can also be defined by how an image is framed, and mastering aspect ratio gives photographers creative control over their final output.
-
For Visual Design (Graphic Design, Digital Art, Photo Manipulation, Creative Ideas): Graphic designers and digital artists work with specific canvas dimensions that directly translate to aspect ratios. Whether designing a banner, a social media post, or a website layout, adhering to the correct proportions is essential for a polished and functional design. Photo manipulation projects often require integrating elements with consistent aspect ratios to maintain realism and coherence.
-
Avoiding Distortion and Maintaining Quality: Automatic resizing, a common culprit when uploading images to various platforms, frequently distorts pictures, resulting in an unappealing, stretched, or squashed look. By manually adjusting the aspect ratio, you maintain control over the final output, preserving image quality and ensuring your content appears exactly as intended.
Common Aspect Ratios and Their Uses
- 16:9 (Widescreen): Standard for monitors, TVs, YouTube videos, and most digital presentations. Ideal for landscapes and cinematic shots.
- 4:3 (Standard): Common for older monitors, projectors, and traditional photography. Provides a slightly squarer frame.
- 3:2: A classic photography aspect ratio, often used by DSLR cameras. Offers a balanced frame for various subjects.
- 1:1 (Square): Popular on social media platforms like Instagram, perfect for profile pictures and showcasing single subjects.
- 9:16 (Vertical Widescreen): Emerged with mobile-first content, ideal for Instagram Stories, TikTok, and YouTube Shorts.
Understanding these ratios allows you to strategically crop or adjust your images to fit their intended purpose, optimizing both aesthetic appeal and functional display.
Changing Aspect Ratio on Your Windows Device (Windows 10 & 11)
For Windows users, adjusting the display’s aspect ratio can significantly enhance the viewing experience, eliminating black bars or stretched visuals. This applies whether you’re working on a single screen, managing multiple displays, or optimizing for video playback.
Adjusting Through Display Settings
The most straightforward method for modifying your display’s aspect ratio in Windows 10 and 11 is through the built-in display settings.
For Windows 11:
- Right-click on your desktop and select “Display settings” from the context menu.
- In the Display settings window, scroll down to the “Scale and layout” section.
- Under the “Display resolution” dropdown menu, you’ll see a list of available resolutions, each inherently linked to a specific aspect ratio. Select the desired aspect ratio (e.g., 1920x1080 for 16:9, 1280x960 for 4:3).
- Click on “Apply” to save the changes.
- If prompted, confirm the changes by clicking “Keep changes.”
For Windows 10:
- Right-click on your desktop and select “Display Settings.”
- In the Display Settings window, scroll down to the “Scale & Layout” section.
- Under “Display resolution,” select the desired resolution from the drop-down menu. This implicitly changes the aspect ratio.
- Click “Apply” to save the changes.
- If the desired aspect ratio isn’t immediately visible, click “Advanced display settings” and then “Display adapter properties for Display X” (where X is your display number). From there, click “List All Modes” to explore more options.
Tips for Display Settings:
- Native Aspect Ratio: Always aim to use your display’s native aspect ratio whenever possible. This is the default ratio supported by your monitor and ensures content appears without distortion, maintaining optimal image quality. You can find this information in your monitor’s user manual or on the manufacturer’s website.
- Limitations: This method is limited to predefined options. For custom ratios or finer control, you might need alternative methods.
Leveraging Graphics Card Control Panels
If Windows’ default display settings don’t offer the exact aspect ratio you need, your graphics card control panel is the next place to look. NVIDIA, AMD, and Intel provide dedicated software that offers more granular control over display settings, including aspect ratio and scaling.
General Steps:
- Right-click on your desktop and select either “NVIDIA Control Panel,” “AMD Radeon Settings,” or “Intel Graphics Settings” (the name varies based on your graphics card manufacturer).
- Within the control panel, navigate to the display or resolution settings section. Look for options related to “Aspect Ratio,” “Scaling,” “Display,” or “Video.”
- Here, you’ll typically find options like “Maintain aspect ratio,” “Full-screen,” “Centered,” or custom scaling options. Choose the desired aspect ratio or adjust scaling settings to achieve your preferred view.
- Click “Apply” or “Save” to implement the changes.
Tips for Graphics Card Settings:
- Driver Updates: Ensure your graphics card drivers are always up to date. Outdated drivers can limit functionality and aspect ratio options. Visit your card manufacturer’s website for the latest versions.
- Flexibility: This method often provides more flexible and customizable aspect ratio options compared to Windows’ built-in settings, allowing for more precise adjustments.
Advanced Methods for System-Wide Control (Third-Party Tools & Registry)
For users requiring even more specialized control or encountering limitations with standard methods, advanced techniques involving third-party software or the system registry can be explored.
Using Third-Party Software:
Several third-party applications provide advanced display customization, including creating custom resolutions and aspect ratios. Examples include:
- PowerStrip: A powerful utility for advanced display control.
- Custom Resolution Utility (CRU): Allows users to create custom resolutions for both AMD/ATI and NVIDIA GPUs.
- Monitor Manufacturer Software: Some monitor brands provide their own utilities for fine-tuning display settings.
Pros: Extensive customization, precise control, additional features to enhance visual experience. Cons: Requires higher technical knowledge, potential compatibility issues or conflicts, need for reliable sources. Tips: Research thoroughly, read user reviews, download from trusted sources, and proceed with caution. Back up your system before making significant changes.
Modifying the System Registry Editor (Caution Advised):
Editing the Windows Registry can allow for highly specific aspect ratio adjustments, but it is inherently risky and should only be attempted by advanced users with a solid understanding of system configurations. Incorrect modifications can lead to system instability or even render your device inoperable.
- Press Windows key + R, type
regedit, and press Enter. - Navigate to
HKEY_LOCAL_MACHINE\SYSTEM\CurrentControlSet\Control\GraphicsDrivers\Configuration. - Expand the
Configurationfolder and locate a subfolder with a long string of numbers and letters (representing your display configuration). - Within this folder, find the
DWORDvalues namedPrimSurf_Size.cx(width) andPrimSurf_Size.cy(height). - Double-click on each, change “Base” to “Decimal,” and input your desired width and height values for the aspect ratio.
- Click “OK” and restart your computer for changes to take effect.
Pros: Highest level of customization for specific, otherwise unavailable aspect ratios. Cons: Extremely risky; requires advanced technical knowledge; potential for system damage. Tips: ALWAYS create a system restore point or full system backup before editing the registry. Follow precise, step-by-step guides from trusted sources.
Mastering Aspect Ratio with Image Editing Software (Adobe Photoshop)
When it comes to individual images, image editing software like Adobe Photoshop offers unparalleled control over aspect ratio adjustments. This is crucial for photographers, graphic designers, and anyone serious about maintaining the integrity and aesthetic of their visuals.
The Crop Tool: Your Primary Method
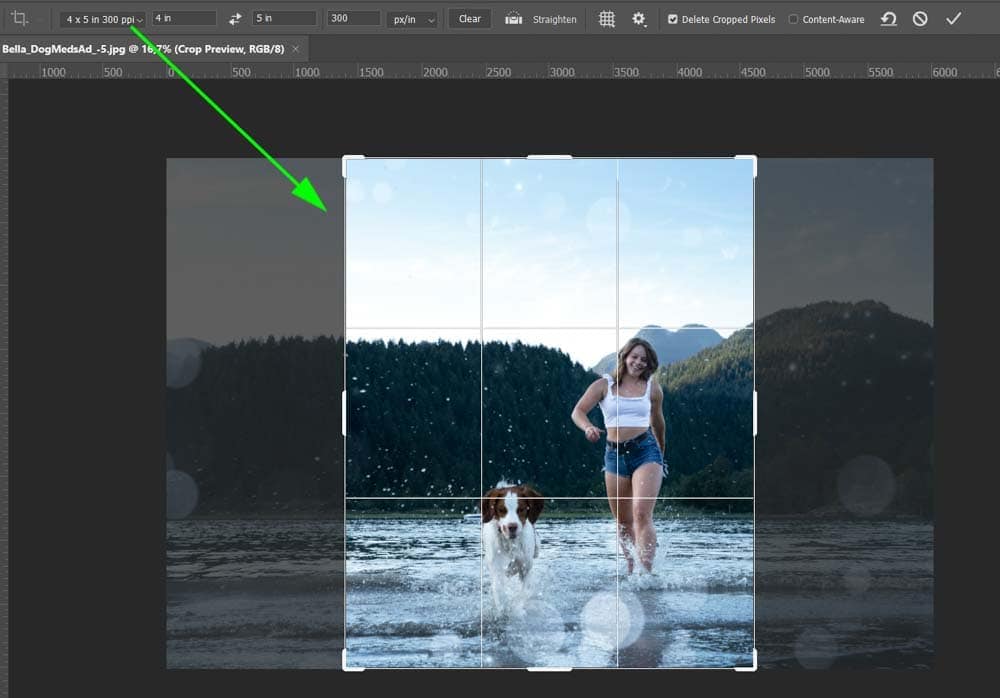
In Photoshop, the Crop Tool (shortcut ‘C’) is your go-to feature for changing an image’s aspect ratio. This tool allows you to redefine the boundaries of your image, effectively cropping out unwanted parts to fit new proportions.
Step-by-Step Process:
- Open the Image: Launch Photoshop and open the image you wish to modify.
- Select the Crop Tool: Click on the Crop Tool icon in the Toolbar (left side) or press ‘C’ on your keyboard.
- Choose an Aspect Ratio: In the Options Bar at the top of the screen (once the Crop Tool is active), locate the “Ratio” drop-down menu. You can select from predefined common ratios like 16:9, 4:3, 1:1, or choose “Original Ratio” to reset.
- Adjust the Crop Box: A crop box will appear over your image. You can click and drag the handles on the box to resize it, or click inside the box and drag to reposition the entire crop area. The faded areas outside the box indicate what will be cropped off.
- Confirm the Crop: Once you’re satisfied with the composition within the new aspect ratio, click the checkmark icon in the Options Bar or press Enter on your keyboard.
This method is highly effective for tailoring images for specific platforms (e.g., Instagram’s 1:1, YouTube thumbnail’s 16:9) or for print sizes (e.g., 8x10 or 5x7 photo frames).
Setting Custom Ratios and Presets
Photoshop goes beyond predefined options, allowing you to input custom aspect ratios and even save them for future use.
- Custom Ratio: In the Ratio drop-down menu, select “Ratio.” Then, in the two input boxes next to it, type in your desired width and height values (e.g., “5” and “7” for a 5:7 ratio). Photoshop will automatically apply this custom ratio to your crop box.
- Custom Dimensions: If you know the exact pixel width and height you need, you can select “W x H Resolution” from the drop-down menu and enter the precise dimensions. This is particularly useful for web graphics or specific digital art specifications.
- Saving Presets: For frequently used custom aspect ratios (e.g., a specific banner size for your website on Tophinhanhdep.com), you can save them as presets. After entering your custom ratio, click the drop-down menu again and select “New Crop Preset.” Give it a descriptive name, and it will appear in your list for quick access, streamlining your workflow for images, photography, and visual design projects.
Creative Considerations: Cropping vs. Content-Aware Scaling
Changing the aspect ratio often involves cropping parts of the image, which can be creatively beneficial (e.g., focusing on a subject) but sometimes undesirable if crucial elements are lost.
- Intentional Cropping: For photographers and visual designers, cropping is a powerful compositional tool. It allows you to emphasize the focal point, remove distractions, and adapt an image for a specific context without distorting it. When changing a landscape image to a portrait ratio, careful cropping is usually the best approach to maintain quality and artistic intent.
- Avoiding Cropping (with caution):
- Content-Aware Fill: Photoshop’s Content-Aware Fill can intelligently generate new pixels to fill empty areas created by expanding the canvas to a new aspect ratio, rather than cropping. This works best with simple, predictable backgrounds.
- Stretching (generally not recommended): While technically possible, manually stretching an image to fit a new aspect ratio without cropping almost always leads to visible distortion, making the image look unnatural. If you must attempt this, make sure “Delete Cropped Pixels” is unticked after using the crop tool. Then, go to
Image > Canvas Sizeto expand the canvas, and useEdit > Free Transform(Ctrl+T / Cmd+T) to stretch the image to fill the new canvas. This method should be used sparingly and with great care to avoid an unappealing result. - Adding a Border: A simpler, non-destructive way to change an image’s apparent aspect ratio without cropping or stretching is to increase the canvas size to the desired ratio and fill the new borders with a solid color (often white or black), effectively creating a frame around your original image. This is a common practice for aesthetic images and certain social media layouts.
Online Solutions and Specific Applications: Expanding Your Toolkit
Beyond dedicated software like Photoshop, a wealth of online tools and application-specific settings can help you manage aspect ratios with ease.
Utilizing Online Aspect Ratio Changers (Tophinhanhdep.com)
For quick adjustments without specialized software, online tools are invaluable. Tophinhanhdep.com offers a robust suite of image tools, including an intuitive aspect ratio changer.
How Tophinhanhdep.com’s Aspect Ratio Changer Works:
- Upload Your File: Navigate to Tophinhanhdep.com’s free aspect ratio changer. Upload your image file (PNG, JPG, GIF are commonly supported formats).
- Define Your Ratio: Once uploaded, you’ll see options on the right-hand side. Select “Aspect Ratio” under the “Define by” section.
- Choose or Customise: Use the drop-down menu to select a common ratio (e.g., 16:9, 1:1) or manually enter custom width and height values into the provided boxes. Tophinhanhdep.com’s online Aspect Ratio Calculator can assist if you need to determine values.
- Preview and Apply: Click “Apply” to see a real-time preview of your image with the new aspect ratio. You can often adjust the cropping area within the preview to select the most important parts of your image.
- Download: Once satisfied, click “Download” to save your newly proportioned image to your device.
Advantages of Online Tools like Tophinhanhdep.com:
- Accessibility: No software installation required; accessible from any device with an internet connection.
- Speed: Quick and efficient for on-the-fly adjustments.
- Cost-Effective: Often free to use, making them perfect for casual users or those on a budget.
- Diverse Use Cases: Ideal for adapting images for social media posts, email headers, blog graphics, or quick wallpapers and backgrounds from various thematic collections.
Aspect Ratio in Presentation Software (PowerPoint)
Presentations often demand specific aspect ratios to look professional on different projectors or screens. PowerPoint, for example, has shifted its default ratio over the years.
- Changing Slide Size: In PowerPoint, go to the “Design” tab, then click “Slide Size” (usually in the top-right corner). You can choose between “Standard (4:3)” or “Widescreen (16:9).” There’s also an option for “Custom Slide Size” to input specific dimensions.
- Handling Distorted Images: A common issue arises when copying slides or content (especially images) from a presentation with one aspect ratio to another with a different one. Images can become stretched or squashed.
- Method 1 (Copy Content, Not Slide): To avoid distortion, create a new presentation with the desired aspect ratio. Then, for each slide from the old presentation, copy individual elements (Ctrl+A to select all on a slide, Ctrl+C to copy) and paste them into the new presentation (Ctrl+V). This preserves the aspect ratio of individual elements. You can then manually adjust their size and placement to fill the new slide dimensions.
- Method 2 (Fixing Distorted Images): If you’ve already copied entire distorted slides, right-click on a distorted image and select “Format Picture.” In the “Format Picture” pane that appears, go to “Size & Properties.” Set “Scale Height” and “Scale Width” to 100% to restore original proportions. Ensure “Lock Aspect Ratio” is checked to prevent future distortion when resizing.
Optimizing for Digital Platforms and Printing
Understanding aspect ratio is critical for both online display and physical output.
- Digital Platforms: Each platform (website, social media, app) has recommended image dimensions and aspect ratios for optimal display. For instance, Instagram profile pictures are 1:1, stories are 9:16, and landscape posts can be 1.91:1. Always check the platform’s guidelines to ensure your beautiful photography or creative designs are displayed correctly without unwanted cropping or resizing. This ensures your aesthetic, nature, or abstract images maintain their visual impact.
- Printing: When printing high-resolution images, the aspect ratio must match the print size. A standard photo print of 4x6 inches has a 3:2 aspect ratio, while an 8x10 print has a 5:4 ratio. Using an image with a different ratio will necessitate cropping or result in white borders. Planning your crop in advance using tools like Photoshop or Tophinhanhdep.com ensures your physical prints look as intended.
Best Practices and Troubleshooting for Aspect Ratio Adjustments
Mastering aspect ratio also involves understanding common pitfalls and best practices to ensure your visual assets consistently impress.
Maintaining Image Quality and Avoiding Distortion
- Start with High Resolution: Always begin with the highest resolution image possible. This provides more pixels to work with, allowing for significant cropping or resizing to adjust aspect ratios without a noticeable loss in clarity or sharpness. High-resolution stock photos are particularly amenable to this.
- Prioritize Cropping: When changing aspect ratios, cropping is generally preferable to stretching. Stretching distorts pixels and makes the image look unnatural. Cropping, while potentially removing parts of the image, maintains the integrity of the remaining pixels.
- Understand Native Resolution: For displays, sticking to the native resolution ensures the sharpest image. Deviating from it can cause blurriness or pixelation, even if the aspect ratio is technically correct.
- Content-Aware Scaling with Care: While useful, Photoshop’s Content-Aware Scale should be used judiciously. It works best with simple backgrounds and can produce unnatural results if applied too aggressively to complex areas or human subjects.
When to Seek Professional Assistance
While many aspect ratio adjustments are straightforward, some complex scenarios might warrant professional help:
- Advanced Photo Manipulation: For intricate visual design or photo manipulation projects where a specific, non-standard aspect ratio must be achieved without any visual compromise, professional digital artists have the expertise and advanced tools to achieve seamless results.
- System-Wide Display Issues: If you’re experiencing persistent display issues on Windows even after trying all methods, or if registry editing seems too daunting, IT support or a graphics card specialist can provide tailored assistance.
- Large-Scale Media Projects: For video production or large-format printing where exact aspect ratios are critical to the final output, consulting with professionals ensures technical accuracy and high-quality results.
Frequently Asked Questions
1. How do I change the aspect ratio on Windows 11? Right-click your desktop, select “Display settings,” then go to “Scale and layout” and choose your desired resolution (which defines the aspect ratio) from the “Display resolution” dropdown menu. Click “Apply.”
2. Can I customize the aspect ratio on Windows 11/10? Windows’ built-in display settings offer predefined aspect ratios linked to resolutions. For custom ratios, you’ll need to use your graphics card control panel (NVIDIA, AMD, Intel) or advanced third-party software. Direct customization via registry editing is also possible but risky.
3. Will changing the aspect ratio affect the clarity of my display or image? Changing the aspect ratio itself primarily affects the proportions. However, if you choose a resolution that isn’t the native resolution of your display, or if you stretch an image instead of cropping it, you may experience a loss of clarity, sharpness, or distortion. It’s always best to maintain the native resolution for displays and crop images to new aspect ratios whenever possible.
4. Can I change the aspect ratio for specific apps or games on Windows? Generally, Windows display settings apply system-wide. Some games or media players have their own internal aspect ratio or resolution settings that can be adjusted within the application’s options. For design software like Photoshop, you adjust the image’s aspect ratio directly within the program, not the system display.
5. What should I do if my desired aspect ratio isn’t available in Windows display settings? First, update your graphics drivers. If the issue persists, try adjusting through your graphics card’s control panel (NVIDIA, AMD, Intel). For advanced needs, consider third-party tools like CRU, or, with extreme caution, modify the system registry.
6. What’s the best aspect ratio for social media? It varies by platform and content type. Instagram favors 1:1 for posts, 9:16 for stories, and 4:5 for vertical images. YouTube videos are typically 16:9. Always check the specific platform’s recommendations for optimal display of your images, aesthetic photography, or digital art.
Conclusion
Mastering how to change the aspect ratio of an image is a fundamental skill in today’s visually driven world. From optimizing your Windows desktop with perfectly fitted wallpapers to preparing high-resolution stock photos for various platforms, and from crafting precise visual designs to simply enjoying movies without distorted visuals, understanding aspect ratios is key.
Whether you’re leveraging the simplicity of your Windows display settings, diving into the detailed control of Photoshop’s Crop Tool, or utilizing convenient online resources like Tophinhanhdep.com’s Aspect Ratio Changer, the tools and knowledge are at your fingertips. By prioritizing image quality, understanding the nuances of cropping versus stretching, and knowing when to apply different methods, you can ensure your images always present their best self. Embrace these techniques, and transform your viewing and creative experiences into something truly seamless and aesthetically pleasing. Tophinhanhdep.com is here to support all your image and visual design needs, providing the inspiration and tools to bring your creative ideas to life.