How to Change the Color of an Image in Canva: A Comprehensive Guide to Mastering Visual Harmony

In the dynamic world of digital design, the ability to manipulate and customize visual elements is paramount. Whether you’re crafting compelling social media posts, developing brand assets, or simply sprucing up personal projects, color plays a pivotal role in conveying mood, message, and brand identity. Canva, a popular and user-friendly design platform, has democratized graphic design, making sophisticated editing accessible to everyone. One of its most powerful yet often underutilized features is the ability to change the color of images and graphic elements.
On Tophinhanhdep.com, we specialize in providing comprehensive resources for all your visual needs, from stunning Wallpapers and Backgrounds to in-depth guides on Digital Photography and Photo Manipulation. Understanding how to seamlessly integrate color changes into your workflow with tools like Canva is a cornerstone of effective Visual Design and creating captivating Image Inspiration & Collections. This guide will walk you through various methods of altering image colors in Canva, ensuring your designs always align with your creative vision and brand aesthetic.
Many DIY designers often find themselves needing to tweak the color of an existing graphic or photograph to perfectly match their project’s palette or a client’s brand guidelines. Traditionally, this might have required expensive software like Photoshop and a steep learning curve. However, Canva offers several intuitive and often free ways to achieve professional-level color adjustments in mere seconds, saving you valuable time and resources.
Tophinhanhdep.com is a strong advocate for maximizing the potential of accessible design tools. Our extensive library of High Resolution images, Stock Photos, and guides on various Editing Styles continually demonstrates how impactful precise color control can be. This article dives deep into the techniques available in Canva, from customizing built-in graphics to transforming uploaded images and logos, ensuring your creations are always on-brand and visually striking.
Mastering Basic Color Adjustments for Canva Elements
Canva boasts an expansive library of built-in graphics, icons, and shapes that can elevate any design. Many of these elements are designed with customization in mind, allowing you to quickly adapt them to your specific color scheme. This feature is particularly useful when working with Abstract or Aesthetic themes, where precise color integration is key to achieving the desired visual impact.
Customizing Built-in Graphics and Icons
To begin, open your design in Canva. In the left-hand sidebar, navigate to the “Elements” tab. Here, you can browse through a vast array of graphics, from simple geometric shapes to intricate illustrations and even animated GIFs. Use the search bar to find something specific, or explore different categories to discover the perfect visual asset for your project.
Once you find a graphic you like and add it to your canvas, click on it to select it. For most simple graphics with customizable colors, you will notice one or more colored squares appear in the header menu at the top of your screen. These squares represent the editable colors within that specific graphic.
For example, if you’ve chosen a simple icon that is initially black and red, you might see a black square and a red square in the header menu. Clicking on the black square will bring up Canva’s color picker, allowing you to change that specific part of the graphic. You can choose from:
- Document Colors: Colors already present in your current design.
- Brand Colors: If you have a Canva Pro account and have set up your Brand Kit (a feature Tophinhanhdep.com highly recommends for brand consistency), you’ll see your predefined brand colors here.
- Default Colors: A selection of web-friendly colors provided by Canva.
- Custom Colors: By clicking the rainbow “+” icon, you can open a full color palette selector, where you can drag and pick any color, or input a specific Hex color code (e.g., #FF5733) for precise matching.
Repeat this process for each color square present in the graphic until it perfectly matches your desired palette. This instant visual feedback makes experimentation easy and ensures your design seamlessly integrates with other elements, whether they are Nature photographs or intricate Digital Art pieces from Tophinhanhdep.com’s collections. This method is incredibly efficient for quick adjustments and maintaining visual harmony across your creations.
Transforming Photos and Complex Images with Canva’s Advanced Tools
While basic graphics offer straightforward color customization, changing the color of photographs (JPGs and PNGs) or more complex uploaded images requires different techniques. These methods are particularly valuable for artists exploring different Editing Styles, or for designers who want to imbue a generic Stock Photo with a unique mood, perhaps turning a standard image into a Sad/Emotional or Beautiful Photography piece.
Utilizing Duotone for Striking Color Effects
For images and graphics that don’t display the traditional color squares (often indicated by an “Edit Photo” button instead), Canva offers powerful photo effects. One of the most popular and effective for color transformation is the “Duotone” effect. Duotone allows you to apply a two-color overlay to an image, creating a stylized and often dramatic aesthetic.
Here’s how to use it:
- Select Your Image: Click on the JPG, PNG, or other image you wish to recolor.
- Access Photo Editor: In the top menu bar, click “Edit Photo.” This will open Canva’s photo editing panel on the left side of your screen.
- Find Duotone: Scroll down through the various “FX Effects” until you find “Duotone.” Click on it.
- Choose a Preset or Customize: Canva offers a variety of Duotone presets (e.g., “Blush,” “Emerald,” “Sepia”). Clicking on any of these will instantly apply the effect to your image, giving you a quick preview.
- Fine-Tune with Highlights and Shadows: To customize further, click on the selected Duotone preset again (or click “See All” and select your chosen effect). This will reveal options to adjust the “Highlights” and “Shadows” colors, as well as their intensity. You can select colors from your brand kit, document colors, or use the color picker to choose completely custom hues. By carefully adjusting these, you can create a wide spectrum of visual moods, from vibrant and dynamic to subdued and melancholic.
- Apply and Refine: Once satisfied with your Duotone effect, click outside the effect panel to apply the changes.
The Duotone effect is a fantastic way to give standard photographs a distinctive visual signature, aligning them with specific branding or artistic themes. It transforms an ordinary image into a piece of Digital Art, reflecting the creative ideas and editing styles found on Tophinhanhdep.com.
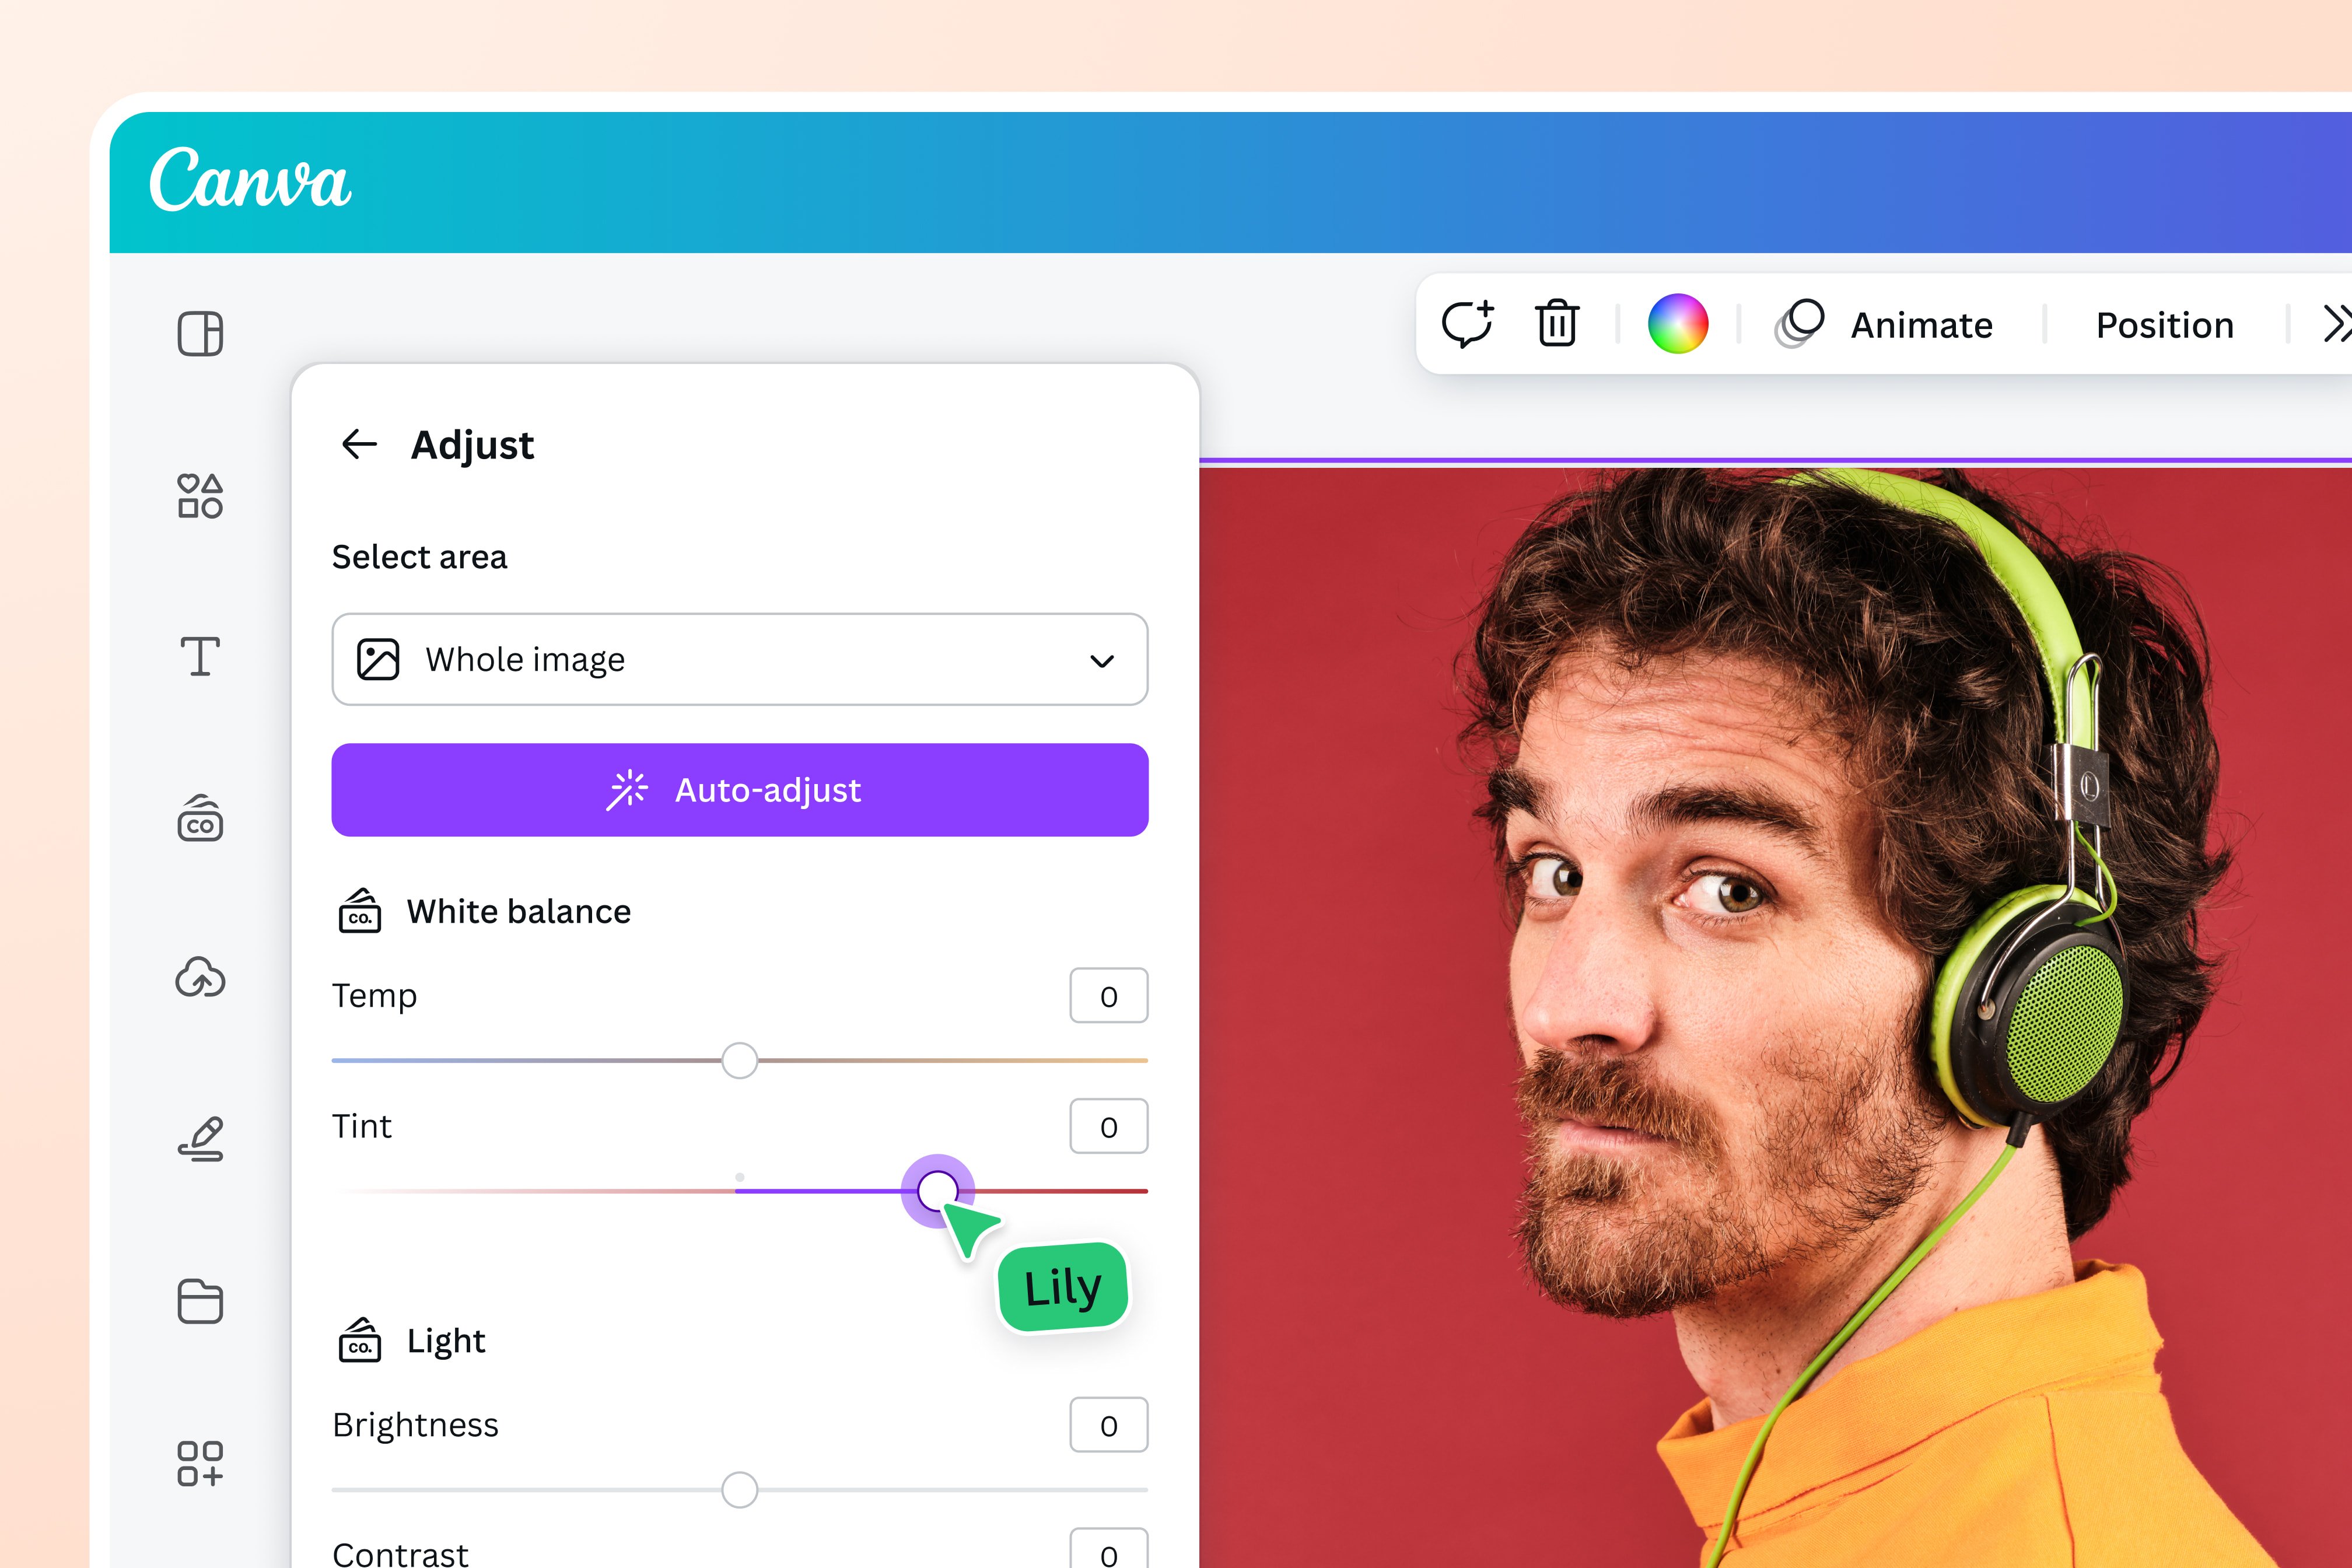
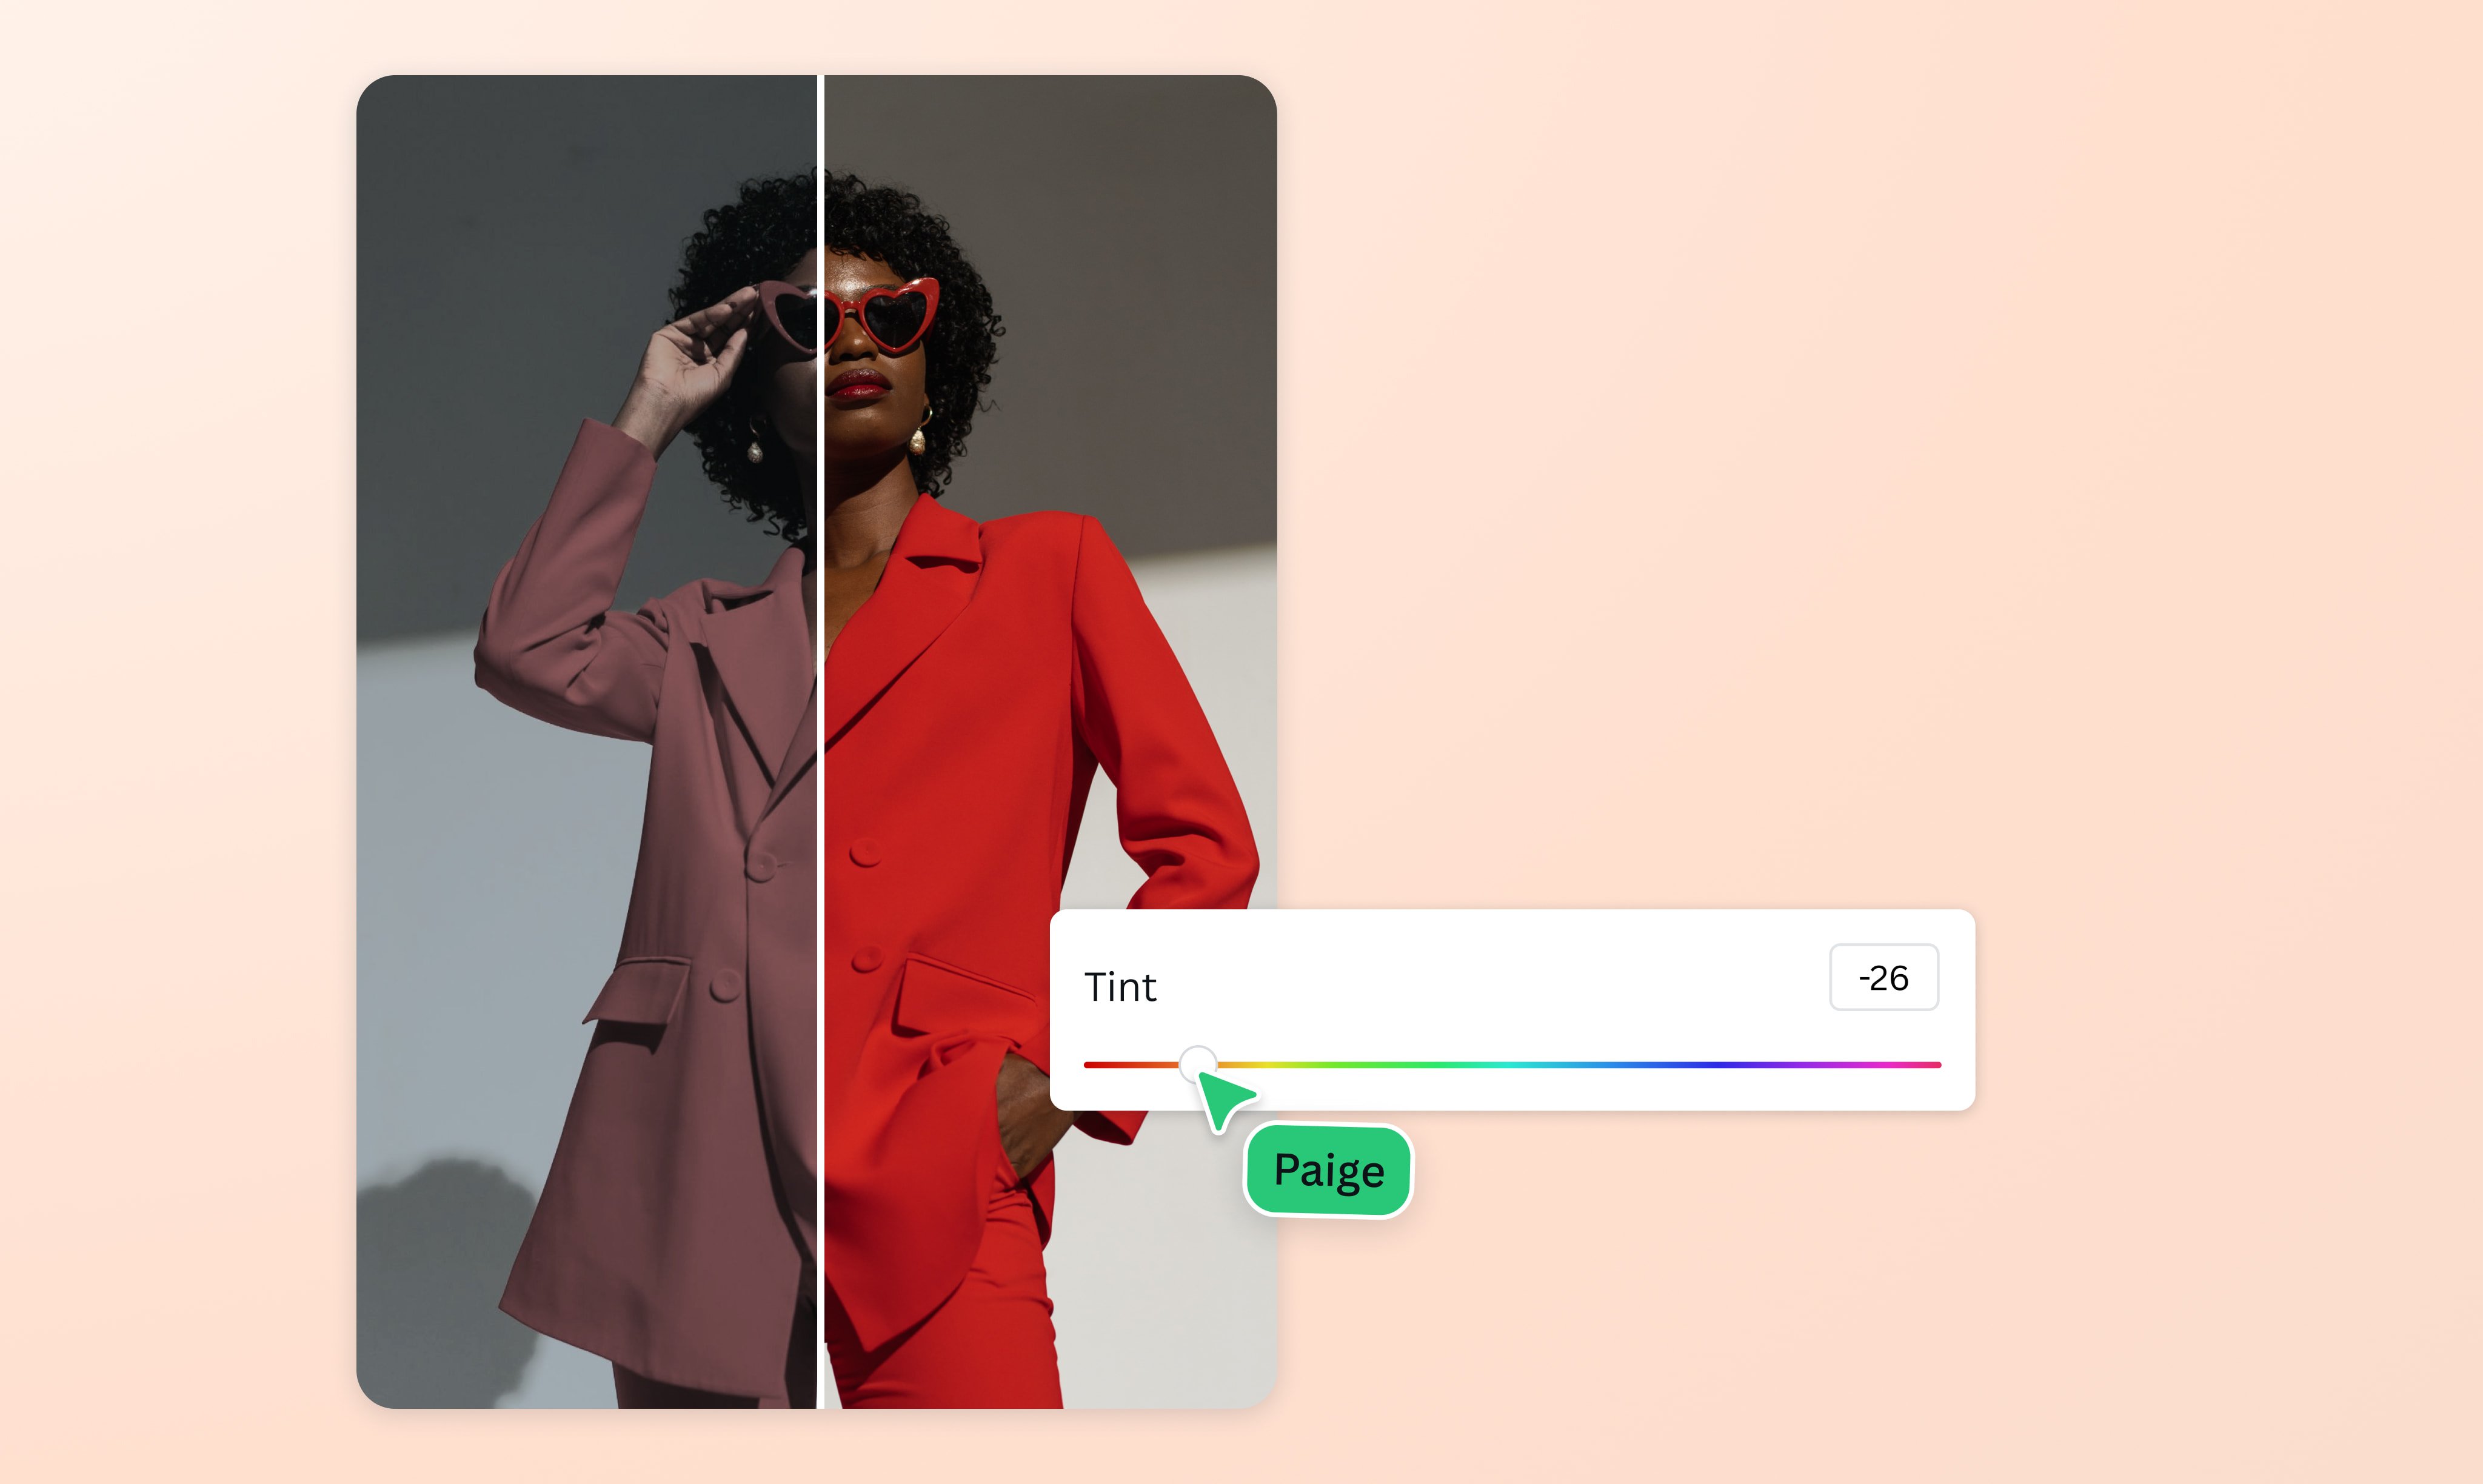
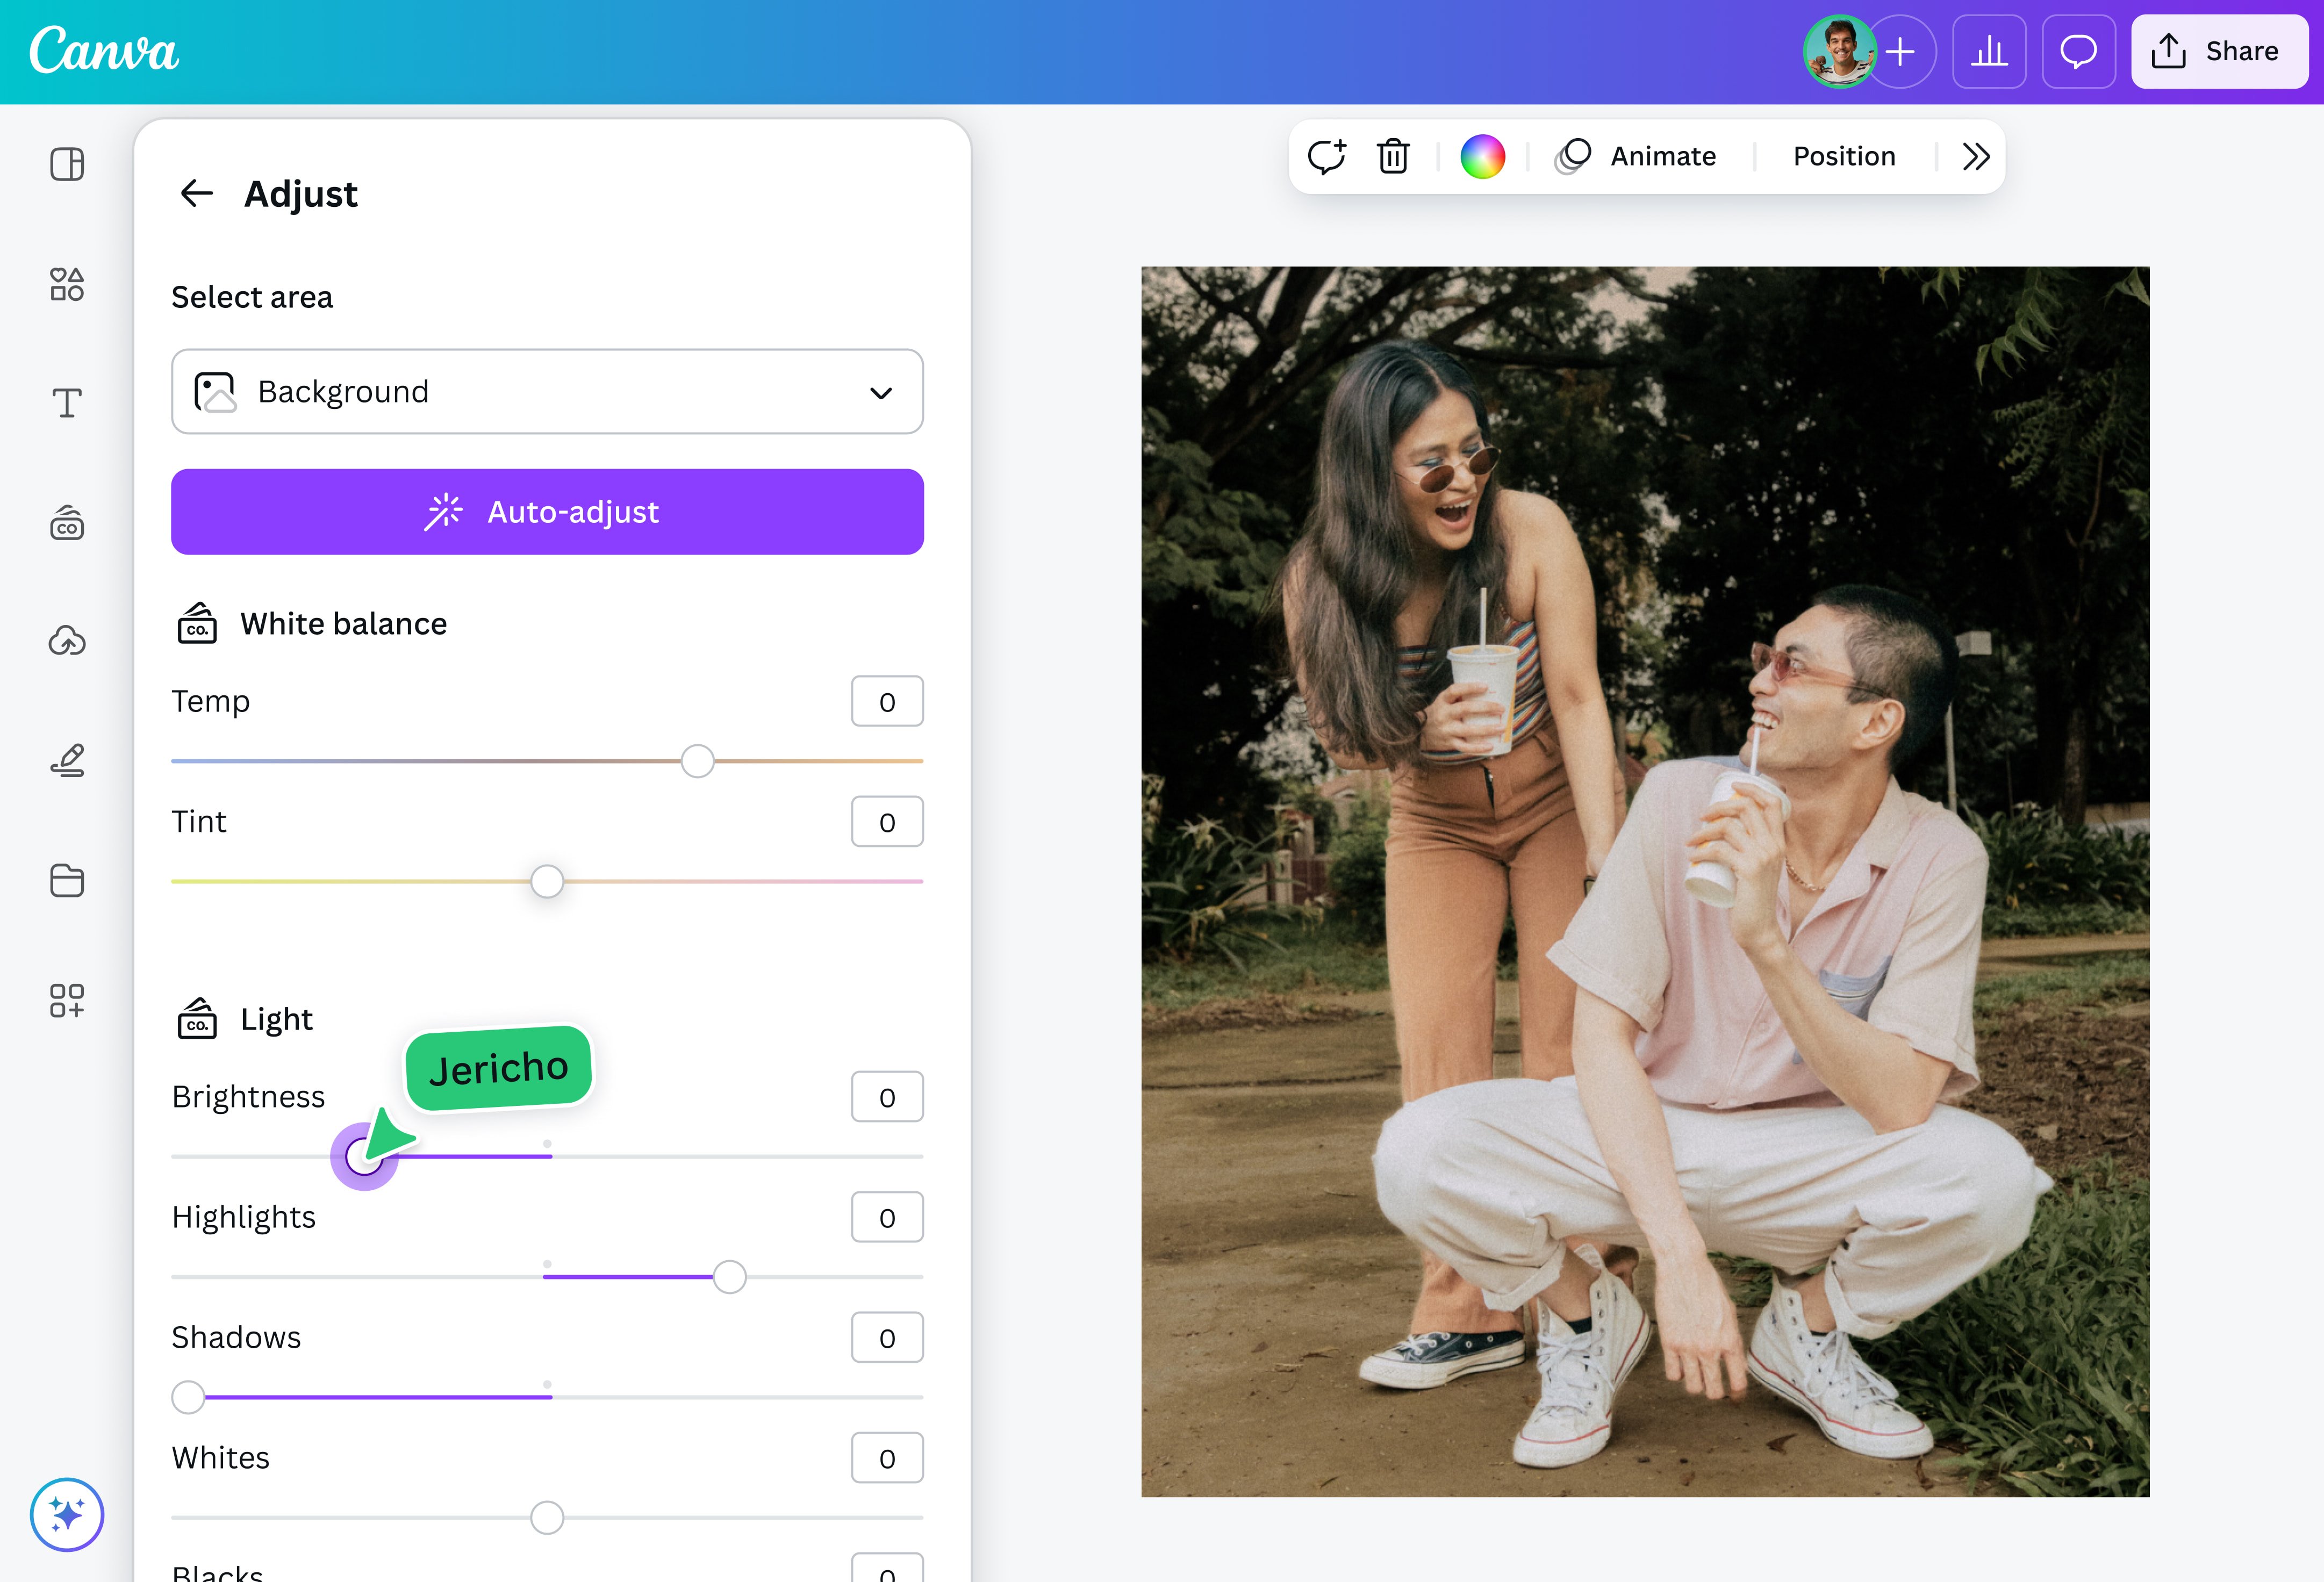
Exploring Other Photo Editing Adjustments
Beyond Duotone, Canva provides other fundamental adjustments that can subtly or dramatically alter an image’s color and tone:
- Adjust: Under the “Edit Photo” panel, the “Adjust” section offers manual controls for brightness, contrast, saturation, tint, blur, and more. While not direct “color changing” in the same way as Duotone, manipulating saturation and tint can significantly impact the perceived colors of an image. For instance, reducing saturation can create a vintage or muted feel, while increasing it can make colors pop.
- Color Mix: For more granular control over specific color ranges within an image, you might experiment with tools that allow for HSL (Hue, Saturation, Luminance) adjustments, although these are more advanced and might require a Canva Pro account. These are useful for correcting color casts or enhancing particular hues in a complex photograph.
These tools, combined with Duotone, provide a comprehensive suite for Photo Manipulation, allowing you to transform any High Resolution image into a perfectly tailored visual asset.
Achieving Brand Consistency: Using Your Brand Kit for Color Harmony
Maintaining a consistent brand identity across all your visual content is crucial for recognition and professionalism. Canva’s “Brand Kit” feature, especially powerful for Canva Pro users, is an invaluable tool for ensuring that all your graphics and images adhere to your brand’s specific color palette. This aligns perfectly with Tophinhanhdep.com’s emphasis on cohesive Visual Design and curated Thematic Collections.
Setting Up Your Brand Kit (Canva Pro)
If you have a Canva Pro account, setting up your Brand Kit is the first step towards effortless brand-aligned color changes.
- Access Brand Kit: From your Canva homepage, click “Brand Kit” on the left-hand sidebar.
- Add Brand Colors: Under the “Brand Colors” section, you can add multiple color palettes. Input your brand’s primary colors, secondary colors, and any accent colors using their exact Hex codes. This ensures precise color matching across all your designs.
Once your Brand Kit is established, these colors will be readily available in every design project, appearing as a dedicated section in the color picker whenever you’re changing the color of an element or text.
Changing All Colors in a Template with Two Clicks
One of the most revolutionary features for brand consistency is the ability to instantly swap colors across an entire template. This saves countless hours that would otherwise be spent manually clicking and changing individual elements.
Imagine you’ve found a beautiful Canva template on Tophinhanhdep.com’s Creative Ideas section, but its default colors don’t match your brand. Here’s how you can transform it in seconds:
- Open Your Template: Start with the Canva template you wish to customize.
- Select an Element: Click on any element within the template that has a color you want to change (e.g., a shape, a line, or a text box).
- Open the Color Picker: In the top-left menu, click on the colored square that represents the element’s current color.
- Choose a New Brand Color: From the color picker panel, select one of your predefined Brand Colors from your Brand Kit (or any other desired color).
- “Change All” Option: After selecting the new color, look for a magical prompt at the bottom-left of the color picker window. It will say, “Change All [old color] to [new color]?” Check this box.
Voila! Every instance of the “old” color throughout the entire template will instantly transform into your chosen “new” color. This single action can overhaul a multi-page document or complex graphic design project in moments. This powerful feature is perfect for adapting templates from Tophinhanhdep.com’s diverse range of Aesthetic, Nature, or Abstract designs to fit your specific branding needs.
Troubleshooting Tip: If you notice that not all instances of a color have changed, it might be because a text block or complex graphic initially contained two slightly different shades of a similar color, or the element wasn’t a true single color. In such cases, you might need to manually select those specific elements and ensure they are assigned a single color first, then retry the “Change All” option.
Unlocking Customization: The Power of SVG for Uploaded Graphics and Logos
While Canva provides extensive options for its built-in elements and photos, what about your own custom graphics and logos? Many designers want the flexibility to change the color of their uploaded brand assets directly within Canva. The key to this advanced customization lies in using SVG (Scalable Vector Graphic) files. This is particularly important for brand consistency, ensuring your logo always matches the current Visual Design or Mood Board you’re working with. Tophinhanhdep.com emphasizes high-quality assets, and SVG is crucial for that.
Understanding SVG Files
SVG is a vector file format that is ideal for graphics, illustrations, and logos. Unlike raster formats (like JPG and PNG) which are pixel-based and lose quality when scaled, SVG files are defined by mathematical paths. This means they can be scaled to any size without pixelation, and, crucially for our purpose, their colors can often be edited directly within platforms like Canva.
Most professional designers provide logos and brand graphics in vector formats like AI (Adobe Illustrator), EPS, or PDF. To make these color-changeable in Canva, they usually need to be converted to SVG.
Making Your Own Graphics Color-Editable in Canva
If you have vector files for your graphics or logos (e.g., from Creative Market or your brand designer), you can prepare them for color editing in Canva:
- Obtain Vector Files: Ensure you have the original vector files (AI, EPS, or editable PDF) for your graphics. Raster formats (PNG, JPG) are pixel-based and generally cannot have their colors individually altered in the same way.
- Open in a Vector Editing Program: Use a graphics program like Adobe Illustrator or Affinity Designer to open these files.
- Pre-Coloring (Optional but Recommended): While not strictly necessary for color changeability in Canva, it saves time to set the initial colors of your graphics to your brand palette within the vector editor.
- Prepare for SVG Export:
- Outline Fonts: Convert all text layers to outlines. SVG files cannot handle editable fonts, so this step ensures your typography renders correctly.
- Outline Strokes: Similarly, any strokes (outlines) on shapes should also be outlined.
- Remove Transparency Effects: SVG files in Canva may not fully support advanced transparency effects (like overlay, multiply, screen). It’s best to remove or flatten these effects before export.
- Limit Colors: For optimal results and broader compatibility, aim for graphics with a maximum of 5 distinct colors. Canva has a limit to the number of color editable regions it can detect in an SVG.
- Export as SVG: Use the “Asset Export” or “Save As” function in your vector editing program to export each individual graphic piece as an SVG file.
- Upload to Canva: Go to Canva, navigate to “Uploads,” and upload your newly created SVG files.
Once uploaded, when you add these SVG graphics to your Canva design and select them, you should see the familiar color squares in the header menu, allowing you to change their colors just like built-in Canva elements. This is a game-changer for brand consistency, empowering you to adapt your logo and brand assets to any background or thematic collection you are designing for, be it for a sleek corporate presentation or a vibrant aesthetic wallpaper. Tophinhanhdep.com highly encourages leveraging this technique for professional-grade visual design.
Making Your Logo Color-Editable in Canva
The same SVG principle applies to your logo. Being able to change your logo’s color (e.g., from full color to white for dark backgrounds, or to an alternate brand palette) is invaluable. Request an SVG file from your brand designer, specifically one that has fonts and strokes outlined, and avoids complex transparency effects. If you encounter issues, it’s often due to these SVG limitations. Tophinhanhdep.com also offers resources for basic logo color changes even without vector files, providing solutions for various scenarios.
Practical Steps and Essential Tips for Effective Color Changes
Beyond the specific tools, understanding the broader context of color manipulation and integrating it with other design principles will elevate your work significantly. Tophinhanhdep.com believes that effective Visual Design extends beyond mere technical steps to encompass strategic creative choices.
General Steps for Color Changing in Canva: A Quick Overview
For any image or graphic you wish to recolor, the general workflow in Canva typically involves these steps:
- Create/Open Your Design: Start a new design or open an existing one in Canva.
- Add Your Image/Graphic: Upload your own image or select one from Canva’s “Elements” or “Photos” library. For best results with complex color changes on your own photos, consider starting with High Resolution images from Tophinhanhdep.com’s collections.
- Select the Element: Click on the image or graphic on your canvas.
- Look for Color Options:
- Color Squares: For simple vector graphics or built-in elements, look for colored squares in the top menu bar. Click these to open the color picker.
- Edit Photo: For photographs (JPG, PNG) or more complex uploaded graphics, click “Edit Photo” in the top menu bar, then explore “FX Effects” (like Duotone) or “Adjust” options.
- Choose Your Color: Use the color picker to select from document colors, brand colors, default colors, or input a custom Hex code.
- Apply and Repeat: Apply the chosen color. If the element has multiple editable colors, repeat the process for each. For templates, use the “Change All” option for efficiency.
- Review and Refine: Always step back and review how the new colors interact with the overall design. Does it align with your Mood Board, or enhance the thematic collection you are building?
Essential Tips for Optimal Color Manipulation
- Understand Color Theory: A basic understanding of color theory (complementary, analogous, monochromatic palettes) will help you make more impactful color choices. Tophinhanhdep.com offers resources on effective color usage in Graphic Design.
- Utilize External Color Pickers: If you need to match a specific color from an external source (e.g., a website, another image), a browser extension like “ColorPick Eyedropper” can be incredibly useful. This tool allows you to hover over any element on your screen, identify its Hex code, and then easily input that code into Canva for precise matching. This seamlessly integrates with the “Image Tools” expertise provided by Tophinhanhdep.com.
- Experiment with Effects: Don’t be afraid to experiment. Canva offers a multitude of photo effects beyond Duotone that can subtly alter an image’s color profile. Play around with filters and adjustments to see how they transform your images.
- Maintain Brand Consistency: For businesses and brands, always refer to your Brand Kit. Consistent color usage across all your marketing materials (whether it’s a social media post, a presentation, or a website banner) reinforces brand recognition, a key aspect of Tophinhanhdep.com’s Visual Design philosophy.
- High-Resolution Assets: Start with high-quality images whenever possible. While Canva’s AI Upscalers can improve lower-res images, beginning with a High Resolution photo from Tophinhanhdep.com ensures the best results for color manipulation and overall visual clarity.
- Save and Optimize: After making your color changes, download your image in the appropriate file format (PNG for transparency, JPG for photographs). Consider using image compressors or optimizers, available as Image Tools on Tophinhanhdep.com, to ensure your files are web-ready without sacrificing quality.
Beyond Color: Expanding Your Canva Skills with Tophinhanhdep.com
Mastering color changes is just one facet of unlocking Canva’s full potential. Tophinhanhdep.com provides a wealth of tutorials and resources to help you further enhance your design capabilities. For instance, you can explore guides on:
- How to Change Background in Canva (Color + Image Tutorial): Learn to customize entire backgrounds with colors or images using Canva’s tools, including the background generator and Magic Edit.
- How to Make Text Vertical in Canva: Creative text layouts can add flair to your designs.
- How to Upload a Font to Canva: Expand your typographic options for even more branding flexibility.
- How to Highlight Text in Canva Docs: Essential for clear communication in documents.
- How to Download an Image in Canva [Single and Multiple Images]: Ensure you can effectively export your masterpieces.
- How to Unlock and Lock Pages in Canva: Control editing access for collaborative projects.
- How to Embed a Video in Canva and Play It: Incorporate dynamic content into your presentations.
- How to Space Evenly in Canva: Achieve precise alignment and professional layouts.
- How to Fade an Image in Canva: Create seamless blends and subtle effects.
- How to Flip Text in Canva: Add unique mirrored or inverted text elements.
By integrating these techniques with your newfound color-changing expertise, you’ll be well on your way to creating stunning, professional-quality designs for any purpose. Tophinhanhdep.com is your ultimate partner in elevating your visual content creation.
Conclusion
Changing the color of an image in Canva is a fundamental skill that empowers designers and content creators to craft visuals that are perfectly aligned with their brand, message, and artistic vision. From the simplicity of customizing built-in graphics with a few clicks to the advanced techniques of employing Duotone effects for photographs or preparing SVG files for full logo control, Canva offers versatile solutions for every need.
Remember that effective color manipulation goes hand-in-hand with understanding visual design principles and leveraging the right tools. By utilizing Canva’s features and integrating them with the comprehensive insights and high-quality assets provided by Tophinhanhdep.com, you can transform your creative ideas into captivating realities. Start experimenting today, and unlock a world of vibrant possibilities in your digital designs.