Mastering Image Color Transformation in Photoshop: A Comprehensive Guide for Tophinhanhdep.com Users

In the vibrant world of digital imagery, color plays a pivotal role in conveying mood, highlighting subjects, and defining aesthetic appeal. Whether you’re a professional photographer, a graphic designer, or simply an enthusiast looking to enhance your personal collection of images, the ability to accurately and creatively manipulate colors in Adobe Photoshop is an indispensable skill. At Tophinhanhdep.com, we understand the profound impact of visual design, from captivating Wallpapers and Backgrounds to intricate Digital Art and Photo Manipulation. Our platform thrives on providing high-resolution images, stock photos, and creative ideas, making color transformation a crucial skill for anyone engaging with visual content.
This comprehensive guide will delve into various powerful techniques within Photoshop to change the color of any element in your image. We’ll explore fundamental adjustment layers, advanced selection methods, and specialized tools, ensuring you can achieve precise, impactful, and realistic color alterations. From subtly shifting a background hue to entirely recoloring an object or grading an entire scene, these methods will empower you to bring your creative visions to life and align with the trending styles and thematic collections found on Tophinhanhdep.com.
Core Techniques for Selective Color Adjustment
At the heart of Photoshop’s color manipulation capabilities are adjustment layers, offering a non-destructive workflow that is crucial for professional-grade editing. These layers allow you to make changes without permanently altering the original pixels of your image, providing flexibility and control to revisit and refine your adjustments at any point.
The Versatility of Hue/Saturation Adjustment Layers
The Hue/Saturation adjustment layer is perhaps the most fundamental and frequently used tool for changing colors. It allows for broad-stroke changes across an entire image or highly specific adjustments to individual color ranges.
To access it, navigate to Layer > New Adjustment Layer > Hue/Saturation, or click the half-black, half-white circle icon at the bottom of the Layers panel and select “Hue/Saturation.” This creates a new adjustment layer above your image, ensuring your edits are non-destructive.
Once the Properties panel appears, you’ll see sliders for Hue, Saturation, and Lightness.
- Hue: This slider shifts the actual color. Dragging it left or right will cycle through the color spectrum, effectively changing the base color of the selected area.
- Saturation: Controls the intensity or purity of the color. Slide right to make colors more vibrant, and left to desaturate them, eventually leading to grayscale.
- Lightness: Adjusts the brightness of the color. Moving right brightens it, while moving left darkens it.
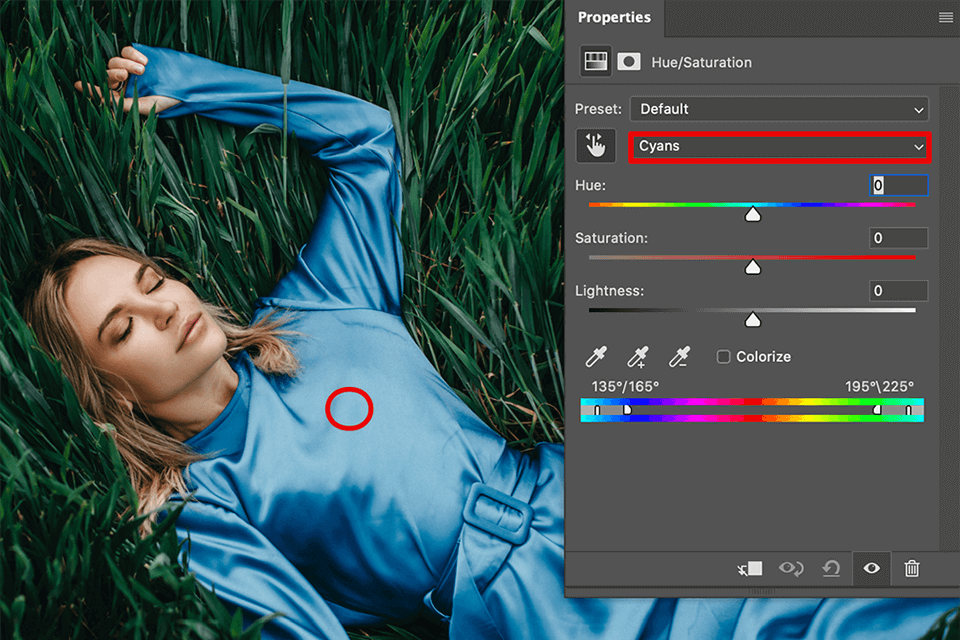
For targeted adjustments, the Hue/Saturation panel offers a powerful feature: the Targeted Adjustment Tool (the small hand icon with arrows). Clicking this tool allows you to directly sample a color in your image by clicking and dragging. When you click on a specific color, Photoshop automatically isolates that color channel (e.g., Reds, Yellows, Cyans) in the dropdown menu above the sliders. Then, dragging left or right on the image while holding the tool will adjust the Hue, Saturation, or Lightness of only that sampled color and its similar tones, leaving other colors untouched. This is incredibly useful for changing a shirt’s color, altering sky tones, or adjusting foliage without affecting skin tones.
Remember, the beauty of an adjustment layer is its accompanying layer mask. Initially, this mask is white, meaning the adjustment affects the entire layer below it. If you want the adjustment to apply only to a specific area, you can paint black on the mask to hide the effect, or invert the mask to black (Ctrl/Cmd + I) and then paint white on the areas you do want to affect. This non-destructive approach is paramount for maintaining image quality and flexibility throughout your visual design process, helping you create stunning images for Tophinhanhdep.com’s diverse collections, from Nature photography to Abstract art.
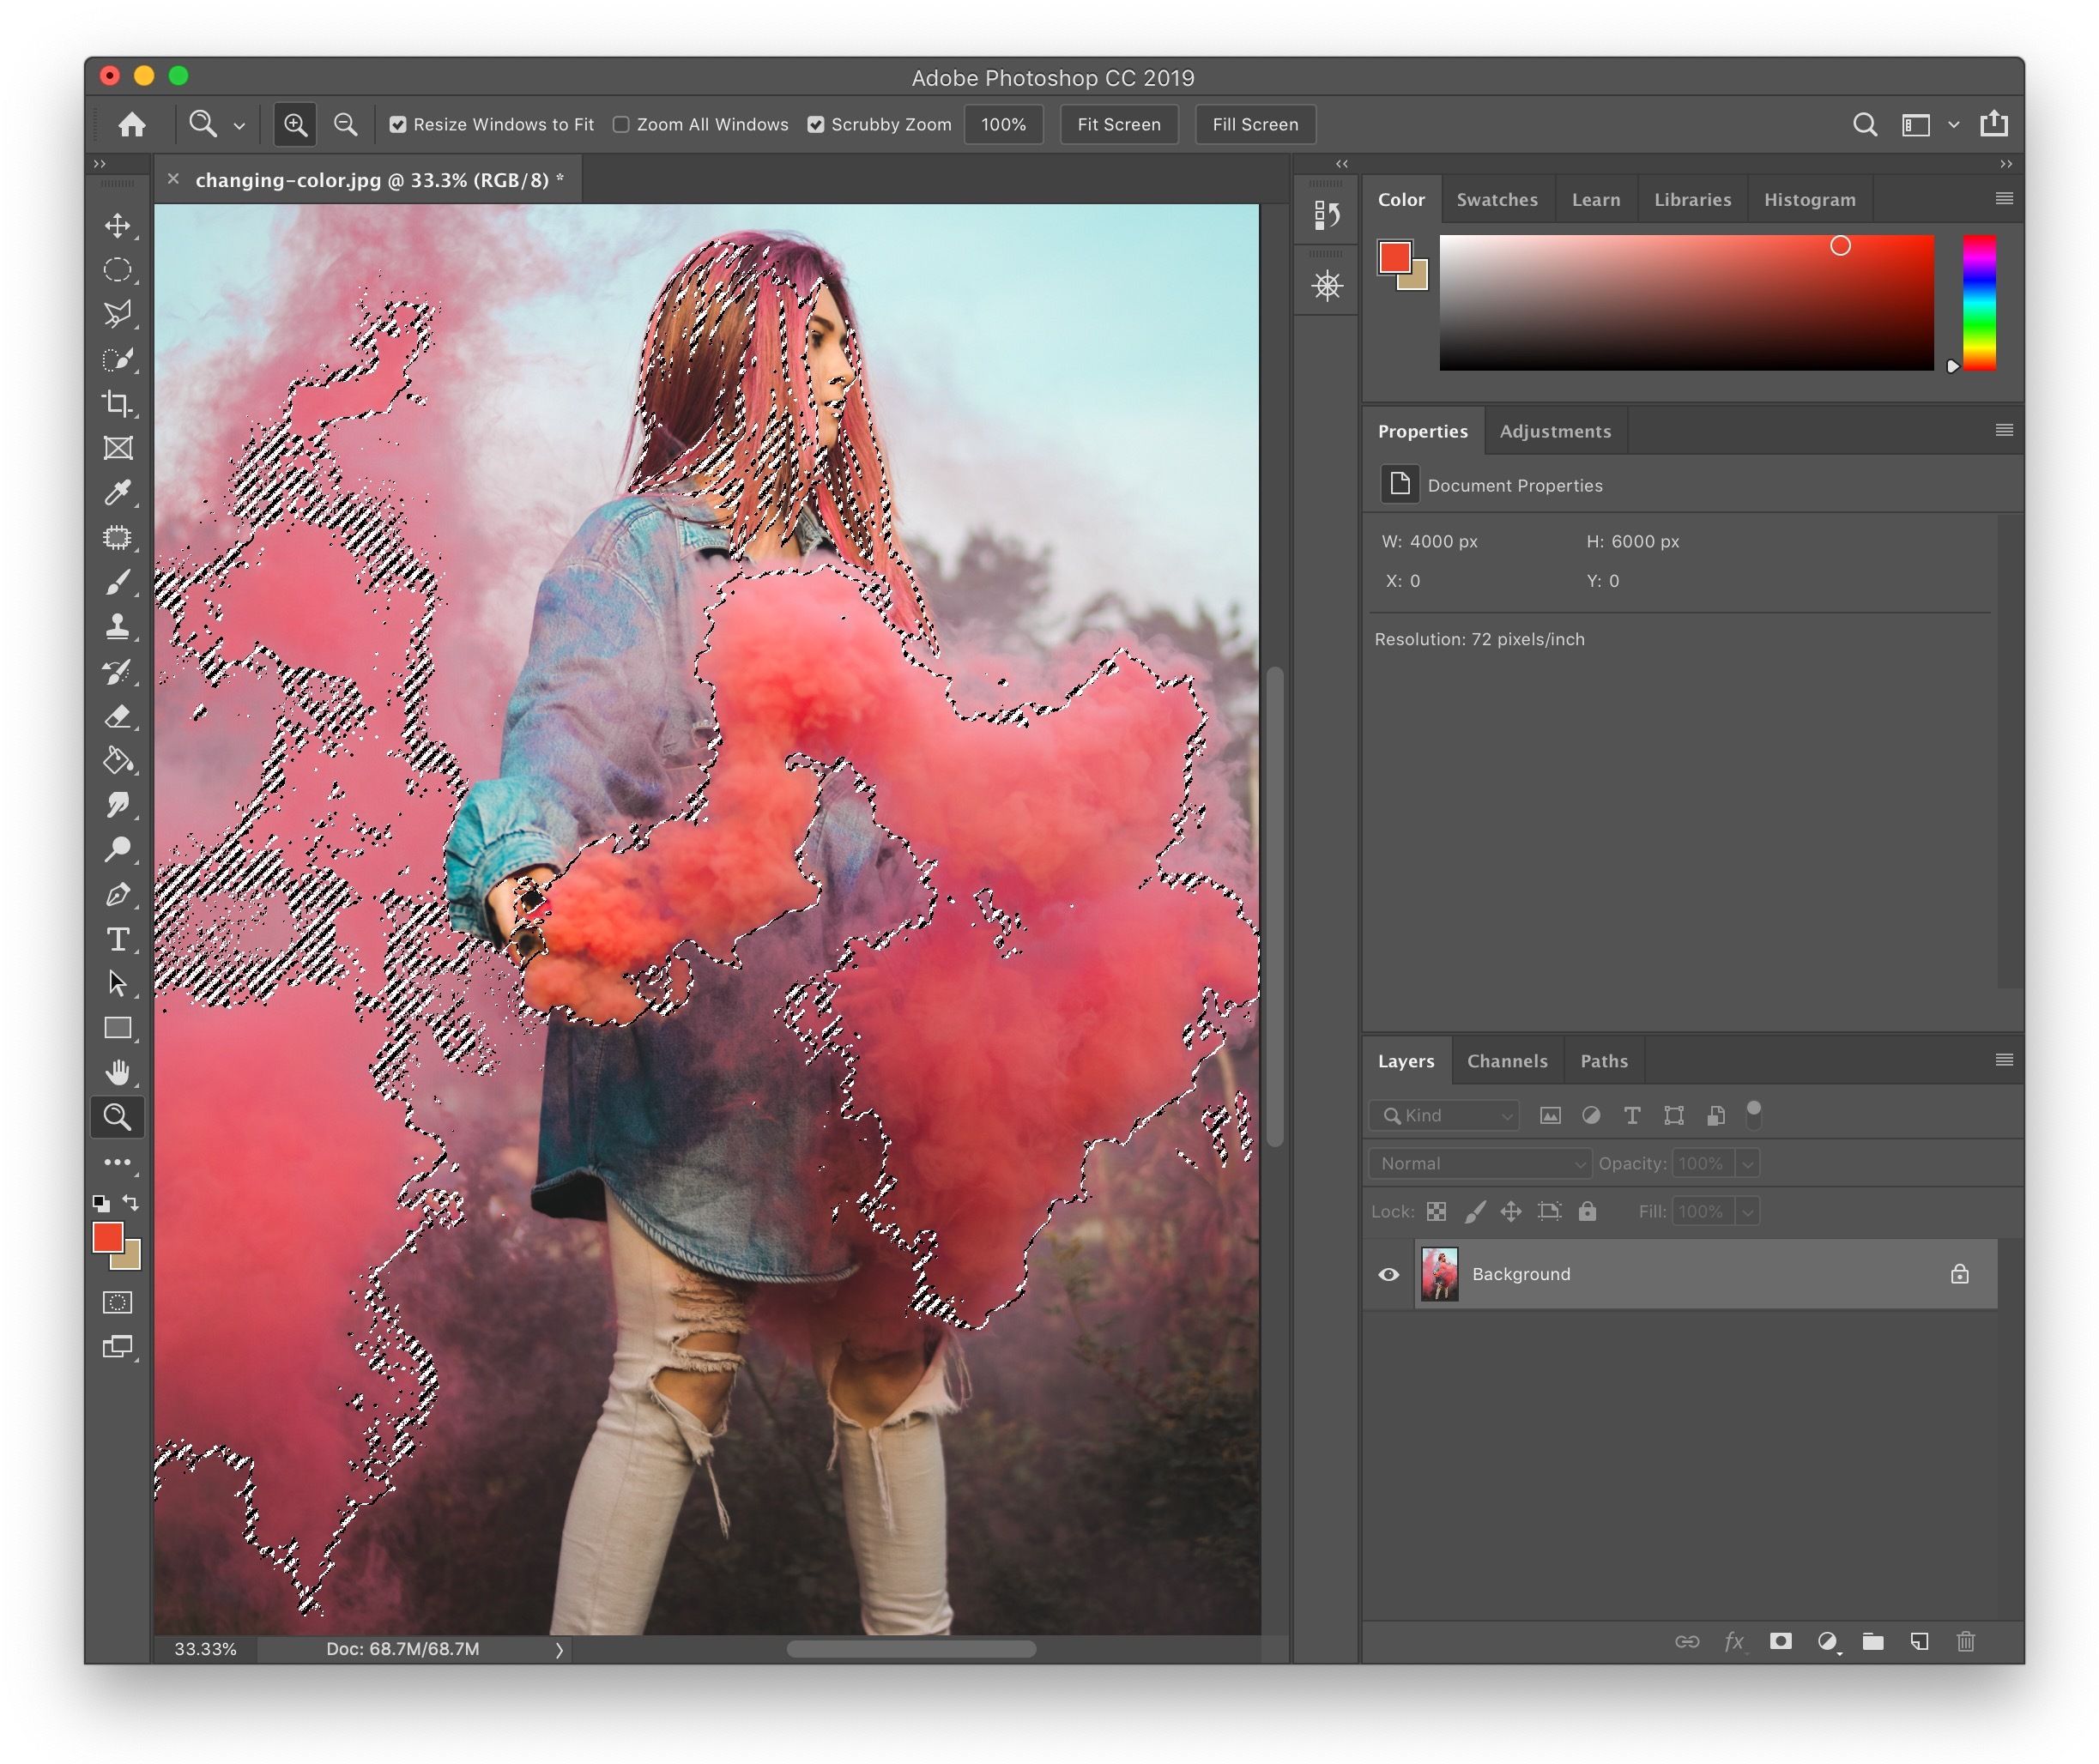
Precision Selection with Color Range
While the Hue/Saturation adjustment layer is versatile, sometimes you need an even more precise way to select a specific color or range of colors within your image, especially when dealing with complex details or subtle gradients. This is where the Color Range selection tool truly shines.
To make a color range selection, go to Select > Color Range. A dialog box will appear, presenting various options for selecting colors. By default, “Sampled Colors” is selected, allowing you to pick colors directly from your image.
- Sampling Colors: Use the regular
Eyedropper Tool(the first eyedropper icon) to click on the color you wish to change in your image or within the small preview area in the dialog. Photoshop will immediately show a black and white preview, where white areas indicate selected pixels, and black areas are unselected. - Refining the Selection with Fuzziness: The
Fuzzinessslider controls the range of similar colors included in your selection. Increasing the fuzziness expands the selection to include more tones similar to your sampled color, while decreasing it narrows the selection to very specific shades. Experimenting with this slider is key to getting an accurate initial selection. - Adding or Subtracting Colors: Often, a single click isn’t enough. Use the
Add to Sampleeyedropper (the eyedropper with a plus sign) to click and include additional color tones into your selection. Conversely, use theSubtract from Sampleeyedropper (with a minus sign) to remove unwanted colors. For broader adjustments, you can even click and drag with these eyedroppers over larger areas in your image or the preview. - Previewing Your Selection: The
Selection Previewdropdown menu in the Color Range dialog offers different ways to visualize your selection on your actual image. Options like “Quick Mask” (red overlay), “Grayscale,” or “Black Matte” can help you see precisely what areas are being selected, making it easier to refine.
Once you are satisfied with your color range selection, click “OK.” You’ll see the marching ants indicating your active selection. Now, immediately apply a Hue/Saturation Adjustment Layer (as described above: Layer > New Adjustment Layer > Hue/Saturation). Photoshop will automatically load your precise color range selection into the adjustment layer’s mask. This means your Hue, Saturation, and Lightness adjustments will only affect the colors you carefully selected using the Color Range tool.
This method is invaluable for tasks like changing a specific product color for e-commerce photography on Tophinhanhdep.com, altering the color of an item in a composite image, or making nuanced changes to a specific part of a complex visual design. The combination of Color Range and Hue/Saturation offers unparalleled control and precision.
Advanced Strategies for Targeted Color Changes
Beyond the core techniques, Photoshop offers more specialized strategies to handle complex color transformations, from altering entire backgrounds to creatively grading your images. These methods are particularly useful for Visual Design and Photo Manipulation projects, allowing for dramatic aesthetic shifts that can elevate your work on Tophinhanhdep.com.
Transforming Backgrounds and Specific Objects
Changing backgrounds or specific objects requires a blend of selection finesse and targeted adjustments to ensure a natural and seamless look.
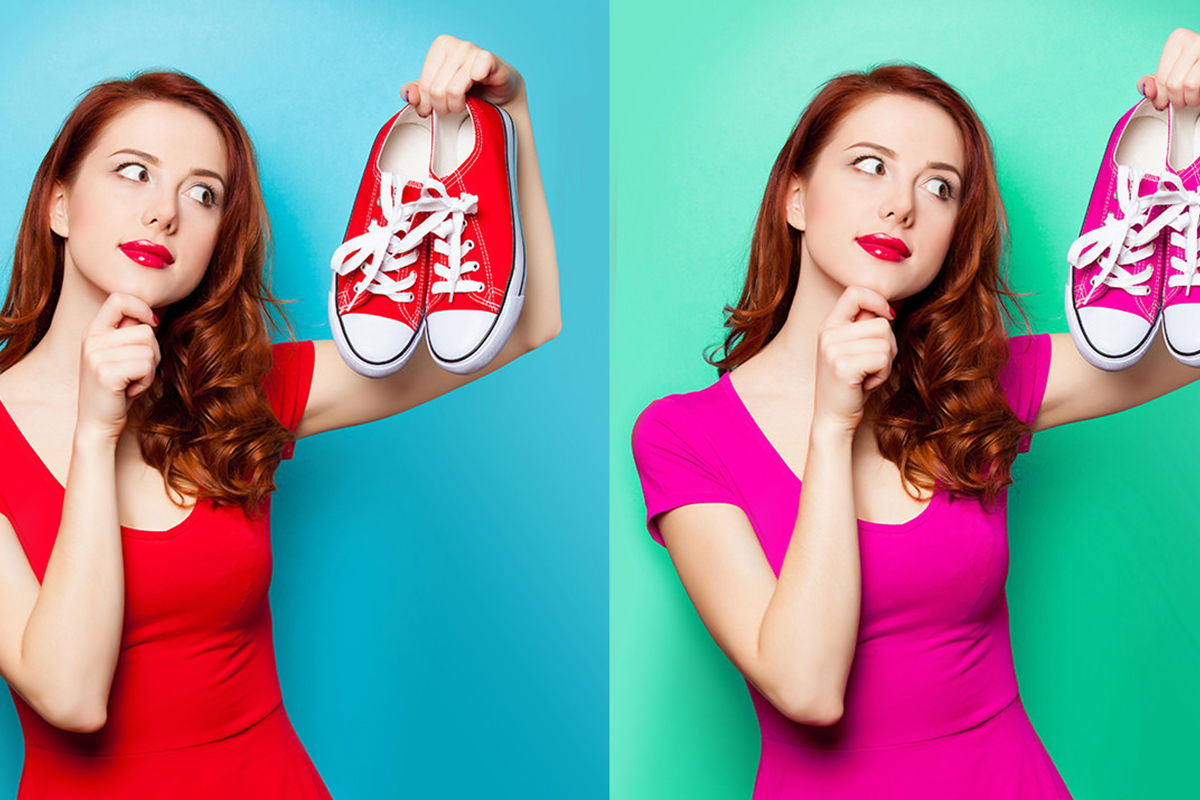
Quick Background Color Changes
For backgrounds with relatively uniform colors, you can use a simple, yet effective method:
- Hue/Saturation with Properties Panel: Create a
Hue/Saturation Adjustment Layer. In the Properties panel, click on theTargeted Adjustment Tool(the finger icon). - Sample Background Color: Click on the background color you want to change. This action isolates that specific color channel in the Hue/Saturation dropdown.
- Adjust Hue Slider: Move the Hue slider to instantly change the background color. You’ll observe that only the sampled color changes, often leaving your main subject untouched. This works best when the subject’s colors are distinct from the background. You can then adjust Saturation and Lightness to perfect the new background hue. This method is incredibly efficient for aesthetic backgrounds or simple studio shots on Tophinhanhdep.com.
Detailed Object and Clothing Recoloring
Recoloring specific objects, such as clothing, requires a more refined selection, especially when the object has complex edges or blends into the surroundings.
- Initial Selection: Start with a selection tool appropriate for your object. The
Quick Selection Tool(found under the Magic Wand Tool, shortcutW) is excellent for quickly outlining distinct objects. For more intricate shapes, thePen ToolorSelect and Maskworkspace might be preferred. Once your initial selection is made, you may need to invert it (Ctrl/Cmd + Shift + I) if you initially selected the background instead of the object. - Refine Edge for Precision: For detailed edges like hair or fabric, use
Select > Select and Mask(orRefine Edgein older versions). This workspace allows you to fine-tune your selection, smoothing edges, feathering, and removing unwanted background remnants. Using the “Refine Edge Brush Tool” can work wonders on challenging areas. - Create a New Layer for Selection: After refining your selection, output it as a
Layer Maskor aNew Layer with Layer Maskwithin the Select and Mask workspace, or by clicking the Layer Mask icon at the bottom of the Layers panel. If you prefer to have the object on its own layer, pressCtrl/Cmd + Jto duplicate the selected area onto a new layer. - Apply Hue/Saturation: With your object now isolated (either on a masked adjustment layer or its own layer), apply a
Hue/Saturation Adjustment Layer(clipped to the object layer if it’s on a separate layer, by holdingAlt/Optionand clicking between the layers). Now, you can freely move the Hue slider to change the object’s color. Adjust Saturation and Lightness to match the desired look. - Refining with a Brush Tool: If the
Hue/Saturationadjustment inadvertently affected small, unwanted areas (like skin reflections on clothing), you can refine the adjustment layer’s mask. Select theBrush Tool (B), set the foreground color to black (to hide the effect) or white (to reveal it), and paint directly on the layer mask to precisely control where the color change is applied. This non-destructive painting technique is critical for a polished result.
Adding Depth and Realism to Backgrounds
A solid color background can sometimes look flat. To make it more natural and help your subject stand out, you can simulate studio lighting by adding highlights and shadows.
- Initial Background Change: First, change the background to a solid color using the methods described above (e.g., Magic Wand Tool, Select Inverse, Refine Edge, and then
Layer > New Fill Layer > Solid Color). Ensure this Solid Color Fill Layer is positioned below your subject layer in the Layers panel. - Creating Highlights with Levels:
- Select the
Elliptical Marquee Tool (M). Draw an ellipse in the area where you want a highlight, typically near the center or behind your subject’s face. - Right-click within the selection and choose
Feather. A feather radius of200 pixelsor more works well for a soft transition. - Create a
Levels Adjustment Layer(Layer > New Adjustment Layer > Levels). The selection will automatically create a mask. - In the Properties panel, slide the middle (gamma) slider to the left to brighten the midtones, creating a gentle highlight.
- Select the
- Adding Shadows with Levels:
- Repeat the
Elliptical Marquee Toolstep to create another large elliptical selection. - Feather the selection (e.g.,
200 pixels). - Right-click and select
Select Inverseto select the outer edges of your image. - Create another
Levels Adjustment Layer. - Slide the middle (gamma) slider to the right to darken the midtones, creating a subtle vignette effect around the edges.
- Repeat the
- Blending and Adjusting: Tweak the opacity and sliders of your Levels layers until the background gradient looks natural, creating a sense of depth that makes your subject pop. This technique transforms a basic background into a dynamic, professional setting, enhancing the appeal of images for Tophinhanhdep.com’s collections.
Artistic Color Grading and Overlay Effects
Color grading is the process of altering the overall color of an image to evoke a certain mood, style, or aesthetic. Photoshop offers powerful tools for this, including gradients and gradient maps, allowing you to infuse your images with creative color palettes.
- Gradient Fill Layers for Overlays:
- Go to
Layer > New Fill Layer > Gradient. In the Gradient Fill dialog, you can choose from various preset gradients or create your own custom blend. - Once applied, open the Layers panel and change the
Blend Modeof the gradient layer (e.g., Soft Light, Overlay, Color). Experiment with different blend modes to see how the gradient interacts with the image’s existing colors. - Adjust the
Opacityof the gradient layer to control the intensity of the effect. Lower opacities often yield more realistic and subtle results. - You can also modify the gradient’s angle and scale directly in the Gradient Fill dialog box by double-clicking the gradient layer’s thumbnail. This is perfect for creating cinematic looks or adding a vintage feel to your beautiful photography.
- Go to
- Gradient Map Adjustment Layers:
- A
Gradient Mapis a unique adjustment that maps the luminance (lightness values) of your image to the colors of a chosen gradient. Darkest areas will take on the gradient’s left-most color, and brightest areas will take on the right-most color, with midtones mapping to the colors in between. - Create a
Gradient Map Adjustment Layer(Layer > New Adjustment Layer > Gradient Map). - Click on the gradient bar in the Properties panel to open the Gradient Editor. Here, you can select existing gradients or create new ones by adding and moving color stops. For example, a gradient from deep blue (shadows) to bright orange (highlights) can create a dramatic, stylized look.
- As with Gradient Fills, change the
Blend Modeof the Gradient Map layer (e.g., Color, Soft Light, Overlay, Luminosity) and adjust itsOpacityto fine-tune the effect. - The “Reverse” option in the Gradient Map properties can swap the highlight and shadow colors, offering another dimension of control.
- A
Combining Gradient Fill and Gradient Map layers with varying blend modes and opacities can produce incredibly rich and complex color grades. This is a favorite technique among digital artists and visual designers to create unique aesthetics for Tophinhanhdep.com, transforming ordinary photographs into striking digital art.
The Specialized Color Replacement Tool and its Nuances
For those quick, brush-based color changes that need to preserve texture and shading, Photoshop offers a dedicated Color Replacement Tool. This tool is unique because it allows you to paint a new color over an existing one while intelligently retaining the original image’s shadows, midtones, and highlights, resulting in a remarkably realistic transformation.
The Color Replacement Tool is nested under the Brush Tool in the Tools panel. You can select it by clicking and holding the Brush Tool icon or by repeatedly pressing Shift + B until it appears.
Using the Color Replacement Tool
- Set Foreground Color: The first step is to choose your desired replacement color. This color should be set as your
Foreground Colorin the Tools panel. Click on the foreground color swatch to open the Color Picker and select your new hue. - Configure Tool Options: Before painting, look at the Options Bar at the top of the screen:
- Mode: This dropdown determines how the new color is applied.
Color: This is the default and generally best option, as it replaces the original color while preserving the luminosity and texture, making for realistic changes.Hue: Changes only the hue, leaving saturation and luminosity intact.Saturation: Changes only the saturation.Luminosity: Changes only the brightness.
- Sampling: This controls how the tool samples the original color you want to replace.
Continuous: Samples colors continuously as you drag the brush.Once: Samples only the color under the initial point of your click and replaces only that color (and similar tones) as you paint.Background Swatch: Replaces only the areas that match your current background color.
- Limits: This defines how the tool detects the boundaries of the color being replaced.
Continuous: Replaces colors that are contiguous (connected) to where you initially click.Discontiguous: Replaces all sampled colors under the brush anywhere in the layer, regardless of whether they are connected.Find Edges: Similar to Continuous, but attempts to maintain sharp edges of the object being colored, often yielding cleaner results for well-defined objects.
- Tolerance: This slider determines how similar a color must be to the sampled color to be replaced. A low tolerance will only replace very exact color matches, while a high tolerance will replace a broader range of similar colors. Adjust this to prevent “color bleed” into unintended areas.
- Anti-aliasing: Check this box to smooth the edges of the replaced color, preventing a jagged or pixelated appearance.
- Mode: This dropdown determines how the new color is applied.
- Paint to Replace: Once your settings are configured, simply paint over the area of your image whose color you wish to change. The tool will apply your foreground color while preserving the intricate details of the underlying texture and shading.
The Color Replacement Tool is remarkably effective for subtle changes to objects, clothing, or small details where maintaining realism is crucial, and a quick, intuitive brushstroke is preferred over complex selections. It’s a valuable addition to any photo editor’s toolkit for crafting stunning visual content for Tophinhanhdep.com.
Conclusion
The ability to change colors in Photoshop is a cornerstone of digital image editing, offering endless creative possibilities for photographers, graphic designers, and anyone passionate about visual storytelling. From the foundational power of Hue/Saturation adjustment layers and the precision of Color Range selections to the specialized nuances of the Color Replacement Tool, Photoshop provides a diverse array of methods to achieve your desired aesthetic.
By mastering these techniques, you can transform the mood of a portrait, update a product’s appearance, or infuse your digital art with dynamic new palettes. Remember the importance of non-destructive editing through adjustment layers and masks, giving you the freedom to experiment and refine your vision.
At Tophinhanhdep.com, we celebrate the art of visual creation. Whether you are looking for inspiring Wallpapers, high-resolution Backgrounds, or exploring new dimensions in Photo Manipulation and Digital Art, the skills you’ve learned today will be invaluable. We encourage you to download sample images, practice these methods, and explore how color can dramatically alter perception and emotion in your images. Dive into the world of color transformation and unlock new creative frontiers with your photography and design projects, contributing to and drawing inspiration from the rich collections available at Tophinhanhdep.com.