Mastering Color Transformation in Photoshop: A Tophinhanhdep.com Guide

In the vibrant world of digital imagery, color plays a pivotal role in conveying mood, setting aesthetic tones, and capturing attention. Whether you’re a professional photographer aiming for a specific editing style, a graphic designer crafting a compelling visual, or simply an enthusiast looking to enhance your personal collection of beautiful photography, the ability to deftly manipulate colors in Adobe Photoshop is an invaluable skill. At Tophinhanhdep.com, we understand the power of a perfectly chosen palette, and how it can transform a simple image into a stunning wallpaper, a captivating background, or a piece of digital art that resonates deeply.
Photoshop stands as the premier image tool for intricate color adjustments, offering a vast array of features far beyond basic converters or compressors. This comprehensive guide from Tophinhanhdep.com will walk you through various techniques to change the color of an image or specific elements within it, empowering you to unlock new creative ideas, refine your photo manipulation skills, and truly master the visual design landscape. From subtle shifts to dramatic recolors, we’ll explore methods that are essential for anyone dealing with high-resolution images, stock photos, or any visual content destined for thematic collections or trending styles.
The Core of Color Change: Hue/Saturation and Selections
At the heart of Photoshop’s color manipulation capabilities lies the Hue/Saturation adjustment, a versatile tool that allows for broad or highly targeted color shifts. However, the true magic often begins with precise selections, ensuring that your changes affect only the intended areas without bleeding into unwanted regions.
Isolating Colors with the Color Range Tool
One of the most efficient ways to initiate a color change in Photoshop, particularly when dealing with distinct colors, is by utilizing the Color Range selection tool. This feature allows you to select pixels based on their color values, making it an indispensable asset for detailed photo manipulation.
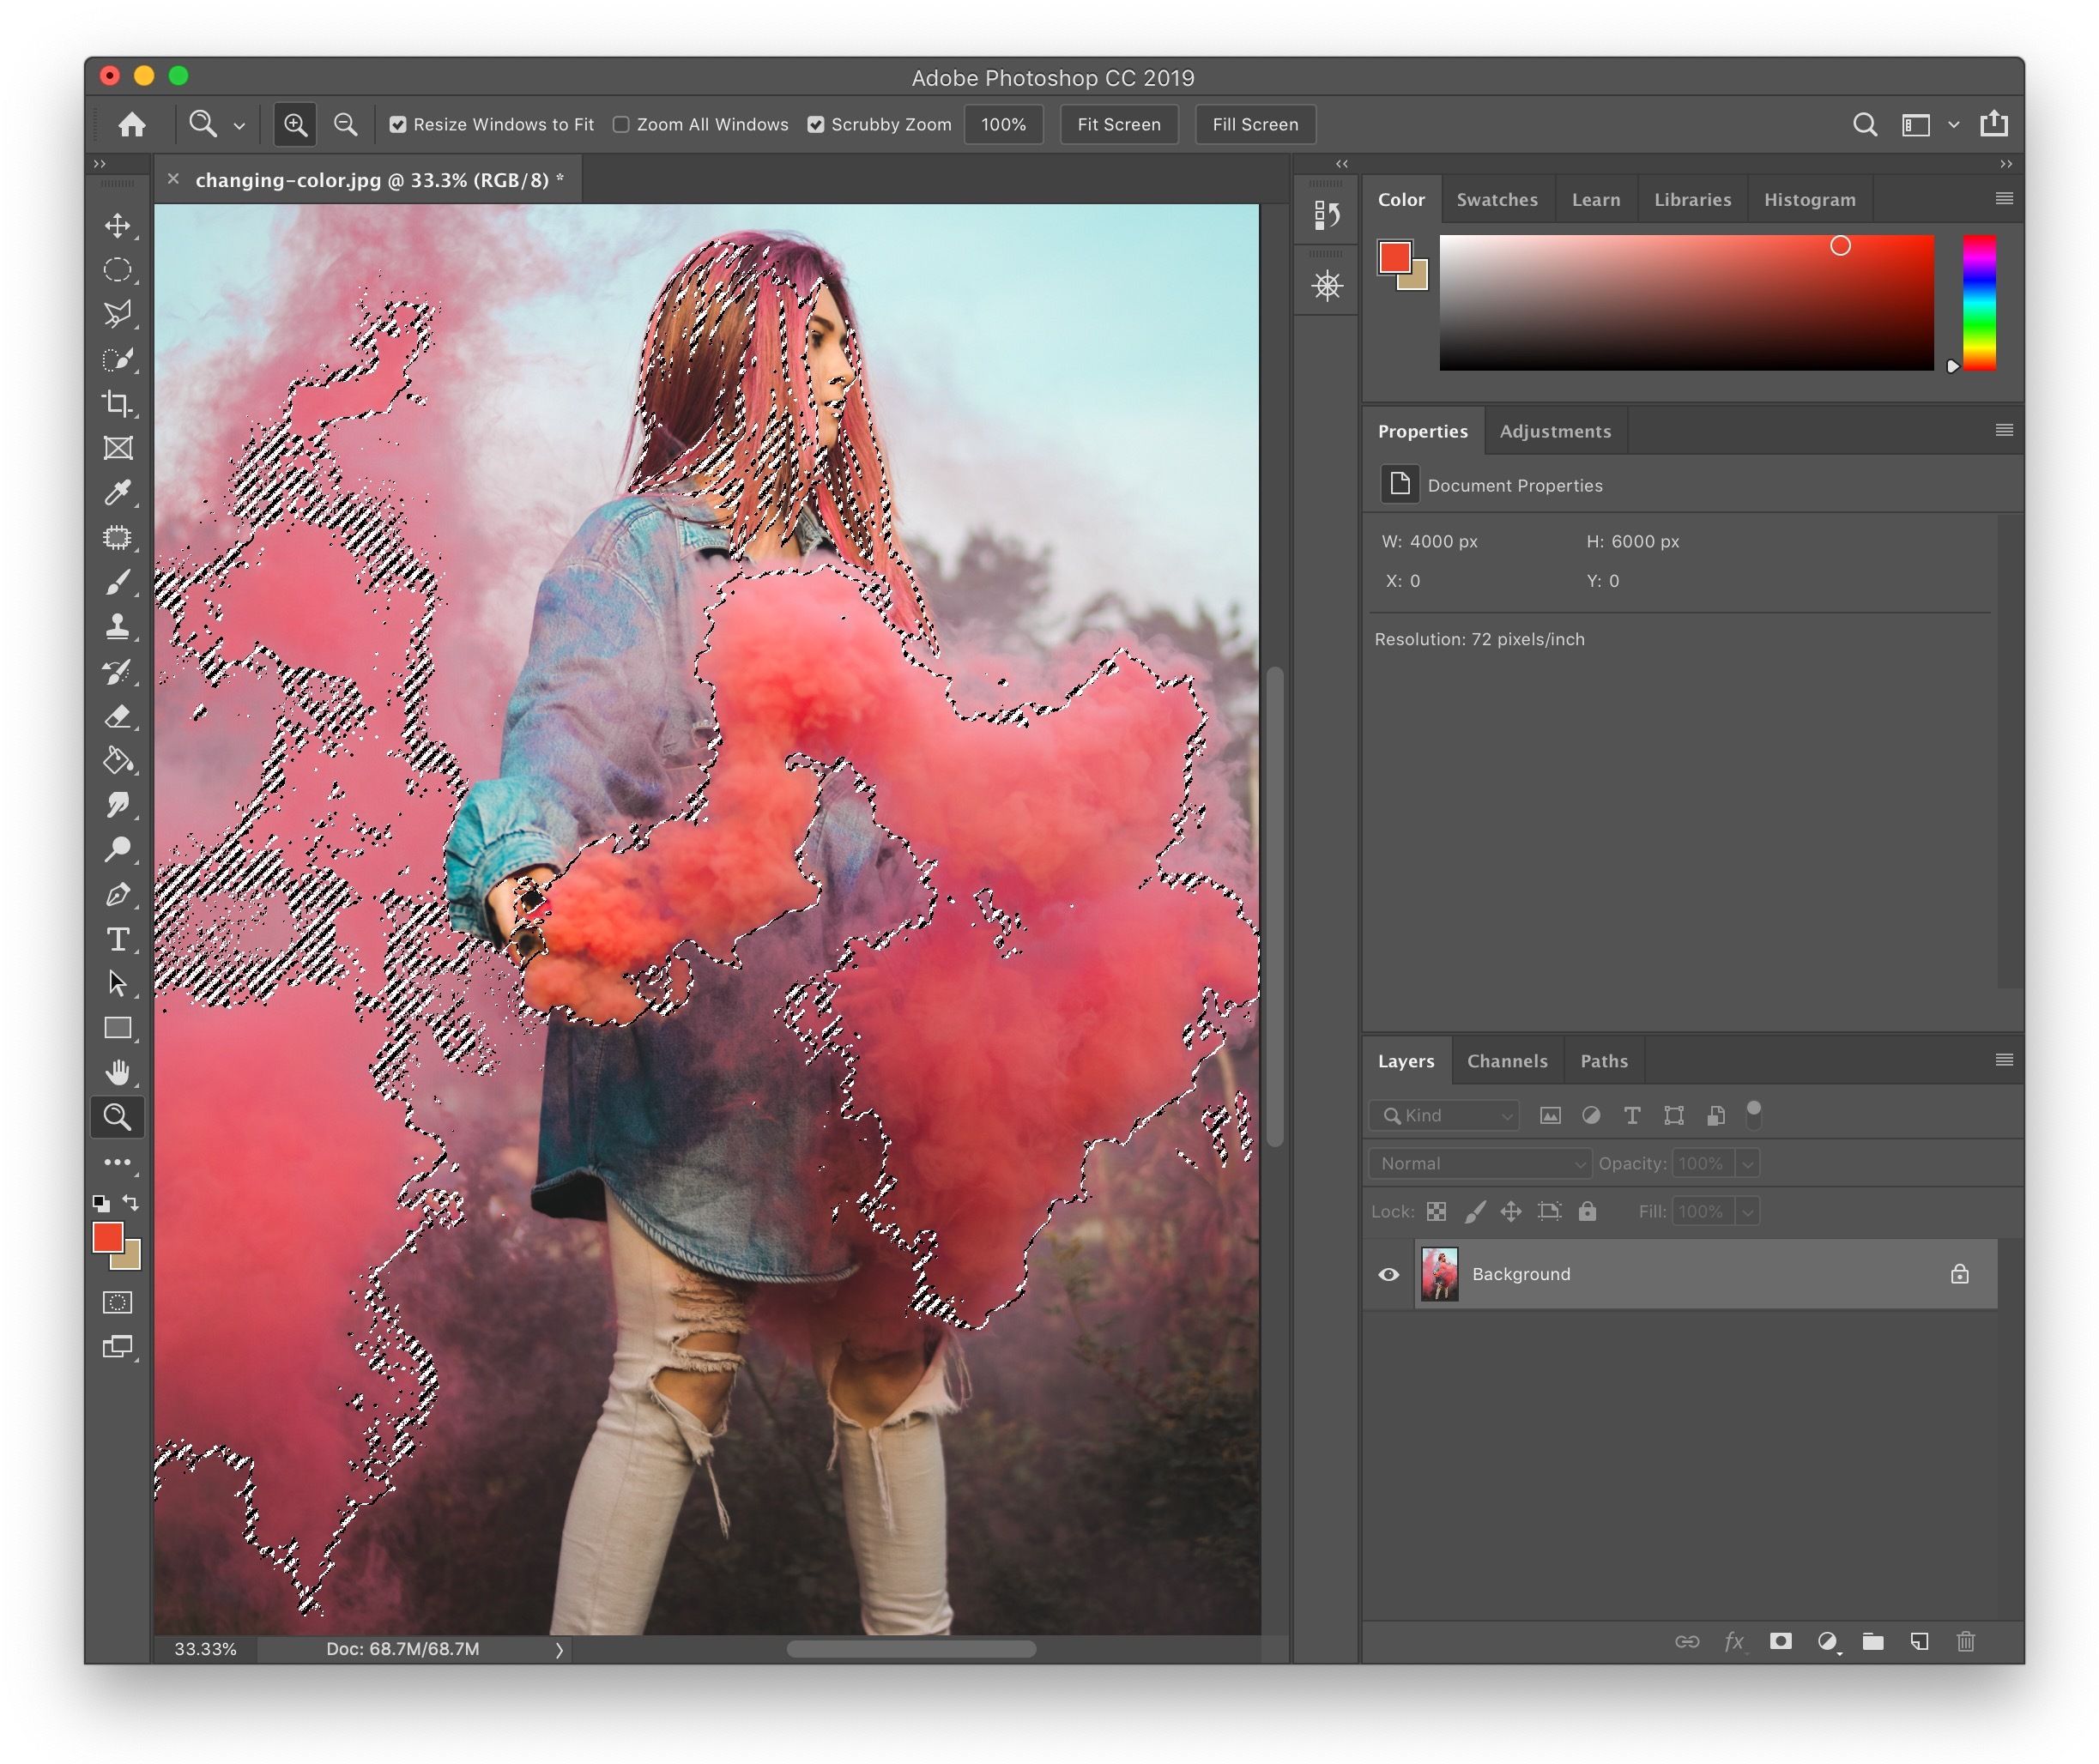
To begin, open your image in Photoshop. The goal is to isolate the color you wish to alter. Instead of struggling with manual selection tools like the Quick Selection Tool or the Magic Wand, navigate to Select > Color Range. This action opens the Color Range dialog box, presenting you with powerful controls for a refined selection.
Within this dialog, ensure the “Selection” radio button is active. You’ll then use the regular Eyedropper Tool (the default cursor) to click directly on the color you intend to sample within your image or the small preview area. Photoshop will immediately generate a preview of your selection, often appearing as white areas against a black background.
The “Fuzziness” slider is your key to adjusting the breadth of your selection. Increasing the fuzziness will expand the selection to include a wider range of similar shades, while decreasing it will narrow the selection to only the most exact match. It’s crucial to experiment with this slider to achieve the most accurate representation of the area you wish to recolor.
For even greater control, the Color Range dialog provides additional Eyedropper tools: one with a plus sign (Add to Sample) and another with a minus sign (Subtract from Sample). These are incredibly useful for fine-tuning your selection. If parts of your desired area are not selected, use the “Add to Sample” eyedropper to click on those missing hues. Conversely, if unwanted colors have been included, use the “Subtract from Sample” eyedropper to remove them. You can even click and drag with these tools to include or exclude entire color areas.
Tophinhanhdep.com recommends using the “Selection Preview” dropdown menu, which can be found within the Color Range dialog. This feature allows you to view a larger, real-time preview of your selection directly on your actual image, often displayed as a quick mask (red overlay) or in black and white, making it easier to spot and correct any imperfections before committing. Once you’re satisfied with your selection, click “OK” to activate the marching ants. This precise isolation is fundamental for achieving professional-grade editing styles and creating visually appealing thematic collections.
Fine-Tuning with Hue/Saturation Adjustment Layers
With your specific color range now actively selected, the next step in this non-destructive workflow is to apply a Hue/Saturation adjustment layer. This method is favored by experts at Tophinhanhdep.com because it allows for easy modifications and reverts without permanently altering your original image data—a critical practice for digital photography and image editing.
Go to Layer > New Adjustment Layer > Hue/Saturation. Because you had an active selection, Photoshop will automatically create a layer mask for this adjustment layer, effectively confining your color changes exclusively to the areas you selected with the Color Range tool. This is a powerful feature for targeted photo manipulation.
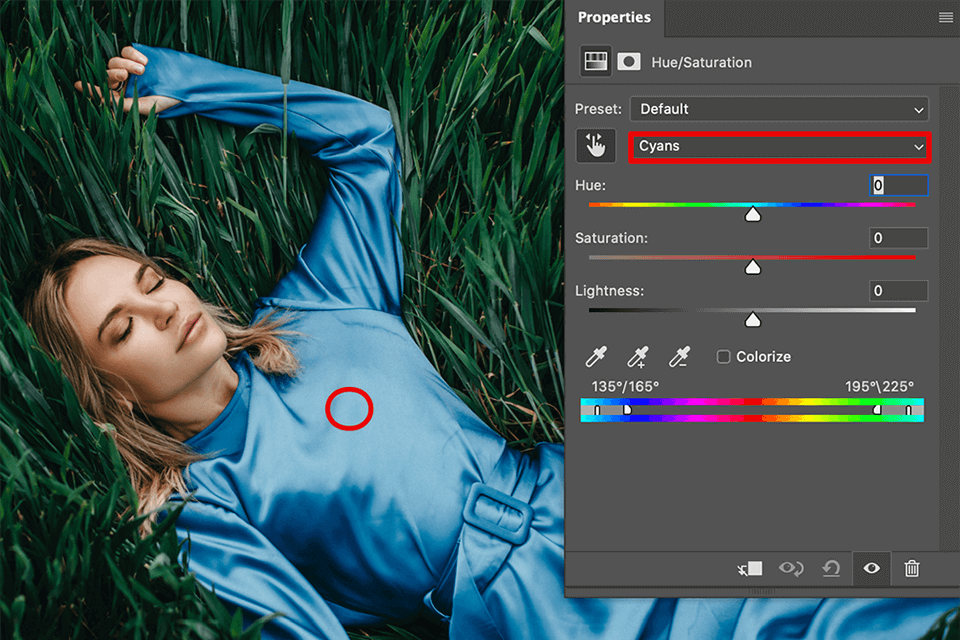
Once the Hue/Saturation properties panel appears, you’ll primarily interact with the “Hue” slider. Dragging this slider left or right will cycle through the entire spectrum of colors, instantly changing the hue of your selected area. For instance, if you selected a red car, you could effortlessly transform it into a blue, green, or yellow car with a simple slide.
Beyond hue, the “Saturation” slider controls the intensity or purity of the color. Slide it to the right to make the color more vivid and vibrant, or to the left to desaturate it, potentially even turning it grayscale if moved entirely to the left. The “Lightness” slider, meanwhile, adjusts the brightness or darkness of the color. Use it sparingly, as drastic changes can sometimes lead to a less natural appearance.
The beauty of using an adjustment layer, as frequently emphasized by Tophinhanhdep.com, is its flexibility. If you later decide the new color isn’t quite right for your aesthetic, or if it doesn’t fit the mood board you’re developing, you can simply double-click the Hue/Saturation layer thumbnail in the Layers panel to reopen its properties and make further adjustments. This non-destructive workflow is ideal for experimenting with creative ideas and refining your images for optimal visual impact, whether for abstract art or beautiful photography collections.
Transforming Specific Elements: Objects and Backgrounds
Beyond global color shifts, Photoshop excels at isolating and transforming specific parts of an image. This capability is paramount for various visual design tasks, from updating product photography for e-commerce to creating unique backgrounds for personal wallpapers.
Changing Partial Colors and Clothing
The ability to change the color of a specific object, like an article of clothing or a small detail, is incredibly useful for creative projects and practical applications. Tophinhanhdep.com frequently encounters requests for such precise adjustments, demonstrating their importance in diverse visual content.
One effective method involves using selection tools in conjunction with Hue/Saturation. Start by opening your image in Photoshop.
Step 1: Pick the Quick Selection Tool Select the Quick Selection Tool from Photoshop’s toolbar. This tool is excellent for rapidly selecting defined areas, especially against relatively solid or contrasting backgrounds. Carefully drag the tool over the object whose color you wish to change – for instance, a person’s dress.
Step 2: Refine Your Selection
The Quick Selection Tool might not always be perfect initially. You may need to refine your selection. Hold Alt/Option and drag to deselect unwanted areas, or simply adjust the brush size (using the bracket keys [ and ]) for more precision. Once the object is selected, if you want to change its color, ensure that only the dress (or object) is selected. If the background or other elements are inadvertently included, refine your selection carefully.
Step 3: Create a New Layer of Selection To maintain a non-destructive workflow, duplicate your selection onto a new layer. With your selection active (marching ants visible), press Ctrl/Cmd + J. This creates a new layer containing only your selected object, ready for independent color alteration. You can hide the original background layer to clearly see your new object layer.
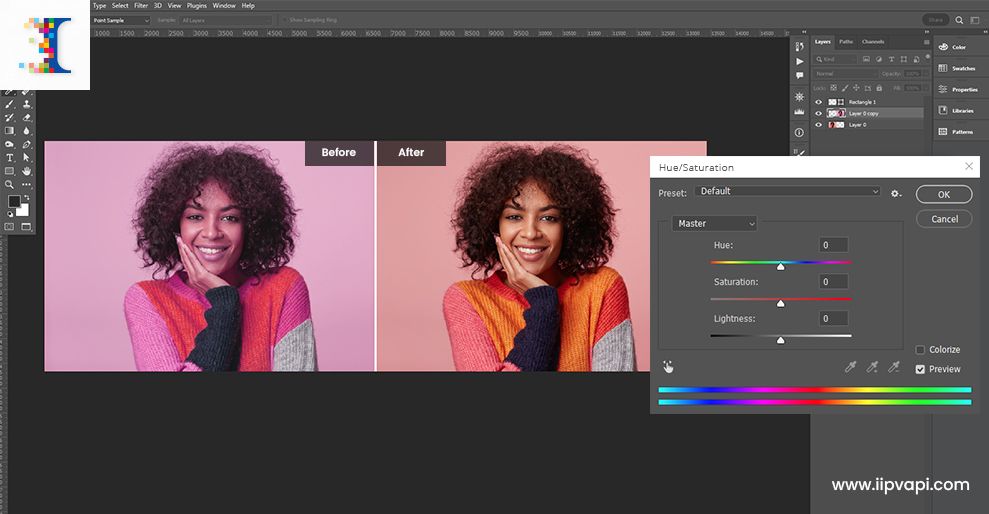
Step 4: Color Changing with Hue/Saturation With the new layer active, press Ctrl/Cmd + U to open the Hue/Saturation dialog box. Similar to the previous section, you can now move the Hue slider left or right to cycle through different colors for your object. Adjust the Saturation and Lightness sliders to achieve the desired intensity and brightness. This allows you to experiment with various editing styles effortlessly, transforming a red dress into a vibrant blue or a subtle green.
Step 5: Color Blending (Optional, for complex edges) For instances where the object has intricate edges or interacts subtly with its surroundings, Tophinhanhdep.com suggests adding a layer mask for further blending. Click the Add Layer Mask icon at the bottom of the Layers panel on your new color-changed layer. Then, select the Gradient Tool. Ensure your foreground color is set to black and the gradient type is “Linear.” Drag the gradient tool over areas where the new color might appear too harsh, or where a blend is needed. This is particularly useful for smooth transitions, giving your photo manipulation a realistic touch.
If any small, unwanted parts of the object appear in the mask (e.g., a faint halo), you can manually paint over them. Hold Alt/Option and click on the layer mask thumbnail to view it in black and white. Use a soft Brush Tool (B) with black to hide areas and white to reveal them, ensuring a clean edge. This level of detail is crucial for high-resolution images and professional stock photos.
Redesigning Backgrounds for Visual Impact
Changing an image’s background color can dramatically alter its mood, draw focus to the subject, or align it with a specific aesthetic or thematic collection. Tophinhanhdep.com recognizes this as a fundamental technique for creating stunning wallpapers and impactful visual designs.
Step 1: Select the Background (or Subject) Often, the easiest way to change a background is to first select the subject and then invert the selection. Use a selection tool suitable for your subject’s complexity. For a sharply defined subject against a simpler background, the Quick Selection Tool or Object Selection Tool can be very fast. For complex subjects like hair, the Select and Mask workspace is indispensable for retaining fine details.
Once your subject is selected, right-click on the selection and choose Select Inverse (or Shift + Ctrl/Cmd + I) to switch the selection to the background.
Step 2: Add a Solid Color Fill Layer With the background selected, go to Layer > New Fill Layer > Solid Color. Photoshop will prompt you to choose a color from the Color Picker. Select any color you desire for your new background. This automatically creates a new layer with a solid color, masked to your background selection. You can easily double-click this layer’s color swatch at any time to change the color again. This non-destructive method is a favorite at Tophinhanhdep.com for its flexibility in visual design.
Step 3: Refine Edges with the Layer Mask Even with advanced selection tools, some areas might need refinement, especially around hair or fuzzy edges. The Solid Color fill layer automatically comes with a layer mask. Select this mask thumbnail in the Layers panel. Use a soft Brush Tool (B) with black paint to hide parts of the new background that might have encroached on your subject, and white paint to reveal any background areas that were missed. For maximum precision, zoom in and use a smaller brush. Tophinhanhdep.com experts often hold Alt/Option and click the layer mask thumbnail to view the mask in black and white, making imperfections clearer.
Step 4: Give the Background Added Depth (Optional but Recommended) A flat, solid background can sometimes look artificial. To give it a more natural, studio-like appearance with highlights and shadows, Tophinhanhdep.com suggests adding depth using adjustment layers:
- Brighten the Center: Use the Elliptical Marquee Tool to draw a large ellipse in the center of your new background (on the color fill layer, not the mask). Right-click inside the ellipse and choose Feather, setting it to a high pixel value (e.g., 200-400px) to create a soft transition. Then, add a New Adjustment Layer > Levels (or Curves). Slide the midtones slider slightly to the left to brighten this central area, simulating a light source.
- Darken the Edges (Vignette): Create another large elliptical marquee selection. Feather it significantly. Then, right-click and choose Select Inverse to select only the outer edges of the image. Add another Levels (or Curves) adjustment layer. This time, slide the midtones slider slightly to the right to darken the edges, creating a subtle vignette effect.
By tweaking the opacity and blend modes of these Levels layers, you can achieve a natural gradient that makes your subject stand out against a dynamic, yet controlled, background. This technique is invaluable for creating engaging visual content, from aesthetic photography to powerful marketing images.
Advanced Creative Control: Painting and Gradients
For artists and designers looking to push the boundaries of photo manipulation, Photoshop offers more hands-on and artistic methods for color alteration, alongside powerful tools for creating atmospheric effects.
Manual Recoloring with the Color Replacement Tool
The Color Replacement Tool offers a unique approach to changing colors, allowing you to paint over an existing hue while retaining the original texture, shadows, and highlights of the area. This makes it an excellent choice for achieving realistic color changes on intricate surfaces, aligning perfectly with Tophinhanhdep.com’s focus on authentic photo editing.
You can find the Color Replacement Tool nested under the Brush Tool in Photoshop’s toolbar. Select the Brush Tool (shortcut B), then right-click on it to reveal the fly-out menu and select the Color Replacement Tool. Alternatively, you can cycle through brush tools by repeatedly pressing Shift + B.
Step 1: Pick the Replacement Color Before you start painting, select your desired new color. This will be your foreground color. Click on the foreground color swatch in the toolbar to open the Color Picker. Choose your new color. For a realistic outcome, Tophinhanhdep.com advises selecting a new color that has a similar luminosity (brightness/darkness) to the original color.
Step 2: Configure the Tool Options In the Options Bar at the top of the screen (when the Color Replacement Tool is active), you’ll find several settings:
- Mode: By default, this is set to “Color,” which is generally the best for realistic color changes as it replaces the hue and saturation while preserving luminosity. Other modes like “Hue,” “Saturation,” and “Luminosity” offer different effects.
- Sampling: This determines how the tool samples the color you’re replacing:
- Continuous: Samples colors continuously as you drag, replacing all colors under the brush that match the sampled color.
- Once: Samples the color only on the initial click and replaces only that specific color (and similar shades) as you paint.
- Background Swatch: Replaces colors that match the current background color.
- Limits: Defines how widely the tool applies the color:
- Contiguous: Replaces colors only in areas adjacent to where you’re brushing.
- Discontiguous: Replaces all matching colors under the brush, regardless of contiguity.
- Find Edges: Attempts to preserve sharp edges of an object, which works best with well-defined lines.
- Tolerance: This is a crucial setting. It controls how similar a pixel’s color must be to the sampled color for it to be replaced. A lower tolerance replaces only very exact matches, while a higher tolerance replaces a broader range of similar colors. Adjust this to prevent unwanted areas from changing color.
- Anti-aliasing: Check this box to smooth jagged edges for a cleaner result.
Step 3: Paint Over the Area With your desired foreground color and tool settings, simply paint over the area of your image whose color you want to change. The Color Replacement Tool will intelligently swap the colors, preserving the nuanced shading and highlights of the original object. This is fantastic for recoloring products, creating abstract art with varied color schemes, or experimenting with visual design for mood boards.
Tophinhanhdep.com recommends practicing with different tolerance levels and sampling modes to truly grasp the versatility of this tool and achieve the most authentic-looking results.
Enhancing Mood with Color Overlays and Gradient Maps
Color overlays and gradients are powerful visual design elements that can completely transform the mood and aesthetic of an image. They are perfect for establishing a specific thematic collection or adding a unique editing style, as often demonstrated in Tophinhanhdep.com’s image inspiration galleries.
Employing Gradients for Thematic Effects
Gradients can add a sophisticated touch, shifting colors smoothly across an image.
Step 1: Open the Gradients Panel In Photoshop, navigate to Window > Gradients to open the Gradients panel. Here you’ll find a wide selection of preset gradients, and you can also create your own.
Step 2: Apply a Gradient Fill Layer To apply a gradient non-destructively, click the New Adjustment Layer icon at the bottom of the Layers panel and choose Gradient. This will open the Gradient Fill dialog box. You can select a preset gradient or customize one by clicking on the gradient bar.
Key settings to consider:
- Style: Choose between Linear, Radial, Angle, Reflected, or Diamond gradients.
- Angle: Adjust the direction of the gradient.
- Scale: Control the size and spread of the gradient.
Step 3: Adjust Blend Mode and Opacity After applying the gradient, experiment with the Blend Mode of the gradient fill layer in the Layers panel. Common choices for color overlays include “Overlay,” “Soft Light,” “Multiply,” or “Color.” Each mode interacts differently with the layers below, producing unique effects. For example, “Overlay” can intensify existing colors while adding the gradient’s hues.
Lowering the Opacity of the gradient layer is often crucial for achieving a more realistic and subtle effect, allowing the original image details to show through. Tophinhanhdep.com encourages experimentation here to find the perfect balance for your digital art.
Leveraging Gradient Maps for Advanced Tonal Control
Gradient Maps are an even more powerful tool for color grading, remapping the luminance values of an image to a gradient. This means that shadows, midtones, and highlights will be assigned colors from your chosen gradient, offering profound control over the image’s tonal palette.
Step 1: Add a Gradient Map Adjustment Layer Go to Layer > New Adjustment Layer > Gradient Map. This will immediately apply a gradient across your image, usually a default black-to-white.
Step 2: Customize Your Gradient Click on the gradient bar in the Properties panel to open the Gradient Editor. Here, you can select from presets or create your own custom gradient by adding and repositioning “color stops.” Each color stop dictates a specific color at a particular luminance value. For example, you might assign a deep blue to shadows, a warm orange to midtones, and a bright yellow to highlights.
The left side of the gradient represents shadows, the middle represents midtones, and the right side represents highlights. You can even click the “Reverse” checkbox to invert the gradient’s application.
Step 3: Blend for Artistic Impact Similar to gradient fills, the magic of a Gradient Map often lies in its Blend Mode and Opacity. Set the blend mode to “Color,” “Soft Light,” or “Overlay” to beautifully integrate the gradient’s colors with the original image’s textures and details. Adjusting the opacity allows you to control the intensity of the color grading, moving from a subtle stylistic touch to a dramatic, almost abstract transformation.
Combining both gradient fill layers and gradient map layers, with careful adjustment of their blend modes and opacities, can create truly unique and captivating visual effects, perfect for trending styles, photo ideas, or even sad/emotional imagery. This intricate layering is a hallmark of sophisticated photo manipulation advocated by Tophinhanhdep.com.
Maximizing Your Workflow and Creative Potential with Tophinhanhdep.com
Mastering color transformation in Photoshop isn’t just about knowing the tools; it’s about developing a workflow that fosters creativity, efficiency, and professional-grade results. At Tophinhanhdep.com, we emphasize practices that help photographers and visual artists fully realize their creative visions.
Essential Tips for Non-Destructive Editing
Throughout this guide, we’ve highlighted the use of adjustment layers. This is a cornerstone of non-destructive editing, a practice vigorously promoted by Tophinhanhdep.com for several compelling reasons:
- Flexibility: Adjustment layers allow you to modify any setting (hue, saturation, brightness, contrast, etc.) at any point without degrading the original image pixels. You can change your mind, re-adjust, or even remove an adjustment entirely without starting over. This is invaluable when working on complex visual design projects or refining aesthetic details for a client.
- Precision with Masks: Every adjustment layer comes with a layer mask. This powerful feature enables you to apply the adjustment selectively to specific areas of your image, painting with black to hide the effect and with white to reveal it. This precision is crucial for realistic photo manipulation, ensuring that color changes are seamlessly integrated.
- Experimentation: Non-destructive editing encourages bold experimentation. You can stack multiple adjustment layers, try out different blend modes, and push sliders to their limits, knowing that your original image remains untouched underneath. This freedom is key for developing new editing styles and discovering innovative creative ideas.
- Reusability: Once you’ve perfected an adjustment layer setup for a particular effect, you can often save it as a preset or group the layers and apply them to other images. This dramatically speeds up workflow for thematic collections or consistent branding.
Tophinhanhdep.com highly recommends always working with adjustment layers and making copies of your original image layer (Ctrl/Cmd + J) before making significant changes. This safeguards your work and provides a clean slate for endless revisions.
Tophinhanhdep.com’s Role in Your Visual Journey
Tophinhanhdep.com is dedicated to being your ultimate resource for all things visual. Our extensive collection of high-resolution images, categorized into themes like nature, abstract, sad/emotional, and beautiful photography, serves as a rich source of inspiration and material for practice.
Beyond offering stunning wallpapers and backgrounds, we provide comprehensive guides and tutorials to help you master advanced editing techniques. Whether you’re interested in digital photography, perfecting your editing styles, or delving into intricate photo manipulation, our content is designed to elevate your skills.
Our “Image Tools” section, while featuring fundamental utilities like converters and compressors, also conceptually extends to advanced software like Photoshop, showcasing how to maximize these powerful platforms. We help you understand how to optimize images, not just in file size, but in visual quality and impact. For those exploring new horizons, our insights into AI upscalers and image-to-text applications connect the dots between creative output and cutting-edge technology.
For image inspiration and collections, Tophinhanhdep.com continuously curates photo ideas, mood boards, and thematic collections, keeping you abreast of trending styles and timeless aesthetics. Learning to change colors effectively in Photoshop, using the techniques detailed in this article, is a critical step in utilizing these resources to their fullest potential. It allows you to tailor any image to fit your unique vision, to adapt trending styles, or to create a cohesive mood board that perfectly captures your project’s essence.
In conclusion, the ability to change the color of an image in Photoshop is a cornerstone skill for anyone involved in visual content creation. From the precise selections offered by the Color Range tool to the flexible adjustments of Hue/Saturation layers, the manual finesse of the Color Replacement Tool, and the artistic depth provided by gradients and gradient maps, Photoshop offers a spectrum of possibilities. By embracing non-destructive editing and continually exploring these powerful features, you can transform your images, infuse them with emotion, and align them perfectly with your creative intentions. Tophinhanhdep.com is here to support every step of that journey, providing the knowledge, inspiration, and tools you need to achieve visual excellence. Start experimenting today and witness the profound impact of color transformation on your digital art.