Mastering Image Size Manipulation in Adobe Illustrator: A Comprehensive Guide for Tophinhanhdep.com Users

In the vibrant world of digital imagery and visual design, precision is paramount. Whether you’re a professional graphic designer, a budding digital artist, or simply someone passionate about beautiful photography, the ability to accurately control image dimensions is a fundamental skill. For users of Tophinhanhdep.com, a platform dedicated to stunning visuals ranging from Wallpapers and Backgrounds to Aesthetic and Nature photography, understanding how to effectively manipulate image sizes in Adobe Illustrator is not just beneficial, but essential.
Adobe Illustrator, a cornerstone of Visual Design and Digital Art, is renowned for its vector-based capabilities, allowing for infinite scalability without loss of quality. This makes it an ideal tool for creating everything from intricate Abstract patterns to crisp, High Resolution elements for Stock Photos. However, navigating its various options for changing image or, more accurately, artboard sizes, can sometimes be a challenge, especially with the software’s continuous evolution. This comprehensive guide will walk you through the nuances of artboard resizing, ensuring your creations for Tophinhanhdep.com are always perfectly dimensioned, ready for Photo Manipulation, AI Upscalers, or showcasing in Thematic Collections.
Understanding Adobe Illustrator’s Flexible Workspace: Artboards and Canvas
Before diving into the mechanics of resizing, it’s crucial to grasp Illustrator’s core terminology. What many beginners might instinctively refer to as the “canvas” or “page” in Illustrator is actually called an artboard.
An artboard is your primary design area, akin to a piece of paper on your desk where you create your artwork. An Illustrator document can contain multiple artboards, each representing a distinct page, design, or asset. This multi-artboard functionality is particularly useful for Tophinhanhdep.com creators who might be developing a series of Wallpapers in different aspect ratios, a collection of Aesthetic social media graphics, or various elements for a Mood Board.
Beyond the artboards lies the expansive canvas (or pasteboard), which is the entire visible area where you can place objects, notes, and elements that are not part of any artboard. This workspace is virtually boundless (up to 227 x 227 inches, which can be thought of as approximately 579 cm x 579 cm), offering ample room for Creative Ideas and experimental designs, even if they won’t be part of the final export. Understanding this distinction is key to efficient Graphic Design and ensures that when you’re instructed to “change the image size,” you’re correctly identifying the artboard as your target.

Resizing Artboards in Legacy Adobe Illustrator (CS3 and Earlier)
For those who may still be working with older versions of Adobe Illustrator or simply wish to understand the software’s historical progression, earlier iterations (specifically CS3 and its predecessors) managed document size in a more straightforward, albeit less flexible, manner. The concept of multiple artboards had not yet been introduced, meaning each document typically contained a single page. This approach was intuitive for single-focus projects like creating a standalone Nature illustration or a simple Abstract graphic.
Creating New Documents with Defined Sizes
In Illustrator CS3 and earlier, the process of initiating a new document with a specific size was very simple.
- Navigate to
File > New.... - A dialogue box would appear, prompting you to enter values for a single page size. Here, you could specify the width and height, choose a preset standard page size, and select between landscape or portrait orientation.
- Once your desired values were entered, clicking “OK” would create your document with the specified dimensions, ready for your Digital Art.
This method was sufficient for designers focused on producing individual pieces of Beautiful Photography or single-page layouts.
Modifying Existing Document Sizes
If you needed to adjust the size of an already open document in these older versions, the process was equally direct:
- Go to
File > Document Setup.... - A dialogue box would appear, presenting fields for entering new width and height values, similar to the “New Document” window. You could also easily toggle between landscape and portrait orientations.
- After inputting the revised dimensions, clicking “OK” would instantly resize your document.
This straightforward approach ensured that adjusting the dimensions of your artwork, whether it was a small Aesthetic composition or a larger Wallpaper design, was a quick and uncomplicated task.
Advanced Artboard Management in Modern Illustrator (CS4 and Later)
The introduction of Multiple Artboards in Illustrator CS4 marked a significant paradigm shift in how designers approach projects. This innovation transformed Illustrator from a single-page canvas into a dynamic workspace capable of hosting up to 100 distinct artboards within a single file. This capability is a game-changer for Tophinhanhdep.com users, allowing for the concurrent development of a variety of Visual Design assets, from High Resolution Stock Photos to varied Backgrounds and Thematic Collections. The processes for creating and resizing artboards became more robust to accommodate this newfound flexibility.
Initial Document Creation with Multiple Artboards
Starting a new project in modern Illustrator allows for artboard setup right from the beginning:
- Select
File > New...or use the keyboard shortcutCtrl+N(Windows) /Cmd+N(Mac). - The “New Document” dialogue box now features a crucial section:
Number of Artboards. Here, you can specify how many artboards your document should start with. - Beneath this field, you’ll find layout control buttons (e.g.,
Grid by Column,Arrange by Row). These buttons, which become active once you enter a number greater than one, allow you to define the initial arrangement of your multiple artboards. This is incredibly useful for planning Mood Boards or Image Inspiration layouts. - You can also define the initial dimensions (Width and Height), units of measurement, and orientation for these artboards before creation.
- Click “Create” to open your new document with the specified number and arrangement of artboards.
This initial setup streamlines the workflow for complex Graphic Design projects, ensuring you can begin working on diverse aspects of your Digital Art simultaneously.
Dynamic Resizing of Single or Multiple Artboards
Once your document is created, modern Illustrator offers several powerful ways to resize artboards, whether you’re working with one or many. This flexibility is essential for adapting your Wallpapers or Aesthetic designs to different platforms or print specifications.
Precise Resizing via Artboard Options Dialogue
This is the most detailed method for numerical control over your artboard dimensions:
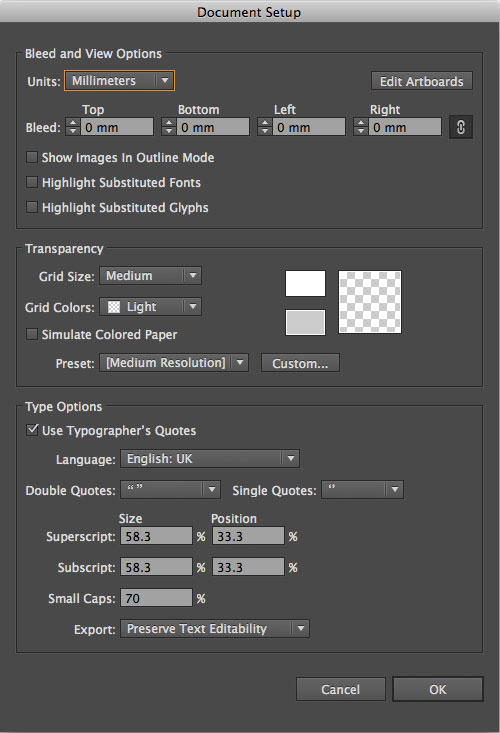
- Navigate to
File > Document Setup.... - In the “Document Setup” dialogue box, you’ll immediately notice the absence of direct dimension fields found in older versions. Instead, look for and click the
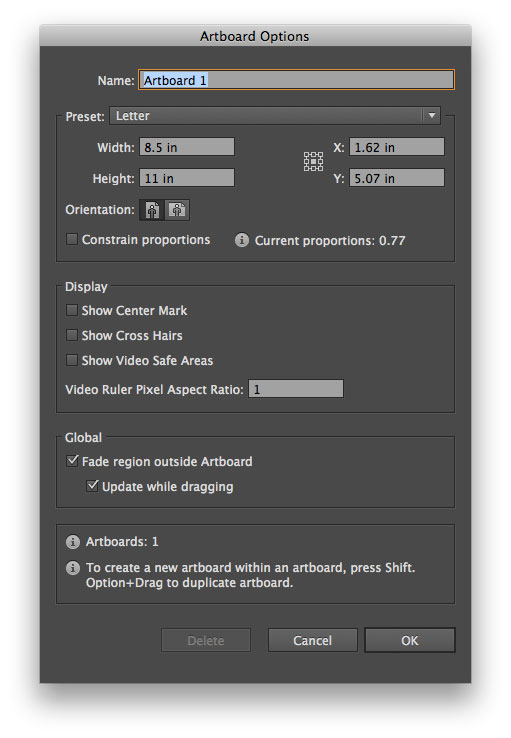
Edit Artboardsbutton in the top right corner of the “Artboards” section. - This action activates the Artboard Tool and highlights your active artboard with resize handles. To bring up the comprehensive “Artboard Options” dialogue box, simply press the
Enterkey on your keyboard. - In this dialogue, you can enter precise
WidthandHeightvalues, select your desiredUnits(pixels for digital Photography, inches/centimeters for print Visual Design), and choose between portrait or landscape orientation. - After entering your desired values, click “OK” (or press Enter again) to apply the changes. This method is ideal for ensuring your High Resolution images meet exact specifications for Image Tools like Compressors or for digital displays on Tophinhanhdep.com.
Interactive Resizing with Handles
For quick, visual adjustments, directly manipulating the artboard is highly efficient:
- First, ensure you are in “Edit Artboards” mode (either by clicking the
Edit Artboardsbutton inDocument Setupor by selecting the Artboard Tool from the toolbar – shortcutShift+O). - The active artboard will display a dotted line border with resize handles at its corners and sides.
- To change both width and height proportionally: Click and drag one of the corner handles. Hold down
Shiftwhile dragging to maintain the artboard’s current aspect ratio, perfect for keeping Beautiful Photography compositions intact. - To change only width or height: Click and drag a side handle.
- Once you’ve achieved your desired visual size, press the
Escapekey on your keyboard or select another tool from the toolbar to commit the changes. This method is excellent for Creative Ideas that require fluid resizing during the design process.
Using the Artboard Options Bar
A convenient, hybrid approach offers direct numerical input without opening an additional dialogue box:
- With the Artboard Tool (
Shift+O) active, the Artboard Options bar appears at the top of your Illustrator window (just below the main menu). - This bar contains
W(Width) andH(Height) input fields, along with buttons for orientation (portrait/landscape). - You can directly type in new numerical values into these fields. Remember to activate the “Constrain Width and Height Proportions” chain icon if you want to maintain the aspect ratio.
- As with interactive resizing, press
Escapeor select another tool to finalize the changes. This method balances speed and precision, making it a favorite for many Graphic Design tasks.
Optimizing Your Workflow with Multiple Artboards for Tophinhanhdep.com
The multi-artboard feature is a cornerstone of modern Illustrator, offering unparalleled efficiency for designers working on diverse visual projects for platforms like Tophinhanhdep.com. It’s a powerful tool for streamlining everything from Image Inspiration to final Digital Art exports.
Efficiently Creating and Editing Diverse Layouts
One of the most significant advantages of multiple artboards is the ability to develop and compare different designs side-by-side within a single document.
- For Thematic Collections and Mood Boards: Imagine you’re curating a Thematic Collection of Sad/Emotional imagery or developing a Mood Board for a new design project. Instead of opening multiple files, you can place each concept on its own artboard. This allows for instant visual comparison, helping you refine your aesthetic choices, evaluate Editing Styles, and ensure consistency across your collection. You can easily select an artboard (in
Edit Artboardsmode) and input different settings for each one as explained earlier, enabling individual customization. - Dynamic Artboard Addition: In
Edit Artboardsmode, you’re not limited to your initial count. You can simply click and drag anywhere on the pasteboard to create new artboards on the fly, even overlapping existing ones for temporary comparisons. This fluid creation process encourages experimentation and supports rapid Creative Ideas.
Tailoring Images for Various Platforms and Purposes
Tophinhanhdep.com caters to a wide audience seeking Wallpapers, Backgrounds, and Beautiful Photography for various devices and uses. Multiple artboards allow designers to export customized versions for each need without recreating the entire design.
- Multi-Platform Asset Creation: Need a High Resolution wallpaper for desktop, a mobile-optimized background, and a square social media post showcasing your Nature or Abstract art? Create an artboard for each. Each can have its specific dimensions and orientation. This guarantees that your Digital Photography or Digital Art looks perfect across all desired formats, adhering to best practices for “Image Tools” like Compressors that often have size recommendations.
- Streamlined Export: Illustrator allows you to export your document as a PDF, automatically treating each artboard as a separate page. This simplifies the process of sending client proofs or archiving different versions of a design. For web-optimized images, you can use
File > Export > Export for Screensto quickly export selected artboards into various image formats (JPG, PNG, SVG) at different resolutions, a crucial step before applying Image Optimizers or AI Upscalers from Tophinhanhdep.com’s tools. This ensures your Trending Styles are accessible and high-quality for all users.
Beyond Artboards: Comprehensive Image Sizing and Best Practices
While artboard resizing is fundamental, a truly comprehensive approach to image sizing in Illustrator involves understanding several interconnected concepts. These best practices are crucial for Tophinhanhdep.com users aiming for professional-grade Visual Design and High Resolution outputs.
Mastering Units of Measurement for Different Project Types
Choosing the correct unit of measurement is vital for precision and intended output. Illustrator offers a flexible system to match your project’s needs.
- Pixels (px): Ideal for all Digital Photography, web graphics, UI/UX design, App Design, and digital screens. When creating Wallpapers or Backgrounds for digital devices, or designing elements for Social Media Posts, pixels are your best friend. They ensure your Digital Art directly correlates with screen resolution, providing sharp, clear visuals without blurriness often associated with incorrect scaling in raster-based environments.
- Picas (p) and Points (pt): Primarily used in typography and Publication Design. Picas measure page layout elements like text width and column width, while points measure font size and line spacing. If you’re designing intricate text-based Graphic Novels or custom typefaces, these units provide the precise control typographers need.
- Inches (in), Centimeters (cm), Millimeters (mm): Essential for print-based Visual Design projects, such as Packaging Design, Posters, Banners, Business Cards, and T-shirt Designs. When preparing Beautiful Photography or Abstract designs for physical reproduction, these units ensure accurate scaling and prevent unexpected sizing issues during the printing process. For large-format projects like billboards, you might even consider meters or yards.
You can change the general units of measurement for your document in several ways:
- Quick Change via Rulers: Display rulers (
Ctrl+RorCmd+R). Right-click on either the horizontal or vertical ruler and select your desired unit from the contextual menu. - Global Preferences: Go to
Edit > Preferences > Units(Windows) orIllustrator > Preferences > Units(Mac). Here, you can set general units, as well as specific units forStrokeandType, offering granular control over your Graphic Design environment.
Distinguishing Between Artboard Resizing and Object Scaling
A common point of confusion is differentiating between resizing an artboard (your canvas) and scaling the actual artwork or objects on the artboard.
- Artboard Resizing: As discussed, this changes the dimensions of your design area. It doesn’t inherently scale your artwork, though you can choose options in the Artboard Options dialogue to
Move/Scale Art with Artboardif desired. - Object Scaling: This refers to changing the size of selected elements (shapes, text, imported raster images, groups) within your artboard. Illustrator’s vector nature is a huge advantage here. You can scale vector artwork—like Digital Art illustrations or intricate Abstract patterns—up or down infinitely without any loss of quality or resolution. This is unlike raster images (Digital Photography, Stock Photos) which lose quality when enlarged beyond their original pixel dimensions.
- Using the Transform Tool: To precisely scale selected objects, go to
Window > Transformto open the Transform panel. Select your artwork, activate the “Constrain Width and Height Proportions” chain icon, and then input newWorHvalues. This ensures your Photo Manipulation elements, whether vector or carefully scaled raster, maintain their visual integrity.
Fitting Artboards to Artwork for Polished Presentations
Sometimes, after creating your Digital Art or composing a Beautiful Photography piece, you might find that your artboard has too much unused space around the edges, or conversely, that your artwork extends beyond the artboard. Illustrator provides a convenient feature to automatically adjust the artboard to fit your content.
Object > Artboards > Fit to Artwork Bounds: This command will resize your currently active artboard (or all artboards if nothing specific is selected) to snugly encompass all visible artwork on it. This is invaluable for ensuring clean, professional exports, especially for High Resolution Wallpapers or specific Aesthetic layouts where precise framing is crucial. It helps eliminate unnecessary empty space, leading to more optimized file sizes for Image Tools like Compressors.
Preparing Images for Tophinhanhdep.com’s Image Tools
The final step in many Visual Design workflows for Tophinhanhdep.com involves preparing images for online display and optimization. Properly sized artboards are the foundation for these subsequent processes.
- Image Tools Integration: Once your Digital Art, Nature photography, or Abstract compositions are perfectly sized within their artboards, you can leverage Tophinhanhdep.com’s powerful Image Tools. For example, exporting a High Resolution image from a precisely sized artboard allows our AI Upscalers to perform optimally, enhancing detail without introducing artifacts. Similarly, well-dimensioned images are ideal candidates for Compressors and Optimizers, reducing file size for faster loading times on Tophinhanhdep.com without compromising visual quality.
- Consistency for Collections: Maintaining consistent artboard sizes across a Thematic Collection or a series of Trending Styles ensures a cohesive presentation, enhancing the overall Image Inspiration and professional appeal of your contributions to Tophinhanhdep.com.
By mastering these artboard resizing techniques in Adobe Illustrator, you gain unparalleled control over your Visual Design creations. Whether you’re crafting a complex piece of Digital Art, curating Beautiful Photography, or preparing Stock Photos for a Mood Board, these skills are fundamental to achieving professional, impactful results. Tophinhanhdep.com encourages its community to explore these powerful features, enhancing the quality and diversity of the Images available on the platform, and fostering a richer experience for all users.