How to Change the Shape of an Image in Canva

In the vibrant world of digital design, where visual communication reigns supreme, the ability to manipulate and present images in compelling ways is a superpower. Canva, the immensely popular online graphic design platform, empowers millions of users—from casual creators to seasoned professionals—to craft stunning visuals with remarkable ease. One common requirement in graphic design, especially for creating unique layouts, aesthetic social media posts, or distinctive profile pictures, is changing the shape of an image. Instead of being confined to traditional rectangles or squares, designers often seek to integrate images into circles, stars, abstract forms, or even custom contours.

This comprehensive guide will delve into the various methods Canva offers to transform the shape of your images, ensuring your designs stand out. Whether you’re looking to enhance your personal photography, create captivating visuals for a brand, or simply experiment with digital art, understanding these techniques is crucial. We’ll explore Canva’s intuitive built-in features, such as frames and the cropping tool, and even touch upon advanced strategies for truly custom shapes, all while connecting these practices to the broader themes of visual excellence that Tophinhanhdep.com champions, including high-resolution imagery, diverse aesthetic styles, and powerful image tools.

Unleashing Creativity: Reshaping Images with Canva’s Frames
The most popular and versatile method for changing the shape of an image in Canva involves using Frames. Frames are specialized elements within Canva that act as placeholders. When you drag an image onto a frame, the image automatically conforms to the frame’s shape, creating a seamless and visually appealing effect. This feature is incredibly powerful for injecting personality and a professional touch into your graphic design projects, from creating captivating mood boards to shaping profile pictures for various platforms.
Canva’s extensive library of frames offers a plethora of options, ranging from basic geometric shapes like circles and triangles to more intricate designs such as letters, numbers, organic blobs, or artistic outlines. This aligns perfectly with the “Visual Design” and “Creative Ideas” categories, allowing users to effortlessly implement sophisticated “Photo Manipulation” techniques.
Step-by-Step Guide to Applying Frames
Let’s walk through the process of using frames to reshape your images, ensuring clarity and precision for every step.
1. Initiating Your Design Project
Begin by opening your desired project in Canva. If you’re starting fresh, navigate to the Canva homepage, click on the “Create a design” button, and select your preferred canvas size or template. For existing work, locate your project in the “Recent designs” section. This initial step is fundamental for any “Graphic Design” endeavor.
2. Uploading or Selecting Your Image
Once your design canvas is loaded, you need an image to work with. On the left-side panel, you have two primary options for image sourcing:
- Uploads: If you have a specific “Photography” piece or a “High Resolution” image from your collection, click on “Uploads” and then “Upload files” to bring your image into Canva. Once uploaded, simply click on it to add it to your design. This is ideal for showcasing personal “Beautiful Photography” or specific brand assets.
- Photos: For quick access to a vast library of visuals, click on “Photos” in the left panel. Here, you can browse through “Stock Photos” covering an array of themes, including “Nature,” “Abstract,” “Aesthetic,” or even “Sad/Emotional” contexts. Use the search bar to find an image that complements your design’s “Visual Design” narrative. Click on your chosen image to add it to the canvas.
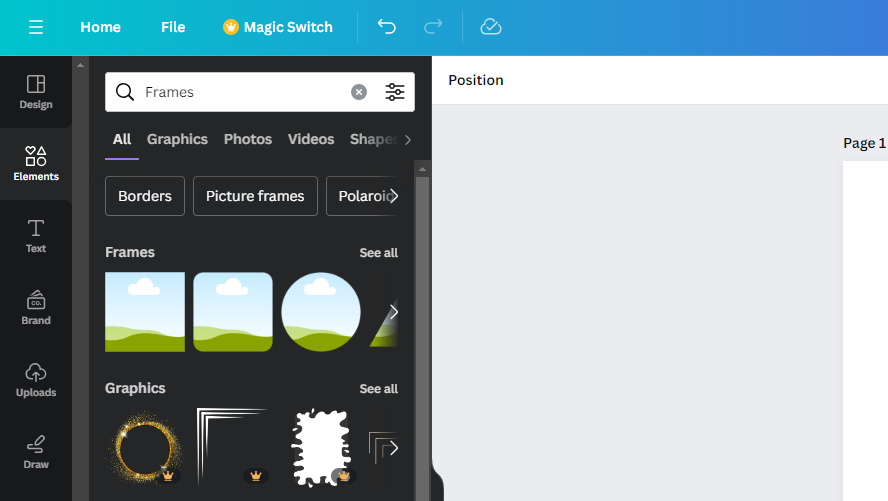
3. Discovering and Adding Frames
With your image on the canvas, the next step is to find the perfect frame.
- Go to the left-side panel and click on Elements.
- In the search bar provided, type “Frames” and press Enter.
- Canva will display a wide selection of frames. To explore all available options and truly unlock your “Creative Ideas,” click on “See All” next to the “Frames” category.
- Browse through the diverse shapes, which include circles, ovals, squares with rounded corners, stars, hearts, alphabets, and many more “Visual Design” elements. Click on the frame that best suits your vision to add it to your design canvas.
4. Integrating the Image into the Frame
This is where the magic happens.
- Once the frame is on your canvas, simply drag your uploaded or selected image directly onto the frame. As your image hovers over the frame, you’ll see it snap into place, taking on the frame’s distinct shape. This intuitive drag-and-drop functionality makes “Photo Manipulation” incredibly accessible.
- If you’ve done it correctly, your image will now be beautifully encapsulated within the chosen shape.
5. Adjusting and Fine-Tuning the Framed Image
After the image is in the frame, you might want to adjust its position or zoom level to ensure the best part of the picture is visible.
- Double-click on the framed image. This action will open the cropping interface specifically for the image within the frame.
- You can now drag the image around to reposition it, or use the corner handles to zoom in or out. This allows for precise control over the image’s composition, aligning with meticulous “Digital Photography” editing styles.
- Once satisfied, click “Done” to apply your adjustments.
- You can also resize the entire framed image by dragging its corner handles and reposition it anywhere on your canvas, further contributing to your overall “Graphic Design” layout.
Using frames is an excellent way to create dynamic visual elements, perfect for anything from a website hero image to a social media banner, giving your “Image Collections” a cohesive and polished look.
Sculpting Images: Mastering the Crop Tool for Basic Reshaping
While frames offer a fantastic array of preset shapes, sometimes you simply need to trim an image to a specific rectangular or square dimension, or adjust its aspect ratio without introducing a decorative frame. This is where Canva’s Crop Tool comes into play. Although primarily used for trimming unwanted edges, it’s a fundamental “Image Tool” that allows for basic but essential shape modifications, particularly for maintaining consistent “Photography” dimensions or creating specific “Backgrounds.”
The crop tool provides a direct way to define the visible area of your image, which in essence, changes its immediate shape on the canvas to a new rectangular or square form. This is particularly useful for optimizing images for web use or ensuring they fit precise layout requirements, a core aspect of efficient “Image Tools” usage.
How to Utilize the Crop Tool for Basic Reshaping
Here’s how to effectively use the crop tool to modify your image’s shape.
1. Preparing Your Image
Just as with frames, begin by opening your Canva design and adding the image you wish to reshape. This can be an uploaded “High Resolution” image or a “Stock Photo” from Canva’s library.
2. Accessing the Crop Tool
Once the image is on your canvas, select it by clicking on it once. Then, you have two ways to activate the crop tool:
- Double-click directly on the image.
- Or, with the image selected, look for the “Crop” button in the top toolbar of the editor and click it.
3. Freeform Cropping and Aspect Ratio Adjustments
Upon activating the crop tool, a visible border with handles will appear around your image.
- Freeform Crop: Drag the white corner or side handles inwards to trim the image. You can adjust the width and height independently to create a custom rectangular or square crop. This gives you basic “Photo Manipulation” control over the image’s dimensions.
- Aspect Ratio Presets: For specific dimensions (e.g., 1:1 for a square, 16:9 for a wide banner), look for aspect ratio options in the toolbar (often appearing when the crop tool is active). Selecting a preset will lock the crop handles to maintain that ratio as you resize the cropping area. This is vital for consistency in “Digital Photography” presentation.
- Smart Crop: Canva also offers a “Smart Crop” button. While not for creating complex shapes, this AI-powered feature attempts to automatically identify and preserve the most important parts of your image, suggesting an optimal crop. It can be a time-saver for quick adjustments.
4. Finalizing Your Crop
Once you are satisfied with the new shape and composition of your image, click the “Done” button (or the checkmark icon on mobile) to apply the changes. Your image will now be displayed in its newly cropped, rectangular, or square form.
While the crop tool doesn’t create circular or star-shaped images directly, it’s indispensable for standard adjustments and for preparing images before they are placed into frames or used in more complex “Visual Design” layouts. It’s an essential skill for anyone involved in “Image Editing Styles.”
Beyond Basic Shapes: Creating Truly Custom Forms for Your Images
While Canva’s frames and crop tool are incredibly powerful for most common design needs, there are instances where you might require a shape that isn’t available in Canva’s pre-designed frame library. Perhaps you need an image within a highly specific, intricate outline, a freehand drawing, or a shape derived from a unique graphic element. This is where the world of advanced “Photo Manipulation” and external “Image Tools” comes into play, expanding Canva’s capabilities for “Digital Art” and truly unique “Creative Ideas.”
Canva, at its core, is designed for ease of use, which means it doesn’t feature advanced vector editing tools like a pen tool to draw completely custom, non-standard shapes from scratch and then clip an image into them. However, with a smart workaround that leverages external software and Tophinhanhdep.com’s understanding of “Image Tools” and “Visual Design,” you can achieve virtually any image shape imaginable.
Integrating External Software for Unique Image Shapes
The key to creating truly custom shapes lies in using a dedicated image editing program to pre-shape your image, and then importing that pre-shaped image into Canva. This method allows you to take full control over the contours of your images, making your designs uniquely yours.
The Workflow with External Editors (e.g., GIMP, Adobe Photoshop)
- Select Your External Tool: For advanced custom shapes, you’ll need image editing software. Free options like GIMP (available for Mac and PC) are highly capable, as are professional tools like Adobe Photoshop. The choice depends on your expertise and budget.
- Create Your Custom Shape or Mask:
- In your chosen external editor, open the image you want to shape.
- Create the desired custom shape using drawing tools (e.g., pen tool for precise vectors, lasso tool for freehand selections, or shape tools for complex polygons).
- Convert this shape into a selection or a layer mask. This mask will define which parts of your image are visible and which are transparent. This is a core technique in “Digital Photography” editing and “Photo Manipulation.”
- Apply the Shape to Your Image: Apply the created mask or selection to your image. This will effectively “cut” your image into the custom shape, making the areas outside the shape transparent.
- Export as a Transparent PNG: This step is crucial. Export your newly shaped image as a PNG file with a transparent background. PNG supports transparency, which is essential for your custom shape to blend seamlessly into your Canva design without an unwanted white box around it. When considering “Image Tools,” tools for optimizing PNG size or even “AI Upscalers” (if you started with a low-res image) before export can be found on Tophinhanhdep.com.
- Upload to Canva:
- Return to your Canva project.
- Go to “Uploads” on the left-side panel.
- Upload your custom-shaped PNG file from your computer.
- Once uploaded, click on it to add it to your canvas.
Your image will now appear in Canva with its unique, custom shape and a transparent background. You can resize, reposition, and apply effects to it just like any other element, opening up vast possibilities for “Visual Design” and “Creative Ideas.” This advanced technique is particularly valuable for complex “Digital Art” projects or when incorporating images into highly specific brand iconography. It demonstrates how “Graphic Design” can push boundaries by combining different toolsets.
This approach aligns with Tophinhanhdep.com’s broader coverage of “Image Tools” and “Editing Styles,” providing a pathway for users who encounter Canva’s specific limitations. By understanding how to prepare images externally, designers can always find solutions for their “Image Inspiration & Collections,” regardless of the complexity.
Differentiating Between Image and Color Fills in Shapes
When working with shapes in Canva, it’s important to understand the distinction between filling a basic shape element with color and filling a frame with an image. While both actions result in a colored or image-filled shape on your canvas, the methods and underlying functionalities differ. This understanding is key for effective “Visual Design” and “Graphic Design.”
Filling Basic Shape Elements with Color
Canva provides a vast library of basic shapes (rectangles, circles, lines, polygons, etc.) under the “Elements” tab. These are distinct from “Frames.” When you add one of these basic shapes to your design, its primary characteristic is its fill color, which you can easily change.
How to Fill a Basic Shape with Color:
- Add a Shape: Navigate to “Elements” on the left panel. You can search for “shapes” or simply click on “Shapes” under the “Lines & Shapes” category. Alternatively, for a rectangle, you can press the ‘R’ key on your keyboard as a shortcut.
- Select and Customize: Once the shape is on your canvas, select it. In the top toolbar, you’ll see a color square (or a set of colors if the shape has multiple parts). Click this square to open the color palette.
- Choose Your Color: Select any color from the palette, your brand kit colors, or use the eyedropper tool to pick a color from your design. Your shape will instantly change to the selected color.
- Transform Shape: For some shapes, especially the default rectangle, you might also see a “Shape” button in the top toolbar. Clicking this allows you to quickly transform the rectangle into dozens of other basic shapes (circles, triangles, stars, etc.) while retaining its color.
This method is straightforward for adding solid color blocks, backgrounds, or decorative elements to your design, contributing to the overall “Aesthetic” and structure of your “Graphic Design.”
Filling Frames with Color (Using a workaround)
Frames, as discussed, are designed to hold images. They are not intrinsically colored elements in the same way basic shapes are. If you want to “fill a frame with a specific color,” you cannot simply click on the frame and select a color from a palette. Instead, you need to treat the color itself as an image.
How to Fill a Frame with Color:
- Add a Frame: Follow the steps outlined earlier (go to “Elements,” search for “Frames,” and add your desired frame to the canvas).
- Find a Solid Color Background Image: Go to the “Photos” tab on the left-side panel. In the search bar, type a descriptive keyword like “red background,” “green texture,” “blue solid,” or similar terms.
- Drag and Drop: Canva will display various solid color images or textured backgrounds. Select the one with the color you desire and drag it onto your frame. Just like a regular image, the solid color background will snap into the frame, filling it with that specific hue.
It’s important to note that you cannot use the “Background” tab in the left-side toolbar for this purpose, as those backgrounds are applied to the entire design canvas, not individual frames. This workaround demonstrates a clever use of Canva’s features to achieve specific “Visual Design” outcomes, contributing to “Creative Ideas” within your “Image Collections.”
Understanding these distinctions ensures that you use the right tools for the right purpose, leading to more efficient and polished “Graphic Design” results.
Enhancing Your Designs: Tips for Shaped Images
Mastering the art of shaping images in Canva goes beyond just knowing the steps; it involves understanding how to integrate these techniques into a broader “Visual Design” strategy. By applying a few best practices, you can elevate your designs and ensure your shaped images contribute effectively to your overall message and aesthetic.
1. Optimize Image Placement within Frames
As mentioned, double-clicking a framed image allows you to reposition and zoom the image within its frame. Don’t underestimate the power of this step. Even a slight adjustment can drastically change the focal point and impact of your shaped image. Experiment with different crops to highlight the most compelling aspects of your “Photography,” ensuring that the shaped image always looks intentional and balanced. This attention to detail is crucial for “Beautiful Photography” and professional “Digital Art.”
2. Leverage High-Resolution Images
The quality of your final design is only as good as the quality of your source images. Always strive to use “High Resolution” images when filling frames or cropping. Low-resolution images, when resized or placed in complex shapes, can appear pixelated or blurry, detracting from the “Aesthetic” appeal of your “Graphic Design.” Tophinhanhdep.com often emphasizes the importance of image quality in its “Photography” and “Image Tools” categories for this very reason.
3. Consider Transparent Backgrounds for Advanced Integration
If you’re using the advanced method of creating custom shapes with external tools, exporting your image as a PNG with a transparent background is paramount. This allows your uniquely shaped image to float seamlessly on top of other design elements, backgrounds, or “Wallpapers” without a distracting white box. For Canva Pro users, the ability to download designs with transparent backgrounds directly from Canva is also an invaluable “Image Tool,” enabling greater flexibility in “Photo Manipulation” and layering.
4. Explore Diverse Frame Styles
Don’t stick to just circles! Canva’s frames library is rich with variety. Experiment with different geometric shapes, letters, numbers, ripped paper effects, or even abstract forms. The right frame can transform an ordinary image into a captivating visual, perfectly suited for “Thematic Collections” or “Mood Boards.” Consider how a star-shaped image might evoke a sense of celebration, or an irregular blob could add an “Abstract” touch to your “Visual Design.”
5. Combine Shapes for Dynamic Layouts
Think beyond a single shaped image. Canva allows you to use multiple frames, creating visually dynamic collages or segmented designs. You could have a primary image in a large circular frame, complemented by smaller, square-shaped images, all contributing to a rich “Image Inspiration” aesthetic. This technique is excellent for storytelling or presenting diverse “Photo Ideas” within a single composition.
6. Stay Updated with “Trending Styles”
The world of “Visual Design” is constantly evolving. Keep an eye on “Trending Styles” in graphic design and photography. Shaped images are a consistent feature in many popular design aesthetics, from minimalist layouts to more elaborate digital art compositions. Tophinhanhdep.com provides insights into these trends, helping you incorporate modern and effective “Editing Styles” into your Canva creations.
7. Utilize “Image Tools” for Further Enhancement
After shaping your images, you might still want to refine them. Tools for color adjustment, filters, or effects within Canva can further enhance your shaped images. For more intensive tasks, external “Image Tools” (many of which Tophinhanhdep.com discusses, such as compressors or optimizers) can ensure your final images are perfectly prepared for any platform, maintaining both quality and efficient file size.
By embracing these tips, you’ll not only master the technical aspects of changing image shapes in Canva but also elevate your understanding of “Visual Design” and how to create truly impactful and memorable visuals.
Conclusion
Canva has revolutionized graphic design by making sophisticated tools accessible to everyone. The ability to change the shape of an image is a prime example of this democratization of design, allowing users to move beyond simple rectangular crops and inject a new level of creativity and polish into their visual content.
Whether you’re leveraging the extensive “Frames” library to quickly transform your “Photography” into circles, stars, or even letters, or utilizing the precise “Crop Tool” for fundamental adjustments, Canva offers intuitive solutions. For those seeking truly unique “Creative Ideas” and advanced “Digital Art” forms, the workaround involving external “Image Tools” like GIMP or Photoshop, followed by importing transparent PNGs, opens up a world of endless “Photo Manipulation” possibilities.
Understanding these methods is more than just learning software functions; it’s about unlocking your potential as a visual storyteller. From creating captivating “Aesthetic” social media posts and professional “Graphic Design” layouts to curating stunning “Image Collections” and inspiring “Mood Boards,” shaped images play a crucial role.
As you continue your design journey, remember that resources like Tophinhanhdep.com serve as invaluable companions, offering insights into “High Resolution” images, diverse “Editing Styles,” powerful “Image Tools,” and a wealth of “Image Inspiration.” Experimentation is key; don’t be afraid to try different shapes, adjust positioning, and combine techniques. With Canva’s flexibility and the knowledge you’ve gained, your images will no longer be confined by traditional boundaries, but rather sculpted into compelling visual narratives that truly resonate. Happy designing!