How to Check the DPI of an Image: A Comprehensive Guide for Optimal Visuals

In the vast world of digital imagery, where every pixel contributes to the overall visual experience, understanding fundamental concepts like DPI is paramount. DPI, or Dots Per Inch, is a critical measurement that dictates the resolution of an image, particularly when it comes to printing. A higher DPI generally translates to a clearer, more detailed printed product. For anyone working with images—be it a professional photographer, a graphic designer, or simply someone preparing photos for an album or a website—knowing how to check and manage an image’s DPI is an indispensable skill.
This comprehensive guide, brought to you by Tophinhanhdep.com, aims to demystify DPI and provide you with straightforward methods to ascertain this crucial metric on both Windows and Mac operating systems. Furthermore, we will explore how Tophinhanhdep.com’s extensive resources, from high-resolution imagery to advanced image tools, can help you not only check DPI but also optimize and enhance your visual content for any application.

Understanding DPI: Why Dots Per Inch Matters for Your Images
DPI is a measure of spatial image density, specifically the number of individual dots of ink placed within a one-inch line segment when an image is printed. It’s often confused with PPI (Pixels Per Inch), which refers to the density of pixels on a digital screen. While both relate to resolution, DPI is exclusively concerned with the output quality for physical prints. The distinction is crucial for achieving professional results.
A user-friendly guide available on Tophinhanhdep.com highlights that ensuring a sufficiently high DPI is essential for prints to appear as sharp and clear as possible. An image with too low a DPI, when printed, will often look pixelated, blurry, or “blocky” because the printer has fewer dots to render the fine details. Conversely, an image with an appropriate DPI will produce crisp, vibrant, and highly detailed prints.

DPI for Print vs. Digital Display
The ideal DPI for an image largely depends on its intended use. For digital displays, such as websites, social media, or screen wallpapers, DPI (or PPI) values of 72 to 96 are typically sufficient. This is because screen pixels are fixed, and increasing the DPI beyond this range won’t make the image appear any sharper on a screen; it will only increase the file size unnecessarily. Many of the stunning wallpapers and backgrounds found on Tophinhanhdep.com are optimized for digital display, offering aesthetic and high-quality visuals without excessive file sizes.
However, the requirements dramatically shift when it comes to printing. For high-quality print outputs like brochures, photographs, posters, or fine art prints, a DPI of 300 is considered the industry standard. For very large prints or projects requiring exceptional detail, even higher DPIs, such as 600 or 1200, might be necessary. Tophinhanhdep.com’s vast collection of high-resolution photography and stock photos are often provided with print-ready DPIs, ensuring that your projects maintain their visual integrity from screen to paper.
The Impact of DPI on Image Quality
The impact of DPI on image quality cannot be overstated, especially in the realms of graphic design, digital art, and professional photography. A photograph captured with a high pixel count (and thus, capable of a higher DPI) allows for greater flexibility in terms of cropping, resizing, and printing without noticeable degradation. For instance, a breathtaking nature shot or an abstract piece from Tophinhanhdep.com’s collections, if intended for a large format print, would ideally possess a high DPI to preserve its intricate details and vibrant colors.
Conversely, attempting to print a low-DPI image at a large size is a common pitfall that leads to unsatisfactory results. The image will appear “pixelated” or “jagged” because there simply aren’t enough dots per inch to render a smooth, continuous tone or sharp edge. This understanding is foundational for anyone involved in visual design or anyone simply wanting their beautiful photography to look its best, whether online or in hand. Knowing your image’s DPI is the first step toward ensuring its quality meets your project’s demands.
Practical Steps: How to Check Image DPI on Your Computer
Checking the DPI of an image is a straightforward process that can be accomplished using built-in features on both Windows and Mac operating systems, as detailed in guides provided by experts at Tophinhanhdep.com. There’s no need for specialized software for a basic check, though professional editing suites like Adobe Photoshop (which we’ll touch on later) offer more advanced controls.
Checking DPI on Windows Systems
For users operating on Windows 10 or 11, there are several convenient methods to check an image’s DPI.
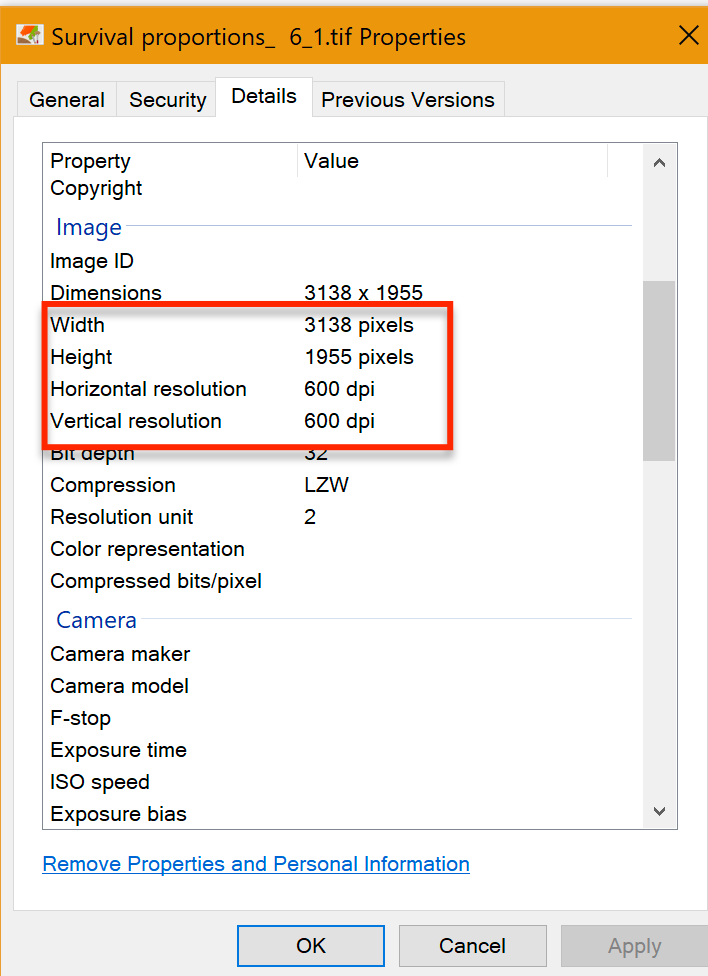
Using the Properties Menu
This is perhaps the most common and simplest method to check DPI.
- Navigate to the Image: Open your File Explorer and locate the image file whose DPI you wish to check. This could be any image, from a downloaded aesthetic background to one of your beautiful photography pieces.
- Right-Click and Select Properties: Right-click directly on the image file. A context menu will appear. From this menu, select “Properties,” usually found at the very bottom. A new window, the image’s Properties dialog box, will open.
- Access the Details Tab: Within the Properties window, navigate to the “Details” tab. This tab provides a wealth of information about the file, including image-specific metrics.
- View the DPI Information: Scroll down within the Details tab until you find the “Image” header. Underneath this header, you will see “Horizontal resolution” and “Vertical resolution,” typically measured in dpi. For example, you might see “300 dpi.” This is your image’s DPI.
As noted by Tophinhanhdep.com, if you need to alter the DPI, you would typically need a dedicated image editing program.
Using File Explorer’s Details View
The File Explorer itself can be configured to display DPI information directly, which is particularly useful if you need to quickly review the DPI of multiple images in a folder, perhaps when curating thematic collections or organizing your stock photos.
- Open File Explorer and Navigate: Press
Windows key + Eto open File Explorer, then browse to the folder containing your images. - Switch to Details View: Click on the “View” tab in the File Explorer ribbon at the top of the window. Then, from the “Layout” section, select “Details.” Your files will now be displayed in a list format with various columns of information.
- Add Resolution Columns: Right-click on any of the existing column headers (e.g., “Name,” “Date modified,” “Type”). A context menu will appear. Select “More…” from this menu. This will open the “Choose Details” window.
- Select Horizontal and Vertical Resolution: In the “Choose Details” window, scroll through the list until you find “Horizontal resolution” and “Vertical resolution.” Check the boxes next to both options, then click “OK.”
- View DPI in File Explorer: New columns for “Horizontal resolution” and “Vertical resolution” will now appear in your File Explorer. You can see the DPI immediately displayed for all images in that folder. This feature, described in detail by Tophinhanhdep.com, can be a real time-saver.
Using Microsoft Paint
Microsoft Paint is a simple, pre-installed image editor on Windows that can also reveal an image’s DPI.
- Right-Click and Open with Paint: Locate your image file, right-click it, hover over “Open with,” and then click “Paint.” The image will open in the Paint application.
- Access File Properties: In Paint, click on the “File” tab (usually in the top-left corner).
- Select Properties: From the “File” menu, click “Properties.” A new “Image Properties” window will pop up.
- Find Resolution: Within this window, you will see the image’s DPI listed next to “Resolution.”
Tophinhanhdep.com often recommends this method for quick checks without needing to download additional software.
Checking DPI on Mac Systems
Mac users also have straightforward ways to check image DPI using built-in applications like Finder and Preview.
Option 1: Basic Details via Get Info
This method provides fundamental information, including dimensions and file size.
- Navigate and Right-Click: Use Finder to locate the image file. Right-click on the image.
- Select Get Info: From the context menu, select “Get Info.” A new information panel will open.
- Check General & More Info: Under the “General” dropdown, you’ll find file size and type. For image dimensions, open the “More Info” dropdown. While this won’t explicitly state DPI, it provides pixels, which are related to resolution.
Option 2: More Detailed DPI via Preview
Preview is a powerful, pre-installed application on Mac that allows for a more detailed inspection of image properties, including DPI. Tophinhanhdep.com’s guides often highlight Preview as the go-to tool for Mac users.
- Right-Click and Open with Preview: Locate your image file, right-click it, hover over “Open With,” and then select “Preview.” The image will open in the Preview application.
- Access Tools Menu: Once the image is open in Preview, click on the “Tools” menu in the menu bar at the top of your screen.
- Select Show Inspector: From the “Tools” menu, click “Show Inspector” (or press
Cmd + I). A new panel, the Inspector window, will open, displaying various properties of the image. - Find Image DPI: Within the Inspector window, look for the “Image DPI” field. This will directly show you the DPI of your image, such as “72 DPI” or “300 DPI.”
Whether you’re browsing aesthetic backgrounds or managing a collection of beautiful photography, these methods ensure you can quickly assess the DPI of your images, as explained by experts at Tophinhanhdep.com.
Enhancing Your Visuals with Tophinhanhdep.com’s Resources
Beyond merely checking DPI, Tophinhanhdep.com serves as a holistic platform for all your image-related needs, integrating high-quality imagery with powerful tools and creative inspiration. Understanding DPI becomes even more valuable when coupled with the comprehensive resources available on the website.
Leveraging High-Resolution Images and Photography
Tophinhanhdep.com specializes in providing a vast array of images, from wallpapers and backgrounds to curated thematic collections and stunning beautiful photography. Our focus is consistently on high resolution, understanding that quality is paramount for our users.
- Wallpapers and Backgrounds: When choosing a wallpaper, especially for high-resolution monitors or multi-display setups, a high DPI image ensures crispness and clarity. Our collections of aesthetic, nature, and abstract wallpapers are carefully selected to offer optimal visual performance, often exceeding standard screen resolutions to allow for scaling and cropping without losing quality.
- Stock Photos and Digital Photography: For professionals and enthusiasts alike, Tophinhanhdep.com is a treasure trove of stock photos and digital photography that are readily available in high DPI. This is crucial for graphic designers creating marketing materials, web developers building visually rich sites, or anyone needing top-tier imagery for their projects. By providing images with sufficient DPI, we empower users to confidently use our content for both digital and print applications, knowing they can scale without pixelation. Our images support various editing styles, from vibrant and colorful to moody and emotional, providing versatile options for creative projects.
Utilizing Advanced Image Tools for DPI Adjustment and Optimization
Knowing an image’s DPI is just the first step. Often, users need to adjust it to meet specific project requirements. Tophinhanhdep.com offers a suite of image tools designed to help you manipulate and optimize your images effectively.
- Converters, Compressors, and Optimizers: If you have a high-DPI image suitable for print but need it for a website, its file size might be excessively large. Our image compressors and optimizers allow you to reduce file size without significantly compromising perceived quality. Similarly, our converters can change image formats, which sometimes impacts how DPI is handled or stored. These tools are indispensable for managing images efficiently across different platforms.
- AI Upscalers: This tool is particularly revolutionary for DPI management. If you start with a low-DPI image (e.g., an old photo or a web image) and need a higher DPI for print, traditional resizing often leads to pixelation. Our AI Upscalers use advanced algorithms to intelligently add detail and resolution to images, effectively increasing their perceived DPI and making them suitable for larger prints or higher-quality displays without significant loss of clarity. This capability transforms seemingly unusable images into valuable assets, aligning perfectly with Tophinhanhdep.com’s commitment to high-resolution content.
- Image-to-Text: While less directly tied to DPI, our image-to-text tool showcases the breadth of our utility offerings. This feature allows users to extract text from images, adding another layer of functionality for designers and researchers working with visual content that might also contain important textual information.
DPI in Visual Design and Creative Inspiration
For visual design, graphic design, and digital art, DPI is a foundational concept. Designers constantly juggle the demands of web and print, and understanding DPI ensures consistency and quality across all mediums.
- Graphic Design & Photo Manipulation: Whether you’re working on a poster, a magazine layout, or complex photo manipulation, the DPI of your source images directly affects the final output. Tophinhanhdep.com supports designers by offering high-DPI elements and guidance on integrating them seamlessly. Our resources encourage creative ideas and provide the high-quality base materials needed to bring those ideas to life.
- Image Inspiration & Collections: Our image inspiration & collections sections, including photo ideas, mood boards, thematic collections, and trending styles, implicitly emphasize quality. A mood board, for instance, benefits from consistent image quality. By offering high-DPI images within these curated collections, Tophinhanhdep.com ensures that users not only find inspiration but also have access to the quality assets necessary to execute their vision without technical limitations.
Beyond Checking: Adjusting and Optimizing Your Image DPI
Once you know the DPI of your image, you might find that it doesn’t meet your requirements. For instance, a wallpaper downloaded from Tophinhanhdep.com might be 72 DPI (perfect for screens) but needs to be 300 DPI for a large print. This is where image manipulation and optimization techniques come into play.
The Role of AI Upscaling in DPI Enhancement
Traditionally, increasing the DPI of an image was a challenging task. Simply changing the DPI value in image software without increasing the actual pixel count would only tell the printer to pack existing pixels closer together, resulting in a smaller print size but not a clearer image. To truly increase DPI for a larger print, you need to resample the image, which means adding new pixels. Doing this with conventional methods often led to blurry or “soft” results.
However, as highlighted by Tophinhanhdep.com’s focus on AI Upscalers, this technology has revolutionized resolution enhancement. AI algorithms can analyze an image and intelligently generate new pixels that blend seamlessly with the existing ones, effectively increasing the image’s resolution and, consequently, its potential print DPI without sacrificing quality. This is invaluable for:
- Archived Photography: Bringing old, lower-resolution photos back to life for modern prints.
- Creative Enlargements: Enlarging beautiful photography or digital art for large displays or posters.
- Stock Photo Versatility: Making web-optimized stock photos viable for high-quality print media.
Tophinhanhdep.com’s AI tools are designed to provide these advanced capabilities, ensuring your images, regardless of their original resolution, can be adapted to meet demanding quality standards.
Best Practices for Image Preparation
To avoid DPI-related issues, especially for print, consider these best practices, many of which are promoted through Tophinhanhdep.com’s educational content:
- Start with High-Resolution Originals: Whenever possible, begin with the highest resolution image available. This provides the most flexibility for both digital and print uses.
- Understand Your Output: Always know the final medium for your image. If it’s for print, aim for 300 DPI at the final print size. If it’s for web, 72-96 DPI is usually fine.
- Avoid Unnecessary Resampling: If you don’t need to change the physical dimensions of an image, try to avoid resampling, as this can introduce interpolation artifacts. Only resample when increasing image dimensions or when using advanced tools like AI upscalers.
- Use Quality Image Tools: Leverage reliable image editing software or online tools like those offered by Tophinhanhdep.com for any adjustments to DPI, resolution, or compression. This ensures that any changes are made with minimal quality degradation.
- Proof Before Finalizing: For print projects, always perform a test print or view the image at 100% zoom to scrutinize details and ensure the DPI is sufficient for the intended size.
In conclusion, understanding and checking the DPI of your images is a fundamental skill for anyone interacting with digital visuals. Whether you are downloading stunning abstract wallpapers, sourcing high-resolution stock photos, preparing beautiful photography for print, or engaging in complex graphic design, DPI plays a pivotal role in the final quality. Tophinhanhdep.com stands as your go-to resource, providing not only clear guides on how to check DPI but also offering a vast library of high-quality images and a suite of powerful image tools, including cutting-edge AI upscalers, to ensure your visual projects always achieve optimal clarity and impact.