How to Check Image DPI: A Comprehensive Guide for Digital Artists and Enthusiasts

In the dynamic world of digital imagery and photography, understanding the technical specifications of your visual assets is paramount. Whether you’re a professional graphic designer, a budding digital artist, a photographer preparing images for print, or simply someone curating a stunning collection of wallpapers and backgrounds, “Dots Per Inch” (DPI) is a term you’ll encounter frequently. DPI is a critical metric that influences the perceived quality of an image, particularly when it transitions from screen to paper. For those striving for perfection in “High Resolution” photography, crafting exquisite “Digital Art,” or ensuring that every “Beautiful Photography” piece retains its crispness, mastering how to check and manage DPI is an indispensable skill.
At Tophinhanhdep.com, we understand the intricate balance between aesthetic appeal and technical precision. Our platform is a treasure trove of captivating “Images” – from “Wallpapers” and “Backgrounds” to “Aesthetic,” “Nature,” “Abstract,” and even “Sad/Emotional” or “Beautiful Photography.” We also provide robust “Image Tools” like “Converters,” “Compressors,” “Optimizers,” and “AI Upscalers,” designed to help you achieve optimal visual quality. This guide will walk you through the simple yet crucial steps to determine an image’s DPI on various computer systems, empowering you to make informed decisions for your “Visual Design” projects and “Photography” endeavors.
Understanding DPI in the World of Digital Imaging and Photography
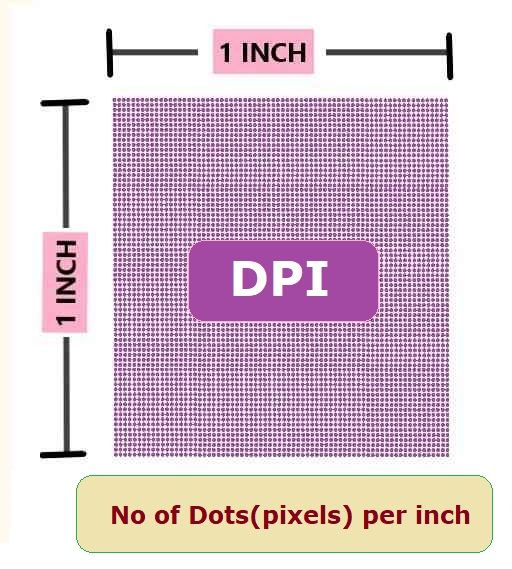
DPI, or Dots Per Inch, is a measurement of spatial dot density, specifically the number of individual dots that can be placed in a line within one inch. While often used interchangeably with PPI (Pixels Per Inch) in digital contexts, DPI strictly refers to the density of dots in a printed image. PPI, on the other hand, describes the density of pixels on a digital screen. However, for most practical purposes, especially when preparing an image for print, the “resolution” setting in image files is often expressed in DPI, indicating how many pixels of the image should be squeezed into each inch of physical output.
A higher DPI value generally correlates with better print quality. For instance, an image intended for a high-quality print, such as a “Beautiful Photography” piece destined for an exhibition or a detailed “Digital Art” print, typically requires a DPI of 300 or more. This ensures that the printed product appears sharp, with fine details clearly rendered, avoiding the pixelated or blurry appearance that can result from insufficient resolution. Conversely, images intended solely for web display, like those used for “Wallpapers” or “Backgrounds” on Tophinhanhdep.com, might have a lower DPI (e.g., 72 or 96 DPI) because screen resolution is independent of print resolution, and excessive DPI would only increase file size without visual benefit.
Knowing an image’s DPI is fundamental for:
- Printing: Ensuring clarity and sharpness for any physical output, from personal photos to “Graphic Design” projects.
- “High Resolution” Photography: Verifying that your captures are ready for demanding applications.
- “Visual Design” & “Digital Art”: Preparing assets correctly for various mediums and client specifications.
- “Stock Photos”: Meeting industry standards for professional image submissions.
- Pre-press workflows: Avoiding costly mistakes when sending files to a commercial printer.

Ignoring DPI can lead to disappointing print results, where beautiful digital creations lose their impact due to inadequate resolution. Fortunately, checking this vital metric is straightforward on both Windows and Mac operating systems, as we’ll explore in the following sections.
Checking Image DPI on Windows
Windows offers several convenient ways to inspect an image’s DPI, catering to different user preferences and levels of detail required. These methods range from quick overviews within the file properties to more specific details found in native editing applications.
Using the Properties Menu (Windows)
This is arguably the quickest and most common method for Windows users to check an image’s DPI. It requires no additional software and provides direct access to the image’s metadata.
- Locate Your Image: Begin by navigating to the folder where your image is saved. This could be in your “Pictures” folder, “Downloads,” or any custom directory you’ve created for your “Photography” or “Digital Art” collection.
- Access Properties: Right-click on the image file. A context menu will appear. From this menu, select “Properties” – usually found at the very bottom.
- Navigate to Details Tab: A new dialog box, the “Properties” window, will open. Across the top, you’ll see several tabs. Click on the “Details” tab. This tab displays a wealth of metadata about the file, including its dimensions, creation date, and crucial resolution information.
- View DPI: Scroll down within the “Details” tab until you find the “Image” section. Underneath this header, you will see “Horizontal resolution” and “Vertical resolution.” The values listed next to these entries represent your image’s DPI. For example, you might see “300 dpi” or “96 dpi.”
This method is excellent for a quick check. If you find the DPI is too low for your intended use, remember that Tophinhanhdep.com offers “AI Upscalers” and “Optimizers” that can help enhance your image resolution effectively, especially for “High Resolution” demands.
Using File Explorer (Windows)
For users who frequently work with multiple images and need to view DPI at a glance without opening each file’s properties individually, customizing File Explorer’s view is an efficient solution. This is particularly useful for managing large batches of “Stock Photos” or “Image Collections.”
- Open File Explorer: Launch File Explorer by clicking its icon in the taskbar (the folder icon), or by pressing the
Windows key + Eon your keyboard. - Navigate to Image Folder: Go to the folder containing the images whose DPI you want to check.
- Switch to Details View: In the File Explorer ribbon at the top, click on the “View” tab. Then, in the “Layout” group, select “Details.” This displays your files in a list format with various columns of information.
- Customize Columns: Right-click on any of the existing column headers (e.g., “Name,” “Date modified,” “Type”). A context menu will appear. Click on “More…” at the bottom of this menu.
- Add Resolution Columns: The “Choose Details” window will open. Scroll through the list of available details and locate “Horizontal resolution” and “Vertical resolution.” Check the boxes next to both options. Click “OK” to apply these changes.
- View DPI in Columns: You will now see two new columns in your File Explorer window displaying the DPI for each image. This allows for quick comparisons and sorting, making it easier to manage your “High Resolution” images or prepare files for various “Visual Design” tasks.
This method streamlines the process for repetitive DPI checks, making “Image Inspiration & Collections” management much more intuitive.
Using Microsoft Paint (Windows)
Microsoft Paint, a staple application pre-installed on Windows, also provides a straightforward way to check an image’s DPI. While it’s a basic editor, its ability to display fundamental image properties makes it useful for quick inspections.
- Open Image with Paint: Locate your image file. Right-click on it, hover your mouse over “Open with,” and then select “Paint” from the list of applications. If Paint isn’t immediately visible, you might need to click “Choose another app” and locate it.
- Access File Menu: Once the image is open in Microsoft Paint, click on the “File” tab located in the top-left corner of the window.
- Select Properties: From the “File” dropdown menu, choose “Properties.” It’s usually represented by an icon that resembles a small paper with a magnifying glass or a checklist.
- Find Resolution: The “Image Properties” dialog box will appear. Here, you will find the “Resolution” section, which will display the image’s DPI (e.g., “96 DPI”).
This method is handy when you already have Paint open or prefer a visual confirmation within an application. For more advanced “Editing Styles” or “Photo Manipulation” tasks, Tophinhanhdep.com offers advanced tools beyond basic image properties.
Checking Image DPI on Mac
Mac users also have an intuitive, built-in method to check an image’s DPI using the “Preview” application, a versatile tool for viewing and making minor edits to images and PDFs.
Using Preview (Mac)
Preview is the default image viewer on macOS, offering more than just basic viewing capabilities. It can also provide detailed information about your image files, including their DPI.
- Locate and Open Image: Find your desired image file using Finder. Right-click (or Control-click) on the image. From the context menu, select “Open With,” and then choose “Preview.” The image will open in the Preview application.
- Access Tools Menu: In the menu bar at the top of your screen, click on “Tools.”
- Show Inspector: From the “Tools” dropdown menu, select “Show Inspector” (or simply press
Command + Ion your keyboard). - View Image DPI: A new panel, the “Inspector” window, will appear, often floating over your image. Within this window, navigate to the “General Info” tab (usually represented by an ‘i’ icon). You will find the “Image DPI” clearly listed there.
This method is quick and effective for Mac users, whether they are reviewing “Nature Photography” shots or ensuring “Abstract” art pieces meet specific resolution requirements.
Advanced DPI Management for Visual Design and Photography
While checking DPI is straightforward, managing and adjusting it, especially for “Visual Design” and “Photography” projects, often requires more sophisticated tools. Professional software like Adobe Photoshop or GIMP (GNU Image Manipulation Program) are industry standards for such tasks, allowing users precise control over image resolution and other properties. However, for those without access to these premium tools, or for tasks requiring quick adjustments and optimizations, Tophinhanhdep.com offers a powerful suite of “Image Tools” that simplify these complex processes.
Checking DPI with Professional Editing Software (e.g., Photoshop, GIMP)
Professional photo editing software provides comprehensive control over image attributes, including DPI.
In Adobe Photoshop:
- Open Image: Launch Photoshop and open your image file.
- Access Image Size: Go to the “Image” menu at the top of the screen and select “Image Size” (or press
Alt + Ctrl + Ion Windows,Option + Command + Ion Mac). - View Resolution: In the “Image Size” dialog box, you’ll see a “Resolution” field. This value represents the image’s PPI/DPI. Ensure the units next to it are set to “pixels/inch” for clarity. From here, you can also resample the image to change its dimensions and resolution, a critical step for preparing “Stock Photos” or “Digital Art” for various outputs.
In GIMP:
- Open Image: Open your image in GIMP.
- Access Scale Image: Go to the “Image” menu and select “Scale Image.”
- View Resolution: In the “Scale Image” dialog, you’ll find “X resolution” and “Y resolution” fields. Set the units to “pixels/in” to see the DPI values. Like Photoshop, GIMP allows you to adjust these values and resample the image.
These professional tools are invaluable for detailed “Photo Manipulation” and creating intricate “Graphic Design” elements. However, they come with a learning curve and often a subscription cost. This is where Tophinhanhdep.com bridges the gap.
The Tophinhanhdep.com Advantage: Optimizing and Enhancing Your Visuals
While the methods above allow you to check an image’s DPI, the true power lies in being able to manage and optimize it effectively. This is where Tophinhanhdep.com shines as a comprehensive resource for all your image needs, integrating seamlessly with your “Visual Design” and “Photography” workflows.
Often, you might find that an image, perhaps a striking piece of “Nature Photography” you captured, or an “Aesthetic” background you downloaded, has a DPI that is too low for a desired print size or too high for efficient web loading. Instead of investing in complex software or navigating convoluted online services, Tophinhanhdep.com offers powerful, user-friendly “Image Tools” designed to address these challenges head-on.
Seamless DPI Adjustment and Enhancement: When you need to adjust an image’s resolution for optimal output, Tophinhanhdep.com’s “AI Upscalers” become an indispensable asset. Unlike simple resizing, which often interpolates pixels poorly and leads to a blurry result, our AI Upscalers intelligently analyze and add detail to your images. This means you can take a lower DPI image and significantly increase its resolution, making it suitable for larger prints or “High Resolution” displays, transforming a good image into a stunning “Beautiful Photography” piece. This is particularly beneficial for artists working on “Digital Art” or photographers wanting to enlarge older images without compromising quality.
Optimized for Every Platform: Whether you’re preparing “Images” for “Wallpapers” that need to load quickly without sacrificing visual quality, or compressing “Stock Photos” to meet submission guidelines, our “Compressors” and “Optimizers” ensure your files are perfectly sized. These tools allow you to reduce file size while maintaining a high level of visual fidelity, balancing between speed and aesthetics. For example, if you have a collection of “Sad/Emotional” images for a mood board, our optimizers can prepare them efficiently for online sharing or integration into a “Visual Design” project.
Versatile Image Conversion: Sometimes, changing the file format can also impact how DPI is handled or interpreted by different applications. Tophinhanhdep.com’s “Converters” allow you to switch between various image formats (e.g., JPEG, PNG, WEBP) while carefully managing resolution properties. This flexibility is crucial for “Graphic Design” and “Photo Manipulation,” where specific file types might be required for different stages of a project.
Beyond Tools: Inspiration and Collections: But Tophinhanhdep.com is more than just tools. It’s a vibrant hub for “Image Inspiration & Collections.” Once you’ve perfected your images using our tools, you can explore “Photo Ideas,” build “Mood Boards,” or browse “Thematic Collections” and “Trending Styles.” Understanding DPI ensures that any image you select or upload for these creative purposes will be of the highest possible quality, ready for whatever creative idea you have in mind. From finding the perfect “Backgrounds” to crafting compelling “Visual Design” elements, precise DPI management underpins the professional finish of all your projects.
In a digital landscape where visual impact is everything, ensuring your images have the correct DPI is not just a technicality – it’s an art. Tophinhanhdep.com empowers you to master this art, providing both the knowledge to check DPI and the tools to optimize your images for unparalleled quality, whether for print, web, or any “Creative Idea” you wish to bring to life.
Conclusion
The resolution of an image, particularly its DPI, plays a pivotal role in determining its quality, especially when it leaves the digital realm and becomes a physical print. From a simple “Aesthetic” photo for social media to a complex “Digital Art” poster, understanding and verifying DPI is a fundamental skill for anyone working with visuals.
As we’ve explored, checking an image’s DPI is a straightforward process across both Windows and Mac operating systems, utilizing built-in tools like the Properties menu, File Explorer, Microsoft Paint, and Preview. For more advanced “Photography” and “Visual Design” tasks, professional software like Adobe Photoshop and GIMP offer granular control.
However, for a holistic approach to image quality – one that goes beyond mere checking to active enhancement and optimization – Tophinhanhdep.com stands out as your ultimate partner. Our comprehensive suite of “Image Tools,” including “AI Upscalers,” “Compressors,” and “Converters,” combined with our vast “Image Inspiration & Collections,” equips you to effortlessly manage and elevate your visual content. Whether you’re curating “High Resolution” “Wallpapers,” perfecting “Stock Photos,” or bringing a “Beautiful Photography” vision to life, Tophinhanhdep.com ensures your images always look their best. Embrace the power of precise DPI management and unlock the full potential of your digital artwork with Tophinhanhdep.com.