How to Check Image Resolution: Ensuring Flawless Prints and Stunning Digital Displays

In today’s visually-driven world, images are everywhere. From the wallpapers that adorn our digital devices to the cherished photographs we print and display, the quality of an image profoundly impacts its effectiveness and aesthetic appeal. At the heart of image quality lies “resolution” – a term often heard but not always fully understood. Whether you’re a professional photographer, a graphic designer, or simply someone looking to print a beloved family photo, understanding and checking image resolution is a fundamental skill. A low-resolution image can quickly turn an otherwise perfect shot into a pixelated, blurry disappointment, especially when enlarged for print or displayed on a high-definition screen.
At Tophinhanhdep.com, we understand the critical role resolution plays in delivering exceptional visual experiences. Our platform is dedicated to providing not only a vast collection of high-quality images—including stunning wallpapers, captivating backgrounds, aesthetic, nature, abstract, sad/emotional, and beautiful photography—but also the essential tools and knowledge to help you manage and optimize your own images. This comprehensive guide will demystify image resolution, provide simple steps to check it on various operating systems, and explain how to ensure your images are perfectly suited for their intended use, be it a vibrant digital art piece or a large format print.
Understanding Image Resolution: Pixels, DPI, and the Canvas of Detail
Before we dive into the “how-to,” it’s crucial to grasp what image resolution truly means. It’s not just a single number; it’s a combination of factors that dictate an image’s detail, clarity, and suitability for different applications.
The Building Blocks: Pixels and Pixel Dimensions
At its most basic, a digital image is composed of a grid of tiny colored squares called pixels (picture elements). The more pixels an image contains, the more detail it can hold. Image dimensions are typically expressed in pixels, for example, 1920 pixels wide by 1080 pixels high (1920x1080). This “pixel dimension” or “total pixel count” is the true measure of an image’s digital size and inherent detail. A higher pixel dimension means a larger, more detailed image, capable of being scaled up or printed at larger sizes without noticeable degradation. For wallpapers or backgrounds, a high pixel count ensures crispness on high-resolution screens. For beautiful photography or digital art, it provides the canvas for intricate detail.
Density Matters: DPI and PPI Explained
While pixel dimensions tell you the absolute digital size, DPI (Dots Per Inch) and PPI (Pixels Per Inch) define the density of those pixels within a physical inch.
- PPI (Pixels Per Inch): This refers to the density of pixels in a digital image file. While DPI is often used interchangeably, PPI is technically more accurate for digital images. It dictates how many pixels are packed into one inch of a digital image. A higher PPI means a denser concentration of pixels, leading to a sharper, more detailed image when printed.
- DPI (Dots Per Inch): This term strictly refers to the density of ink dots that a printer can place on one inch of paper. A higher DPI on a printer means it can produce finer details and smoother color transitions. When discussing image resolution for print, however, “DPI” is commonly used to refer to the effective resolution of the image file that the printer will interpret.
The critical distinction for practical purposes is the general guideline:
- Web and Screen Use: Images for websites, social media, and digital displays typically require a resolution of 72 PPI/DPI. This density is sufficient for most screens, balancing visual quality with file size for faster loading times. Using a higher resolution image (e.g., 300 DPI) for web display offers no visual advantage and only increases file size unnecessarily.
- Print Use: For high-quality physical prints, a much higher resolution is necessary. The industry standard for most print applications, including photo prints, posters, and professional documents, is 300 PPI/DPI. This density ensures that individual pixels are imperceptible to the naked eye, resulting in a crisp, clear print. For very large format prints, sometimes 150-200 DPI can be acceptable, especially when viewed from a distance, but 300 DPI is always ideal for close viewing.

Understanding this distinction is vital for anyone using images. A stunning piece of digital art intended for a canvas print, or a high-resolution stock photo for a marketing brochure, must be 300 DPI at the desired print size to look professional. Conversely, uploading a 300 DPI image to your website as a background will slow down your page without any visible improvement over a 72 DPI version.
How to Check Image Resolution on Your Computer
Knowing the difference between high-resolution and low-resolution is one thing; actually checking your own images is another. Fortunately, both Windows and Mac operating systems provide straightforward ways to access an image’s resolution and dimensions. These quick checks are your first line of defense against pixelated prints and fuzzy digital displays, ensuring your beautiful photography or creative ideas translate flawlessly.
Checking Resolution on a Windows PC
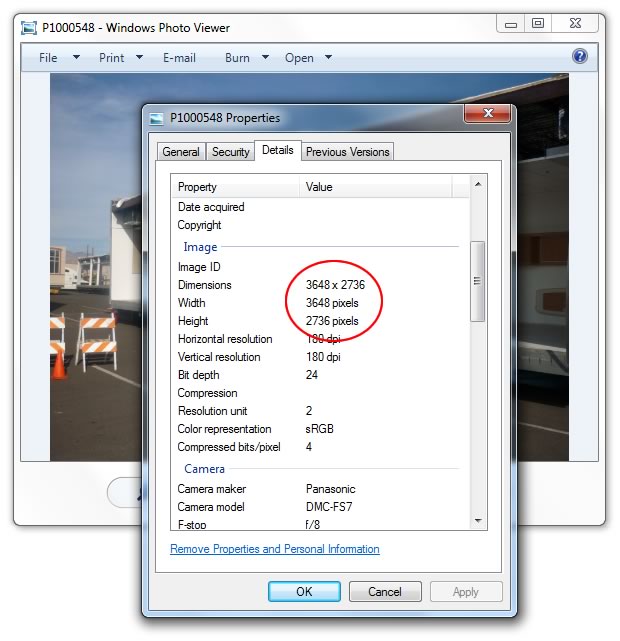
For Windows users, checking an image’s resolution is a simple, three-click process that reveals crucial details about your file. This method is consistent across various versions of Windows, including Windows 7, 8, 10, and 11.
- Locate the Image: Navigate to the folder where your image file is stored.
- Right-Click the Image: Select the image file you wish to check. Right-click on it to open the context menu.
- Access Properties: From the context menu, choose “Properties.” A new window will appear, displaying various information about the file.
- Navigate to the ‘Details’ Tab: Within the “Properties” window, you’ll see several tabs. Click on the “Details” tab.
- View Dimensions and Resolution: Scroll down in the “Details” tab. Here, you will find comprehensive information under the “Image” section, including:
- Dimensions: This will show the width and height of the image in pixels (e.g., 1920x1080 pixels).
- Horizontal Resolution and Vertical Resolution: These values will indicate the DPI/PPI of the image (e.g., 300 DPI or 72 DPI). For print quality, look for these numbers to be 300.
This quick method allows you to ascertain whether your image possesses the necessary pixel density for high-resolution photography projects or if it’s better suited for digital display.
Checking Resolution on Mac OSX
Mac users can also easily verify an image’s resolution and dimensions using a similar intuitive process.
- Locate the Image: Find the image file on your Mac.
- Right-Click or Control-Click: Select the image file. Right-click on it, or if you don’t have a two-button mouse, hold down the Control key while clicking (Control-click).
- Select ‘Get Info’: From the context menu that appears, choose “Get Info.” A window will open displaying information about the image.
- Expand ‘More Info’ Section: In the “Get Info” window, you’ll see various sections. Look for and expand the “More Info” section (you might need to click a small disclosure triangle next to it).
- View Dimensions and Resolution: Under the “More Info” section, you will find:
- Dimensions: This displays the width and height of your image in pixels (e.g., 2560x1440 pixels).
- Resolution: This shows the PPI/DPI value (e.g., 300 dpi or 72 dpi). As with Windows, a value of 300 dpi is generally desired for high-quality prints.
By following these simple steps, both Windows and Mac users can quickly assess the resolution of their images, making informed decisions about their usage for everything from personal photo prints to professional graphic design projects.
Interpreting Resolution and Pixel Dimensions for Print
Knowing an image’s pixel dimensions and DPI/PPI is only half the battle; understanding what those numbers mean for your final output, especially for print, is crucial. This is where the practical application of resolution knowledge truly comes into play for your photography, visual design, and image collections.
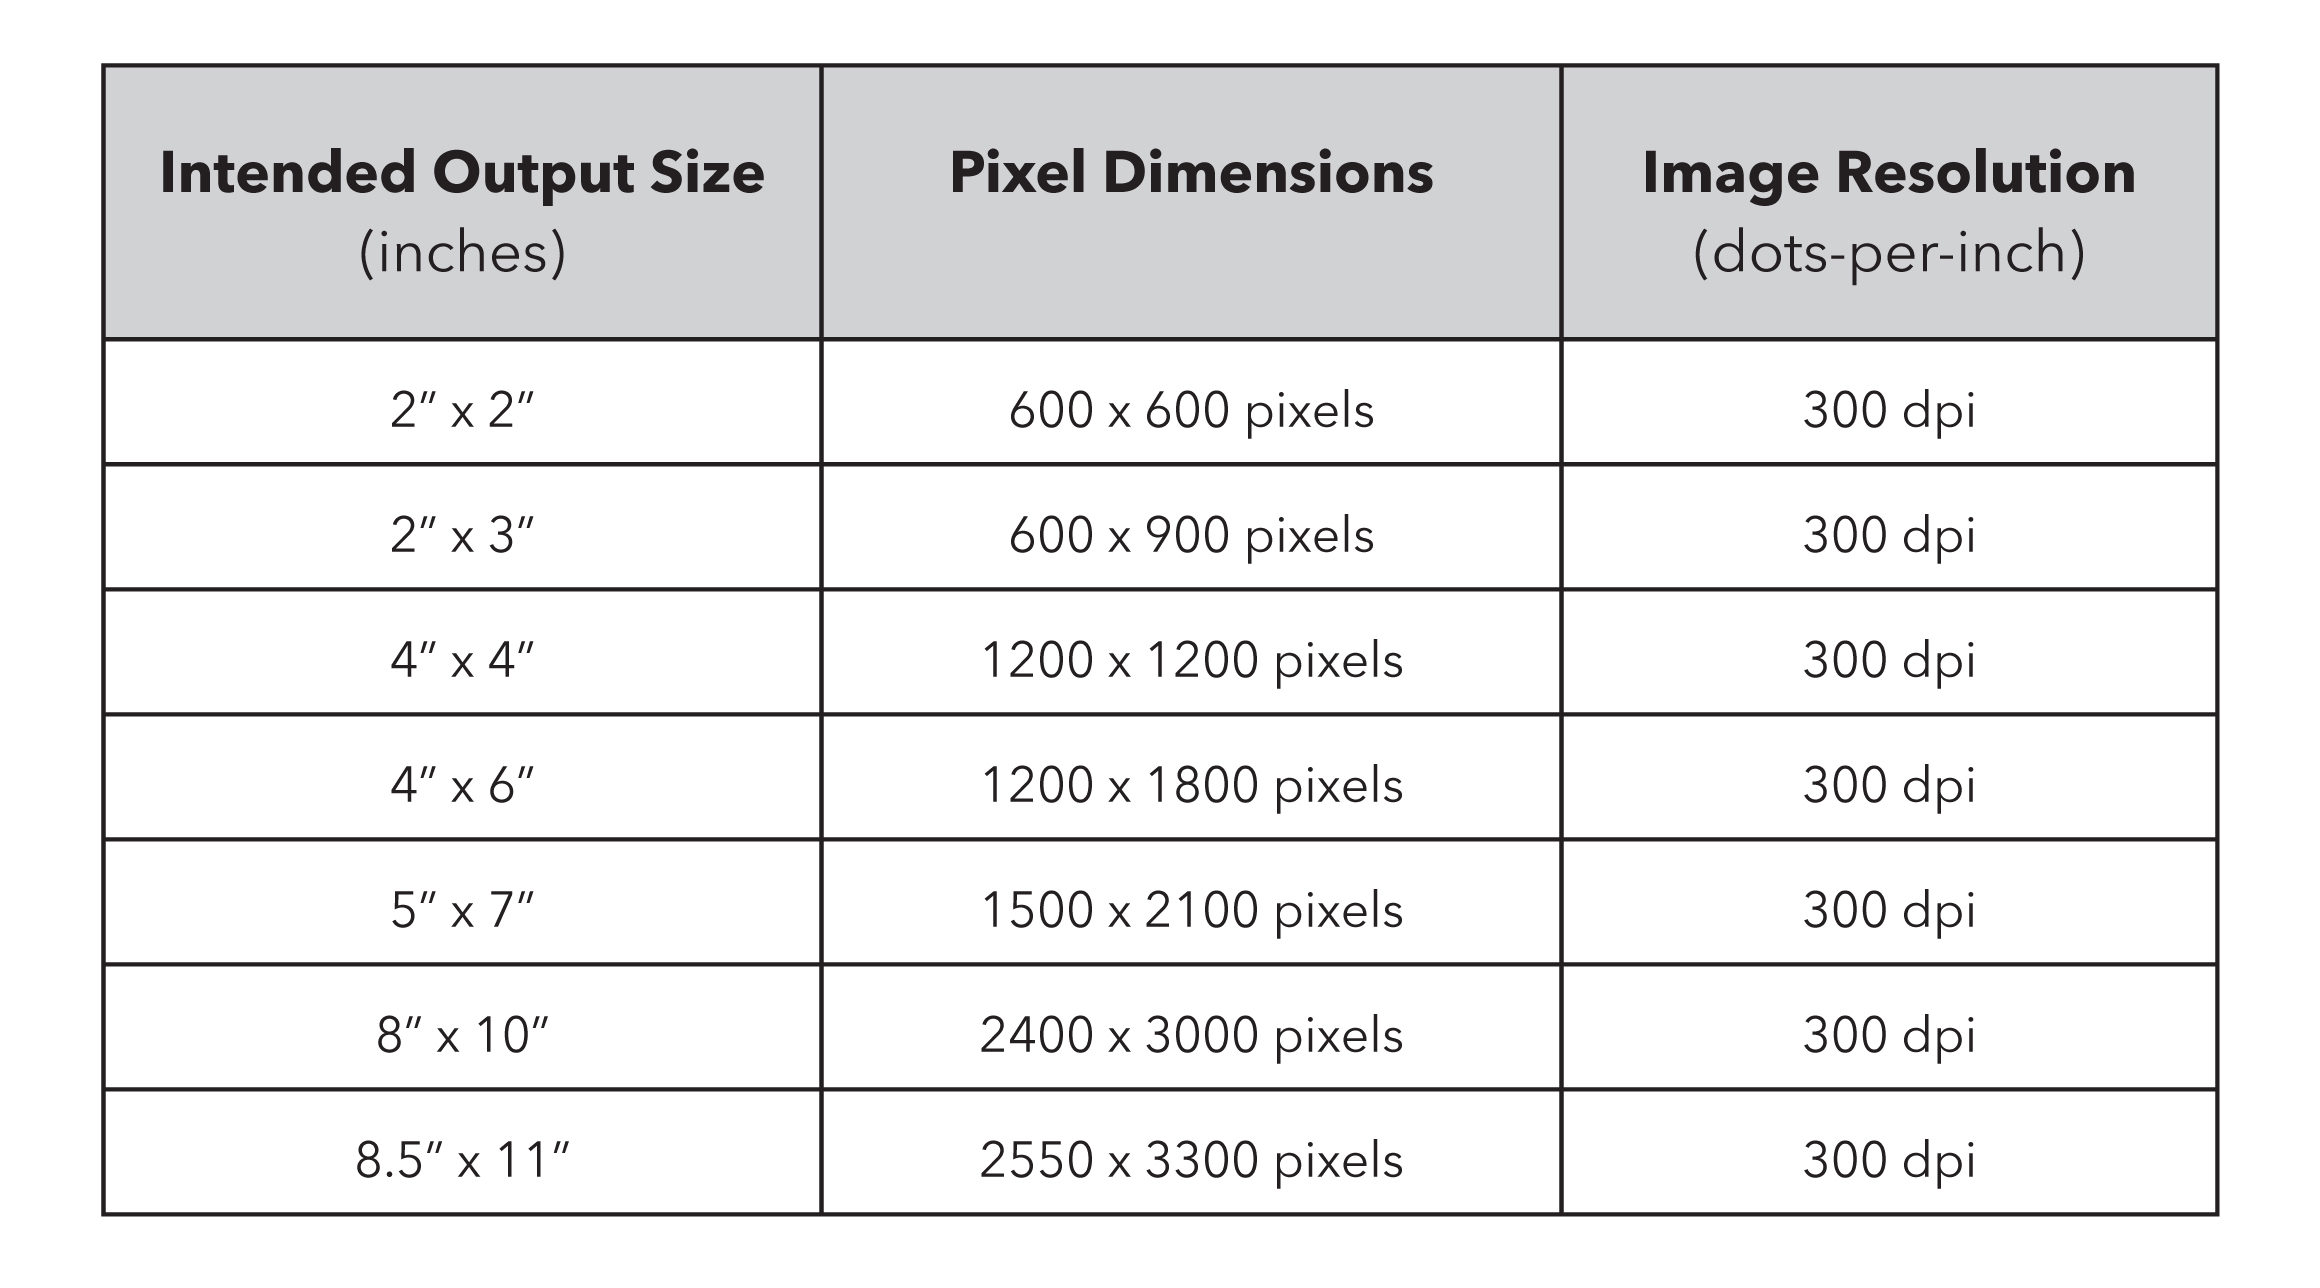
As a rule of thumb, for a high-quality print, you want 300 pixels per inch (300 PPI). To determine the maximum printable size of your image without pixelation, you divide the image’s pixel dimensions by the desired PPI.
Example: Let’s say your image has dimensions of 1800 pixels wide by 1200 pixels high.
- Desired Print Quality: 300 PPI
- Max Printable Width: 1800 pixels / 300 PPI = 6 inches
- Max Printable Height: 1200 pixels / 300 PPI = 4 inches
So, an 1800x1200 pixel image can be printed beautifully up to 6x4 inches at 300 PPI. If you try to print this image much larger, say 8x10 inches, the effective PPI will drop below 300, and the image will start to look blurry or pixelated.
The “Resing Up” Fallacy: It’s important to note that you can “alter the resolution in Photoshop” (or similar editing software) to change an image’s DPI, but this often comes with a significant caveat. If you have a low-resolution image (e.g., 72 DPI) and you simply change its DPI setting to 300 DPI without adding new pixel information, the software will effectively shrink the physical dimensions of the image. The total number of pixels remains the same, but they are now more densely packed.
For example, an image that is 1800 pixels wide might measure 25 inches at 72 DPI (1800/72 = 25). If you then “res up” this same 1800-pixel image to 300 DPI without resampling (adding pixels), its physical printable size will shrink to only 6 inches (1800/300 = 6). The image isn’t magically gaining detail; you’re just instructing the printer to pack the existing pixels more tightly.
To truly increase an image’s resolution for print (i.e., add more pixels), you need to use a process called resampling or upscaling. While modern software and AI upscalers can do an impressive job, they are essentially generating new pixel data, which can introduce artifacts or make the image look unnaturally smooth. It’s always best to start with an image that has sufficient original pixel data.
Practical Takeaway for Printing: For general purposes, if you’re looking to print a common photo size like 3x5 inches, you’ll want an image with pixel dimensions roughly around 900x1500 pixels. This provides enough pixel data to achieve 300 PPI for that size (e.g., 900 pixels / 300 PPI = 3 inches; 1500 pixels / 300 PPI = 5 inches). For larger prints such as Tophinhanhdep.com’s large format prints or collage posters, you will need significantly higher pixel counts. Always aim for the highest native resolution possible from your camera or source.
The Impact of Resolution Across Digital and Print Media
Resolution isn’t just a technical spec; it’s the foundation of visual quality, influencing everything from the crispness of a digital wallpaper to the vibrancy of a printed photo book. Understanding its impact is key to mastering photography, visual design, and the effective use of image tools.
High-Resolution for Stunning Photography and Visual Design
For photographers and visual designers, high resolution isn’t merely a preference—it’s a necessity. It provides the canvas for detail, clarity, and the flexibility required for professional-grade output.
- High Resolution Photography: Whether it’s nature photography capturing intricate textures, aesthetic shots demanding perfect clarity, or beautiful photography aiming for emotional depth, high resolution is paramount. It allows every leaf, every brushstroke, every subtle expression to be rendered with precision. When you visit Tophinhanhdep.com, you’ll find that our commitment to high-resolution images ensures that our stock photos, wallpapers, and backgrounds maintain their breathtaking quality, even on the most advanced displays. Digital photography, by its very nature, benefits immensely from higher sensor pixel counts, which translate directly into higher image resolution.
- Stock Photos: Reputable stock photo platforms, including those referenced on Tophinhanhdep.com, offer images in various resolutions. Always choose the highest available resolution for your projects, even if you plan to scale down. It’s easier and better quality to downscale a high-res image than to try and upscale a low-res one. This ensures versatility for different applications, from small web graphics to large print advertisements.
- Digital Photography and Editing Styles: High-resolution files are a dream for editing. They provide ample data for intricate adjustments, color grading, and applying various editing styles without introducing noticeable artifacts. When you manipulate a high-resolution image, you have more leeway to crop, resize, and apply filters, maintaining a high level of detail throughout the process. This is particularly crucial for photo manipulation, where layers and complex effects demand pristine source material.
- Graphic Design and Digital Art: For graphic designers, high-resolution source images are non-negotiable. Whether you’re designing a brochure, a billboard, or a complex digital art piece, starting with high-resolution assets ensures that your final product is sharp, professional, and free of pixelation. Low-resolution images can severely limit creative ideas and compromise the integrity of your visual design, making it look amateurish.
Low Resolution: When It’s Acceptable (and When It’s Not)
While high resolution is often the goal, there are scenarios where low resolution is perfectly acceptable, even desirable. The key is understanding the context and avoiding common pitfalls.
- Acceptable Use Cases (72 DPI): For web applications, such as images embedded in a blog, social media posts, or website backgrounds, 72 DPI is the standard. It provides sufficient visual quality for screen display while keeping file sizes small. Smaller file sizes mean faster loading times, which improves user experience and SEO. Tophinhanhdep.com’s extensive collection of aesthetic, nature, and abstract images, when optimized for web, make for perfect wallpapers and backgrounds on your devices or websites without bogging them down.
- When Low Resolution is Problematic: The moment you consider printing a low-resolution image, you’re likely heading for disappointment. Pixelated or blurry photos are definite big letdowns when you see your final prints. This holds true for everything from classic photo prints and square prints to large format prints, panoramic photo prints, and A-sized photo prints. The same applies to more elaborate creations like collage posters, collage prints, photo wall decals, and photo books. Trying to blow up a 72 DPI image for any of these print products will result in a visibly blocky and unprofessional output. Even viewing a low-resolution image on a high-definition monitor can reveal its flaws, making it unsuitable for a high-quality desktop wallpaper.
- Common Sources of Low-Resolution Images: Be wary of images sourced from social media platforms, instant messaging apps, or casual screenshots. These platforms often heavily compress images to save bandwidth, drastically reducing their resolution and making them unsuitable for print or professional digital use. Always seek original, high-resolution files when possible for your important projects.
The Role of Resolution in Image Collections and Inspiration
Resolution extends its influence even to the realm of creative inspiration and thematic collections. The quality of images in your mood boards or photo ideas can significantly impact the final output of your visual design projects.
- Mood Boards and Thematic Collections: When building mood boards or curating thematic collections, high-resolution images provide a richer source of inspiration. They allow you to zoom in on details, appreciate textures, and accurately gauge colors, which is crucial for translating those ideas into tangible designs. Whether you’re collecting trending styles or specific aesthetic images, starting with high-quality inputs ensures your creative vision remains uncompromised.
- Photo Ideas and Creative Concepts: For aspiring photographers or graphic designers seeking photo ideas, examining high-resolution examples can illuminate techniques and compositional choices that might be lost in a low-res version. Observing the fine details in beautiful photography or the intricate layers of digital art requires a clear, high-fidelity image. Tophinhanhdep.com offers a wealth of inspiration through its diverse image categories, encouraging users to always consider the technical aspects, including resolution, alongside the artistic ones.
In essence, resolution is the invisible thread connecting your initial creative spark to your final masterpiece, whether it’s a delicate print or a dynamic digital display. Ignoring it is like trying to build a house with flimsy foundations; the results are bound to disappoint.
Leveraging Tophinhanhdep.com’s Image Tools for Optimal Quality
Understanding image resolution is the first step; the next is knowing how to manage and enhance it. Tophinhanhdep.com isn’t just a repository of stunning images; it also offers a suite of image tools designed to empower you with control over your visual assets. These tools become invaluable when you need to adapt an image’s resolution, optimize its file size, or even extract information, ensuring your content always looks its best.
Enhancing Resolution with AI Upscalers
One of the most common challenges is dealing with a beautiful image that simply isn’t high-resolution enough for a desired print size or a modern high-definition display. This is where AI Upscalers from Tophinhanhdep.com come to the rescue.
- How AI Upscalers Work: Traditional upscaling (simply stretching an image) results in pixelation. AI upscalers, however, use sophisticated machine learning algorithms trained on vast datasets of images. They analyze the existing pixels and intelligently “guess” what new pixels should be added to increase the image’s dimensions and detail. They can effectively add detail, sharpen edges, and reduce noise, making a lower-resolution image appear significantly clearer and more suitable for larger displays or prints.
- Applications: An AI upscaler is particularly useful for:
- Old Photographs: Breathing new life into scanned vintage photos that lack modern resolution.
- Web Images for Print: Attempting to make a web-optimized image suitable for a small print.
- Cropped Images: Recovering detail in heavily cropped portions of larger images.
- Digital Art and Graphic Design: Enhancing components for larger compositions or refining textures.
- Benefits: While an AI upscaler can’t create detail that was never there, it can significantly improve the perceived resolution and quality, often making an image perfectly usable for purposes it wouldn’t have been otherwise. This allows you to transform an aesthetic background into a crisp desktop wallpaper or a small photo into a presentable classic photo print.
Optimizing Images: Compressors and Optimizers
While increasing resolution is often the goal, sometimes the challenge is the opposite: reducing file size while maintaining visual quality. This is crucial for web performance and efficient storage, especially for collections of wallpapers, backgrounds, or stock photos. Tophinhanhdep.com’s Compressors and Optimizers help strike this delicate balance.
- Image Compressors: These tools reduce the file size of an image by removing redundant data or applying more efficient encoding techniques. Lossy compression (like JPEG) sacrifices some data for a much smaller file, while lossless compression (like PNG) reduces size without any quality loss, though typically less dramatically.
- Image Optimizers: Optimizers often combine compression techniques with other adjustments, such as stripping metadata, reducing color depth, or resizing images, to achieve the smallest possible file size with minimal impact on visual quality.
- Why Optimization Matters:
- Website Performance: Smaller image files load faster, improving user experience, reducing bounce rates, and boosting SEO rankings. This is vital for showcasing beautiful photography or extensive image collections.
- Email & Messaging: Sending large image files can be cumbersome. Optimized images are quick to send and receive.
- Storage Efficiency: Managing large numbers of images, like personal photo ideas or thematic collections, becomes more efficient with optimized files.
- Wallpapers and Backgrounds: While you want high pixel dimensions for crispness, excessive file size for a wallpaper can slow down system performance. Optimization helps achieve the best of both worlds.
Converters and Image-to-Text for Versatility
Beyond resolution and size optimization, Tophinhanhdep.com offers tools that enhance the versatility and utility of your images.
- Image Converters: These tools allow you to change an image from one file format to another (e.g., JPEG to PNG, PNG to WebP). Different formats have different strengths: JPEGs are great for photos with smooth color gradients due to their efficient lossy compression; PNGs excel with images containing sharp lines, text, or transparency; and WebP offers superior compression for web images. Converters are essential for ensuring your images are compatible with various platforms and applications, whether you’re uploading digital art or preparing images for a graphic design project.
- Image-to-Text (OCR - Optical Character Recognition): While not directly related to resolution, an Image-to-Text tool is a powerful utility for extracting textual information from images. This could be useful for digitizing documents, extracting quotes from visually appealing text-based aesthetic images, or even creating searchable archives from your photo collections. It highlights Tophinhanhdep.com’s commitment to providing comprehensive image solutions beyond just visual quality.
By integrating these image tools into your workflow, you gain greater control over your visual assets, ensuring they meet the specific requirements of any project, from high-resolution photography prints to optimized web content and beyond.
Best Practices for Acquiring and Preparing Images
Achieving optimal image quality—whether for digital display or physical prints like those offered by Tophinhanhdep.com—starts long before you click “print” or “upload.” It involves mindful acquisition and careful preparation. By adopting these best practices, you can avoid common resolution pitfalls and consistently produce stunning results for all your visual design, photography, and image inspiration needs.
Sourcing High-Resolution Images
The quality of your final output is directly tied to the quality of your source image. Always aim for the highest resolution possible from the outset.
- Use Original Camera Files: Whenever possible, work with the original files straight from your camera or smartphone. These are typically the highest resolution and least compressed versions of your images. Avoid using copies that have been sent through messaging apps, uploaded to social media, or downloaded from low-quality websites, as these often undergo significant compression and resizing, severely reducing their pixel count and detail. For professional digital photography, shooting in RAW format provides the maximum amount of image data for editing and maintaining high resolution.
- Choose High-Resolution Stock Photos: If you’re utilizing stock photos for your graphic design or creative ideas, always select the highest resolution option available for download. Most stock platforms, including those Tophinhanhdep.com recommends for finding beautiful photography or aesthetic images, offer multiple sizes. Investing in a larger file size upfront provides flexibility for future use, even if your immediate need is for a smaller application.
- Be Skeptical of Random Web Downloads: Images found through a quick web search are usually optimized for screen display (72 DPI) and may have low pixel dimensions. These are rarely suitable for printing beyond a very small size. If you find an image online that inspires a photo idea, treat it as a concept and seek out a higher-resolution version or a similar stock photo.
- Scan Physical Art at High DPI: If you’re digitizing physical artwork, drawings, or old photographs for use in digital art or photo manipulation, scan them at a high DPI (e.g., 300 DPI or even 600 DPI for very detailed work or small originals). This ensures that you capture as much detail as possible in the digital conversion.
Planning for Print: Matching Resolution to Output Size
Printing is where resolution’s importance becomes most evident. Pixelated prints are a common and easily avoidable disappointment.
- Know Your Desired Print Size First: Before sending an image to a print service, know the exact physical dimensions you want for your print. This is the most crucial step. Once you have the desired dimensions (e.g., 8x10 inches, A3, 24x36 inches for large format prints), you can calculate the minimum required pixel dimensions.
- Calculate Required Pixel Dimensions (at 300 PPI):
Required Width (pixels) = Desired Width (inches) x 300 PPIRequired Height (pixels) = Desired Height (inches) x 300 PPIFor example, for an 8x10 inch print, you would need an image of at least 2400 pixels wide (8 x 300) by 3000 pixels high (10 x 300).
- Check and Compare: Use the methods outlined earlier (Windows Properties or Mac Get Info) to check your image’s actual pixel dimensions. Compare these to your calculated required dimensions.
- When Your Image is Too Small: If your image’s pixel dimensions are significantly lower than what’s required for 300 PPI at your desired print size, consider your options:
- Print Smaller: Reduce the print size until your image’s native resolution supports 300 PPI.
- Use an AI Upscaler: Tophinhanhdep.com’s AI Upscaler can help enhance the resolution, but manage expectations. It won’t perfectly recreate detail that was never there, especially for significant enlargements.
- Acquire a Higher Resolution Version: This is always the best solution.
- Tophinhanhdep.com’s Print Services: When preparing for any of Tophinhanhdep.com’s diverse print offerings—from classic photo prints and square prints to panoramic photo prints, A-sized photo prints, removable wall decals, collage posters, collage prints, giant photostrips, photo books, or photo cards—always ensure your images meet the recommended resolution for the chosen product size. High-resolution input guarantees the stunning output Tophinhanhdep.com strives for.
Digital Display Considerations
While print typically demands 300 DPI, digital displays have their own resolution considerations that impact your image collections, wallpapers, and backgrounds.
- Screen Resolution: Modern screens, from smartphones to 4K and 8K monitors, have increasingly high pixel densities. An image that looks crisp on a standard HD monitor might appear slightly soft on a 4K display if its pixel dimensions are too low. For wallpapers and backgrounds, aim for pixel dimensions that match or exceed your screen’s native resolution (e.g., 3840x2160 for a 4K monitor). Tophinhanhdep.com’s vast collection of wallpapers is curated with these high-resolution displays in mind.
- Website Optimization: For images on your website, while you want good visual quality, you also need to balance it with file size. Use Tophinhanhdep.com’s image compressors and optimizers to reduce file size while maintaining acceptable quality. A good practice is to save images at 72 DPI with pixel dimensions appropriate for their display size on the web. This ensures fast loading times without compromising the aesthetic appeal of your digital art or beautiful photography showcases.
- Image Formats: Choose the right file format. JPEGs are excellent for photographs, PNGs for graphics with transparency or sharp lines, and WebP for optimized web images. Tophinhanhdep.com’s converters can assist with this.
By thoughtfully acquiring and preparing your images with resolution in mind, you safeguard the quality and impact of your visual content, ensuring that every image, whether a sad/emotional photo or a vibrant abstract piece, lives up to its full potential.
Conclusion: Empowering Your Visual Journey with Resolution Knowledge
The journey through the world of digital images, from breathtaking photography to intricate graphic design, is profoundly influenced by one core concept: resolution. As we’ve explored, understanding the interplay of pixels, PPI, and DPI is not just technical jargon; it’s a fundamental skill that empowers you to control the quality of your visual output, whether destined for a screen or a print. Pixelated or blurry photos are definite big letdowns, but with the right knowledge and tools, they are entirely avoidable.
Tophinhanhdep.com stands as your comprehensive partner in this visual journey. We believe that stunning images should be accessible and manageable for everyone. Our vast collections of high-resolution images—encompassing everything from captivating wallpapers and evocative backgrounds to aesthetic, nature, abstract, sad/emotional, and beautiful photography—are carefully curated to inspire and delight. Beyond inspiration, our platform provides essential resources, including:
- Guidance on Photography: We empower you with insights into high-resolution photography, the nuances of digital photography, and various editing styles to elevate your craft.
- Cutting-Edge Image Tools: Our suite of tools, from AI upscalers that can breathe new life into lower-resolution images, to compressors and optimizers for efficient file management, and versatile converters and image-to-text functionalities, are designed to put control firmly in your hands.
- Visual Design Support: We foster creativity in graphic design and digital art, offering resources for photo manipulation and sparking creative ideas that demand high-quality assets.
- Image Inspiration & Collections: Discover a wealth of photo ideas, build compelling mood boards, and explore thematic collections that leverage the power of high-quality visuals to inform and inspire your trending styles.
By knowing how to check image resolution on your Windows PC or Mac OSX, and by understanding how pixel dimensions translate into print sizes, you are equipped to make informed decisions. You can confidently select the perfect image for a large format print, optimize a background for your website, or enhance an old photograph with our AI upscalers. Always make sure that your photos have the required resolution for the size you have chosen, whether it’s for classic photo prints, square prints, panoramic prints, A-sized prints, or any of our bespoke collage posters and photo books.
In a world saturated with visuals, quality makes all the difference. Embrace the power of resolution, explore the resources at Tophinhanhdep.com, and transform your digital and printed images into truly remarkable works of art. Let your vision shine through with unparalleled clarity and detail.