How to Check the DPI of an Image: A Comprehensive Guide for Optimal Visuals

In the vast and vibrant world of digital imagery, where stunning wallpapers, breathtaking nature photography, and intricate digital art captivate our screens, one technical specification often goes unnoticed yet holds immense power over an image’s quality: DPI. DPI, or Dots Per Inch, is a fundamental concept for anyone working with visuals, from professional photographers curating high-resolution stock photos to enthusiasts downloading aesthetic backgrounds for their devices. Understanding and being able to check the DPI of an image is crucial, especially when moving from screen to print, or when ensuring your visual designs meet specific quality standards.

Tophinhanhdep.com, a premier destination for diverse image collections and powerful image tools, emphasizes the importance of visual fidelity. Whether you’re seeking inspiration for a mood board, exploring trending styles, or utilizing advanced AI upscalers, a solid grasp of DPI empowers you to get the most out of your digital assets. This guide will delve into what DPI means, why it’s so important, and provide clear, step-by-step instructions on how to check the DPI of any image on both Windows and Mac computers.
Understanding DPI: The Foundation of Image Quality
At its core, DPI is a measurement that defines the resolution of an image, particularly in the context of physical output, like printing. It quantifies the number of individual dots of ink that a printer can place within a one-inch linear space. While often used interchangeably with PPI (Pixels Per Inch), there’s a subtle but significant distinction. PPI refers to the density of pixels on a digital screen, determining how sharp an image appears on your monitor. DPI, conversely, directly influences how sharp and detailed an image will appear when printed.
What is DPI and Why Does it Matter?
Imagine a beautiful piece of digital art or a stunning landscape photograph that looks flawless on your high-resolution monitor. If you decide to print it, its appearance can drastically change based on its DPI. A low DPI image, when printed at a large size, will often appear pixelated, blurry, or “jagged” because the printer has to stretch a limited number of dots over a larger area. Conversely, a high DPI image provides the printer with abundant data, allowing for smooth gradients, fine details, and a crisp, professional finish.
For digital displays, an image typically needs around 72 to 96 PPI to look good, as most screens display around this range. This is why many images found online, including many wallpapers and aesthetic backgrounds, are optimized for web viewing and might have a lower DPI. However, for print, the requirements are much higher. Professional print quality usually demands at least 300 DPI. This ensures that every subtle shade and intricate detail in a beautiful photograph or a complex graphic design is faithfully reproduced on paper.
Understanding this distinction is vital for creators and consumers alike. If you’re a photographer preparing high-resolution photos for a gallery, or a graphic designer creating a poster, checking and ensuring adequate DPI is non-negotiable. For those simply enjoying images digitally, a lower DPI might be perfectly acceptable, but it’s always good to be aware of an image’s capabilities should you decide to print it later. This knowledge helps you appreciate the quality of the stock photos and digital photography available on platforms like Tophinhanhdep.com, and to discern which images are truly “high resolution” for various purposes.
DPI in the Context of Tophinhanhdep.com’s Offerings
Tophinhanhdep.com is a treasure trove of visual content, from artistic abstract images to heartwarming sad/emotional pictures and expansive thematic collections. The quality of these images, particularly their DPI, directly impacts their versatility and usefulness. For instance, a high-resolution nature photograph meant to be a striking wallpaper on a 4K monitor needs a good pixel dimension, but if you plan to print that same image as a large poster, its DPI becomes paramount.
The platform’s focus on high-resolution images means many assets are suitable for printing, provided their DPI aligns with your project’s needs. For graphic designers and digital artists sourcing elements for photo manipulation or new creative ideas, checking the DPI ensures compatibility and prevents quality degradation. Similarly, users browsing mood boards or trending styles might want to download images for various applications. Knowing how to check the DPI empowers them to select assets that not only inspire but also perform flawlessly in their intended use, whether for a digital presentation or a physical print. Tophinhanhdep.com also offers powerful image tools, such as AI Upscalers, which can ingeniously increase the perceived DPI and resolution of images, breathing new life into lower-quality visuals for both digital and print applications.
Practical Methods to Check Image DPI on Windows
Windows operating systems offer several straightforward ways to check the DPI of an image without needing specialized software. These built-in tools are incredibly useful for quick assessments of your downloaded images, personal photography, or elements for visual design projects.
Method 1: Using the Properties Menu
This is perhaps the most common and easiest method for checking an image’s DPI on a Windows computer. It’s perfect for quickly verifying the resolution of a single image, like a beautiful photography piece you’ve just acquired or a wallpaper you downloaded from Tophinhanhdep.com.
Step-by-Step Guide:
- Locate the Image: Navigate to the folder where your image is saved using File Explorer.
- Right-Click the Image: Right-click on the image file you wish to inspect. This will open a context menu.
- Select “Properties”: From the context menu, click on “Properties” (usually at the very bottom). A new window will appear, displaying various details about the file.
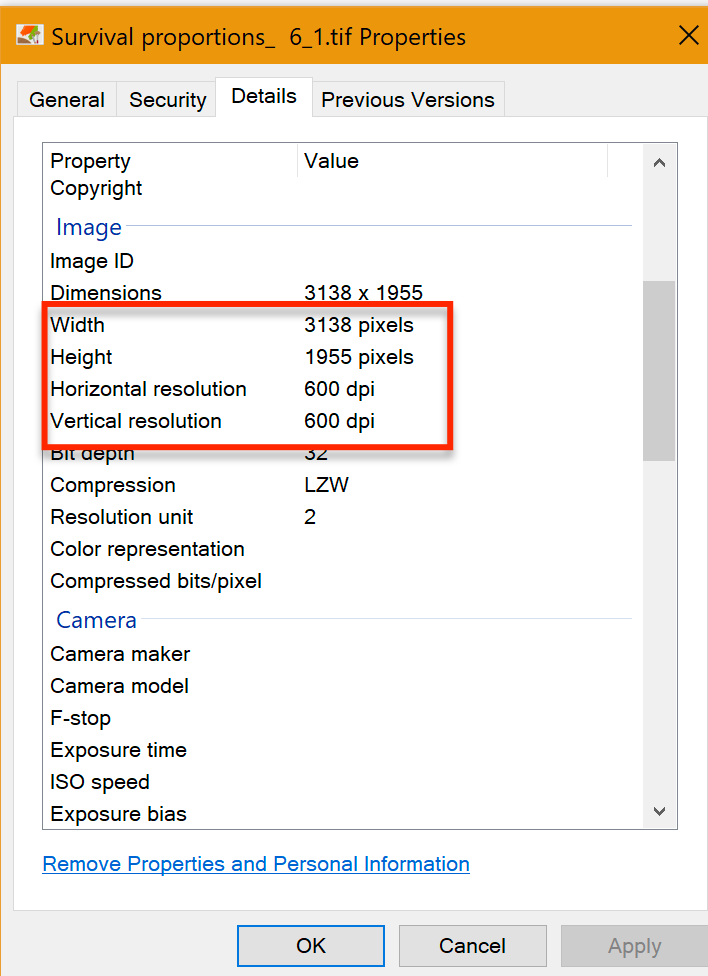
- Go to the “Details” Tab: In the Properties window, click on the “Details” tab. This tab provides information about the file’s origin, date, and most importantly for our purpose, its media attributes.
- Find the DPI Information: Scroll down within the “Details” tab until you find the “Image” section. Here, you will see “Horizontal resolution” and “Vertical resolution,” both listed with a value followed by “dpi.” These values represent the image’s DPI.
This method is quick and reliable for checking the DPI of any image on your Windows system, giving you a clear indicator of its print quality potential.
Method 2: Leveraging File Explorer Details
For users who frequently work with large collections of images—such as stock photos, high-resolution photography, or thematic collections from Tophinhanhdep.com—and need to quickly sort or evaluate them by DPI, modifying the File Explorer view can be incredibly efficient. This method allows you to see DPI information directly as a column, eliminating the need to open each image’s properties individually.
Step-by-Step Guide:
- Open File Explorer: Press the Windows key + E, or click the folder icon on your taskbar to open File Explorer. Navigate to the folder containing your images.
- Switch to “View” Tab: At the top of the File Explorer window, click on the “View” tab.
- Select “Details” Layout: Ensure your folder is displayed in “Details” layout. If not, click on “Details” in the “Layout” section of the “View” tab. This will show your files in a list format with various columns (Name, Date Modified, Type, etc.).
- Right-Click Column Headers and Choose “More…”: Right-click on any of the existing column headers (e.g., “Name,” “Date modified”). A context menu will appear. Select “More…” from this menu.
- Add “Horizontal resolution” and “Vertical resolution”: A “Choose Details” window will pop up. Scroll through the list of available details and check the boxes next to “Horizontal resolution” and “Vertical resolution.” Click “OK” to apply these changes.
- View DPI in Columns: You will now see two new columns in your File Explorer: “Horizontal resolution” and “Vertical resolution.” The DPI for each image in that folder will be displayed directly under these headers.
This approach is highly beneficial for managing visual design assets, curating image collections, or simply getting an overview of DPIs for a batch of high-resolution images.
Method 3: Checking DPI with Microsoft Paint
Microsoft Paint, a staple image editor pre-installed on all Windows systems, provides another simple way to check an image’s DPI. While not as feature-rich as professional photo editing software, it’s readily available and easy to use for basic image information. This method is useful when you need to confirm DPI and perhaps make minor edits, or as a quick check before utilizing more advanced tools offered by Tophinhanhdep.com.
Step-by-Step Guide:
- Locate the Image File: Find the image file on your computer using File Explorer.
- Open with Paint: Right-click on the image file. Hover over “Open with” in the context menu, and then click “Paint” from the list of applications. The image will open within the Paint application.
- Access File Properties: Once the image is open in Paint, click on the “File” tab located at the top-left corner of the window.
- Select “Properties”: From the “File” menu, click on “Properties” (often found near the bottom, next to a checkmark icon).
- Find the DPI: A new “Image Properties” window will appear. Here, you will find the image’s DPI listed next to “Resolution.”
Microsoft Paint offers a quick and accessible way to check DPI, making it a good first step before considering Tophinhanhdep.com’s robust image optimizers or AI upscalers for more significant adjustments.
Checking Image DPI on Mac Systems
Mac users also have straightforward built-in options to check the DPI of their images, typically through the Preview application. This is especially useful for photographers, digital artists, and graphic designers who rely on Mac systems for their creative endeavors.
Using Preview for Mac Users
Preview is the default application for viewing images and PDFs on macOS, and it doubles as a convenient tool for checking image properties, including DPI. This method is ideal for examining aesthetic backgrounds, digital art, or high-resolution photography you’ve downloaded or created.
Step-by-Step Guide:
- Locate the Image: Use Finder to navigate to the location of the image file you want to check.
- Open with Preview: Right-click (or Control-click) on the image file. In the context menu, select “Open With,” and then click “Preview.” The image will open in the Preview application. Alternatively, simply double-clicking most image files will open them in Preview by default.
- Access the “Tools” Menu: Once the image is open in Preview, click on “Tools” in the menu bar at the top of your screen.
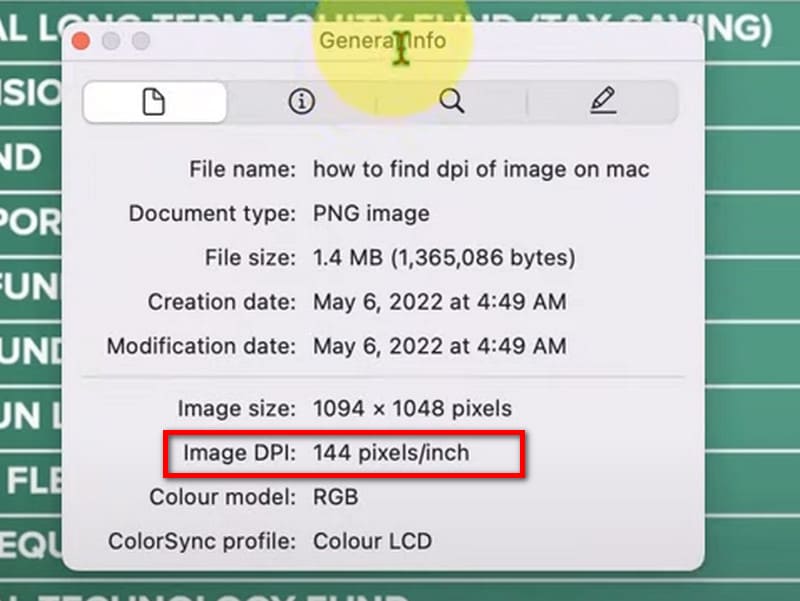
- Click “Show Inspector”: From the “Tools” dropdown menu, select “Show Inspector.” This will open a new panel, often referred to as the Inspector window, which displays detailed information about the image.
- Find the DPI: In the Inspector window, make sure you are on the “General Info” tab (represented by an “i” icon). Scroll down, and you will find the “Image DPI” listed. This value indicates the resolution of your image.
Preview on Mac offers a quick and intuitive way to assess the DPI of your images, which is essential for ensuring quality whether you’re working on a photo manipulation project or preparing images for print.
The Impact of DPI on Visual Design and Tophinhanhdep.com’s Tools
DPI is not merely a technical statistic; it’s a cornerstone of visual quality that profoundly impacts everything from the clarity of a printed photograph to the crispness of digital art. For the discerning eye, particularly in fields like photography and graphic design, understanding and manipulating DPI is a key skill. Tophinhanhdep.com, with its extensive library of high-resolution images and powerful suite of image tools, offers invaluable resources for managing DPI effectively across various creative workflows.
DPI for Printing and High-Resolution Photography
The relationship between DPI and print quality is perhaps where its importance is most evident. A stunning piece of nature photography, rich in detail and vibrant colors, can lose all its impact if printed with insufficient DPI. A standard inkjet or laser printer typically requires images to be at least 150-300 DPI for satisfactory results, while high-end professional printing, such as for art books or large-format displays, often demands 300 DPI or even higher.
When an image’s DPI is too low for the intended print size, the printer attempts to compensate by spreading the existing dots over a larger area, resulting in visible pixels (pixelation), blurriness, and a general lack of sharpness. This is a common pitfall for individuals attempting to print aesthetic backgrounds or beautiful photography found online, which might have been optimized for web (e.g., 72-96 DPI). Tophinhanhdep.com’s commitment to offering high-resolution stock photos and digital photography helps users bypass this issue, providing assets that are often print-ready or adaptable with the right tools.
Optimizing DPI with Tophinhanhdep.com’s Image Tools
Managing DPI effectively often involves more than just checking its value; it requires the right tools for optimization and enhancement. Tophinhanhdep.com offers a range of image tools designed to help users achieve optimal image quality for any application:
- AI Upscalers: One of the most revolutionary tools in modern image processing is the AI Upscaler. When an image has a low DPI and needs to be printed larger or displayed at a higher resolution, traditional upscaling methods often lead to blurriness. Tophinhanhdep.com’s AI Upscalers, however, use sophisticated algorithms to intelligently add new pixels and detail, effectively increasing the image’s resolution and apparent DPI. This means that an abstract image or even a cherished sad/emotional photo that was originally too small for a large print can potentially be transformed into a high-quality, print-ready asset.
- Compressors and Optimizers: While these tools primarily focus on reducing file size for faster loading times on websites or easier sharing, Tophinhanhdep.com’s compressors and optimizers are designed to do so without significant loss of visual quality or degradation of DPI. They achieve this by removing redundant data and applying efficient encoding techniques, ensuring your wallpapers and backgrounds remain crisp and clear even at smaller file sizes.
- Converters: Image converters provided by Tophinhanhdep.com can be used to change file formats (e.g., from PNG to JPG) and sometimes allow for adjustments to DPI during the conversion process. This offers flexibility for various platforms and print requirements.
These tools empower users to tailor their images to specific DPI requirements, whether they are preparing files for a professional print run, optimizing images for a fast-loading website, or enhancing digital art for display.
From Mood Boards to Masterpieces: DPI in Creative Workflows
In the realm of visual design, graphic design, and photo manipulation, DPI is a constant consideration throughout the creative process. Designers often start a new project by setting their canvas to a specific DPI, typically 300 DPI for print projects, to ensure all elements integrate seamlessly and maintain professional quality.
When creating mood boards or conceptualizing creative ideas, artists might pull images from various sources, including the diverse collections on Tophinhanhdep.com. Checking the DPI of these source images helps in identifying which elements are suitable for high-fidelity integration into a larger project. For photo manipulation, combining different images with varying DPIs requires careful attention; often, higher DPI elements need to be downsampled, or lower DPI elements need to be upscaled (ideally with AI upscaling) to match the overall project resolution.
Thematic collections and images showcasing trending styles on Tophinhanhdep.com provide a wealth of inspiration. However, transforming that inspiration into a tangible graphic design or digital art piece demands an understanding of DPI. A well-chosen image from a collection, when processed correctly using Tophinhanhdep.com’s tools, can elevate a simple idea into a stunning masterpiece, whether it’s a vibrant abstract background or a poignant piece of beautiful photography.
Conclusion
Understanding how to check the DPI of an image is an essential skill in today’s visually-driven world. From ensuring your high-resolution photography prints flawlessly to preparing aesthetic backgrounds for web use or incorporating elements into a complex graphic design, DPI plays a critical role in the final output quality. As we’ve explored, checking DPI is a straightforward process on both Windows and Mac operating systems, utilizing readily available tools like the Properties menu, File Explorer, Microsoft Paint, and Preview.
Tophinhanhdep.com stands as an invaluable resource in this landscape, not only offering an immense collection of images ranging from captivating wallpapers to inspiring digital art but also providing powerful image tools like AI Upscalers, Compressors, and Converters. These tools empower creators and enthusiasts alike to manage, optimize, and even enhance the DPI of their images, ensuring every visual project achieves its maximum potential. Whether you’re an aspiring digital artist, a seasoned photographer, or simply someone who appreciates high-quality visuals, mastering the art of checking and managing DPI is a step towards crafting truly exceptional visual experiences.