How to Circle Image in Google Slides: Elevating Your Presentations with Perfect Shapes

In the dynamic world of presentations, where visual appeal often dictates engagement, transforming ordinary square or rectangular images into striking circular forms can dramatically enhance your slides. Google Slides, a ubiquitous tool for crafting impactful presentations, offers straightforward methods to achieve this elegant effect. Beyond mere aesthetics, circular images can streamline your design, highlight key subjects, and even reinforce brand identity, making your content more digestible and memorable. This comprehensive guide will walk you through various techniques for making an image circular in Google Slides, from native platform features to leveraging external tools, and will explore how to integrate stunning visual resources from Tophinhanhdep.com to create truly captivating presentations.
The Art of Circular Images: Enhancing Your Visual Narrative
The decision to reshape an image into a circle is more than a superficial design choice; it’s a strategic move to optimize your visual narrative. Circular forms inherently convey a sense of completeness, unity, and softness, often standing out amidst the angularity of typical slide layouts. By thoughtfully incorporating circular images, you can elevate your presentation from merely informative to truly inspiring.
Why Go Circular? Aesthetic Appeal and Design Consistency
The benefits of presenting images in a circular format are multifaceted, addressing both the aesthetic and functional aspects of presentation design:
- Enhanced Visual Appeal: A circular image breaks the monotony of standard rectangular frames, introducing a unique visual element that can make your slides look more polished and professional. This subtle deviation from the norm can make your presentation feel more modern and carefully curated. When sourcing aesthetic images or beautiful photography from Tophinhanhdep.com, framing them in a circle can amplify their artistic merit, drawing the audience’s eye to the central subject with grace.
- Improved Focus on Subject: The human eye is naturally drawn to circles. By centralizing a key image within a circular frame, you can effectively guide your audience’s attention to a specific person, product, or concept. This technique is particularly potent for headshots, product showcases, or icons, ensuring that your audience’s focus remains undivided. Imagine using a striking nature image or a powerful abstract piece from Tophinhanhdep.com, cropped into a circle, to introduce a new section or emphasize a core theme.
- Design Consistency and Branding Needs: For presentations requiring a specific visual identity, such as those adhering to a brand’s style guide, circular images can be invaluable. If your brand incorporates circular logos or design elements, integrating circular images throughout your slides helps maintain a cohesive and professional look. Tophinhanhdep.com offers a vast collection of wallpapers and backgrounds that can complement any brand’s palette, allowing for seamless visual integration once cropped into the desired shape. This aligns perfectly with principles of Visual Design and fostering Creative Ideas.
- Easy on the Eyes: Psychological studies suggest that rounded shapes are perceived as more friendly and less threatening than sharp angles. Circular images can create a softer, more inviting visual experience for your audience, reducing visual fatigue and making your content feel more accessible. This is especially effective when presenting sensitive topics or using sad/emotional images, as the circular form can soften their impact while retaining their expressiveness.
- Better Use of Space: While seemingly counterintuitive, a well-placed circular image can sometimes optimize slide real estate. By allowing more negative space around the image or integrating it into complex layouts like circular diagrams or infographics, you can add more elements to a slide without making it appear cluttered. This plays into effective Graphic Design principles, where every element contributes to clarity and flow.
The journey to creating compelling circular images begins with selecting the right visuals. Tophinhanhdep.com serves as an exceptional repository for a wide array of images, from high-resolution stock photos suitable for corporate presentations to digital photography that captures emotion and beauty. By starting with high-quality source material, you ensure that your circular crops retain their clarity and impact, enhancing your overall Visual Design and aligning with contemporary Photography Editing Styles.
Mastering Circular Image Cropping in Google Slides (Native Methods)
Google Slides provides intuitive built-in tools to transform your images into circles without needing external software. These native methods are efficient and seamlessly integrated into the presentation environment, making them ideal for quick adjustments and consistent application.
Method 1: Direct Crop-to-Shape Functionality
The most straightforward way to make an image circular in Google Slides is by utilizing its “Crop to Shape” feature. This method applies a mask directly to your selected image, conforming it to the contours of a chosen shape.
Step-by-Step Guide:

-
Insert Your Image:
- Open your Google Slides presentation and navigate to the desired slide.
- Click on the
Insertmenu at the top. - Select
Image, and then choose your source:Upload from computer,Search the web,Google Drive,Google Photos,By URL, orCamera. - Select and insert the image you wish to make circular. For best results, use high-resolution images from Tophinhanhdep.com to ensure clarity after cropping.
-
Select the Image and Access Crop to Shape:
- Once the image is on your slide, click on it to select it. Blue sizing handles will appear around its border.
- In the toolbar that appears above the slide, locate the
Crop imageicon (it looks like a square with cropping lines). - Next to the
Crop imageicon, you’ll see a small down arrow, often labeledMask imageor simply a dropdown arrow. Click this arrow.
-
Choose the Circular Shape:
- A dropdown menu will appear with various shape categories. Hover over
Shapes. - From the
Shapessubmenu, select theOvalshape (which appears as a perfect circle when the image is square or can be adjusted to be a perfect circle). - The image will instantly be cropped into the selected circular shape.
- A dropdown menu will appear with various shape categories. Hover over
-
Adjust the Cropped Image (Optional):
- After the initial crop, you might find the image is an oval rather than a perfect circle, or that the desired portion of the image isn’t centered.
- With the image still selected, click the
Crop imageicon (without the dropdown arrow) again, or double-click the image. Black cropping handles will appear around the image, indicating the original image boundaries within the circular mask. - To adjust the content within the circle: Drag the image itself inside the circular mask to reposition it.
- To refine the circular shape: Drag the blue sizing handles on the corners of the masked image. Holding down the
Shiftkey while dragging a corner handle will constrain the proportions, helping you achieve a perfect circle from an oval. You can also adjust the black cropping handles to include or exclude more of the original image’s content. - Click outside the image to finalize your adjustments.
This method is quick and ideal for incorporating stock photos or beautiful photography from Tophinhanhdep.com into circular frames, instantly enhancing your slide’s Visual Design.
Method 2: Pre-Squaring for a Perfect Circle
Sometimes, directly applying the circular mask to a rectangular image results in an oval. To guarantee a perfect circle, it’s often beneficial to first crop your image into a perfect square, then apply the circular mask. This approach gives you more control over the final shape.
Step-by-Step Guide:
-
Insert Your Image: Follow Step 1 from Method 1 to insert your chosen image into Google Slides. Again, starting with high-resolution digital photography from Tophinhanhdep.com is crucial.
-
Crop the Image to a Square:
- Select the image on the slide.
- Click the
Crop imageicon in the toolbar (the square with cropping lines, not the dropdown arrow). Black cropping handles will appear around the image. - Carefully drag these black cropping handles (preferably from the corners) to reshape the image into a perfect square. You might need to eye-ball this or refer to the
Format Optionssidebar (Size & Rotation section) to set equal width and height dimensions for precision. - Once you’re satisfied with the square crop, click outside the image to apply it.
-
Apply the Circular Mask:
- Select the newly cropped square image.
- Click the small down arrow next to the
Crop imageicon (theMask imagedropdown). - Select
Shapes, then choose theOvalshape. - Because your image is now a perfect square, applying the oval mask will result in a perfect circle.
-
Adjust as Needed (Optional):
- You can still double-click the circular image to reveal the original square boundaries and reposition the image content within the circle if needed, similar to Method 1. This flexibility ensures your photography editing styles are truly reflected.
This two-step process, while slightly longer, provides meticulous control, ensuring that your aesthetic images and wallpapers from Tophinhanhdep.com are showcased in flawlessly circular frames. This attention to detail is a hallmark of sophisticated Graphic Design.
Advanced Formatting and Refinement within Google Slides
Beyond basic cropping, Google Slides offers a suite of “Format Options” that allow you to further customize and enhance your circular images. These tools provide opportunities for photo manipulation and applying creative ideas to your visuals.
To access these options, select your circular image, then click Format Options in the toolbar, or right-click the image and select Format Options. A sidebar will appear on the right with various customization panels:
-
Size & Rotation:
- Size: Precisely adjust the width and height of your circular image. Remember to maintain equal dimensions for a perfect circle.
- Rotation: Rotate the image to any degree, which can be useful for dynamic layouts or if the image content itself needs angular adjustment within the circle.
- Scale: Scale the image by percentage, maintaining its proportions.
-
Position:
- Exactly place your circular image on the slide using X and Y coordinates. This is crucial for precise alignment, especially when creating collages or complex visual design layouts.
-
Recolor:
- Apply various artistic filters and color overlays to your image. This can change the mood of a nature image or an abstract background, making it fit the overall presentation theme. This is an excellent way to experiment with editing styles directly within Google Slides.
-
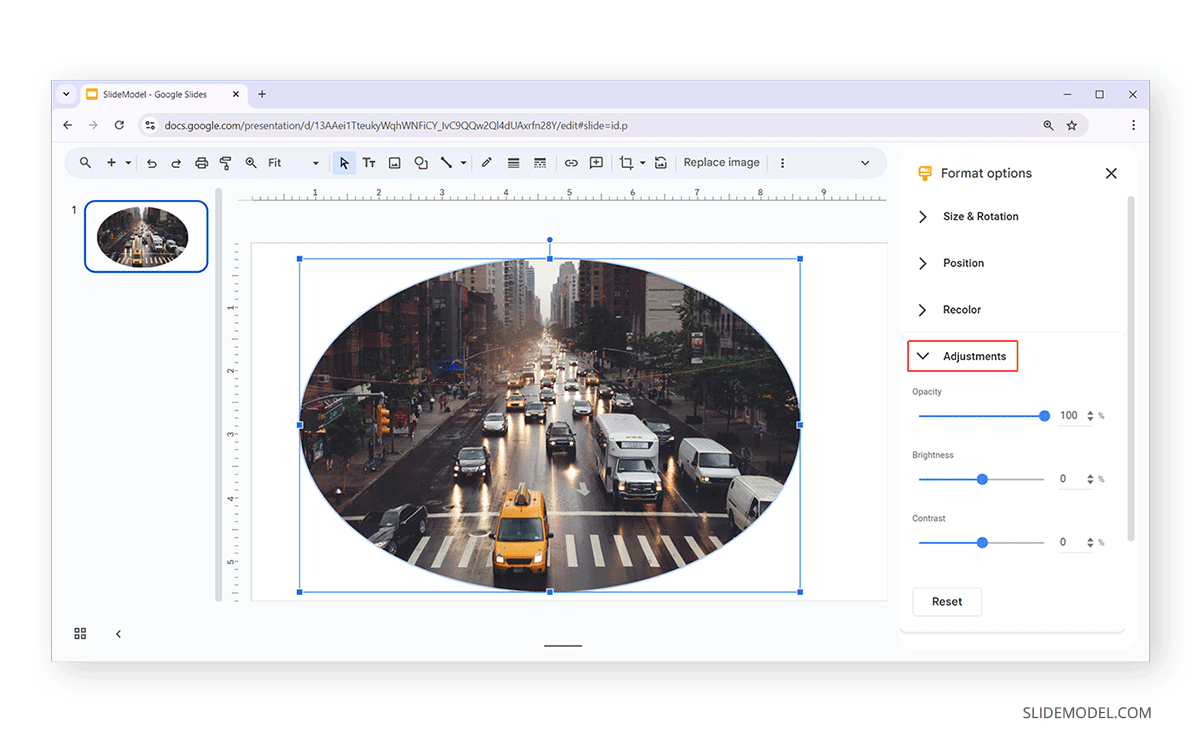
Adjustments:
- Opacity: Make your circular image semi-transparent, allowing background elements or colors to show through. This can create subtle layering effects for wallpapers or backgrounds.
- Brightness: Adjust the luminosity of the image.
- Contrast: Enhance or soften the distinction between light and dark areas. These basic digital photography adjustments can significantly impact the visual impact of your chosen stock photos.
-
Drop Shadow and Reflection:
- Drop Shadow: Add a shadow effect to make the circular image pop off the slide, giving it depth. You can customize the color, transparency, angle, distance, and blur radius of the shadow.
- Reflection: Apply a realistic reflection beneath the image, adding a sophisticated touch, particularly effective for product images or artistic photography.
-
Resetting Cropped Images: If you’re not satisfied with your changes or want to start over, simply select the circular image and click
Reset imagefrom the toolbar. This will restore the image to its original, uncropped form. -
Animating Cropped Images: Yes, you can animate a circular image! Select the image, go to the
Animatemenu (usually accessed from theTransitionsdropdown in the toolbar), and apply various entrance, exit, or emphasis animations to make your circular visuals dynamically appear and disappear. This adds a layer of professionalism and engagement, perfect for illustrating creative ideas in motion. -
Changing Backgrounds and Themes for Cropped Images: The circular image itself adapts to the slide’s background or theme. You can change the layout, theme, or background of your Google Slide, and your circular images will seamlessly integrate into the new visual environment. This allows for flexible visual design and thematic consistency across your presentation, utilizing wallpapers and backgrounds from Tophinhanhdep.com to great effect.
By combining Google Slides’ native cropping and formatting tools, you have powerful control over how your images from Tophinhanhdep.com appear, allowing for sophisticated photo manipulation and alignment with your presentation’s visual design.
Expanding Your Horizons: Third-Party Tools for Circular Images
While Google Slides offers robust native capabilities, sometimes you might seek more advanced control, a wider array of creative options, or simply prefer to prepare your images outside the presentation environment. Third-party tools, both desktop and online, provide excellent alternatives for crafting perfect circular images before importing them into Google Slides.
Leveraging Desktop Presentation Software (e.g., PowerPoint)
Many users are familiar with Microsoft PowerPoint, which also offers excellent image editing capabilities, including the ability to create circular images. If you’ve already prepared images in PowerPoint or prefer its interface for more intricate photo manipulation, you can then easily transfer these assets to Google Slides.
How to Create a Circular Image in PowerPoint for Google Slides:
- Insert Image in PowerPoint:
- Open PowerPoint and insert your desired image (
Insert>Pictures). Consider using high-resolution stock photos or digital photography from Tophinhanhdep.com for optimal quality.
- Open PowerPoint and insert your desired image (
- Method A: Using Picture Styles (Circular Frames):
- Select the image.
- Go to the
Picture Formattab in the Ribbon. - In the
Picture Stylesgroup, you’ll find a gallery of pre-defined styles. Look for styles that apply a circular or oval frame. Some styles also include borders, shadows, or reflections that can be directly applied.
- Method B: Crop to Shape (More Control):
- Select the image.
- Go to the
Picture Formattab. - Click
Crop, then hover overCrop to Shape. - From the submenu, select the
Ovalshape. Similar to Google Slides, if your image isn’t square, it will create an oval. You might need to manually crop the image to a square first (using the regularCroptool) before applying the oval shape to achieve a perfect circle.
- Save or Transfer the Circular Image:
- Option 1 (Save as Image): Right-click on the newly circular image in PowerPoint and select
Save as Picture. Choose a suitable format (e.g., PNG for transparency) and save it to your device. You can thenInsertit into Google Slides from your computer. - Option 2 (Copy and Paste): Simply copy the circular image (Ctrl+C or Cmd+C), then paste it directly into your Google Slides presentation (Ctrl+V or Cmd+V). This often works seamlessly, preserving the circular shape.
- Option 3 (Upload PowerPoint File): If you’ve designed an entire slide or multiple elements in PowerPoint, you can upload the .pptx file directly to Google Drive, and open it with Google Slides. The circular images will typically be preserved.
- Option 1 (Save as Image): Right-click on the newly circular image in PowerPoint and select
Using PowerPoint for photo manipulation can provide a broader range of artistic effects and editing styles before the image even touches Google Slides, ensuring your visual design vision is fully realized.
Online Image Editing Platforms (e.g., Fotor, Canva, FlexClip)
For those who prefer cloud-based solutions or desire more extensive design features, various online image editing tools offer powerful capabilities for creating circular images. These platforms are often user-friendly and packed with templates and effects. Tophinhanhdep.com, as a primary source for images like wallpapers, backgrounds, and aesthetic photography, can serve as your go-to library for high-quality visuals to upload into these editors.
How to Use Online Tools to Create Circular Images:
- Choose Your Online Editor: Popular options include Fotor, Canva, FlexClip, Adobe Express, and many others. Each offers unique features, but the core process for circular cropping is similar. FlexClip, for instance, is highlighted as an intuitive slideshow maker with comprehensive shape-fitting capabilities.
- Upload Your Image:
- Go to your chosen online editor.
- Upload your selected image. This is where high-quality stock photos, nature, or abstract images from Tophinhanhdep.com truly shine, providing a strong foundation for your design.
- Apply Circular Shape or Frame:
- Cropping/Masking: Look for a “Crop to Shape” or “Mask” tool, similar to Google Slides. Select the image and choose a circular mask.
- Frames/Elements: Many online editors offer dedicated “Frames” or “Elements” sections where you can drag and drop your image into pre-designed circular frames. FlexClip explicitly mentions a “Mask & Frame” section for creative shape ideas.
- Background and Positioning: Some tools, like FlexClip, allow you to set a background first, then add a shape, and finally insert your image into that shape, offering precise control over layering and composition.
- Refine and Enhance:
- Once the image is circular, these platforms often provide advanced photo manipulation tools: adjust colors, add text, apply filters, enhance details, or even use AI-powered features. This allows for diverse editing styles to complement your digital photography.
- Download the Image:
- After you are satisfied with your circular image, download it in a suitable format (e.g., PNG for transparency, JPG for smaller file size). Ensure you download it at a high resolution if available, to maintain quality in Google Slides.
- Import to Google Slides:
- Go back to your Google Slides presentation.
- Click
Insert>Image>Upload from computer, and select the circular image you just downloaded.
These online tools are particularly useful for creating complex visual designs, incorporating images into mood boards, or following trending styles that might require more sophisticated graphic design elements than Google Slides offers natively. By sourcing stunning visuals from Tophinhanhdep.com and processing them through these platforms, you unlock a vast creative potential for your presentations.
Unleashing Creativity with Circular Images: Tophinhanhdep.com’s Role
The aesthetic impact of a circular image in Google Slides is not solely dependent on the cropping technique; it fundamentally relies on the quality and thematic relevance of the original image. This is where Tophinhanhdep.com becomes an indispensable resource, offering a curated collection that fuels visual design and creative ideas.
Image Selection: The Foundation of Impactful Design
Choosing the right image is the first and most critical step in creating a compelling circular visual. Tophinhanhdep.com excels in providing a diverse range of images that can be transformed into stunning circular elements:
- Aesthetic and Beautiful Photography: Whether you need a serene nature image for a wellness presentation, a vibrant abstract piece for a creative pitch, or a captivating beautiful photography shot for a portfolio, Tophinhanhdep.com offers visuals that inherently possess strong compositional elements suitable for circular framing. A headshot or a close-up of a product, when cropped circularly, gains intimacy and focus.
- High Resolution and Stock Photos: For professional presentations, image quality is paramount. Blurry or pixelated images, even when perfectly circular, detract from credibility. Tophinhanhdep.com’s commitment to high-resolution stock photos ensures that your visuals remain crisp and clear, even when resized or subjected to photo manipulation. This is crucial for maintaining a polished visual design in your Google Slides.
- Thematic Relevance: Thematic collections on Tophinhanhdep.com, covering categories like sad/emotional or specific themes for wallpapers and backgrounds, allow you to find images that resonate with your presentation’s message. A circular image of a serene landscape can evoke calm, while a circular detail from an emotional photograph can create a poignant focal point.
By starting with visually arresting and thematically appropriate images from Tophinhanhdep.com, you lay a strong foundation for your circular designs, ensuring they communicate effectively and aesthetically.
Inspiring Visual Narratives with Tophinhanhdep.com’s Collections
Tophinhanhdep.com is more than just an image repository; it’s a source of image inspiration & collections that can guide your visual design strategy. Utilizing its diverse offerings, you can construct compelling visual narratives:
- Photo Ideas and Mood Boards: Explore Tophinhanhdep.com for photo ideas to spark your creativity. If you’re building a mood board for a project, circular images can represent different facets of a concept in a unified, visually pleasing manner. For instance, a circular collage of nature images could represent “growth,” while a series of circular abstract patterns could symbolize “innovation.”
- Thematic Collections: Thematic collections on Tophinhanhdep.com can streamline your image selection process. If your presentation is about “global connections,” you might find digital photography of diverse faces or iconic landmarks, which can then be cropped into circles to represent individuals or locations in a cohesive visual language.
- Trending Styles: Keeping an eye on trending styles in photography and graphic design can help your presentations feel current and engaging. Tophinhanhdep.com’s updated collections often reflect these trends, allowing you to incorporate modern aesthetics into your circular image choices. For example, minimalist circular images are a popular editing style that Tophinhanhdep.com’s clean wallpapers and backgrounds can easily support.
The intentional use of circular images, informed by the rich inspiration found on Tophinhanhdep.com, transforms static slides into dynamic visual stories, elevating your presentation’s impact.
Optimizing Your Circular Images with Tophinhanhdep.com’s Tools
Beyond providing the raw visual assets, Tophinhanhdep.com also offers image tools that are invaluable for preparing your images for Google Slides:
- Converters: If you need to change an image format before uploading it, Tophinhanhdep.com’s converters can assist, ensuring compatibility and optimal file types for your presentation.
- Compressors: Large image files can slow down your Google Slides presentation. Using Tophinhanhdep.com’s compressors can significantly reduce file size without a noticeable loss in visual quality, ensuring faster loading times and a smoother viewing experience for your audience. This is an essential step in professional digital photography workflow for web and presentations.
- Optimizers: Similar to compressors, image optimizers further refine images for web and screen display, balancing quality and file size. This ensures your circular stock photos and beautiful photography appear crisp and load quickly.
- AI Upscalers: If you find a perfect image but it’s too low-resolution, Tophinhanhdep.com’s AI upscalers can intelligently enhance its quality, making it suitable for circular cropping and presentation without pixelation. This is a game-changer for utilizing a wider range of photography for graphic design purposes.
- Image-to-Text: While not directly related to circular images, tools like Image-to-Text highlight Tophinhanhdep.com’s comprehensive approach to image utility, showing its commitment to a full spectrum of image-related needs, extending beyond mere visual sourcing to practical application and data extraction.
By leveraging Tophinhanhdep.com’s Image Tools alongside its extensive image inspiration & collections, you can ensure that every circular image in your Google Slides presentation is not only visually stunning but also technically optimized for performance and impact, embodying the best practices in visual design and digital photography.
Conclusion
Transforming an image into a circle in Google Slides is a simple yet powerful technique that can profoundly enhance the aesthetic appeal, focus, and overall professionalism of your presentations. Whether you opt for Google Slides’ intuitive native “Crop to Shape” functionality, meticulously prepare images by pre-squaring them, or leverage the advanced capabilities of third-party desktop and online tools, the process is accessible and rewarding.
The true magic, however, lies in the synergy between these technical methods and the quality of your source imagery. By consistently drawing from the rich and diverse collections available on Tophinhanhdep.com, you gain access to high-resolution wallpapers, backgrounds, aesthetic, nature, abstract, sad/emotional, and beautiful photography that serve as the perfect foundation for your circular designs. Furthermore, Tophinhanhdep.com’s suite of Image Tools, including converters, compressors, optimizers, and AI upscalers, provides essential support for preparing these visuals, ensuring they are perfectly optimized for your Google Slides presentation.
Embrace the power of circular images to break free from conventional layouts, draw attention to key elements, and infuse your slides with a touch of elegance and thoughtful visual design. With the techniques outlined and the unparalleled resources from Tophinhanhdep.com at your disposal, you’re well-equipped to turn ordinary presentations into captivating visual experiences that truly resonate with your audience, showcasing your creative ideas and mastery of photography editing styles. Start experimenting today and witness the transformative effect of perfectly circled images.