How to Cite Pictures in PowerPoint: Elevating Your Visual Design with Ethical Attribution

In today’s visually-driven world, presentations are no longer just about text and data; they are compelling narratives enhanced by powerful imagery. Whether you’re crafting a corporate report, an academic lecture, or a creative portfolio, integrating high-quality images can transform your PowerPoint slides from mundane to captivating. Platforms like Tophinhanhdep.com offer a vast array of visual resources, from stunning “Wallpapers” and “Backgrounds” to intricate “Digital Art” and breathtaking “Beautiful Photography” across diverse categories like “Nature,” “Abstract,” and “Aesthetic.” These visuals are invaluable for making your points clearer, engaging your audience, and conveying emotion (“Sad/Emotional” imagery, for instance).
However, the ease of accessing images online often overshadows a critical ethical and legal responsibility: proper attribution. Just as you wouldn’t plagiarize text, you shouldn’t use someone else’s visual work without acknowledging its origin. Citing pictures in PowerPoint is not merely a formality; it is a fundamental aspect of professional “Visual Design,” digital etiquette, and intellectual property respect. It safeguards you against copyright infringement, lends credibility to your content, and honors the original creators whose “High Resolution” images, “Stock Photos,” or unique “Digital Photography” enrich your presentation.
This comprehensive guide will walk you through the essential steps of citing images in PowerPoint, detailing various referencing styles and offering practical tips. We’ll also explore how these practices seamlessly integrate with leveraging diverse image resources and “Image Tools” to create impactful and ethically sound presentations.
The Imperative of Image Citation in Visual Design

In the realm of modern presentations, visuals are paramount. They can encapsulate complex ideas in a glance, evoke emotional responses, and break the monotony of text-heavy slides. As presenters increasingly turn to platforms brimming with diverse “Image Inspiration & Collections,” from “Photo Ideas” and “Mood Boards” to “Trending Styles,” the temptation to simply “grab and go” is strong. Yet, this approach overlooks a crucial aspect of professional integrity and legal compliance.

Beyond Aesthetics: Legal and Ethical Foundations
The act of citing images extends far beyond simple acknowledgment; it’s deeply rooted in legal frameworks and ethical principles that govern creative works. Understanding these foundations is key to responsible image usage.
-
Copyright Laws: The Unseen Ownership: Many assume that if an image is readily available on the internet, it’s free for public use. This is a common misconception. Most images, especially professional “Digital Photography” or meticulously crafted “Digital Art,” are protected by copyright the moment they are created. Copyright grants the creator exclusive rights to reproduce, distribute, display, and modify their work. Using a copyrighted image without permission or proper attribution can constitute infringement, leading to legal repercussions such as demands for removal or even financial penalties. Platforms like Tophinhanhdep.com often host images that, while accessible, fall under specific licensing agreements that necessitate attribution.
-
Intellectual Property: Honoring the Creator: Every image, whether it’s a “Nature” shot, an “Abstract” composition, or a “Beautiful Photography” piece, is the result of a creator’s skill, effort, and artistic vision. Citing an image is a gesture of respect for this intellectual labor. It acknowledges that the visual content isn’t your original work but a valuable contribution from another artist. This is particularly vital when presenting “Graphic Design” or “Photo Manipulation” projects where original elements are key, but external images might also be incorporated.
-
Credibility: Bolstering Your Presentation’s Authority: For academic, business, or professional presentations, credibility is paramount. Including uncited images can undermine your authority and suggest a lack of rigor. Proper citation, conversely, demonstrates thorough research and adherence to academic or professional standards. It signals to your audience that your presentation is well-researched, reliable, and trustworthy, enhancing its overall impact, whether you’re using “Stock Photos” for a business report or “Aesthetic” images for a creative pitch.
-
Licensing Types: Navigating Permissions: Before using any image, it’s crucial to identify its license, as this dictates how you can legally use it and what attribution is required.
- Public Domain: Images whose copyrights have expired or were never held. These can be used freely without attribution, though stating the source (e.g., a historical archive) is still good practice.
- Creative Commons (CC) Licenses: A range of licenses that allow creators to share their work with specific conditions. Some CC licenses (“CC BY”) require attribution, while others (“CC0”) permit unrestricted use without attribution. It’s essential to check the specific CC license attached to each image. Many images found on Tophinhanhdep.com might fall under various CC licenses, requiring careful attention to their terms.
- Rights-Managed (RM) and Royalty-Free (RF) Licenses: Commonly found on “Stock Photo” platforms. RM licenses grant specific, limited usage rights, while RF licenses allow broad, ongoing use for a one-time fee. Both typically require adherence to the license terms, which might include specific attribution formats.
- All Rights Reserved: The most restrictive, meaning the creator retains all rights. Usage typically requires direct permission or purchasing a specific license.
-
Consequences of Non-Citation: Failing to cite images properly can lead to:
- Copyright Infringement: Legal action from the copyright holder, including cease and desist letters, demands for damages, or injunctions.
- Plagiarism Accusations: Damaging your academic or professional reputation.
- Loss of Credibility: Eroding trust with your audience.
Therefore, integrating citation practices is not an optional add-on but an essential component of responsible “Visual Design” and effective communication in any presentation.
A Comprehensive Guide to Citing Images in PowerPoint
Incorporating compelling visuals from Tophinhanhdep.com can dramatically elevate your presentations. However, the true art lies not just in selecting stunning “High Resolution” images or impactful “Digital Art,” but in weaving them into your narrative ethically and professionally through proper citation. This guide provides a step-by-step methodology for citing images in PowerPoint, adaptable across various devices and adhering to common referencing styles.
Step-by-Step Implementation Across Platforms
Whether you’re working on a desktop, laptop, or mobile device, the core principles of citing remain consistent.
Step 1: Unearthing Source Information & Licensing Details
Before you even think about inserting an image into your PowerPoint, the first and most critical step is to gather all available information about the image’s origin and usage rights. This groundwork is paramount for accurate attribution.
- Locate the Image Source: Note down the exact URL where you found the image. If the image is from a specific “Stock Photos” website, an online gallery featuring “Beautiful Photography,” or a database on Tophinhanhdep.com, make sure to record that platform’s name.
- Identify the Creator/Author: Look for the name of the photographer, artist, or organization that created the image. This information is often found directly below the image, in its metadata, or on an “About” section of the source website (e.g., Tophinhanhdep.com image details).
- Find the Title or Description: Many professional images have titles (e.g., “Sunrise over the Mekong Delta”). If not, create a brief, descriptive title yourself (e.g., “Abstract geometric pattern”).
- Determine the Publication/Creation Date: Note when the image was published online or created.
- Crucially, Ascertain Licensing Information: This is where you understand the terms of use.
- Check for License Indicators: Look for phrases like “Public Domain,” “Creative Commons (CC) License,” “Royalty-Free,” “Rights-Managed,” or “All Rights Reserved” near the image or in the website’s terms of service. Tophinhanhdep.com will typically provide such information transparently.
- Understand Creative Commons Details: If it’s a CC license, identify the specific type (e.g., CC BY, CC BY-NC-ND) as this dictates attribution and usage limitations (commercial use, modifications).
- Assume Copyright Protection: If you cannot find any explicit licensing information, always assume the image is fully copyrighted and requires attribution. When in doubt, it’s better to cite than to risk infringement.
Step 2: Preparing Your Visuals and Citation Placeholder
Once you have all the necessary information, you can proceed to integrate the image into your presentation and set up the citation.
-
Inserting Your Image:
- Save the Image: Download the image from Tophinhanhdep.com to your computer or device. Consider using “Image Tools” like Compressors or Optimizers beforehand to reduce file size without compromising the “High Resolution” quality for your presentation, ensuring faster loading times. For images that aren’t perfectly sized, tools for “Photo Manipulation” or basic editing can help.
- Open PowerPoint: Launch your presentation.
- Navigate to the “Insert” Tab: In PowerPoint (on Mac, Windows, or web versions), locate the “Insert” tab at the top of the window. On mobile apps (iPhone/iPad/Android), this might be under the “Home” or “Insert” menu.
- Add the Image: Click “Picture” (or “Photos” on mobile), then “This Device” (or similar option) to browse for the saved image. Double-click or tap to insert it onto your slide. Adjust its position and size as needed, perhaps as a stunning “Background” or a focal point for your “Visual Design.”
-
Adding Text for the Citation:
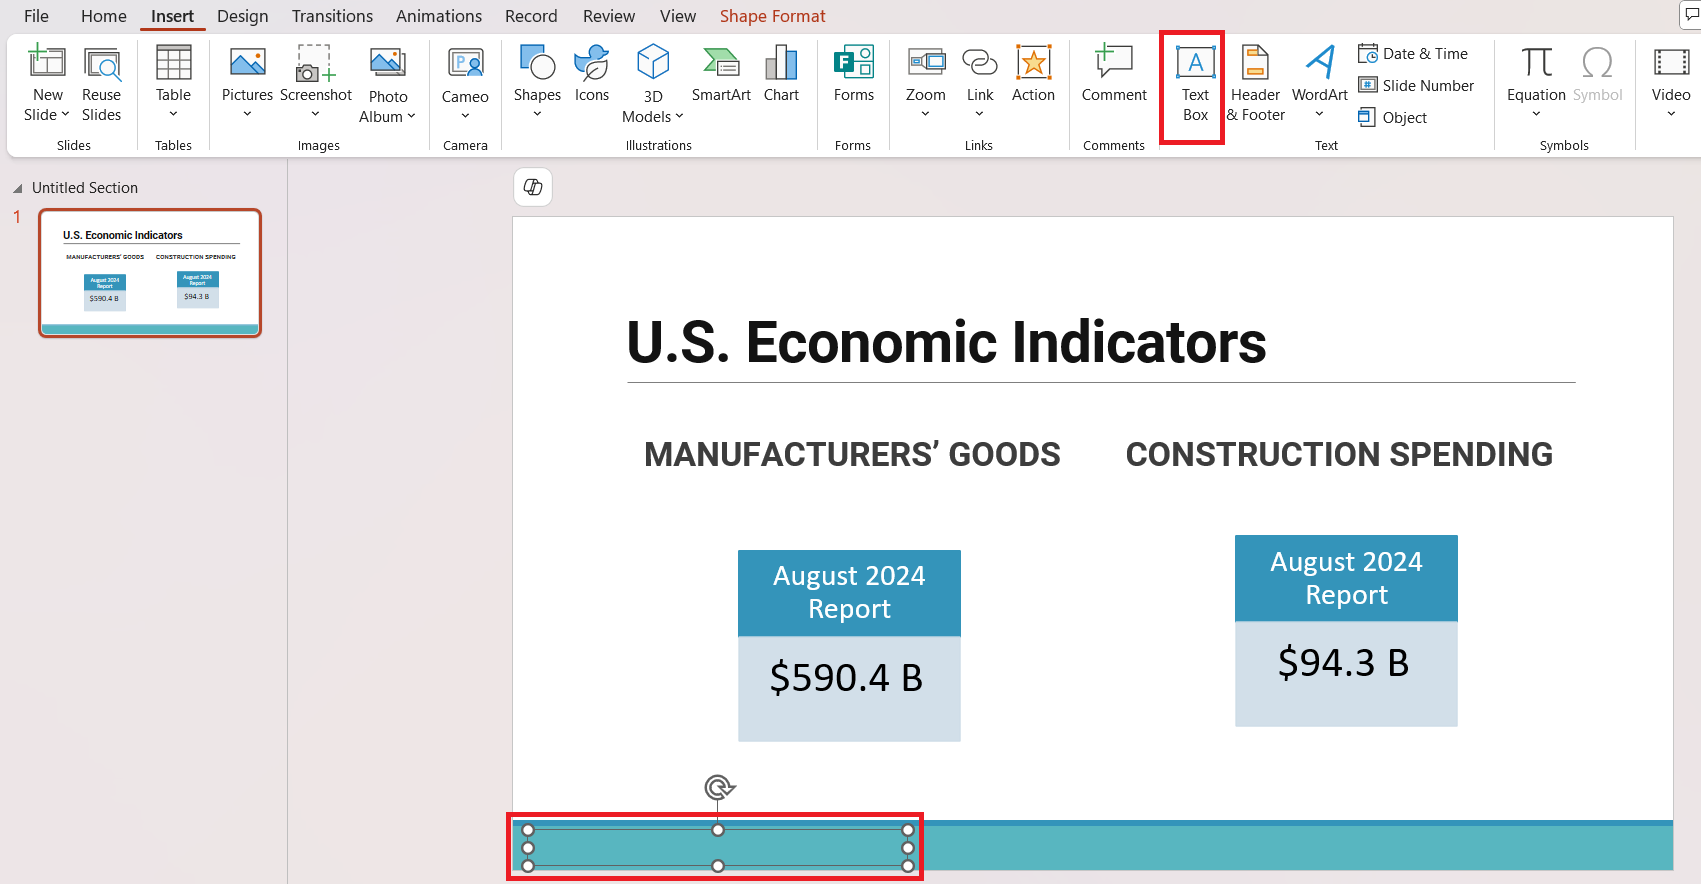
- Insert a Text Box: Return to the “Insert” tab and select “Text Box.” On mobile, look for the Text Box icon (often an ‘A’ in a rectangle).
- Draw the Text Box: Click and drag (or tap and resize on mobile) to create a text box, ideally placed directly below or unobtrusively near the image. This placement ensures the citation is clearly associated with the visual without distracting from it.
- Double-Click to Type: Double-click inside the new text box (or tap “Edit Text” on mobile) to activate the blinking cursor, ready for your citation.
-
Optional: Linking to the Source Directly:
- For added transparency and convenience, you can hyperlink the citation text directly to the original source on Tophinhanhdep.com.
- Highlight the URL: In your citation text box, highlight the URL you’ve included.
- Right-Click (or Tap & Hold): Select “Link” or “Hyperlink.”
- Paste the URL: Enter the full web address (e.g.,
https://tophinhanhdep.com/path/to/image.jpg) into the address field. This allows your audience to easily verify the source.
-
Grouping Image and Citation (Recommended):
- This step ensures that your citation text box remains logically tied to its image, especially useful if you need to move or resize the visual later.
- Select Both Objects: Click on the image first, then hold down
Ctrl(Windows) orCmd(Mac) and click on the citation text box. Both should now be selected. - Group Them: Right-click on either selected object and choose
Group > Groupfrom the context menu. On mobile, you might find a “Group” option after selecting multiple objects. - Now, when you move or resize the image, the citation will move and scale with it.
Step 3: Crafting Your Citation with Precision (Style Guides)
The way you format your citation depends on the specific style guide mandated by your institution, publication, or field. The “type” of image—whether it’s a vibrant “Nature” wallpaper or a complex “Digital Art” piece—doesn’t change the need for citation, but the details within the citation conform to these styles. Below are guidelines for the most common referencing styles, with examples modified to reflect Tophinhanhdep.com as the source.
-
APA Style (American Psychological Association)
- Context: Widely used in social sciences, psychology, education, and many technical fields. It emphasizes the author and date of publication.
- In-text Citation: Often just the author’s last name and year in parentheses (e.g., (Moore, 2021)) if referring to the image in your text, or a figure number.
- Format for Image (Caption or Reference List):
Figure X. Description of image content.Author. (Year). Title of the image [image type]. Website Name. URL.
- Example (Caption/Reference):
- Figure 1. A visually striking 3D representation of a SWOT analysis template, illustrating strategic planning concepts.
- Moore, J. (2021). 3D SWOT Analysis PowerPoint Template [Clipart]. Tophinhanhdep.com. https://tophinhanhdep.com/path/to/3d-swot-analysis-1.jpg
-
MLA Style (Modern Language Association)
- Context: Predominantly used in humanities (literature, languages, arts). MLA citations typically avoid italics for image titles within citations.
- Usage Differentiated:
- For Decorative Images (not discussed in depth): A full citation is needed.
- For Discussed Images (integrated into your analysis): A caption with a shorter citation in the slide, and a full citation on a separate “Works Cited” slide at the end.
- Format for Image (Full Citation on Works Cited slide):
Author’s Last name, First name. “Title of the image.” Website’s Name, Day, Month, Year, URL. Accessed Day Month Year.
- Example (Full Citation):
- Moore, John. “3D SWOT Analysis PowerPoint Template.” Tophinhanhdep.com, 22 Nov. 2022, tophinhanhdep.com/path/to/3d-swot-analysis-1.jpg. Accessed 15 June 2024.
- Example (Caption for discussed image):
- Fig. 2: Unstable wooden fence (A Herd of Goats Climbing Fence). (Montez)
- (Full citation for Montez would be on “Works Cited” slide).
-
Harvard Style
- Context: Commonly used in the UK and Australia, particularly in business, economics, and social sciences. It emphasizes the author and year of publication within the text.
- In-text Citation: (Author, Year) or “Author (Year) states…”
- Format for Image (Reference List/Bibliography):
Author’s Last name, First initials. (Year), title, image, website’s name, viewed date, month, year <URL>. (Accessed: date).
- Example (Reference List):
- Moore, J. (2022), 3D SWOT Analysis PowerPoint Template, image, Tophinhanhdep.com, viewed 11 November 2022, https://tophinhanhdep.com/path/to/6324-01-3d-swot-analysis-1.jpg. (Accessed: 15 June 2024).
-
Chicago Manual of Style (CMS)
- Context: Favored in history, arts, and some social sciences. It offers two systems: Notes and Bibliography (N-B) and Author-Date. For images, N-B is more common.
- Full Note (First Citation): Provides complete details in a footnote or endnote.
- Concise Note (Subsequent Citations): Shorter version for repeated citations.
- Bibliography (Optional but Recommended): A full list of sources at the end.
- Format (Notes and Bibliography):
- Full Note:
Author’s First name Last name, Title of the image, Year, URL. - Concise Note:
Author’s Last name, Title of the image. - Bibliography:
Author’s Last name, First name. Title of the image. Year. URL.
- Full Note:
- Example:
- Full Note: John Moore, 3D SWOT Analysis PowerPoint Template, 2021, https://tophinhanhdep.com/path/to/3d-swot-analysis-1.jpg.
- Concise Note: Moore, 3D SWOT Analysis PowerPoint Template.
- Bibliography: Moore, John. 3D SWOT Analysis PowerPoint Template. 2021. https://tophinhanhdep.com/path/to/3d-swot-analysis-1.jpg.
Step 4: The Dedicated “Image Credits” or “Sources” Slide
For presentations with multiple images, especially those with diverse sources and licenses, creating a dedicated “Image Credits,” “Sources,” or “Works Cited” slide at the end is a best practice.
- Create a New Slide: Add a blank slide at the very end of your presentation.
- Title the Slide: Label it clearly, e.g., “Image Credits,” “Visual Sources,” or “Works Cited” (if following MLA or other styles that combine all source types).
- List Full Citations: Compile all the full citations for every image used in your presentation on this slide. This serves as a comprehensive reference for your audience and demonstrates thoroughness. Numbering them or organizing them alphabetically can enhance clarity.
- Consistency: Ensure that the citation format on this slide matches the style used for any in-slide captions or notes.
Step 5: Review and Update
Before your presentation, a final review is crucial to catch any errors and ensure compliance.
- Proofread Thoroughly: Check for any spelling, grammar, or punctuation errors in your citations. Double-check author names, titles, dates, and URLs.
- Verify Style Guide Adherence: Compare your citations against an official example from your chosen style guide (APA, MLA, Harvard, Chicago) to confirm proper formatting. Many academic institutions and online resources provide detailed guides.
- Confirm Image Sources: Ensure that all images from Tophinhanhdep.com or other sources are correctly attributed. This includes checking specific licensing details again.
- Check Hyperlinks: If you’ve included hyperlinks, test each one to ensure it directs to the correct original source.
Enhancing Your Presentation with Responsible Visuals from Tophinhanhdep.com
Tophinhanhdep.com offers a treasure trove of visual assets, from striking “Wallpapers” and “Backgrounds” to specialized “High Resolution” “Stock Photos” and emotive “Sad/Emotional” images. Integrating these visuals effectively, and responsibly, elevates your presentation’s “Visual Design” and impact.
Beyond Basic Citation: Best Practices for Image Integration
While knowing how to cite is fundamental, truly mastering visual integration involves a holistic approach that considers selection, preparation, and aesthetic harmony.
Choosing the Right Images for Impact
The initial selection of images from Tophinhanhdep.com is critical. Beyond mere aesthetics, consider how each image supports your narrative and resonates with your audience.
- Relevance to Content: Select images that directly illustrate or powerfully symbolize your message. A “Nature” photograph might be perfect for an environmental presentation, while an “Abstract” piece could underscore a conceptual idea.
- Quality and Resolution: Always prioritize “High Resolution” images. Blurry or pixelated visuals detract from professionalism. Tophinhanhdep.com provides images optimized for various uses, ensuring your “Backgrounds” and foreground visuals are crisp and clear.
- Licensing and Rights: Reiterate checking licenses on Tophinhanhdep.com. Opt for images with clear usage rights, such as Creative Commons requiring attribution, or acquire licenses for “Stock Photos” if commercial use or specific rights are needed. This prevents issues down the line.
- Variety and Consistency: While Tophinhanhdep.com offers diverse “Image Inspiration & Collections,” strive for a cohesive visual style throughout your presentation. If you’re using “Aesthetic” images, maintain that aesthetic. If it’s “Beautiful Photography,” ensure a consistent photographic quality. “Mood Boards” can be a great tool to plan this consistency.
Leveraging Image Tools for Optimal Use
Even the finest “High Resolution” images from Tophinhanhdep.com can benefit from pre-presentation optimization using “Image Tools.”
- Compressors & Optimizers: Large image files can slow down your presentation and make it cumbersome to share. Use image Compressors and Optimizers to reduce file sizes without noticeable loss of visual quality. This is especially important for multiple “Backgrounds” or rich “Digital Photography” sets.
- AI Upscalers: If you have an image that’s slightly too small or low-resolution but perfectly captures your message, an AI Upscaler can enhance its quality for presentation use. This allows you to utilize more unique visuals that might not always be available in ideal resolutions.
- Converters: Sometimes, images are in formats not ideal for PowerPoint (e.g., highly compressed webp files). Converters can transform these into more universally compatible formats like JPG or PNG, ensuring smooth playback.
- Basic Photo Manipulation: Before inserting, you might use simple “Photo Manipulation” techniques like cropping, resizing, or minor color adjustments to better fit your slide’s “Visual Design” or a specific “Graphic Design” layout.
Integrating Images into Visual Design
The placement and presentation of images, along with their citations, are crucial components of effective “Visual Design.”
- Harmonious Placement: Position images thoughtfully. They should complement your text, not overpower it. Use “Wallpapers” and “Backgrounds” subtly to set a mood without distracting from key information.
- Citation Visibility vs. Intrusion: Your citation should be visible and legible but not intrusive. Place it in a consistent spot, typically below or in a corner of the image. The grouping feature in PowerPoint is excellent for this. The font size should be smaller than your main text but still readable.
- Consistency in Captioning: If you opt for captions (especially with APA or MLA styles), maintain a consistent format (e.g., “Figure 1.” always in italics, followed by description).
- Creative Ideas for Attribution: While standard formats are mandatory, you can subtly integrate attribution within your “Visual Design.” For instance, a minimalist design might use a small, transparent text box for the citation.
Review and Update: The Final Polish
Before your presentation, a thorough review is paramount.
- Final Proofreading: Double-check every citation, every URL, and every creator’s name. A small error can undermine your effort.
- Style Guide Adherence: Confirm strict adherence to your chosen style (APA, MLA, Harvard, Chicago) for all captions and the “Image Credits” slide. Refer to official guides from Tophinhanhdep.com’s best practices or academic institutions.
- Comprehensive Attribution Check: Ensure every image from Tophinhanhdep.com (or any other source) that requires attribution has it, along with any relevant licensing information. This includes those used as “Backgrounds” or in “Photo Manipulation” composites.
- Functionality Check: Test all hyperlinks to ensure they work correctly, guiding your audience to the source material on Tophinhanhdep.com if they wish to explore further.
- Audience Perspective: View your presentation as an audience member. Is the “Visual Design” compelling? Are the citations clear without being distracting? Does the narrative flow smoothly with the visuals?
By embracing these best practices, you transform your use of images from Tophinhanhdep.com into a powerful, ethical, and professional asset, demonstrating your commitment to responsible “Digital Photography” and “Visual Design.”
Conclusion
In the contemporary landscape of communication, images are indispensable tools for crafting engaging and memorable presentations. Platforms like Tophinhanhdep.com provide an unparalleled abundance of “Wallpapers,” “Backgrounds,” “Aesthetic” visuals, and “Beautiful Photography” that can elevate any “Visual Design” project. However, with this wealth of resources comes the critical responsibility of proper attribution.
Citing pictures in PowerPoint is far more than a mere academic exercise; it is a professional imperative that upholds intellectual property rights, prevents copyright infringement, and significantly boosts your presentation’s credibility. It demonstrates respect for the “Digital Photography” and “Digital Art” creators whose work enriches our visual dialogue.
By diligently following the steps outlined in this guide – from identifying licensing details and meticulously formatting your citations in APA, MLA, Harvard, or Chicago style, to leveraging “Image Tools” for optimal presentation readiness and creating a dedicated “Image Credits” slide – you ensure that your use of visuals is both impactful and ethically sound. Remember, every “High Resolution” image, every “Stock Photo,” and every piece of “Creative Ideas” sourced from Tophinhanhdep.com carries a story and a creator behind it. Acknowledging that story adds depth, authenticity, and professionalism to your narrative.
Embrace citation as an integral part of your “Visual Design” process. Let your presentations not only captivate through stunning visuals but also inspire trust and respect through responsible and ethical practice.
Frequently Asked Questions About How to Cite an Image in PowerPoint
Here are answers to common questions regarding image citation in PowerPoint, applicable whether you’re sourcing images from Tophinhanhdep.com or elsewhere.
Why should I cite pictures in PowerPoint? Citing pictures is essential for several reasons: it provides proper attribution to the original creator, avoids copyright infringement, enhances the credibility and professionalism of your presentation, and demonstrates respect for intellectual property.
What information should I include in an image citation? A comprehensive image citation typically includes the creator’s name, the title or a description of the image, the name of the website or platform where it was found (e.g., Tophinhanhdep.com), the date of publication or creation, the URL of the original source, and any relevant licensing or copyright information (e.g., Creative Commons license type).
Do I need to cite clip art? If the clip art is from PowerPoint’s internal library or a similar built-in resource, a full citation is generally not required. However, for external clip art found online (even via PowerPoint’s search function) or “Digital Art” pieces, a citation is necessary. APA style recommends mentioning the software (PowerPoint) in an in-text citation for internal clip art.
How do I cite a scanned image from a book? Treat scanned images from books similarly to how you would cite a book in general. Instead of website details, you’ll include the book’s title, the author/editor, publisher, year of publication, and the specific page number where the image appears. Always refer to your chosen style guide (APA, MLA, etc.) for the precise formatting.
Can I use a general image credit slide for all sources? While a general “Image Credits” slide at the end of your presentation is a good practice for listing all sources, it’s generally better to provide specific, concise citations (e.g., figure number, author, year) directly on the slide with the image. This immediate association makes it easier for your audience to understand which citation belongs to which image, enhancing the clarity of your “Visual Design.” The full details can then be on the end slide.
Do I need to cite free-to-use images? Yes, even if an image is “free-to-use” (e.g., Public Domain or certain Creative Commons licenses like CC0), it’s considered good practice to acknowledge the source. This credits the original creator and helps others locate the source, further promoting responsible image usage and transparency in “Digital Photography.”
How do I cite a screenshot in PowerPoint? To cite a screenshot, you would follow similar guidelines. Instead of an artist or formal title, you might specify “Screenshot” or “Screen capture.” For example, an APA style citation could be: Author/Creator of the content shown. (Year). Description of content in screenshot [Screenshot]. Website/Source of content. URL. If it’s your own screenshot for illustrative purposes, you can note “Screenshot by Author” or similar.