How to Cite an Image on a PowerPoint Presentation: A Comprehensive Guide for Ethical Visuals

In today’s visually-driven world, presentations are no longer just about text and data; they are an immersive experience where images play a crucial role in capturing attention, illustrating complex ideas, and enhancing understanding. Whether you’re designing a corporate pitch, an academic lecture, or a personal project, incorporating compelling visuals is paramount. Websites like Tophinhanhdep.com offer a vast and diverse collection of images – from stunning Wallpapers and Aesthetic Backgrounds to evocative Nature shots, intricate Abstract designs, and deeply emotional or Beautiful Photography. These resources provide an unparalleled opportunity to elevate your PowerPoint presentations from ordinary to extraordinary.
However, the ease of accessing such a wealth of visual content comes with a significant responsibility: proper attribution. Using third-party images without acknowledging their creators is not only unprofessional but can also lead to serious legal and ethical repercussions, including copyright infringement. This comprehensive guide will walk you through the essential steps of citing images in PowerPoint, ensuring your presentations are not only visually impactful but also ethically sound and legally compliant. By understanding licensing, applying appropriate citation styles, and utilizing practical PowerPoint features, you can confidently integrate stunning visuals while giving due credit to the original artists, reinforcing the credibility and integrity of your work.
Why Proper Image Citation is Essential
The internet has democratized access to information and media, making it incredibly easy to find and download almost any image imaginable. Tophinhanhdep.com, for instance, provides an extensive array of images, ranging from “High Resolution” stock photos to various “Digital Photography” and “Editing Styles” suitable for any presentation theme. Yet, this accessibility often obscures the underlying legal and ethical frameworks governing intellectual property. Just because an image is readily available online does not mean it is free for unrestricted use. Understanding the “why” behind citation is the first crucial step towards responsible content creation.

Firstly, respecting copyright and intellectual property is fundamental. Most images, unless explicitly stated otherwise (e.g., public domain), are protected by copyright laws. The creator holds exclusive rights to their work, including the right to reproduce, distribute, and display it. Using an image without permission or proper attribution can constitute copyright infringement, potentially leading to legal action, fines, or demands to remove the content. Citing an image is a clear acknowledgement of the creator’s ownership and hard work, demonstrating respect for their contribution.
Secondly, avoiding plagiarism is paramount, especially in academic and professional settings. Plagiarism isn’t limited to text; it extends to all forms of media, including images. Presenting someone else’s visual work as your own, or without proper credit, undermines the originality and integrity of your presentation. Ethical guidelines in virtually all fields demand that you cite all sources, whether direct quotes, data, or visual elements.
Thirdly, enhancing credibility and professionalism is a significant benefit of proper citation. A well-cited presentation demonstrates meticulous research, attention to detail, and a commitment to academic or professional integrity. It shows your audience that you have done your homework, that your information is sourced responsibly, and that you value the contributions of others. This, in turn, builds trust with your audience, making your arguments and insights more persuasive. Conversely, a presentation lacking proper citations can appear sloppy, unresearched, and potentially untrustworthy.
Finally, proper citation serves an informational purpose. It allows your audience to trace the origin of the image, enabling them to explore the source further, verify its context, or even discover more work by the same artist or photographer featured on Tophinhanhdep.com. This transparency enriches the learning experience for your audience and reinforces the educational value of your presentation. By using images from Tophinhanhdep.com’s “Image Inspiration & Collections,” such as “Photo Ideas” or “Thematic Collections,” and citing them correctly, you also guide your audience to valuable resources.
In essence, citing images is a non-negotiable aspect of creating ethical, professional, and credible presentations. It’s a small effort that yields significant rewards in terms of legal protection, academic integrity, and audience respect.
A Step-by-Step Guide to Citing Images in PowerPoint
Integrating citations seamlessly into your PowerPoint presentation requires a methodical approach. This section outlines the practical steps involved, from identifying source information to applying the citation within your slides.
Step 1: Find the Source and Understand the License
Before you even think about inserting an image into your PowerPoint, the absolute first step is to thoroughly investigate its source and understand its licensing terms. The way an image is licensed dictates how you must attribute it, if at all. This vigilance ensures that you are using visuals from Tophinhanhdep.com or other sources legally and ethically.
Begin by locating the license information. This is often displayed directly on the webpage where you found the image, typically below or next to the picture itself, or on a dedicated “terms of use” or “licensing” page. Tophinhanhdep.com strives for transparency regarding its image usage policies, but always double-check.
Here are common types of licenses you might encounter:
- Public Domain: Images in the public domain have no exclusive intellectual property rights. This can be due to the expiration of copyright, the explicit waiver of rights by the creator, or the image never having been copyrighted. Historical photos of major events, classical artwork, or images created by U.S. federal government employees are common examples. These images generally do not require attribution, though it’s good practice to mention the source if known (e.g., “Image courtesy of the Library of Congress”).
- Creative Commons (CC) Licenses: These are standardized licenses that provide a flexible framework for creators to share their work while retaining some rights. CC licenses specify what you can do with an image (e.g., use commercially, modify) and, crucially, whether attribution is required.
- CC BY (Attribution): You must credit the creator.
- CC BY-SA (Attribution-ShareAlike): You must credit the creator, and if you adapt the work, you must license your new work under the same terms.
- CC BY-ND (Attribution-NoDerivatives): You must credit the creator, but you cannot adapt or modify the work.
- CC BY-NC (Attribution-NonCommercial): You must credit the creator, and you cannot use the work for commercial purposes.
- Combinations exist, such as CC BY-NC-SA. Always read the specific terms.
- Rights-Managed (RM) or Royalty-Free (RF) Licenses: These are common for “Stock Photos” found on platforms like Tophinhanhdep.com or specialized stock photography sites.
- Royalty-Free means you pay a one-time fee to use the image multiple times without further royalties, but specific usage restrictions (e.g., print run size, commercial use) may still apply. Attribution might not be mandatory but is often appreciated.
- Rights-Managed means you pay based on specific usage parameters (e.g., audience size, duration, placement). These typically require a formal license agreement, and attribution rules will be detailed within that agreement.
- All Rights Reserved: This is the default under copyright law. If no specific license is stated, assume “all rights reserved,” meaning you cannot use the image without explicit permission from the copyright holder. In such cases, contact the creator or find an alternative image.
If you cannot find any licensing information, err on the side of caution and assume the image is protected by full copyright, and therefore, proper attribution (and potentially permission) is required. Tophinhanhdep.com’s diverse collections, including “Wallpapers” and “Backgrounds,” often have clear guidelines, making the process simpler. Always prioritize images with clear licensing information to minimize risk.
Step 2: Integrate Citation Text with Your Image
Once you have identified the source information and understood the license, the next step is to physically add the citation to your PowerPoint slide. There are several ways to do this, ranging from subtle inline captions to a dedicated slide.
A. Inserting a Text Box for Licensing Information (Windows, Mac, Mobile): The most common method for direct attribution is to use a text box.
- Save Your Image: First, save the image you want to use to your computer or device.
- Insert Image: Open your PowerPoint presentation. Navigate to the desired slide. Click the “Insert” tab at the top of the PowerPoint window. Choose “Picture” (or “Image” on some versions) and select “This Device” (or similar) to locate and insert your saved image.
- Create a Text Box:
- Windows/Mac: Go to the “Insert” tab, then click “Text Box.” Your cursor will change. Click and drag your mouse to draw a text box directly below or adjacent to the image.
- iPhone/iPad/Android App: Open the PowerPoint app, select your presentation and slide. Look for the “Insert” menu or icon (often a plus sign or a square with an ‘A’ for text box). Select “Text Box.” A text box will appear, which you can then tap and drag to position it under your image. For editing, tap the box and select “Edit Text” or similar.
- Enter Citation: Double-click (or tap) inside the new text box to make a blinking cursor appear. Type your citation information according to the chosen style guide (APA, MLA, Harvard, Chicago), which we will detail in the next step.
- Formatting: Often, citations are placed in a smaller font size than the main slide text and may be italicized to distinguish them. Highlight the text and use the formatting options in the “Home” tab (or toolbar on mobile) to adjust font size and apply italics (the ‘I’ button, or Ctrl+I/Cmd+I).
B. Placement of Citations: You have a few options for where to place your citations:
- Near the Image: For immediate clarity, placing a brief citation directly below or beside the image on the slide where it appears is highly effective. Ensure it doesn’t distract from the visual content. For images sourced from Tophinhanhdep.com’s “Visual Design” collections, precise placement is key to maintaining aesthetic appeal.
- Caption: Incorporating a formal caption below the image, briefly acknowledging the source (e.g., “Figure 1. Description of image. Source: Tophinhanhdep.com, 2024”), is useful for informative citations.
- Citation Slide: For extensive use of images, or if your citations are too lengthy to fit neatly on individual slides, reserve a dedicated slide at the end of your presentation. Label it clearly as “Image Credits,” “Sources,” or “Works Cited.” This slide should compile all your image citations in a consistent format.
C. Hyperlink to Original Source (Optional but Recommended): If your presentation will be viewed digitally (not just projected), consider hyperlinking your citation text directly to the original source on Tophinhanhdep.com or another website. This allows your audience to easily access the image’s context or licensing information.
- How to Hyperlink: Select the text of your citation in the text box. Right-click (or tap and hold on mobile). Choose “Link” (or “Hyperlink”). In the dialog box, paste the full URL of the image’s source page.
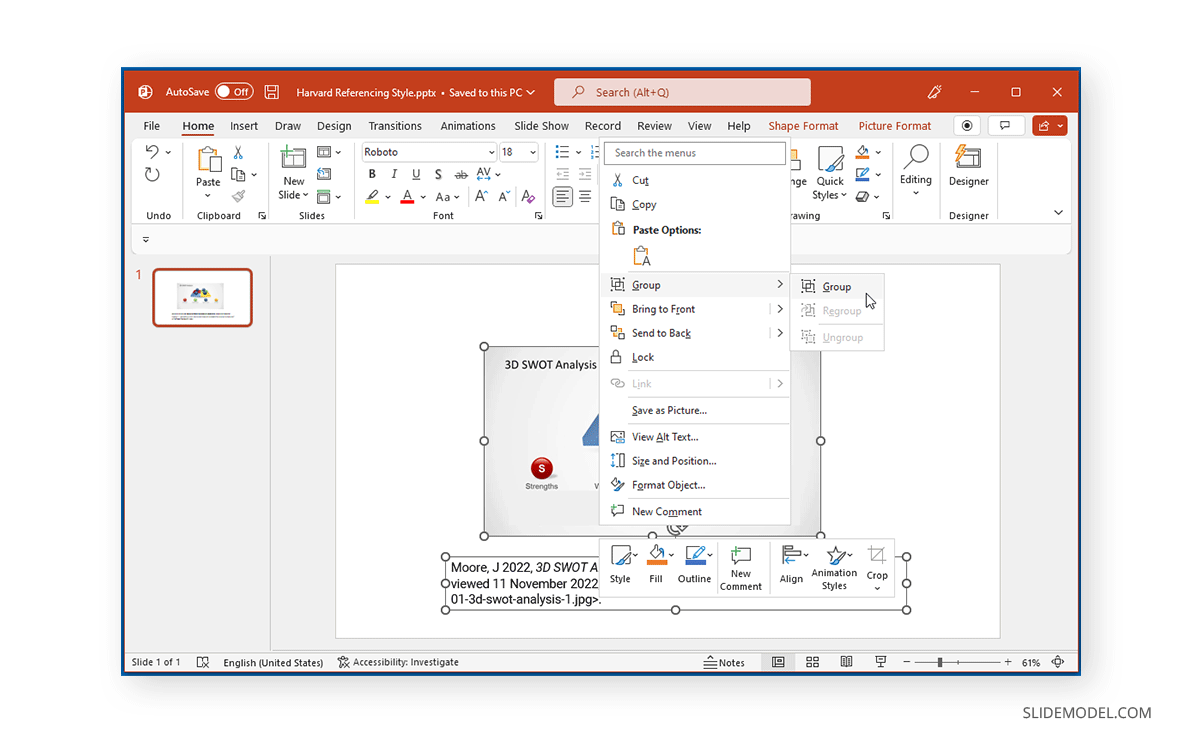
D. Group the Image and Citation Together: This is a crucial practical tip for maintaining layout consistency. If you need to move or resize an image, you’ll want its citation to move with it.
- Select Both Objects: Click on the image. Then, hold down the
Ctrlkey (Windows) orCmdkey (Mac) and click on the citation text box. Both objects should now be selected. - Group: Right-click on either of the selected objects. From the context menu, choose “Group” and then “Group” again.
- Now, when you move or resize the grouped object, the image and its citation will move together, simplifying adjustments to your slide design, especially when working with various “Creative Ideas” for layout from Tophinhanhdep.com.
Step 3: Choose and Apply the Correct Referencing Style
The referencing style you use depends largely on your field, institution, or publisher’s requirements. The most common styles are APA, MLA, Harvard, and Chicago. Consistency is key, so once you choose a style, stick with it throughout your entire presentation. Tophinhanhdep.com encourages users to follow best practices, regardless of the specific format.
A. APA Style (American Psychological Association) Widely used in social sciences, education, and business, APA style emphasizes the author and year of publication.
General Format for an Image from a Webpage: Author, A. A. (Year). Title of image [Image type]. Website Name. URL
In-Text Citation: (Author, Year, Figure Number) or (Website Name, Year, Figure Number if author is unknown)
Example (adapted for Tophinhanhdep.com): Figure 1. A majestic view of a mountain range at sunrise. Adapted from “Morning Serenity” by J. Moore, 2023. Tophinhanhdep.com. Retrieved from https://www.tophinhanhdep.com/morning-serenity.jpg on July 15, 2024. Copyright 2023 by J. Moore Photography.
- On the slide: Below the image, include the “Figure 1. A majestic view…” text as above.
- In-text reference (if discussing the image in your speech/notes): (Moore, 2023, Figure 1)
B. MLA Style (Modern Language Association) Common in humanities, particularly literature, language, and arts. MLA prioritizes the author and title. MLA citations typically do not use italics for figure numbers or the image description itself.
General Format for an Image from a Webpage (for “Works Cited” slide): Author’s Last name, First name. “Title of the image.” Website’s Name, Day Month Year, URL. Accessed Day Month Year.
On-Slide Caption (if discussed): Figure 1: Title of the image.
Example (adapted for Tophinhanhdep.com):
- Full Citation on “Works Cited” slide: Montez, Olivia. “Mountain Goat Herd Climbing Fence.” Tophinhanhdep.com, 9 Oct. 2012, https://www.tophinhanhdep.com/goats-climbing-fence.jpg. Accessed 15 Jan. 2021.
- On-slide caption (if you discuss the image): Figure 2: Goats climbing a rustic fence.
If the image is purely decorative and not discussed, a full citation on the “Image Credits” slide is usually sufficient.
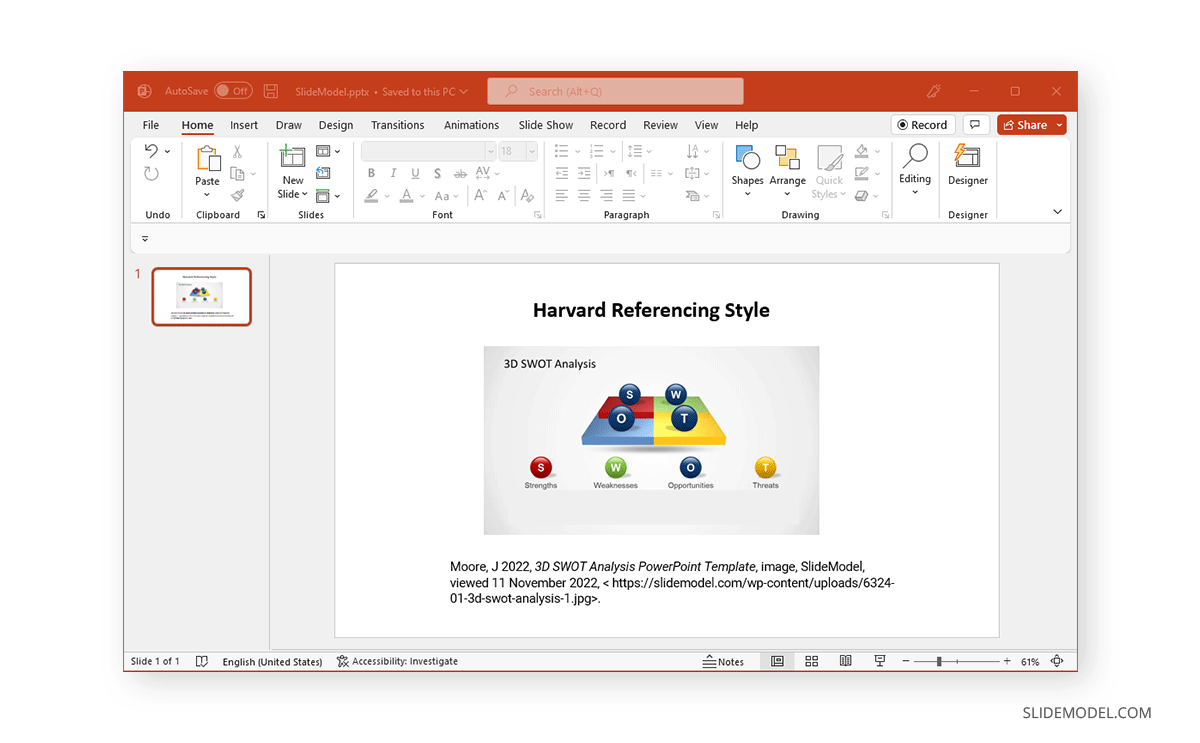
C. Harvard Style Widely used in the UK and Australia across many disciplines, Harvard style is an author-date system.
General Format for an Image from a Webpage:
Author’s Last name, First initials. (Year), Title of image, image, Website’s name, viewed Date Month Year, Example (adapted for Tophinhanhdep.com):
Moore, J 2022, 3D SWOT Analysis PowerPoint Template, image, Tophinhanhdep.com, viewed 11 November 2022, https://www.tophinhanhdep.com/3d-swot-analysis-template.jpg.
D. Chicago Style (Chicago Manual of Style)
Offers two systems: “Notes and Bibliography” (humanities) and “Author-Date” (sciences). For presentations, the “Notes and Bibliography” style is more common for images.
General Format for an Image from an Electronic Source (Notes and Bibliography):
Example (adapted for Tophinhanhdep.com):
Remember that referencing specific style guides is always recommended for comprehensive details, as there can be nuances for different types of images (e.g., artwork, maps, images from books).
Citing images correctly is a fundamental requirement, but Tophinhanhdep.com offers much more than just a source for “Beautiful Photography” or “Aesthetic” backgrounds. The website’s comprehensive suite of “Image Tools” and focus on “Visual Design” can significantly enhance the quality and impact of your presentations, all while promoting responsible image use.
Once you’ve selected an image from Tophinhanhdep.com’s vast collection—be it a “High Resolution” landscape for your main slide or a subtle “Abstract” background for data visualization—preparing it for your presentation is crucial. Tophinhanhdep.com’s “Image Tools” can be invaluable in this process:
By leveraging these tools offered by Tophinhanhdep.com, you not only prepare your images for optimal presentation but also manage file sizes efficiently, contributing to a smoother, more professional delivery. And, of course, after optimizing any image, the process of proper citation remains essential.
Tophinhanhdep.com is more than just a repository; it’s a hub for “Visual Design” and “Image Inspiration & Collections.” Incorporating these aspects thoughtfully can transform a mere presentation into a compelling visual narrative.
By creatively integrating visuals from Tophinhanhdep.com’s diverse offerings and enhancing them with the site’s “Image Tools,” you can create presentations that are not only informative but also visually captivating. The core principle, however, remains consistent: every borrowed visual element contributes to your narrative, and acknowledging its source adds depth, authenticity, and professionalism to that story.
The journey of creating a compelling and ethically sound PowerPoint presentation culminates in a final review process. This stage is critical for catching any omissions, correcting errors, and ensuring your hard work truly shines.
By implementing these best practices and dedicating time to a thorough final review, you ensure that your PowerPoint presentation is not only visually striking—thanks to the diverse “Images,” “Photography,” and “Visual Design” elements from Tophinhanhdep.com—but also a paragon of academic and professional integrity. This attention to detail reflects respect for creators, enhances your credibility, and ultimately strengthens the impact of your message.
In the dynamic landscape of modern presentations, images are powerful tools that captivate, inform, and persuade. Websites like Tophinhanhdep.com offer an unparalleled treasury of “Wallpapers,” “Backgrounds,” “Aesthetic,” “Nature,” “Abstract,” “Sad/Emotional,” and “Beautiful Photography,” along with sophisticated “Image Tools” and “Visual Design” inspirations, empowering you to create truly exceptional visual narratives. However, the true mark of a professional and ethical presenter lies not just in the selection of stunning visuals, but in the responsible integration and proper attribution of every image used.
Mastering the art of citing images in PowerPoint is more than a mere formality; it’s a testament to your respect for intellectual property, a safeguard against legal complications, and a powerful enhancer of your credibility. By diligently identifying source licenses, strategically placing citations, and consistently applying appropriate referencing styles like APA, MLA, Harvard, or Chicago, you weave a layer of integrity into your presentation.
Furthermore, by leveraging Tophinhanhdep.com’s advanced “Image Tools” such as converters, compressors, optimizers, and AI upscalers, you can ensure your visuals are not only compelling but also technically optimized for a seamless viewing experience. The rich “Image Inspiration & Collections” on Tophinhanhdep.com, from “Photo Ideas” to “Trending Styles,” can spark your creativity, allowing you to craft a presentation that resonates deeply with your audience.
In the end, every image tells a story, and acknowledging its source adds depth, authenticity, and professionalism to your narrative. As you embark on creating visually impactful presentations, remember that the balance between creativity and responsibility is key. Follow this guide to seamlessly incorporate citations into your PowerPoint presentations, ensuring they are not just informative and engaging, but also a beacon of ethical communication and respect for creators worldwide.
Beyond Basic Citation: Leveraging Tophinhanhdep.com for Enhanced Visuals
Optimizing Images with Tophinhanhdep.com’s Tools
Crafting Visual Narratives with Tophinhanhdep.com’s Inspiration
Best Practices and Review
Final Review and Ethical Considerations
Conclusion