Master the Art of Image Combination in Tophinhanhdep.com: A Photoshop Guide for Visual Storytelling

In the vibrant world of digital photography and visual design, the ability to seamlessly combine multiple images is a cornerstone of creativity. Whether you’re aiming to craft breathtaking digital art, produce compelling graphic design, or simply enhance your high-resolution photography, Photoshop stands as the indispensable tool. Tophinhanhdep.com is dedicated to providing you with the insights and tools to elevate your visual projects, from stunning wallpapers and aesthetic backgrounds to intricate photo manipulations. This comprehensive guide will walk you through the essential techniques of merging photos in Photoshop, empowering you to bring your creative ideas and thematic collections to life.
Merging images isn’t just about sticking two pictures together; it’s about weaving new narratives, constructing impossible landscapes, and creating visual experiences that defy reality. Imagine placing a solitary figure against an epic nature backdrop, or combining abstract elements to form a unique artistic statement. From enhancing a beautiful photography piece to generating a mood board of sad/emotional imagery, the techniques of image combination unlock a universe of possibilities. This article will cover the most effective and widely used methods, ensuring you gain a solid foundation in digital photography editing styles that transform ordinary shots into extraordinary visual assets.
How Do You Merge Two Photos in Photoshop?
Merging two photos in Photoshop can range from a simple side-by-side arrangement to a complex composite that seamlessly blends elements from different scenes. At its core, image merging relies on Photoshop’s robust layer system, which allows you to stack, adjust, and manipulate individual images independently within a single document. This non-destructive workflow is crucial for digital photography, as it provides immense flexibility for experimentation and refinement without altering your original high-resolution stock photos.
The primary goal of merging photos is to achieve a convincing blend, where the combined elements appear as if they naturally belong together. This involves more than just placing images on top of each other; it requires careful attention to selection, masking, blending modes, and color adjustments. Tophinhanhdep.com recognizes that the best results come from not only knowing how to use the tools but also understanding why certain techniques are applied. By mastering these methods, you’ll be able to create stunning visual designs that are perfect for aesthetic backgrounds, thematic collections, or even as trending styles in graphic design.

Before diving into the technical steps, it’s vital to consider your source material. The success of any composite often begins with selecting images that are compatible in terms of focal length, lighting conditions, and overall quality. While Photoshop offers powerful tools for tonal and color corrections, starting with well-matched images simplifies the editing process significantly. Tophinhanhdep.com recommends using high-resolution images whenever possible, as this provides more detail to work with and ensures your final composite maintains a professional quality, suitable for any creative ideas you might have, from nature wallpapers to abstract digital art.
Step 1 – Select the Images You Want to Blend
The initial and often most crucial step in creating a compelling photo merge is the careful selection of your source images. This isn’t just about picking any two pictures; it’s about choosing images that possess complementary characteristics that will allow for a convincing blend. Consider the narrative or aesthetic you wish to achieve. Are you aiming for a tranquil nature scene, a vibrant abstract composition, or perhaps a more somber, sad/emotional piece? Your choice of images will dictate the mood and success of your final visual design.

For optimal results, Tophinhanhdep.com advises looking for images with similar lighting conditions and perspectives. For instance, if you’re attempting a face swap or integrating a person into a new background, ensure the subjects in both photos are facing in a similar direction and illuminated from a comparable angle. While Photoshop excels at correcting discrepancies in color temperature and tonal balance, minimizing these differences at the outset will save you considerable time and effort in post-production.
Furthermore, the quality and resolution of your images are paramount. Using high-resolution stock photos ensures that your composite retains sharp details and clarity, which is essential for any professional graphic design or beautiful photography display. This consideration is particularly important if your merged image is intended for large-scale applications, such as wallpapers or backgrounds. Think about how your chosen images will contribute to the overall aesthetic and creative ideas you have in mind. Will a vibrant sky blend seamlessly with a detailed landscape? Can an abstract texture elevate a portrait? The possibilities are endless when thoughtful selection precedes the technical work.
Merge Two Photos In Photoshop Using The Quick Select
One of the most efficient ways to combine elements from different photographs, especially when dealing with clear subjects like people, animals, or distinct objects, is through the Quick Select method combined with precise layer masking. This technique is ideal for situations where you want to extract a specific subject from its original background and seamlessly integrate it into a new scene. Tophinhanhdep.com highlights this method as a fundamental skill for photo manipulation, enabling digital artists to create imaginative composites ranging from aesthetic backgrounds to entirely new visual narratives.
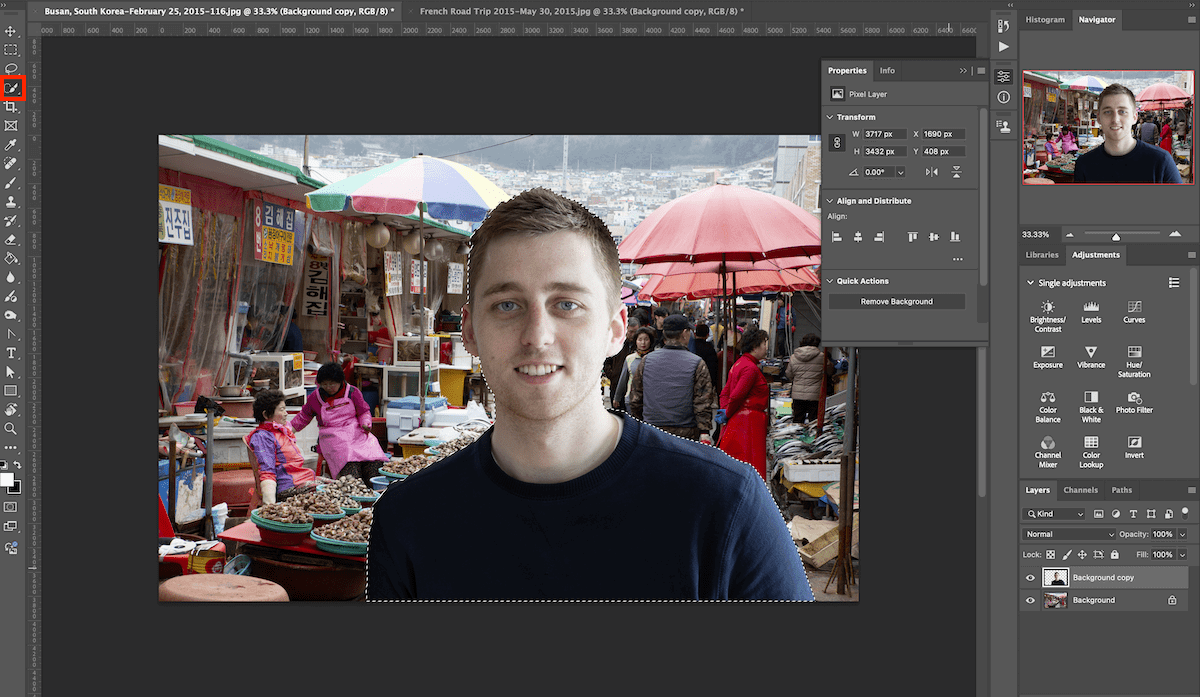
Step 3 – Cut Out Your Subject
Once your chosen images are open in Photoshop—ideally in separate tabs for this technique—the next critical step is to accurately cut out the subject from its original background. This process effectively isolates the element you wish to transfer, setting the stage for its integration into the new scene. Begin by duplicating your background layer; this practice ensures that your original image remains untouched, providing a safety net for any adjustments or mistakes.
Locate the Quick Selection Tool in Photoshop’s toolbar. This intelligent tool allows you to “paint” over your subject, and Photoshop intuitively detects the edges, forming a selection outline. As you brush, a dotted line will begin to encompass your subject. The goal is to make this selection as accurate as possible, hugging the contours of your desired element.
Should the selection stray beyond your subject, don’t fret. In the Options Bar at the top of the screen, you can switch to the Subtract From Selection brush. This allows you to precisely remove unwanted areas from your selection, fine-tuning the outline with precision. You can toggle between “Add to Selection” and “Subtract From Selection” as needed to perfect your selection.
After achieving a precise selection around your subject, the next action is to inverse the selection. This can be done by pressing Cmd + Shift + I (Mac) or Ctrl + Shift + I (Windows). Inverting the selection means that instead of your subject being selected, everything around your subject—the background—is now selected. You’ll notice the dotted line now surrounds not only your subject but also the entire frame of your image. With the background selected, press the Backspace (or Delete) key to remove it. You’ll observe in the Layers panel that the duplicated layer now displays your subject with a transparent background, ready for its new environment. This precise cutout is vital for creating convincing digital art and custom wallpapers on Tophinhanhdep.com.
Step 2 – Create A Layer Mask
After successfully cutting out your subject, the next step in achieving a truly seamless integration is to employ a Layer Mask. While direct deletion of the background is a good start, a Layer Mask offers a non-destructive and highly flexible way to refine the edges and blend your subject with its new surroundings. This technique is a cornerstone of professional photo manipulation and is essential for achieving a polished, natural look in your visual designs.
First, drag your isolated subject layer from its original document tab into your new background image. You can do this by clicking and holding the subject layer in the Layers panel, then dragging it over the tab of your background image, waiting for the document to switch, and then dropping it onto the canvas. Alternatively, if both images are open as separate documents, you can simply drag the entire layer from one document window to the other. Once placed, use Cmd + T (Mac) or Ctrl + T (Windows) to activate the Free Transform tool, allowing you to make initial size adjustments and position your subject within the new scene.
With your subject layer selected in the Layers panel, click on the “Add layer mask” icon at the bottom of the panel. This icon typically looks like a rectangle with a circle inside. A white thumbnail will appear next to your layer’s preview in the Layers panel, indicating that a Layer Mask has been added.
Now, select the Brush tool from the toolbar. The magic of Layer Masks lies in painting with black and white. Ensure your foreground color is set to black (you can quickly toggle between black and white using the X key, and reset to default black/white with D). With the Layer Mask thumbnail selected, begin brushing over the areas of your subject layer that you wish to conceal. Painting with black on the mask will hide parts of the layer, revealing the background image underneath. This is invaluable for refining the edges of your cutout, blending it subtly into the new scene, and correcting any inaccuracies from the initial Quick Selection.
Conversely, if you make a mistake and accidentally hide too much, simply switch your foreground color to white and brush over those areas to reveal them again. This non-destructive approach allows for continuous refinement, ensuring every detail, from stray hairs to intricate textures, is perfectly blended. This meticulous attention to detail is what sets professional digital photography and graphic design apart, contributing to the high-resolution, aesthetic quality Tophinhanhdep.com champions.
Step 5 – Performing Convincing Edits
Achieving a truly convincing image merge goes beyond simply cutting out a subject and placing it on a new background; it requires careful attention to how the elements interact aesthetically and tonally. This “performing convincing edits” phase is where you harmonize your merged photos, ensuring they appear as if they were always meant to be together. Tophinhanhdep.com emphasizes that these adjustments are crucial for transforming a raw composite into a piece of digital art or a seamless addition to your thematic collections.
One of the most common inconsistencies in merged images is the mismatch in color temperature and tone. For example, if your subject was photographed in warm, indoor lighting and your background is a cool, outdoor nature scene, a stark contrast will be immediately apparent. To address this, ensure your subject layer is selected, and then apply adjustment layers (e.g., Color Balance, Photo Filter, Curves, Levels) as clipping masks to only affect your subject layer. This can be done by Alt-clicking (Windows) or Option-clicking (Mac) between the adjustment layer and your subject layer in the Layers panel.
Focus on matching the color temperature first. Use the Color Balance or Photo Filter adjustment layers to introduce warmer or cooler tones to your subject until it visually integrates with the background. Similarly, use Curves or Levels to adjust the brightness, contrast, and overall tonal range of your subject, ensuring its shadows and highlights align with the lighting conditions of the new environment.
For even finer tonal adjustments, particularly for localized lighting, the Dodge and Burn tools are invaluable. These tools allow you to selectively lighten (dodge) or darken (burn) areas of your image. When using them on your subject layer, set the Exposure to a very low percentage (e.g., 5-10%) to make subtle, gradual adjustments. This subtle brushing helps to paint in realistic shadows and highlights that can make a profound difference in the conviction of your composite. Pay close attention to the direction of light in your background and ensure your subject’s shadows fall accordingly.
Remember, the goal is often subtlety. Over-editing can make the composite look artificial. Take breaks and view your image at different zoom levels to catch inconsistencies. These detailed edits are what elevate your merged images from simple cut-and-paste jobs to professional photo manipulation, contributing to the high-resolution, aesthetic quality Tophinhanhdep.com strives for in all forms of digital photography and visual design.
Method 2: Use a Blend Mode
Beyond precise cutouts and meticulous masking, Photoshop offers a powerful and artistic way to combine images through Blend Modes. This method allows two layered images to interact with each other based on their pixel values, creating a wide range of creative effects, from subtle atmospheric additions to dramatic double exposures. Tophinhanhdep.com recognizes Blend Modes as a cornerstone of digital art and advanced photo manipulation, opening doors to endless creative ideas for graphic designers and photographers alike.
Instead of meticulously cutting out subjects, Blend Modes work by changing how the pixels of the top layer interact with the pixels of the layer beneath it. This means you can achieve complex blends and aesthetic overlays with just a few clicks.
To begin, open your two chosen photos in Photoshop. As with the masking technique, you’ll want to bring both images into the same document. The simplest way is to drag one image (your intended overlay) from its document tab into the tab of your background image, then release it onto the canvas. This will automatically create a new layer for the overlay image. Ensure your desired overlay image is positioned on the top layer in the Layers panel.
With your top layer selected, look for the Blend Mode dropdown menu at the top of the Layers panel. By default, it’s usually set to “Normal.” Clicking this menu reveals a diverse array of options, each producing a unique interaction between the layers. For example:
- Multiply: Darkens the overall image, often used for adding textures, shadows, or creating a more intense, moody atmosphere.
- Screen: Lightens the image, ideal for merging bright elements, light effects, or creating ethereal, dreamlike qualities.
- Overlay / Soft Light / Hard Light: These modes increase contrast and saturation, with varying intensities. They are excellent for boosting colors, integrating textures, or creating a vibrant, aesthetic look.
- Difference / Exclusion: Produce highly artistic and often abstract effects by subtracting color information. Great for experimental digital art or unique visual designs.
- Luminosity / Color / Saturation / Hue: These modes transfer specific attributes (luminosity, color, etc.) from one layer to another, often used for creative color grading or subtle thematic changes.
Tophinhanhdep.com encourages experimentation with these modes. Cycle through them using your keyboard (select the Move tool (V), then hold Shift and press + or -) to see how each one dramatically alters the composite. This method is particularly effective for blending abstract elements, enhancing nature backgrounds with dramatic skies, or creating beautiful photography compositions with an added artistic flair.
Achieving Subtle Transitions with Layer Opacity and Fill
Complementing Blend Modes, Layer Opacity and Fill provide further control over how images interact, allowing for subtle transitions and nuanced integration. These tools are fundamental for fine-tuning the visual impact of your merged images, offering a delicate balance between visibility and transparency that is crucial for professional photo manipulation and creating aesthetic visuals.
Once you’ve applied a Blend Mode, or even if you’re just working in Normal mode, the Opacity slider in the Layers panel becomes your next key tool. Located right next to the Blend Mode dropdown, this slider allows you to control the overall transparency of your selected layer. A setting of 100% means the layer is fully opaque, completely covering the layers below (unless a Blend Mode is active). Reducing the Opacity (e.g., to 50%) makes the layer semi-transparent, allowing the underlying image to show through.
This is where true blending often happens. By adjusting the Opacity, you can soften the impact of a Blend Mode, create a ghostly double-exposure effect, or simply make an element feel more integrated into the scene. For instance, if you’ve added a misty texture using a Screen blend mode, lowering its opacity can make the fog appear more natural and less overpowering, perfectly fitting into a sad/emotional or serene nature scene.
While Opacity affects the transparency of the entire layer, including its layer styles, Fill (also in the Layers panel, directly below Opacity) controls the transparency of only the pixels on the layer, not its layer styles. In most image merging scenarios, Opacity and Fill will behave identically unless you have layer styles (like drop shadows or strokes) applied. However, for specific graphic design applications, understanding this distinction can be useful.
The true power of Opacity and Fill emerges when combined with Blend Modes. You can select an interesting Blend Mode, then fine-tune its intensity by adjusting the Opacity. This iterative process of experimenting with different Blend Modes and then adjusting their Opacity allows for a vast spectrum of creative outcomes. Tophinhanhdep.com encourages you to play around with these two settings, as they are instrumental in achieving professional-grade photo manipulation and realizing your unique visual design ideas, from trending styles to timeless thematic collections.
Method 3: Simplified Layouts: Placing Images Side-by-Side for Thematic Presentation
Sometimes, the goal isn’t to blend images into a single, seamless composite, but rather to present them together in a clean, comparative, or thematic layout. Placing two images side-by-side is a straightforward yet highly effective way to showcase related photos, create elegant mood boards, or highlight before-and-after comparisons. Tophinhanhdep.com offers this technique as an excellent method for visual designers looking to compile beautiful photography, organize image inspiration, or present thematic collections in a professional and aesthetically pleasing manner.
This method is particularly useful for presenting portrait-oriented (vertical) images of similar dimensions, ensuring the final composite isn’t excessively wide. It streamlines the process of loading, arranging, and precisely aligning multiple photos within a single Photoshop document.
Instantly Arranging Photos with “Load Files into Stack”
The first step to efficiently creating a side-by-side layout in Photoshop is to use a specialized command that automates the initial loading process. Instead of opening each image separately and then manually dragging them into a new document, Photoshop can do the heavy lifting for you.
To begin, navigate to the File menu in Photoshop’s Menu Bar. From there, select Scripts, and then choose Load Files into Stack… This command is specifically designed to open multiple images and place each one on its own layer within a single new document.
In the “Load Layers” dialog box that appears, ensure “Use” is set to “Files” and then click the “Browse…” button. This will open a file browser where you can navigate to the images you wish to combine. Select your first image, then hold down the Shift key and click on your second image to select both simultaneously. Click “Open.”
Back in the “Load Layers” dialog box, you will see the file names of your selected images listed. It’s crucial for this particular side-by-side technique to leave the options “Attempt to Automatically Align Source Images” and “Create Smart Object after Loading Layers” unchecked. These options are typically for more complex blending or panoramas and are not needed for a simple side-by-side arrangement. Finally, click “OK” to load the images into Photoshop.
Photoshop will then create a new document with both of your chosen images, each on its own layer, neatly stacked on top of each other in the Layers panel. While only the top image will be visible initially, they are now ready for arrangement. This quick loading process is ideal for photographers looking to create visual comparison elements or graphic designers assembling thematic collections and photo ideas with speed and precision, maintaining the high-resolution quality expected from Tophinhanhdep.com.
Dynamic Canvas Management and Image Swapping
With your two images loaded as layers in a single document, the next phase involves intelligently expanding your canvas and arranging them side-by-side. Photoshop offers a clever trick to achieve this in just a few steps, followed by an easy method for swapping their positions if desired. This dynamic approach to canvas management and image placement is perfect for creating aesthetic backgrounds, comparing beautiful photography, or structuring visual narratives for Tophinhanhdep.com.
First, ensure the Move Tool is selected from the toolbar. To leverage Photoshop’s snapping functionality, double-check that View > Snap and View > Snap To > Document Bounds are both checked in the Menu Bar. These settings allow your image to precisely align with the canvas edges as you drag it.
In the Layers panel, select the top image layer. Now, click on this image in your document and begin dragging it horizontally, either to the left or right, off the visible canvas. As you drag, hold down the Shift key to constrain its movement to a perfectly straight line. Don’t worry if the image disappears; it’s merely moving beyond the current canvas boundaries. Once you bring the image close enough to an edge (e.g., the right edge if you’re dragging right), it will snap into place. Release your mouse button, then release the Shift key. Your top image is now positioned just outside the active canvas, adjacent to your other image.
To reveal both images and automatically expand the canvas to accommodate them, go to Image > Reveal All in the Menu Bar. Photoshop will instantly resize your document, presenting both photos side-by-side, creating a clean composite perfect for various visual design applications.
What if you decide the images would look better swapped—the left one on the right, and vice versa? Photoshop makes this simple:
- Re-select the Move Tool.
- Go to
Select > All(Ctrl+AorCmd+A) to select the entire canvas. This enables Photoshop’s alignment options relative to the document edges. - In the Layers panel, click to select the image layer you want to move (e.g., the one currently on the right).
- In the Options Bar at the top (which appears when the Move Tool is active), click the Align Left Edges icon to snap that image to the left side of the canvas.
- Now, select the other image layer in the Layers panel (the one currently on the left).
- In the Options Bar, click the Align Right Edges icon to snap it to the right side of the canvas.
- Finally, go to
Select > Deselect(Ctrl+DorCmd+D) to remove the selection outline.
Just like that, your images are swapped, perfectly aligned, and ready for presentation. This efficient technique ensures your merged images, whether for photography portfolios, graphic design mock-ups, or beautiful photography collections, are always precisely laid out according to your creative ideas.
Beyond the Basics: Enhancing Your Merged Images in Tophinhanhdep.com
Once you’ve mastered the core techniques of combining images in Photoshop, the journey of refinement truly begins. Merging photos is often just the first step in creating a truly compelling visual piece. Tophinhanhdep.com encourages you to explore further enhancements that can elevate your composites, turning them into high-resolution, professional-grade digital art or stunning wallpapers.
1. Unifying Color and Tone: Even with careful initial selection and basic adjustments, a composite image often requires a final pass of color grading to achieve a cohesive look. Use Photoshop’s powerful adjustment layers like Color Lookup, Gradient Map, or Selective Color to apply an overarching color tint or mood. These tools are fantastic for setting an aesthetic tone—whether it’s a warm, nostalgic feel, a cool, futuristic vibe, or a dramatic, sad/emotional atmosphere—and are integral to professional editing styles. Experiment with these layers at reduced opacity or different blend modes to subtly tie all elements together.
2. Adding Textures and Overlays: To infuse your merged image with more depth and character, consider adding textures or overlays. A subtle grunge texture, a soft light leak, or a dreamy bokeh effect can transform the entire visual. These elements can be placed on new layers, adjusted with blend modes (like Overlay, Screen, or Soft Light), and fine-tuned with opacity to create unique effects that enhance your digital art or graphic design projects.
3. Sharpening and Detail Enhancement: After all the blending and adjustments, your composite might benefit from a final touch of sharpening to bring out details. Use the High Pass filter (applied as a Smart Filter with an Overlay blend mode) or the Camera Raw Filter (for global and local adjustments) to enhance clarity without introducing artifacts. This ensures your beautiful photography maintains its high resolution and crispness.
4. Utilizing Image Tools for Optimization: For online use or specific digital displays, optimizing your final image is essential. Tophinhanhdep.com’s image tools like Compressors and Optimizers can reduce file size without significant loss of quality, ensuring faster loading times for web backgrounds or aesthetic portfolios. If your source images had varying resolutions, or if you plan to print your digital art at a large scale, consider using AI Upscalers to intelligently increase resolution and detail. This suite of tools ensures your creative ideas are presented in their best light.
5. Exploring Creative Ideas and Inspiration: The true power of Photoshop lies in its capacity for endless creative exploration. Use your merged images as foundations for new “Photo Ideas.” Experiment with AI Upscalers to enhance minor details, use Image-to-Text tools for artistic typography, or simply revisit Tophinhanhdep.com’s “Image Inspiration & Collections” for new thematic concepts. Building mood boards from your blended images can further refine your visual design skills and help you stay abreast of trending styles.
The journey of photo manipulation in Photoshop is continuous. Each merged image is an opportunity to learn, experiment, and push the boundaries of your digital photography and graphic design skills.
Conclusion: Transform Your Visuals with Tophinhanhdep.com
The world of digital imagery is boundless, and with Photoshop as your creative ally, combining images opens up an infinite realm of possibilities. From crafting high-resolution wallpapers and aesthetic backgrounds to executing intricate photo manipulations for graphic design, the techniques explored in this guide are fundamental to expressing your creative ideas. Tophinhanhdep.com is dedicated to equipping you with the knowledge and tools to transform your photography into captivating visual narratives.
Whether you’re isolating subjects with the Quick Selection Tool, blending elements seamlessly with Layer Masks, or achieving artistic overlays with Blend Modes and Opacity, each method empowers you to construct digital art that tells a unique story. Even simple side-by-side layouts for thematic collections become elegant presentations through precise canvas management.
Embrace the power of Photoshop and let your imagination soar. The ability to merge images is not just a technical skill; it’s a doorway to a new dimension of visual storytelling. Continue to explore, experiment, and draw inspiration from the diverse categories of images, from nature and abstract to sad/emotional and beautiful photography. With Tophinhanhdep.com, you have a partner in every step of your creative journey, offering insights into digital photography, editing styles, and image tools that ensure your visual designs always stand out. Begin merging, and redefine what’s possible with your pictures today.