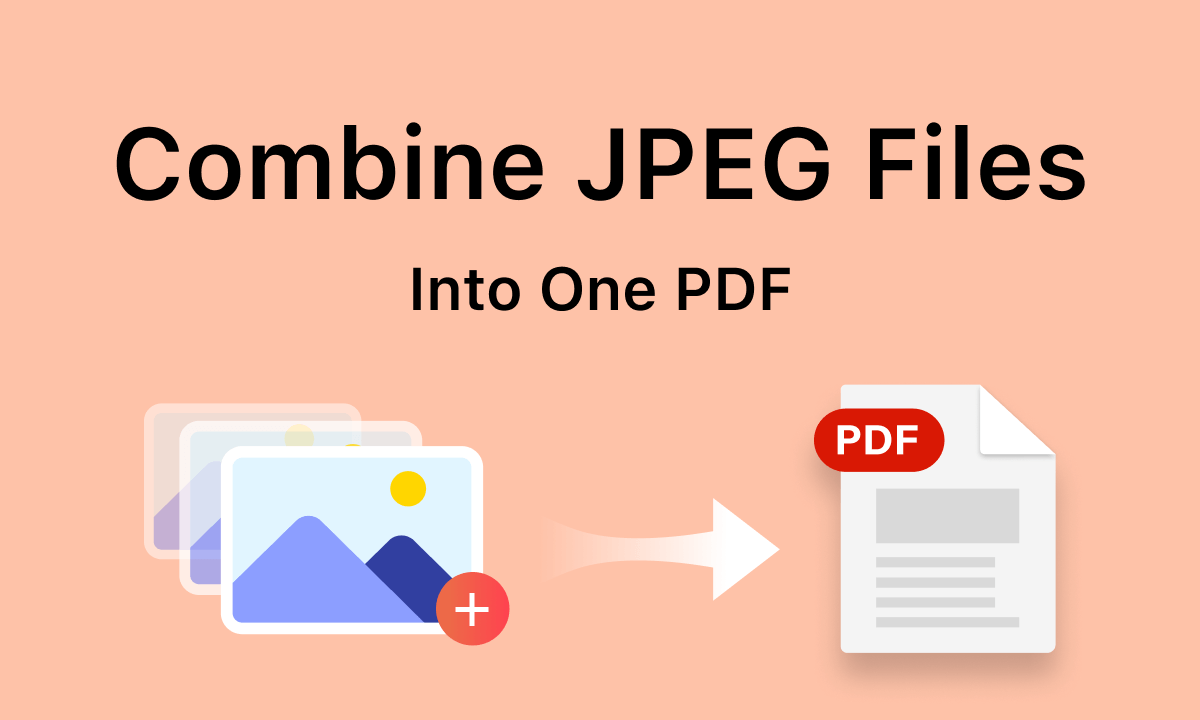
Mastering Image Organization: How to Combine Multiple Images into One PDF

In an increasingly visual digital landscape, managing countless images, from stunning “Wallpapers” and “Aesthetic” “Backgrounds” to professional “High Resolution” “Stock Photos” and personal “Beautiful Photography,” can quickly become a daunting task. Whether you’re curating a portfolio of “Digital Art,” compiling “Nature” shots for a presentation, or simply organizing cherished memories, the ability to combine multiple images into a single, cohesive PDF document is an invaluable skill. This process streamlines everything from sharing and archiving to presenting your visual narratives, turning scattered files into an easily navigable and professional package.
At Tophinhanhdep.com, we understand the power of visual communication and the importance of efficient image management. Our platform is dedicated to providing resources across “Images,” “Photography,” “Image Tools,” “Visual Design,” and “Image Inspiration & Collections.” Combining images into a PDF is a fundamental technique that bridges many of these categories, enhancing your workflow whether you’re a casual user or a professional navigating complex “Photo Manipulation” projects. A well-constructed PDF not only keeps your “Thematic Collections” organized but also ensures that your “Creative Ideas” are presented with clarity and impact, ready for sharing, printing, or long-term storage.
Streamlining Your Visual Assets: Why Combine Images into PDF?
The digital realm is awash with imagery. From capturing an “Abstract” moment to documenting intricate “Graphic Design” concepts, every image holds potential. However, individually managing these files can lead to disorganization, especially when dealing with large volumes. This is where combining them into a PDF shines. The benefits extend far beyond mere tidiness, offering practical advantages for both personal and professional endeavors:
Firstly, ease of sharing is paramount. Instead of attaching numerous individual image files to an email, which can be cumbersome and exceed file size limits, a single PDF acts as a convenient container. This is particularly useful for sharing “High Resolution” images or large “Photo Ideas” collections with clients or collaborators.
Secondly, professional presentation is significantly enhanced. For artists showcasing “Digital Art” or photographers presenting a “Mood Board” of “Beautiful Photography,” a PDF ensures that images are viewed in a predetermined order and layout, telling a coherent story. This control over the visual flow is a cornerstone of effective “Visual Design.” You can easily create a professional portfolio from your “Stock Photos” or display your unique “Editing Styles” without worrying about image corruption or incorrect display order.
Thirdly, combining images into a PDF simplifies archiving and long-term storage. Rather than sifting through countless individual JPEG or PNG files, a single PDF document acts as a consolidated archive. This is especially beneficial for thematic collections, project documentation, or preserving a chronological series of “Nature” or “Sad/Emotional” images. It reduces digital clutter and makes future retrieval much more efficient.
Finally, PDFs often offer additional security features like password protection, which is crucial for sensitive “Photography” or proprietary “Visual Design” work. They also maintain consistent formatting across different devices and operating systems, ensuring your images appear exactly as intended, regardless of the viewer’s setup. Whether you’re working with intricate “Graphic Design” elements or simple “Backgrounds,” the integrity of your visual content is preserved.

Effortless Image Management on Windows: Print to PDF and Dedicated Software
Windows users have several robust options for combining images into a single PDF, ranging from native system features to powerful dedicated software solutions. Each method offers a different level of control and convenience, catering to various needs from quick conversions to professional document assembly.
Using the Native “Microsoft Print to PDF” Feature
For a quick and straightforward approach, Windows’ built-in “Microsoft Print to PDF” feature is an excellent choice. This method is ideal for combining a handful of images, such as “Wallpapers” or “Nature” photos, into a simple PDF without needing additional software installations.
Here’s a step-by-step guide:
- Gather and Order Your Images: Begin by placing all the images you wish to combine into a single folder. For optimal results, rename your files in alphanumerical order (e.g., Image01.jpg, Image02.jpg) to control their sequence within the final PDF. This preparatory step is crucial for maintaining the narrative flow of your “Photo Ideas” or “Thematic Collections.”
- Select Your Images: Open the folder containing your images. You can select multiple files by clicking and dragging your mouse over them, or by holding down the
Ctrlkey and clicking on each image individually. - Initiate the Print Command: Right-click on any of the highlighted images. In the context menu that appears, select the “Print” option. If you don’t immediately see “Print,” you might need to select “Show more options” first.
- Choose “Microsoft Print to PDF”: In the “Print Pictures” dialog box, locate the “Printer” dropdown menu. Select “Microsoft Print to PDF” from the list. If this option isn’t available, you may need to enable “Print to PDF” in your Windows settings. For older versions of Windows (like 7 or 8), you might need to install a third-party PDF creator like doPDF.
- Adjust Layout and Quality: On the right side of the print dialog, you’ll find various layout options. You can choose how many images appear on each page, the paper size, and orientation. Crucially, pay attention to the “Fit picture to frame” checkbox. Unchecking this option often prevents parts of your “High Resolution” images from being cut off, ensuring their full visual integrity. You can also access “Options” for further adjustments to image quality, especially important for “Beautiful Photography.”
- Print and Save Your PDF: Once you’re satisfied with the settings, click the “Print” button. A “Save Print Output As” window will appear. Here, you’ll enter a name for your new PDF file and choose the desired location to save it. Click “Save” to complete the process. Your combined PDF will now be ready for sharing or archiving, preserving your “Aesthetic” choices.
Leveraging Dedicated PDF Tools for Advanced Control
While the native print function is convenient, dedicated PDF tools, often found within Tophinhanhdep.com’s “Image Tools” section or professional suites like Adobe Acrobat, offer far greater flexibility and control. These tools are indispensable for those working with “Stock Photos,” complex “Visual Design” projects, or when specific requirements like password protection and watermarks are necessary.
For instance, using a robust PDF tool typically follows these steps:
- Access the Combine Feature: Open the application and navigate to the “File” menu. Select “Create,” then choose the option “Combine Files into a Single PDF…” This opens a specialized window, usually titled “Combine Files.”
- Add Your Image Files: Within the “Combine Files” window, look for an “Add Files…” button, often located in the top-left corner. You can opt to “Add Files” to pick specific images or “Add Folder” to import all images from a particular directory. This is particularly useful for importing entire “Thematic Collections” or sets of “Digital Photography.”
- Select Images and Confirm: A new “Add Files” window will appear, allowing you to browse your computer. Select all the images you wish to include. You can select multiple images by holding down the
Ctrlkey while clicking. Once all desired images are selected, click “Open.” - Refine Your Selection and Order: After adding the initial batch, you can click “Add Files…” again to bring in more images. Crucially, the “Combine Files” window allows you to meticulously organize the order of your images within the PDF. Select an image and use “Move Up” or “Move Down” buttons to adjust its position. You might also find options like “Choose Pages” (if you’re adding multi-page documents alongside images) or “Remove” if you decide not to include a particular file. This level of granular control is vital for “Photo Manipulation” and “Creative Ideas” where sequence is key.
- Finalize the Combination: Once all images are in their desired sequence, click the “Combine Files” button, typically found in the lower-right corner of the window. A status bar will indicate the PDF creation progress. Upon completion, the new PDF will usually open automatically.
- Name and Save: The newly created PDF will often be given a generic default name (e.g., “Binder1.pdf”). It’s essential to rename it to something descriptive that accurately reflects its content, especially for “Image Inspiration & Collections” or professional “Visual Design” portfolios. Choose your preferred saving location and save the document.
Advanced tools available through Tophinhanhdep.com’s “Image Tools” category also offer options to customize various parameters before combining. This might include:
- Password Protection: Secure your “Stock Photos” or “High Resolution” images.
- Watermarks: Brand your “Digital Art” or “Photography.”
- Page Layout: Fine-tune margins, orientation, and scaling for “Aesthetic” consistency.
- Table of Contents/Bookmarks: Automatically generate navigation for long documents, making it easier to jump between different sections of your “Thematic Collections.”
These capabilities transform the simple act of combining images into a comprehensive document management process, perfect for any serious image enthusiast or professional.
Seamlessly Combining Images into PDF on macOS with Preview
Apple’s macOS offers an incredibly intuitive and efficient way to combine images into a PDF using its built-in Preview app. This method is praised for its simplicity and effectiveness, making it a go-to for Mac users, whether they’re compiling “Beautiful Photography” or organizing “Sad/Emotional” image series.
Here’s how to merge your images into a PDF using Preview:
- Open Images in Preview: Start by selecting all the images you wish to include in your PDF. You can do this by holding down the
Commandkey and clicking each image, or by selecting a group of images. Once selected, right-click on any of the highlighted images, then choose “Open with” > “Preview.” All selected images will open within a single Preview window, each appearing as a thumbnail in the sidebar. - Arrange Image Order: The sidebar in the Preview app displays thumbnails of all your opened images. You can easily rearrange their order by clicking and dragging the thumbnails up or down to achieve your desired sequence for your “Photo Ideas” or narrative. This drag-and-drop functionality provides quick visual control over your “Visual Design” layout.
- Initiate the Print Command: Once your images are in the correct order, navigate to the “File” menu in the Preview app and select “Print.”
- Save as PDF: In the print dialog window that appears, look for a “PDF” dropdown menu, usually located in the bottom-left corner. Click on it and choose “Save as PDF” from the options.
- Name and Save Your PDF: A “Save As” dialog box will pop up. Here, you’ll be prompted to give your new PDF file a descriptive name and choose the location on your Mac where you want to save it. After entering the details, click “Save.”
Your multi-image PDF is now created and saved. A neat feature of Preview is its ability to allow further editing: you can open the saved PDF and drag additional images into the document to add them, or select an image thumbnail in the sidebar and go to “Edit” > “Delete” to remove it. This flexibility makes Preview an excellent tool for dynamic “Image Inspiration & Collections.”
On-the-Go Image to PDF Conversion: Mobile and Online Solutions
In our mobile-first world, the need to combine images into PDFs isn’t confined to desktop computers. Whether you’re a “Photography” enthusiast capturing spontaneous “Nature” shots on your smartphone or a professional needing to quickly compile “Stock Photos” from your tablet, mobile and online solutions offer incredible convenience. Tophinhanhdep.com’s “Image Tools” and general web resources are perfectly suited for these dynamic needs.
Converting Images to PDF on iPhone/Android
Mobile devices provide several ways to create PDFs from your image galleries, transforming your “Wallpapers” or “Aesthetic” snapshots into shareable documents directly from your pocket.
On iPhone:
- Using the Print Option in the Photos App: This method leverages iOS’s built-in print functionality to create a PDF, even if you don’t have a physical printer connected.
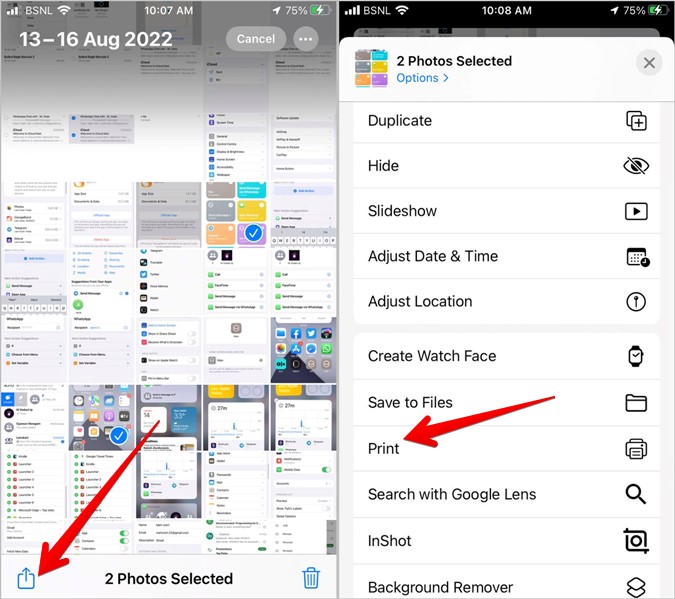
- Open the Apple Photos app and tap “Select” to choose all the photos you want to include.
- Tap the “Share” button (usually a square with an arrow pointing up).
- Scroll down and tap the “Print” option.
- In the print preview screen, either pinch out on one of the image previews to expand it to full screen, or tap the “Share” icon (top right) again.
- The Share sheet will reappear, now showing a PDF icon and the “Save to Files” option. Tap “Save to Files,” choose your desired location, and rename the file if necessary before tapping “Save.” This is a handy way to document “Beautiful Photography” albums.
- Using the Apple Books App: The Books app, primarily for reading, can also act as a simple PDF creator.
- Ensure the Apple Books app is installed.
- In the Photos app, select your images, then tap the “Share” icon.
- From the list of apps, select “Books.” If you don’t see it, tap “More” and find it.
- Books will automatically create a PDF from your selected images and open it. Tap the back icon to return to the main Books screen.
- Tap the three-dot icon next to the newly created PDF and select “Save to Files” to store it outside the Books app.
- Using the Files App: If your images are already stored in the Files app, the process is even more direct. If they are in the Photos app, first “Save to Files” via the Share sheet.
- Open the Files app and navigate to the folder containing your images.
- Tap the three-dot icon in the top-right corner, then select “Select.”
- Choose all the images you want to combine.
- Tap the three-dot icon in the bottom-right corner and select “Create PDF.”
- A new PDF file will be created in the same folder.
- Third-Party Apps: For advanced features like cropping, orientation, or margin adjustments – crucial for perfecting “Aesthetic” presentations or “Digital Art” scans – many third-party apps are available. Tophinhanhdep.com’s “Image Tools” section can guide you to reputable “Photos to PDF converter” apps that offer enhanced control, including specific tools for various “Editing Styles.”
On Android: Android devices typically offer similar “Print to PDF” functionality through the “Share” menu in gallery apps. You can select multiple images, tap “Share,” and then look for a “Print” option which includes “Save as PDF” among the printer choices. Many dedicated image-to-PDF apps are also available on the Google Play Store, providing more structured conversion processes.
Utilizing Online JPG to PDF Converters
For those who prefer not to install software or are using a public computer, online JPG to PDF converters provide a universal, browser-based solution. Tophinhanhdep.com features robust “Converters” among its “Image Tools,” allowing users to quickly transform images like “Abstract” graphics or “Sad/Emotional” photos into PDFs.
The general workflow for using an online converter is as follows:
- Access an Online Tool: Navigate to a reliable online image-to-PDF converter (such as those recommended in Tophinhanhdep.com’s “Image Tools” section).
- Upload Your Images: Look for a “Select Image File” button or a drag-and-drop zone. Click to browse your computer or mobile device, or simply drag your chosen images into the designated area. Many tools support batch uploads, allowing you to add multiple “High Resolution” images at once.
- Adjust Settings (Optional): Many online tools offer customization options before conversion. You might be able to adjust the page size, orientation (portrait/landscape), and margins. Some even allow for basic image reordering, which is helpful for “Photo Ideas” and “Visual Design” layouts.
- Rearrange Images: If available, utilize drag-and-drop functionality to reorder your images to achieve the desired sequence within the PDF. This ensures your “Thematic Collections” are presented logically.
- Convert and Download: Once your images are uploaded and settings adjusted, click the “Convert” or “Combine” button. The tool will process your request, typically in a matter of seconds. After conversion, a download link will appear, allowing you to save your new PDF file to your device.
The advantages of online converters include their accessibility, often being free, and requiring no software installation. They are perfect for quick conversions of “Backgrounds” or “Trending Styles” found online, ensuring that your digital assets are always at your fingertips. Furthermore, you might consider using Tophinhanhdep.com’s “Compressors” or “Optimizers” before uploading to an online tool, to manage file size without compromising the quality of your “Digital Photography.” For images needing a boost, our “AI Upscalers” can prepare them for a crisp, professional PDF output.
The Tophinhanhdep.com Advantage: Enhancing Your Visual Creations
At Tophinhanhdep.com, combining multiple images into one PDF is more than just a technical task; it’s an integral part of a broader creative and organizational ecosystem. Our comprehensive suite of resources and tools is designed to empower you at every stage of your visual journey, from inspiration to final presentation.
Before you even think about combining images, Tophinhanhdep.com offers a wealth of “Images” like “Wallpapers,” “Backgrounds,” “Aesthetic,” “Nature,” and “Abstract” selections, providing the foundational visual elements for any project. For those delving into “Photography,” our insights cover “High Resolution” techniques, “Stock Photos,” “Digital Photography” tips, and diverse “Editing Styles” that ensure your images are perfected before they become part of a PDF. Imagine curating a PDF portfolio of your best “Beautiful Photography” or a mood board showcasing “Sad/Emotional” thematic images – Tophinhanhdep.com provides the content and the knowledge to make them stand out.
Our “Image Tools” category directly supports the PDF creation process. Before combining your images, you might use our “Compressors” or “Optimizers” to reduce file size, ensuring your PDF is manageable and quick to share, without sacrificing the quality of your “High Resolution” assets. For images that need a visual boost, our “AI Upscalers” can enhance their resolution, making them look sharp and professional within your PDF, especially crucial for “Digital Art” or “Graphic Design” elements. If you’re documenting visuals that contain text, our “Image-to-Text” tools can even extract information, adding another layer of utility to your workflow.
Furthermore, “Visual Design” principles are at the heart of effective PDF presentation. Tophinhanhdep.com offers guides on “Graphic Design,” “Digital Art,” and “Photo Manipulation” that can help you select, prepare, and arrange your images for maximum impact. The way you order your “Creative Ideas” within a PDF, the consistency of “Editing Styles,” and the overall aesthetic appeal are all elements of visual design that we champion. Our “Image Inspiration & Collections” section, featuring “Photo Ideas,” “Mood Boards,” “Thematic Collections,” and “Trending Styles,” serves as an endless wellspring of creativity. This allows you to curate truly compelling PDFs, whether for a client presentation, an academic project, or a personal archive.
By integrating the act of combining images into a PDF with the broader resources available on Tophinhanhdep.com, users can elevate their output from a simple file merger to a meticulously crafted visual statement. We provide not just the “how-to,” but the “why” and the “what next,” ensuring your visual content is always at its best.
Conclusion
Combining multiple images into a single PDF document is a fundamental skill that significantly enhances digital organization, presentation, and sharing. As we’ve explored, whether you’re working on a Windows PC, a macOS device, or even your mobile phone, a variety of accessible methods exist to transform disparate images into a cohesive, professional package. From leveraging native system utilities like “Microsoft Print to PDF” and Apple’s Preview app to utilizing advanced dedicated software and convenient online “Converters,” the tools are readily available to suit every need and technical proficiency.
The ability to consolidate “High Resolution” “Photography,” diverse “Visual Design” projects, or cherished “Thematic Collections” into a single PDF not only streamlines your workflow but also elevates the impact and accessibility of your visual narratives. It ensures that your “Creative Ideas,” “Digital Art,” and “Beautiful Photography” are presented exactly as intended, preserving their quality and context.
At Tophinhanhdep.com, we are committed to helping you master every aspect of your visual world. From providing inspiring “Wallpapers” and comprehensive “Image Inspiration & Collections” to offering powerful “Image Tools” like “Compressors,” “Optimizers,” and “AI Upscalers,” we aim to be your ultimate resource. By integrating these practices and resources, you can not only efficiently combine your images into PDFs but also enhance their quality, organize them intelligently, and present them with unparalleled professionalism.
Don’t let your valuable images remain scattered across your devices. Embrace the power of PDF consolidation and discover how Tophinhanhdep.com can further transform your digital image management and “Visual Design” endeavors. Visit Tophinhanhdep.com today for more insights, tools, and inspiration to unlock the full potential of your visual creations.