Mastering Image Compositing: How to Combine Two Images in Photoshop for Stunning Visuals

In the dynamic world of digital imagery, the ability to seamlessly combine multiple photographs into a single, cohesive masterpiece is a skill that transcends basic editing. It’s a fundamental aspect of digital art, photo manipulation, and graphic design, allowing creators to transcend reality, evoke powerful emotions, or simply enhance a narrative. Whether you’re crafting an ethereal landscape, a surreal abstract composition, or a practical advertisement, Photoshop stands as the industry-standard tool for bringing diverse visual elements together.
At Tophinhanhdep.com, we understand the immense potential that lies in mastering such techniques. Our platform serves as a hub for visual inspiration and practical tools, catering to everything from breathtaking Wallpapers and serene Nature backgrounds to vibrant Aesthetic themes, profound Sad/Emotional imagery, and exquisite Beautiful Photography. We provide access to High Resolution images, premium Stock Photos, and insights into Digital Photography and cutting-edge Editing Styles. Furthermore, our Image Tools section offers Converters, Compressors, Optimizers, AI Upscalers, and even Image-to-Text functionalities, all designed to empower your visual journey. This comprehensive guide, from Tophinhanhdep.com, will walk you through various methods of combining two images in Photoshop, equipping you with the expertise to transform your creative ideas into compelling visual narratives, enriching your Mood Boards, Thematic Collections, and Trending Styles.
Foundational Steps for Seamless Image Integration
Before diving into advanced blending techniques, a solid foundation in image selection and layering is crucial. The success of any composite image hinges on how well the initial elements are chosen and prepared. This section will guide you through the essential preliminary steps to ensure your journey in Photoshop is as smooth and effective as possible.
Selecting and Preparing Your Source Images
The trickiest, yet most vital, part of performing a successful photo merge in Photoshop is picking images that will go together harmoniously. You can force images together, but some elements simply won’t work convincingly if not considered beforehand. Factors like focal length, lighting conditions, and even the overall quality of each image play a significant role. Ideally, you want to pick two clear images that share a similar perspective and light direction. For instance, if you’re attempting a face swap or integrating a person into a new background, ensure the subjects are facing in the same general direction and are illuminated similarly. This attention to detail dramatically reduces the amount of post-processing required to make the composite believable.

Tophinhanhdep.com champions the use of high-resolution images, whether from our vast collection of Stock Photos or your own meticulously captured Digital Photography. High-resolution sources provide greater flexibility for cropping, scaling, and detailed editing without compromising quality. When opening your selected images in Photoshop, you can do so in separate tabs via File > Open. Alternatively, for certain techniques like side-by-side arrangements, Photoshop offers a convenient “Load Files into Stack” command (File > Scripts > Load Files into Stack), which automatically places multiple selected images into a single document, each on its own layer.
One crucial consideration during preparation is image size. It’s always better to downsize a larger image than to upscale a smaller one. Upscaling an image inevitably leads to a loss of quality, resulting in noticeable pixelation or blur, which can severely detract from the realism of your combined images. To check each image’s dimensions, look at the bottom of its window in Photoshop or navigate to Image > Image Size. By understanding and managing these foundational aspects, you lay the groundwork for creating stunning visual designs that truly captivate.
The Art of Layering: Bringing Images into a Single Document
Layers are the bedrock of non-destructive editing in Photoshop and are absolutely fundamental to combining images. They allow you to manipulate individual elements of your composite without permanently altering the original image data, offering unparalleled flexibility and control over your visual design process.
There are two primary methods for bringing your selected images into a single Photoshop document as distinct layers:
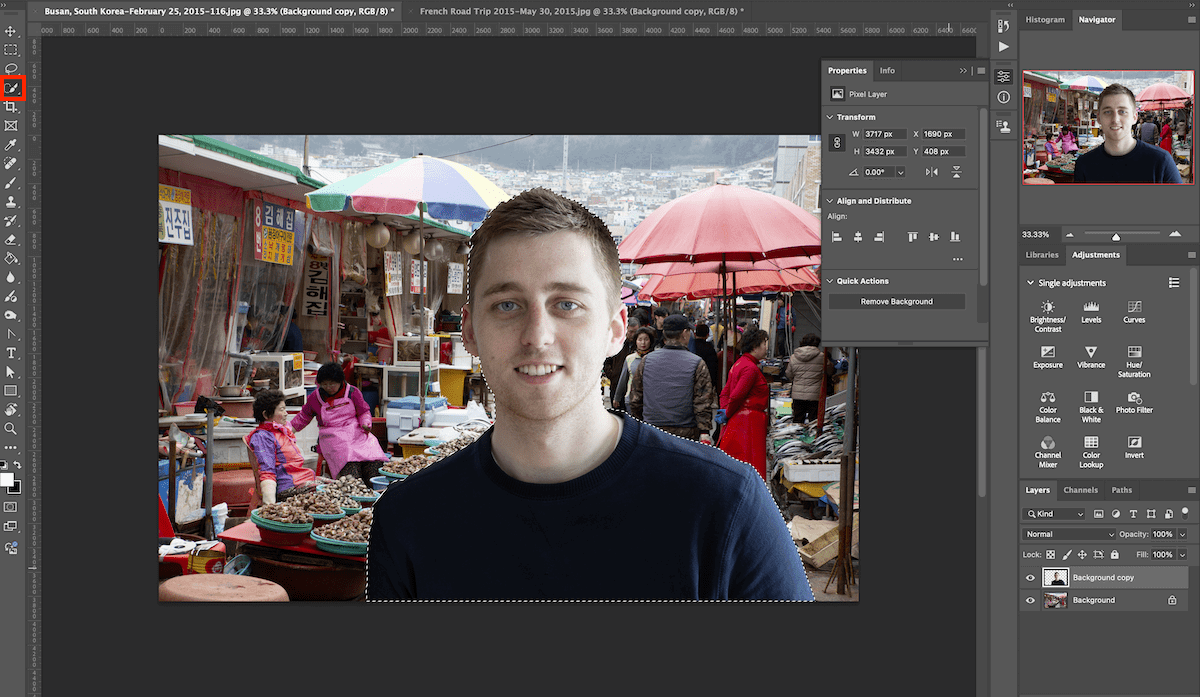
- Dragging and Dropping with the Move Tool: This is the most common technique when you want to isolate a subject from one image and place it onto a background from another. First, open both images in separate tabs. Identify the image containing your subject, ensuring its layer is active in the Layers panel. Select the Move Tool (V) from the toolbar. Click on the background layer (or the subject layer, if already isolated) of the smaller image, drag it over the tab of your background image, hover until the background image appears, and then continue dragging the layer onto the canvas. Crucially, holding down the Shift key as you release the image onto the canvas will automatically center the new layer within the document. This method is quick and intuitive for transferring a single element.
- Loading Files into a Stack: As mentioned earlier, for scenarios where you need to combine multiple images directly into one document, such as for a panorama or a side-by-side display, the “Load Files into Stack” command (File > Scripts > Load Files into Stack) is invaluable. In the Load Layers dialog box, select “Files” for “Use,” click “Browse” to navigate to and select your images (holding Shift to select multiple), and then click “OK.” Photoshop will automatically open a new document with each selected image on its own layer, neatly stacked. This streamlined approach saves time and ensures a consistent setup for subsequent editing.
Once your images are layered, you might need to make initial size and position adjustments. Press Ctrl + T (Windows) or Command + T (Mac) to activate the Free Transform tool. Corner handles will appear around your active layer, allowing you to resize it. Remember to hold Shift while dragging a corner handle to maintain the image’s original aspect ratio, preventing distortion. You can also hold Alt/Option to resize from the center. Click and drag the layer to reposition it on the canvas. Once satisfied, press Enter to apply the transformation. These preliminary adjustments ensure your subjects are appropriately scaled relative to their new environment, forming a more convincing base for your Photo Manipulation.
Precision Blending: Isolating Subjects and Refining Edges
The true art of combining images lies in making disparate elements appear as if they were always part of the same scene. This requires meticulous subject isolation and careful blending of edges, transforming a basic cut-and-paste into a seamless visual narrative.
Cutting Out Subjects with Quick Selection and Layer Masks
The core objective of blending is often to extract a subject from its original background and introduce it into a new setting. Photoshop offers powerful tools for this, with Layer Masks being the cornerstone of non-destructive isolation.
Before performing any cut-out, Tophinhanhdep.com always recommends duplicating your background layer (by dragging it to the “New Layer” icon, or Ctrl/Cmd+J). This preserves your original image data, allowing for endless revisions without damaging your source.
The Quick Selection Tool (W) is an excellent starting point for subjects with relatively defined edges. With the tool active, simply brush inside your subject. Photoshop’s intelligence will attempt to automatically detect and select the edges, forming a “marching ants” dotted line. If the selection extends too far, use the “Subtract From Selection” option in the Options Bar to refine the edges. Conversely, if parts of your subject are missed, use the “Add To Selection” option. This rapid selection technique is particularly effective for people, animals, or prominent objects.
Once your subject is precisely selected, you’ll need to isolate it. Instead of simply deleting the background, which is a destructive edit, we employ a Layer Mask. With your subject selected, click the “Add a layer mask” icon (a rectangle with a circle inside) at the bottom of the Layers panel. This instantly creates a mask that conceals the unselected background, making your subject appear against a transparent checkerboard background (if no other layers are visible). The beauty of a layer mask is that black areas hide parts of the layer, while white areas reveal them. This makes it incredibly easy to refine your selection non-destructively.
For more complex subjects, or for detailed refinements, the Brush Tool (B) becomes your best friend when working with layer masks. With the layer mask thumbnail active (indicated by a white border around it in the Layers panel), set your foreground color to black to hide parts of your layer, or white to reveal them. Use a soft-edged brush (adjusting hardness in the Options Bar) and vary its size (using [ and ]) to meticulously paint along the edges of your subject. Zooming in (Ctrl/Cmd +) allows for pixel-perfect precision. This combination of quick selection for initial isolation and layer mask painting for refinement is a powerful technique for Photo Manipulation and creating realistic composites, transforming ordinary images into extraordinary digital art.
Blending Edges and Enhancing Realism with Brushes
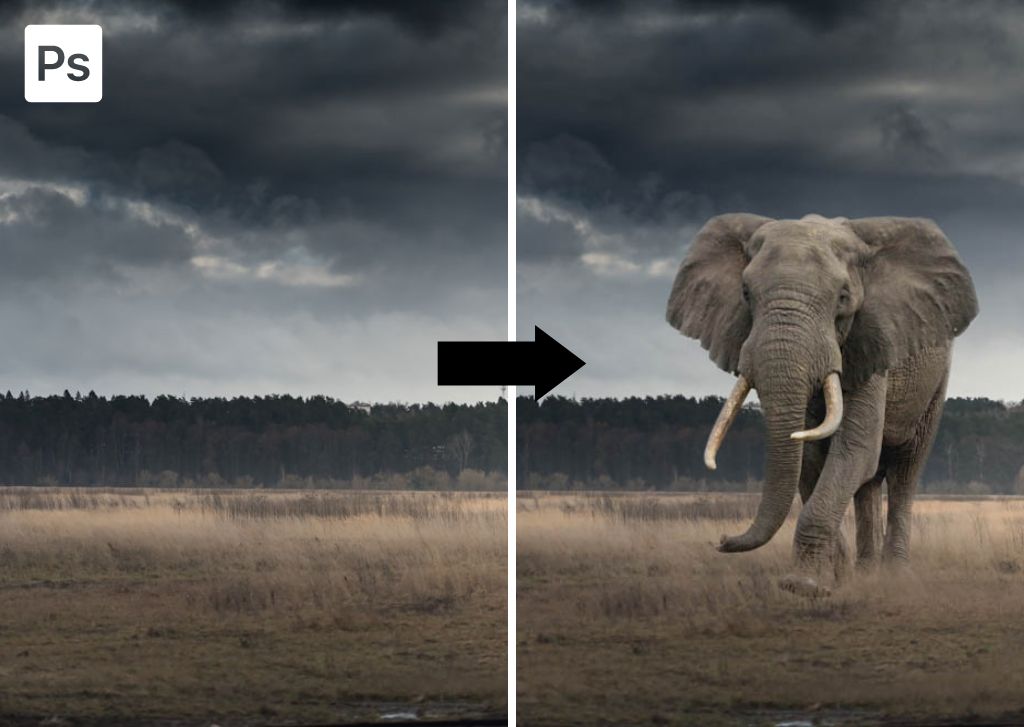
A common giveaway that an image has been composited is when the extracted subject appears to “float” above its new background, lacking realistic integration. The edges might be too sharp, or the subject might not interact naturally with its new environment. Tophinhanhdep.com encourages artists to pay close attention to these subtle details for truly convincing results.
After you’ve cut out your subject using a layer mask, the next step is to seamlessly blend its edges into the background. This is where the Brush Tool, in conjunction with the layer mask, truly shines. For example, if you’ve placed an elephant onto a grassy landscape, its feet shouldn’t just sit on top of the grass; they should appear slightly pressed into it, with blades of grass subtly overlapping the bottom edges of its feet.
To achieve this, ensure your subject’s layer mask is active. Select the Brush Tool (B) and set your foreground color to black. Choose a soft, round brush. By carefully brushing over the very bottom edges of your subject (e.g., the elephant’s feet), you can subtly hide parts of the layer, simulating the effect of the background elements overlapping the subject. If you make a mistake, simply switch your foreground color to white and paint over the area to reveal it again. This iterative process of hiding and revealing allows for incredibly precise and natural blending.
Going a step further, you can enhance realism by adding environmental brush effects. For instance, if your subject is standing in long grass, you can introduce custom grass brushes to paint additional blades around its feet, further integrating it into the scene. Many free brush resources are available online. To import a brush set into Photoshop, select the Brush Tool, open the Brush Preset Picker, click the Gear icon, and choose “Import Brushes.” Once imported, select your desired brush. To ensure color consistency, hold Alt (Win) or Option (Mac) to activate the Eyedropper tool, and click on a nearby area of the background (e.g., the grass) to sample its color for your brush. Create a new layer above your subject layer for these brush strokes. This allows you to edit or remove them without affecting your original subject. Adjust the brush layer’s blend mode and opacity in the Layers panel to make the new elements blend seamlessly, creating a more cohesive and believable Thematic Collection of images. This technique is a fantastic creative idea for elevating any digital art project.
Creative Color and Tone Adjustments for Cohesive Composites
Even with perfect cut-outs and edge blending, a composite can still look unnatural if the colors and tones of the combined images don’t match. In real-world photography, elements within the same scene share consistent lighting and atmospheric qualities. Replicating this in Photoshop is crucial for achieving truly Beautiful Photography and professional-grade photo manipulation.
Harmonizing Colors with the Match Color Adjustment
One of the most common issues when combining images is the discrepancy in color temperature and overall color cast. An object photographed in cool, indoor lighting will look out of place if composited into a warm, sunset landscape without correction. Photoshop’s Match Color adjustment is a powerful tool designed to quickly harmonize the color palettes of your merged images.
To use this feature, first, select the subject layer (the image you’ve brought into the background). Make sure you select the image thumbnail itself, not its layer mask. Then, navigate to Image > Adjustments > Match Color.
In the Match Color dialog box, you’ll find a section at the bottom labeled “Image Statistics.” Here, you need to specify the source of the color you want to match.
- For “Source,” select the current document (it will usually be listed by its filename).
- For “Layer,” choose your background layer. Photoshop will then analyze the color and tonal properties of the background and attempt to apply a similar cast to your subject layer.
Upon applying the adjustment, you might find the effect to be too intense, making your subject look unnaturally saturated or muted. This is where the “Image Options” sliders become invaluable. The most critical one is the Fade slider. Dragging this slider to the right will reduce the intensity of the color matching effect, allowing you to find a perfect balance where the colors are harmonized but still retain their natural appearance. You can also experiment with “Luminance” (for brightness) and “Color Intensity” to fine-tune the match further. Once satisfied, click “OK” to apply the changes. This single adjustment can drastically improve the realism of your composite, making disparate elements feel like they were originally part of the same Beautiful Photography.
Refining Tones and Mood with Curves and Solid Color Layers
While Match Color is excellent for initial color harmonization, achieving true photographic realism or a specific aesthetic often requires more nuanced control over tones and overall mood. Photoshop offers several adjustment layers that can be clipped to affect only specific layers, providing non-destructive ways to refine your composite.
-
Curves Adjustment Layer for Tonal Refinement: Even after color matching, the contrast, brightness, or specific color channels of your subject might not perfectly align with the background. A Curves Adjustment Layer provides precise control over these aspects.
- Add a Curves Adjustment Layer above your subject layer (click the half-filled circle icon at the bottom of the Layers panel and select “Curves”).
- Crucially, clip this adjustment layer to your subject layer. To do this, hold Alt (Win) or Option (Mac) and click on the line between the Curves layer and your subject layer in the Layers panel (a small downward-pointing arrow will appear). This ensures the Curves adjustment only affects your subject, not the entire composite.
- In the Properties panel, you can now manipulate the curve to adjust the shadows, midtones, and highlights of your subject. Drag the curve up to brighten, down to darken, or create an “S” curve for increased contrast. You can also target individual color channels (Red, Green, Blue) for more specific color correction. This fine-tuning helps to blend the subject into the ambient light and shadow of the background, contributing to the overall Aesthetic and realistic appearance.
-
Solid Color Adjustment Layer for Unifying Mood: For a quick yet effective way to unify the mood or introduce a subtle color cast across your entire composite, a Solid Color Adjustment Layer is invaluable, especially for creating cohesive Mood Boards or thematic imagery.
- Add a Solid Color Adjustment Layer at the very top of your layer stack.
- In the Color Picker, choose a color that aligns with the desired mood – perhaps a warm orange for a sunset, a cool blue for a serene atmosphere, or a desaturated tone for a Sad/Emotional effect.
- Change the blending mode of this Solid Color layer to “Color” (found in the drop-down menu at the top of the Layers panel, currently set to “Normal”). This preserves the luminosity of the layers below while applying only the hue and saturation of the solid color.
- Reduce the Opacity of the Solid Color layer (using the slider in the Layers panel) to achieve a subtle effect. This washes a unifying color over the entire image, helping to tie the elements together.
- Advanced Tip: If you want to selectively remove the color cast from certain areas (e.g., to bring out specific colors in your background or subject), use the Solid Color layer’s layer mask. With the mask active and the Brush Tool set to black, paint over the areas where you want to reduce or remove the unifying color, adjusting the brush opacity for subtle control.
These tonal and color adjustments are not just about correction; they are powerful tools for creative expression, allowing you to define the visual design and emotional impact of your combined images.
Beyond Blending: Arranging Multiple Images Side-by-Side
While often focused on creating a single, seamless scene, “combining images” in Photoshop can also mean arranging multiple distinct photographs together in a single canvas for presentation. This technique is particularly useful for creating Photo Ideas, showcasing a series, or making direct comparisons in a visually appealing layout for Tophinhanhdep.com’s Image Inspiration & Collections.
Efficiently Placing Images for Side-by-Side Display
Creating a composite where images are placed distinctly side-by-side, rather than blended, is a straightforward process in Photoshop, especially when starting with photos of similar dimensions.
- Load Files into Stack: Begin by opening your desired images using File > Scripts > Load Files into Stack. This command, as discussed, is ideal for bringing multiple images into a single document, each on its own layer, automatically. For best results, Tophinhanhdep.com recommends using portrait (vertical) orientation photos if you want to avoid an excessively wide composite, and ideally, images that share the same width and height to maintain a clean aesthetic.
- Activate the Move Tool: Select the Move Tool (V) from the toolbar. This tool is essential for manipulating your layers on the canvas.
- Ensure “Snap” is Enabled: For this technique to work smoothly, Photoshop’s snapping features need to be active. Go to View > Snap and ensure it has a checkmark. Then, under View > Snap To, make sure Document Bounds is also checked. This allows layers to “snap” precisely to the edges of your canvas.
- Drag and Position: Select the top layer in your Layers panel. With the Move Tool active, click on the image in the document and begin dragging it to the side (left or right) of where you want it to sit. As you drag, hold down the Shift key to constrain the movement horizontally, ensuring a straight drag. Don’t worry if the image disappears off the canvas – it’s still there. As you get close to the edge of the document, the image will suddenly “snap” into position at the document’s boundary. Release your mouse button, then release the Shift key.
- Reveal All: Once the first image is positioned off-canvas, navigate to Image > Reveal All. Photoshop will instantly expand the canvas to accommodate all visible layers, placing your images perfectly side-by-side. This quick tip from Tophinhanhdep.com is a game-changer for digital photography presentations.
Swapping and Aligning Images for Perfect Layouts
After arranging your images side-by-side, you might decide that a different order would enhance your visual design. Photoshop provides precise alignment tools to easily swap their positions or fine-tune their placement.
- Select the Move Tool: Ensure the Move Tool (V) is still active, as this is necessary to access the alignment options.
- Select the Entire Canvas: To align layers relative to the document, you need to select the entire canvas. Go to Select > All (Ctrl/Cmd+A). A selection outline will appear around the edges of your document.
- Align Layers: In the Layers panel, select the layer you wish to move (e.g., the image on the right). Then, in the Options Bar at the top (with the Move Tool active), you’ll see alignment icons. Click “Align Left Edges” to snap the image to the left side of the canvas, or “Align Right Edges” to snap it to the right. Repeat this for the other image, aligning it to the opposite edge. This effectively swaps their positions.
- Deselect: Once your images are perfectly aligned, go to Select > Deselect (Ctrl/Cmd+D) to remove the selection outline.
This method allows for quick and precise manipulation of your layout, making it easy to create polished Thematic Collections or visual comparisons that adhere to high standards of Graphic Design.
Conclusion
The ability to combine two or more images in Photoshop is an indispensable skill for anyone engaged in visual creation. From the precise isolation of subjects using Quick Selection and Layer Masks to the artistic fusion achieved through Blend Modes and Opacity, and the meticulous harmonization of colors and tones with adjustments like Match Color and Curves, Photoshop empowers you to realize virtually any creative vision.
This Tophinhanhdep.com guide has provided you with a comprehensive toolkit, demonstrating techniques for everything from crafting convincing composites that defy reality to efficiently arranging images side-by-side for impactful presentations. Remember that while these steps offer a structured approach, the true mastery comes with practice and experimentation. Each project will present unique challenges and opportunities for creative problem-solving.
By continually honing these photo manipulation skills, you contribute to the rich tapestry of visual content, whether you’re developing stunning Wallpapers, creating engaging Backgrounds, exploring new Aesthetic themes, or producing high-quality Digital Photography. Tophinhanhdep.com is dedicated to supporting your journey with Image Inspiration & Collections, a wealth of Photo Ideas, and powerful Image Tools to optimize every aspect of your creative workflow. Dive in, experiment, and let your imagination transform the ordinary into the extraordinary, pushing the boundaries of what’s possible in digital art.